Export PDF

RGBlink
TAO tiny 2

User Manual

TAO tiny 2

TAO-1tiny-2

410-5513-12-0

RGBlink

www.rgblink.com

November 2026

1TAO 1tiny 2_Specifications

Key Features + 4K UVC camera to HDMI conversion + Network streaming decoding: RTSP/RTMP + Low Power consumption + Ethernet port for NDI encoding/decoding + Power from standard USB-C PD PSU's
Application
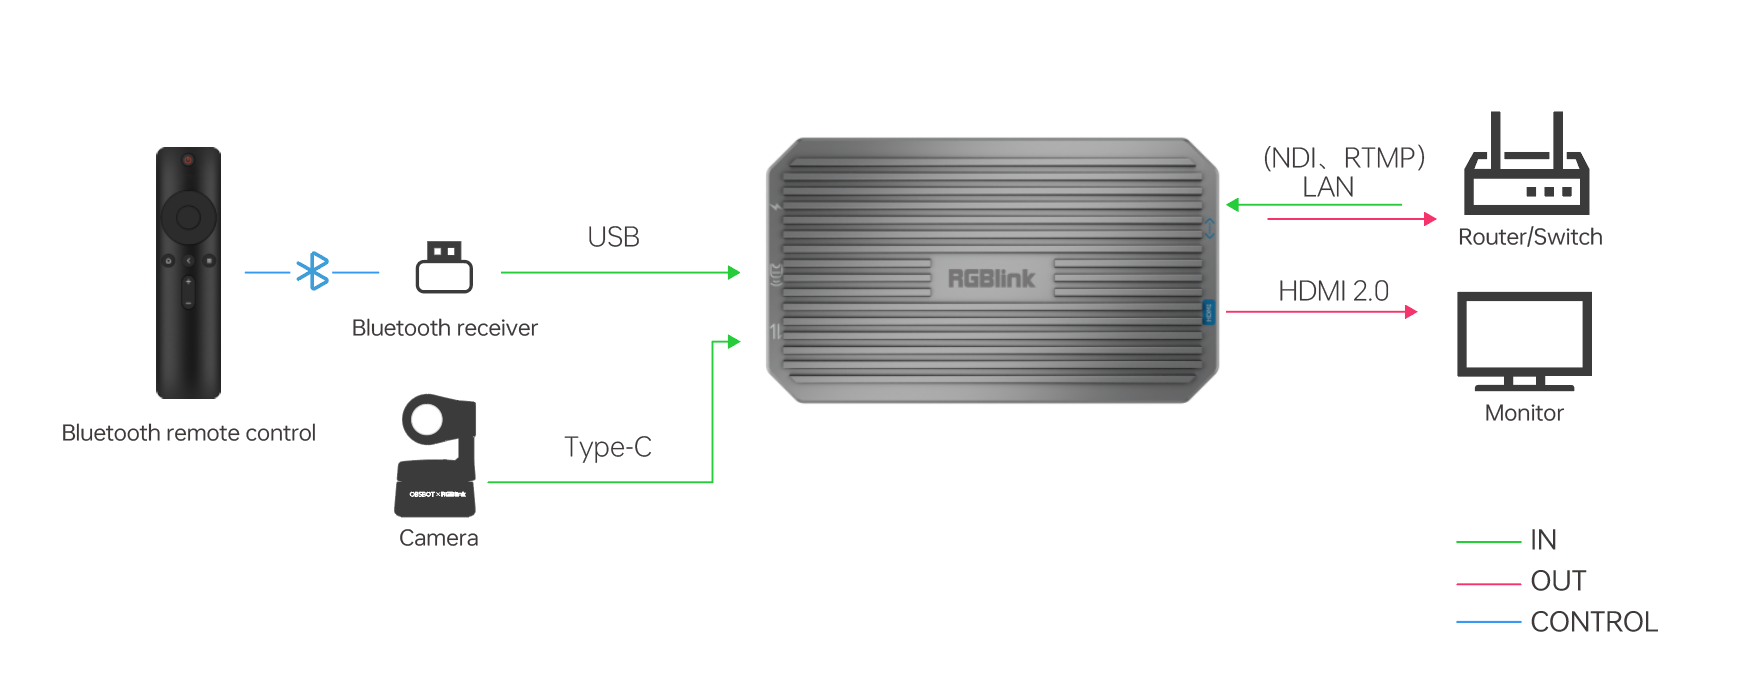
How to work with USB camera with TAO 1tiny 2
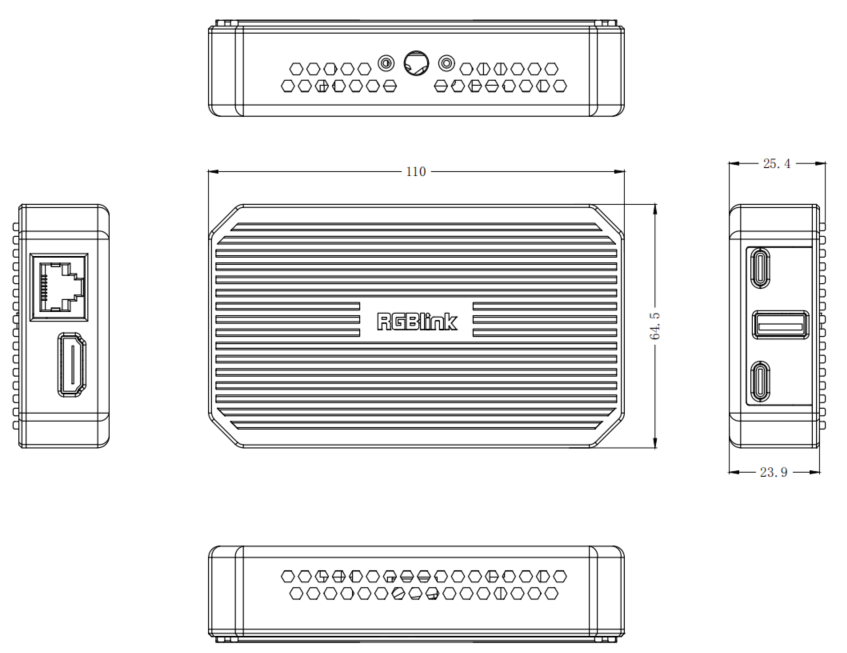
Dimensions

Connectors

ItemDescription
InputType-C1 × USB-C
USB 2.01 × USB-A (Receiver Input for Remote Control or UVC Camera Input)
OutputHDMI 2.01 × HDMI-A
PowerType-C1 × USB-C
EthernetLAN1 × RJ45

Performance

ItemDescription
Input ResolutionsUSB-C
SMPTE720p@25/30/50/60, 1080p@30/50/60, 2160p@30
VESA1280 × 720@30/50/60, 1280 × 768@60, 1920 × 1080@25/30/50/60, 3840 × 2160@30
Output ResolutionsHDMI
SMPTE1080p@30/50/60, 2160p@30
VESA1280 × 720@30/50/60, 1280 × 768@60, 1920 × 1080@25/30/50/60, 3840 × 2160@60
Supported StandardHDMI2.0
USB3.0
Video EncodingMJPEGH.264, H.265,
Streaming ProtocolsRTMP/RTSP/NDI
NDI FeaturesNDI EncodingNDI, HX , up to 1920 x 1080@30
NDI DecodingNDI, HX, NDI, HX2, NDI, HX3, up to 3840 x 2160@60
CompatibilityCamera with UVC1.1/UVC1.5 protocol
Compatibility TestedRGBlinkmini, mini-pro, mini-edge, mini-mx, vue PTZ 2K
Blackmagic DesignATEM mini
DJIOsmo Action 5, Osmo Action 4, POCKET 3
Insta 360X3, link UHD 4K AI
OBSBOTtiny 2K, tiny 4K, meet 2K, meet 4K

Power

ItemDescription
Input Voltage9V/2A (depends on adapter)
Max Power18W

Working Environment

ItemDescription
Temperature0℃~55℃
Humidity20%~55%

Physical

ItemDescription
WeightNet0.2kg
DimensionNet110mm × 64.5mm × 25.4mm

Order Codes

Product CodeItem
410-5513-12-0TAO 1tiny 2

1.1Revision History

VersionDateDescriptionAuthor
V1.12026-03-11Update partial specifications.ZYL
V1.02025-09-22First release.FMY

2TAO 1tiny 2_Quick Start

Welcome to the Quick Start Guide.
Follow the steps in this guide to quickly set up your device and get started.

2.1Product Overview

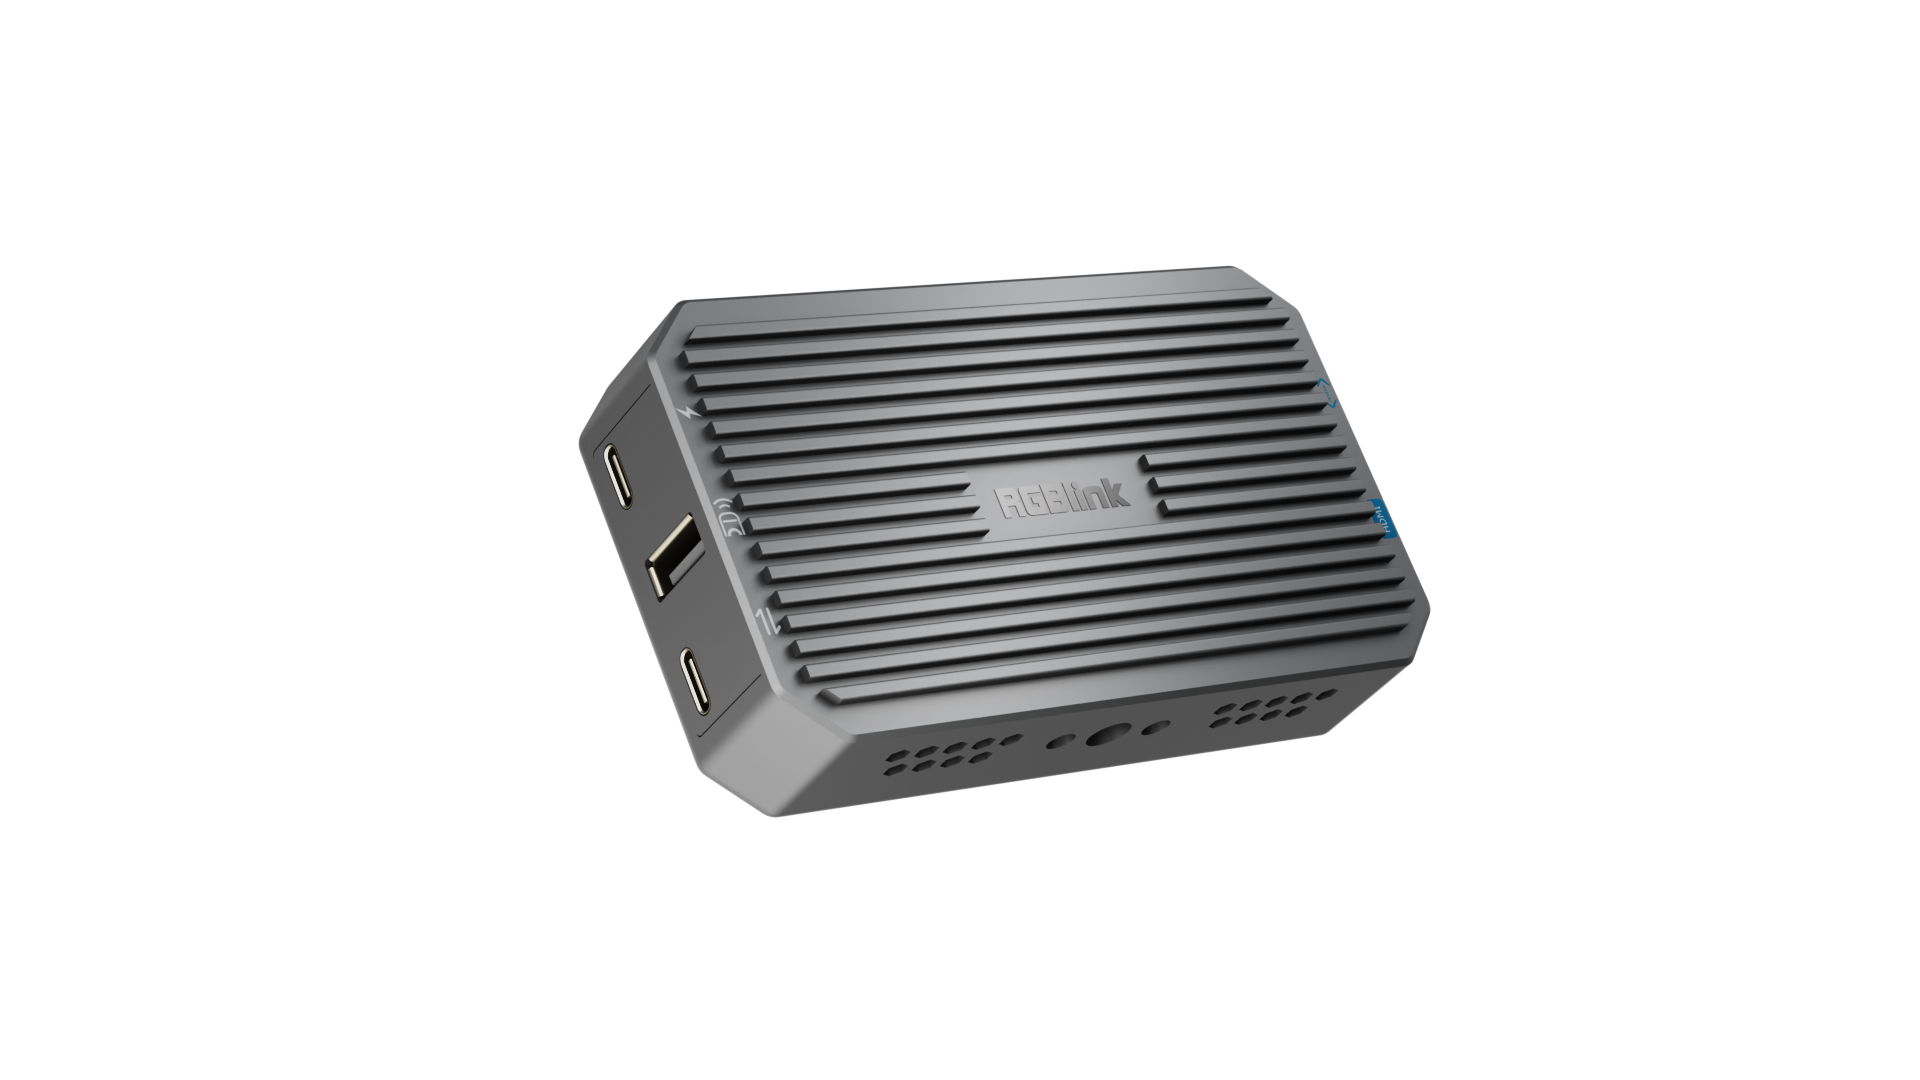
RGBlink introduces the new TAO 1tiny 2 Gen 2 UVC to HDMI smart converter, keeping all the great features of the first version while adding important improvements.

The upgraded model features a stylish silver-gray metal body with better cooling for more reliable performance, plus a new Gigabit Ethernet port for sending high-quality video over networks (with NDI support).

Its easy-to-use web interface lets you control settings and switch signals remotely. It works perfectly with RGBlink mini devices and supports popular UVC cameras - ideal for professional streaming and video production.

The TAO 1tiny 2 converts USB 3.0 (UVC compatible) video to HDMI 2.0 and also handles NDI encoding. It can:

  1. Change video from USB cameras or mini devices into HDMI output or NDI streams;
  2. Turn NDI signals into HDMI 2.0 output.

This means you can use regular USB cameras as professional NDI sources, or show NDI streams on monitors - a flexible solution for live production, meetings, and more.

2.1.1Key Features

  • 4K UVC camera to HDMI conversion
  • Network streaming decoding: RTSP/RTMP
  • Low Power consumption
  • Ethernet port for NDI encoding/decoding
  • Power from standard USB-C PD PSU's

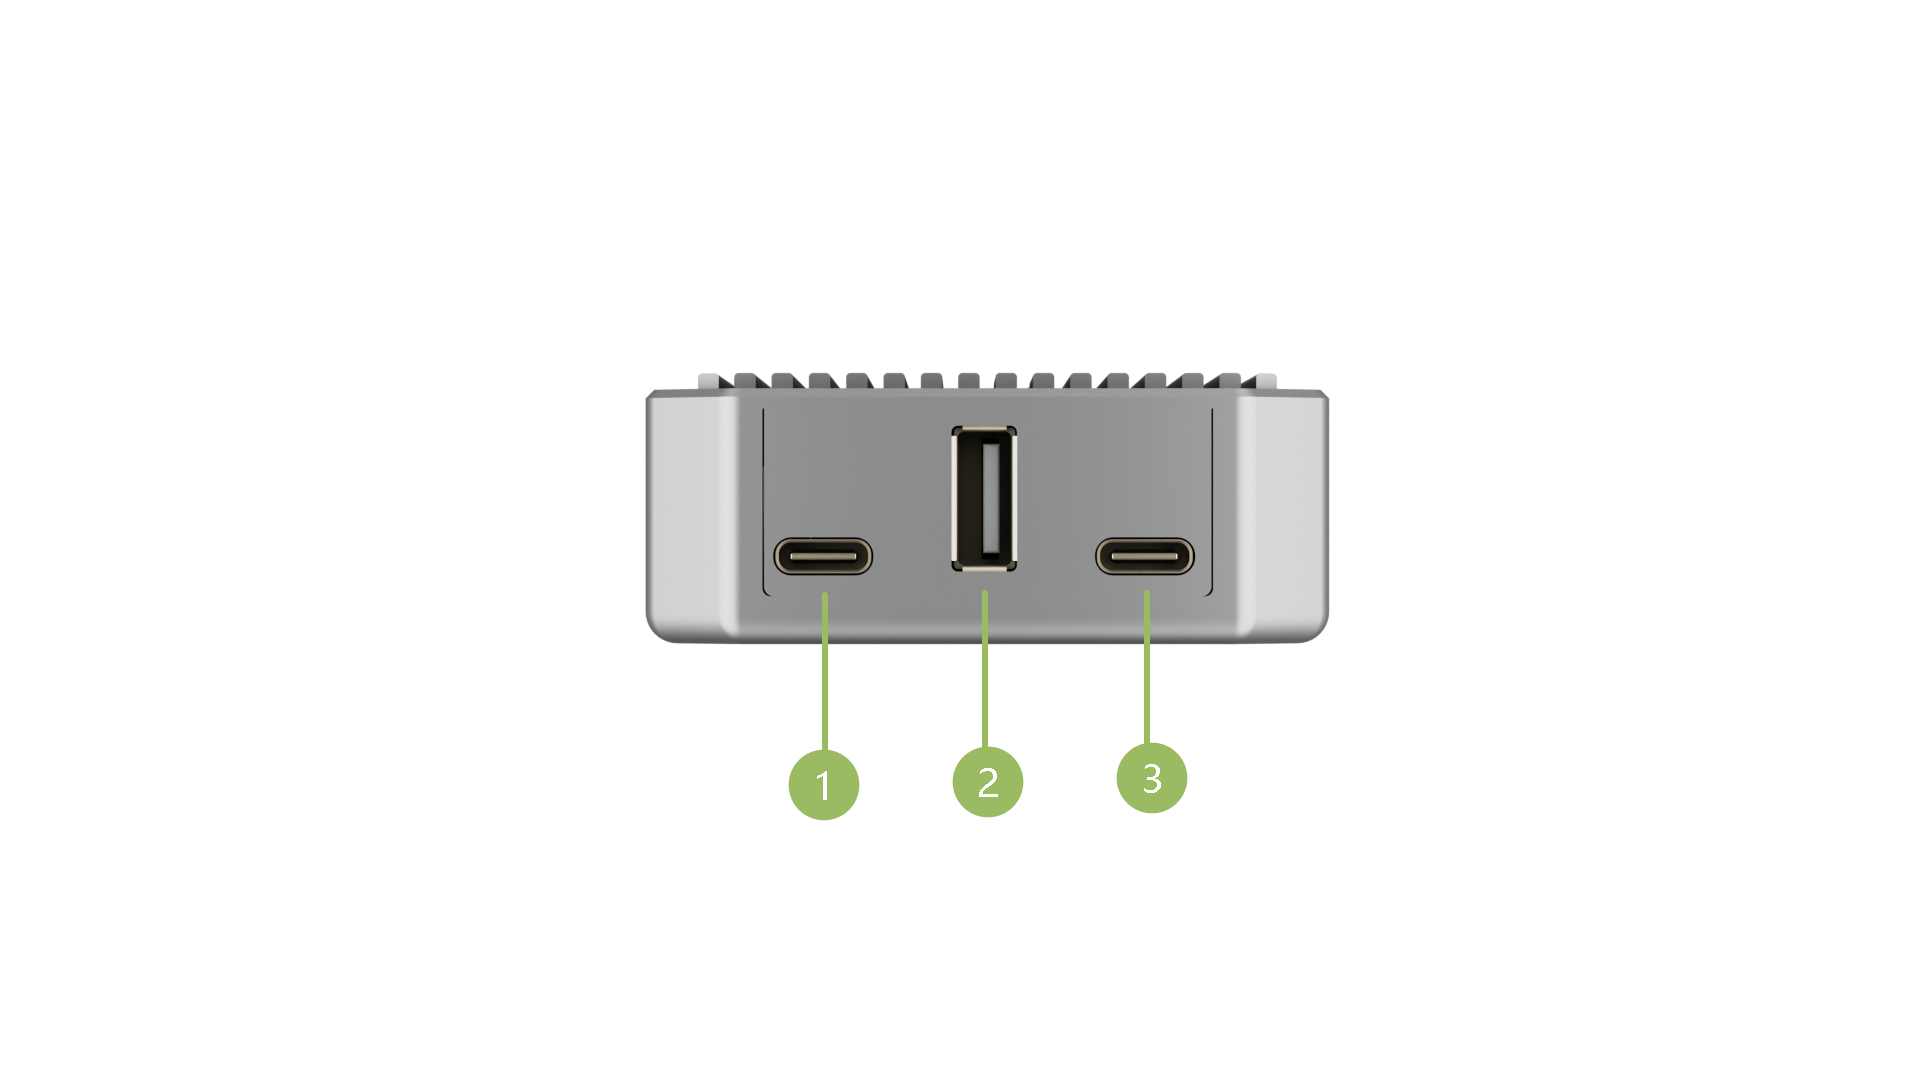
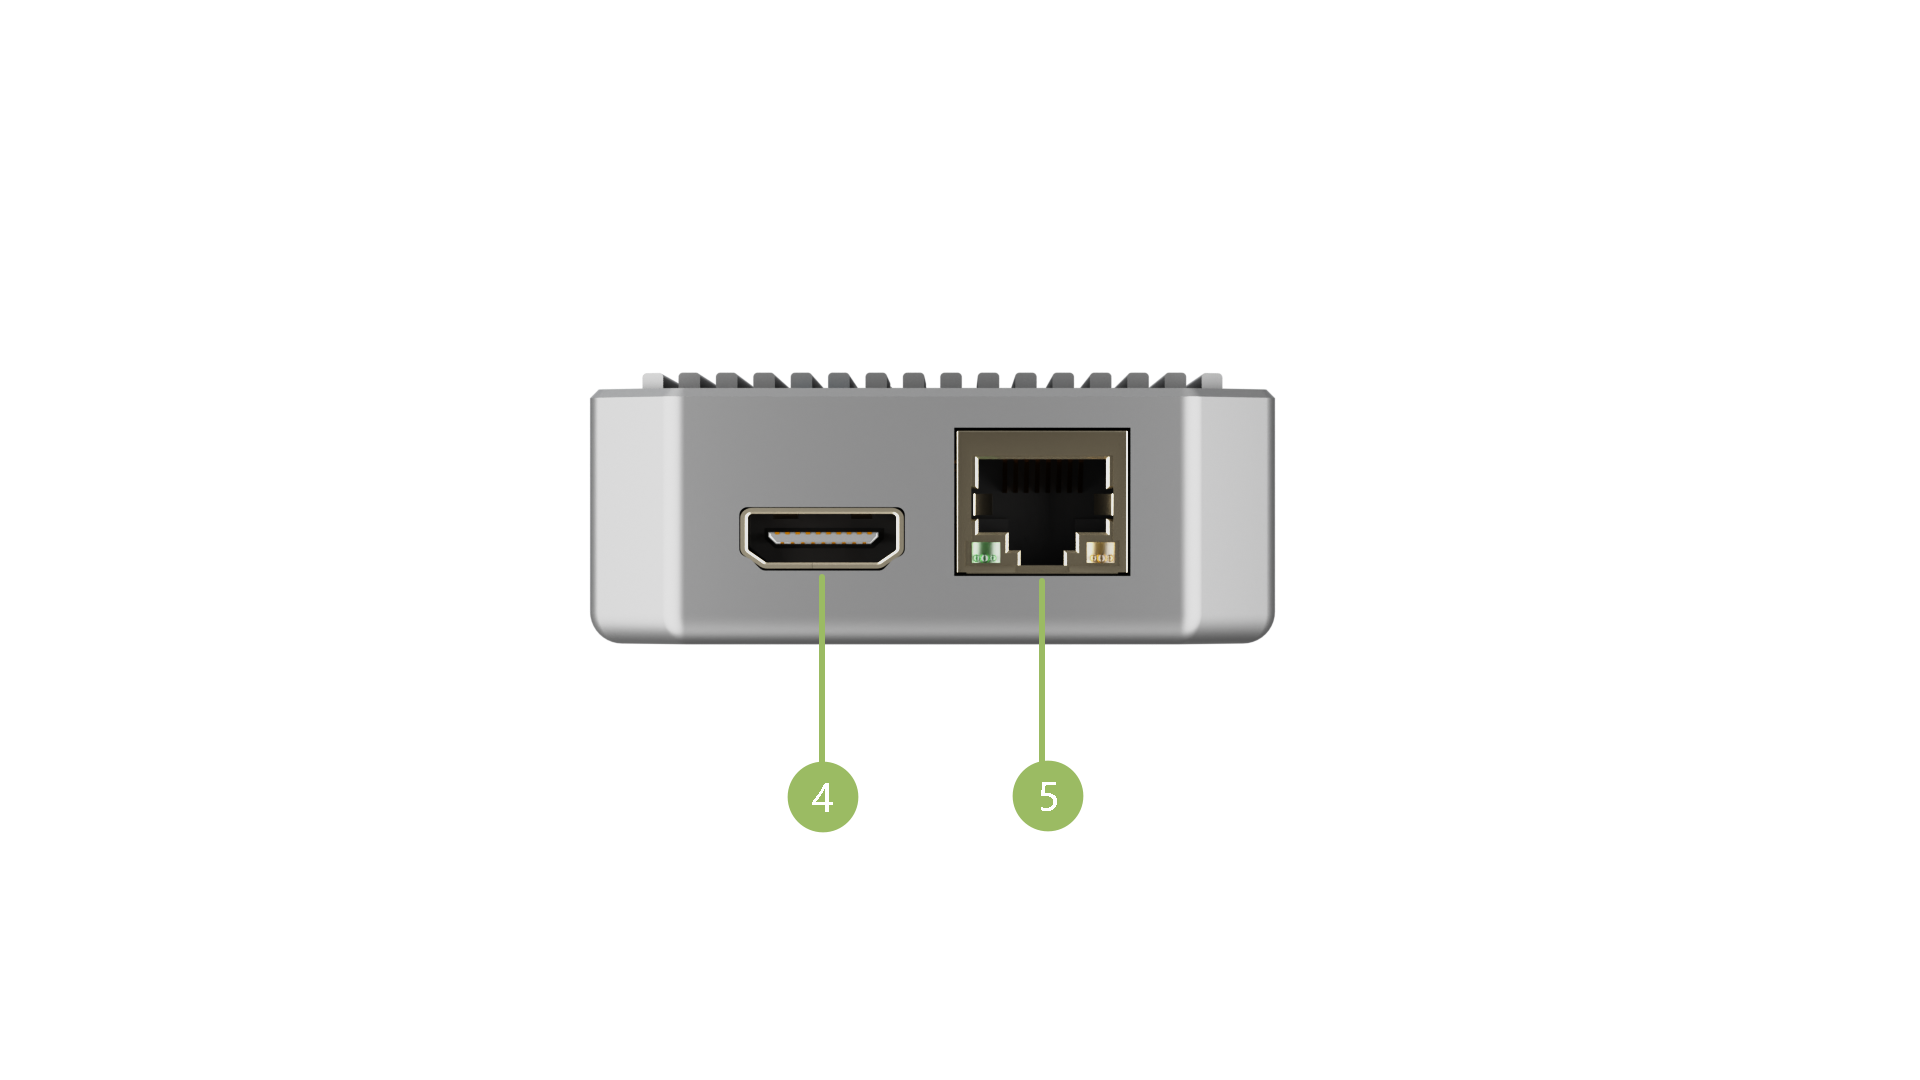
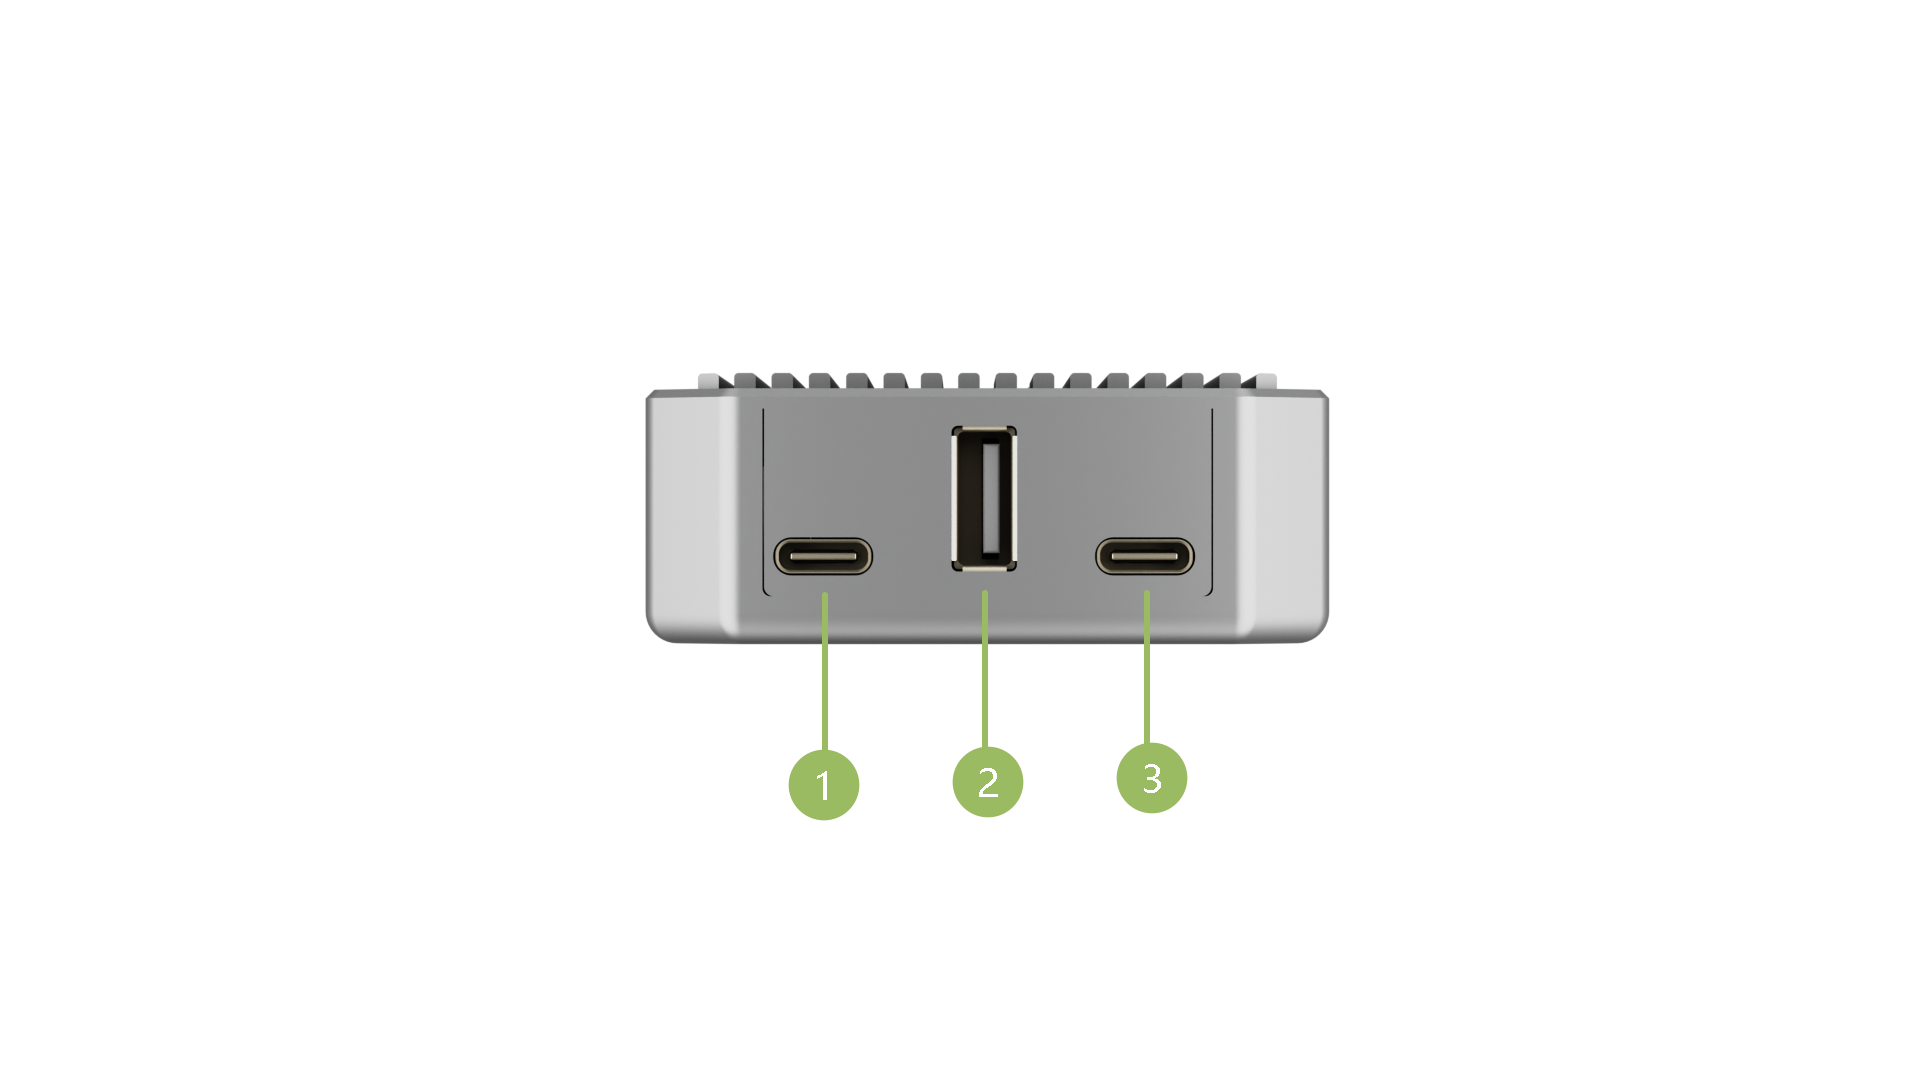
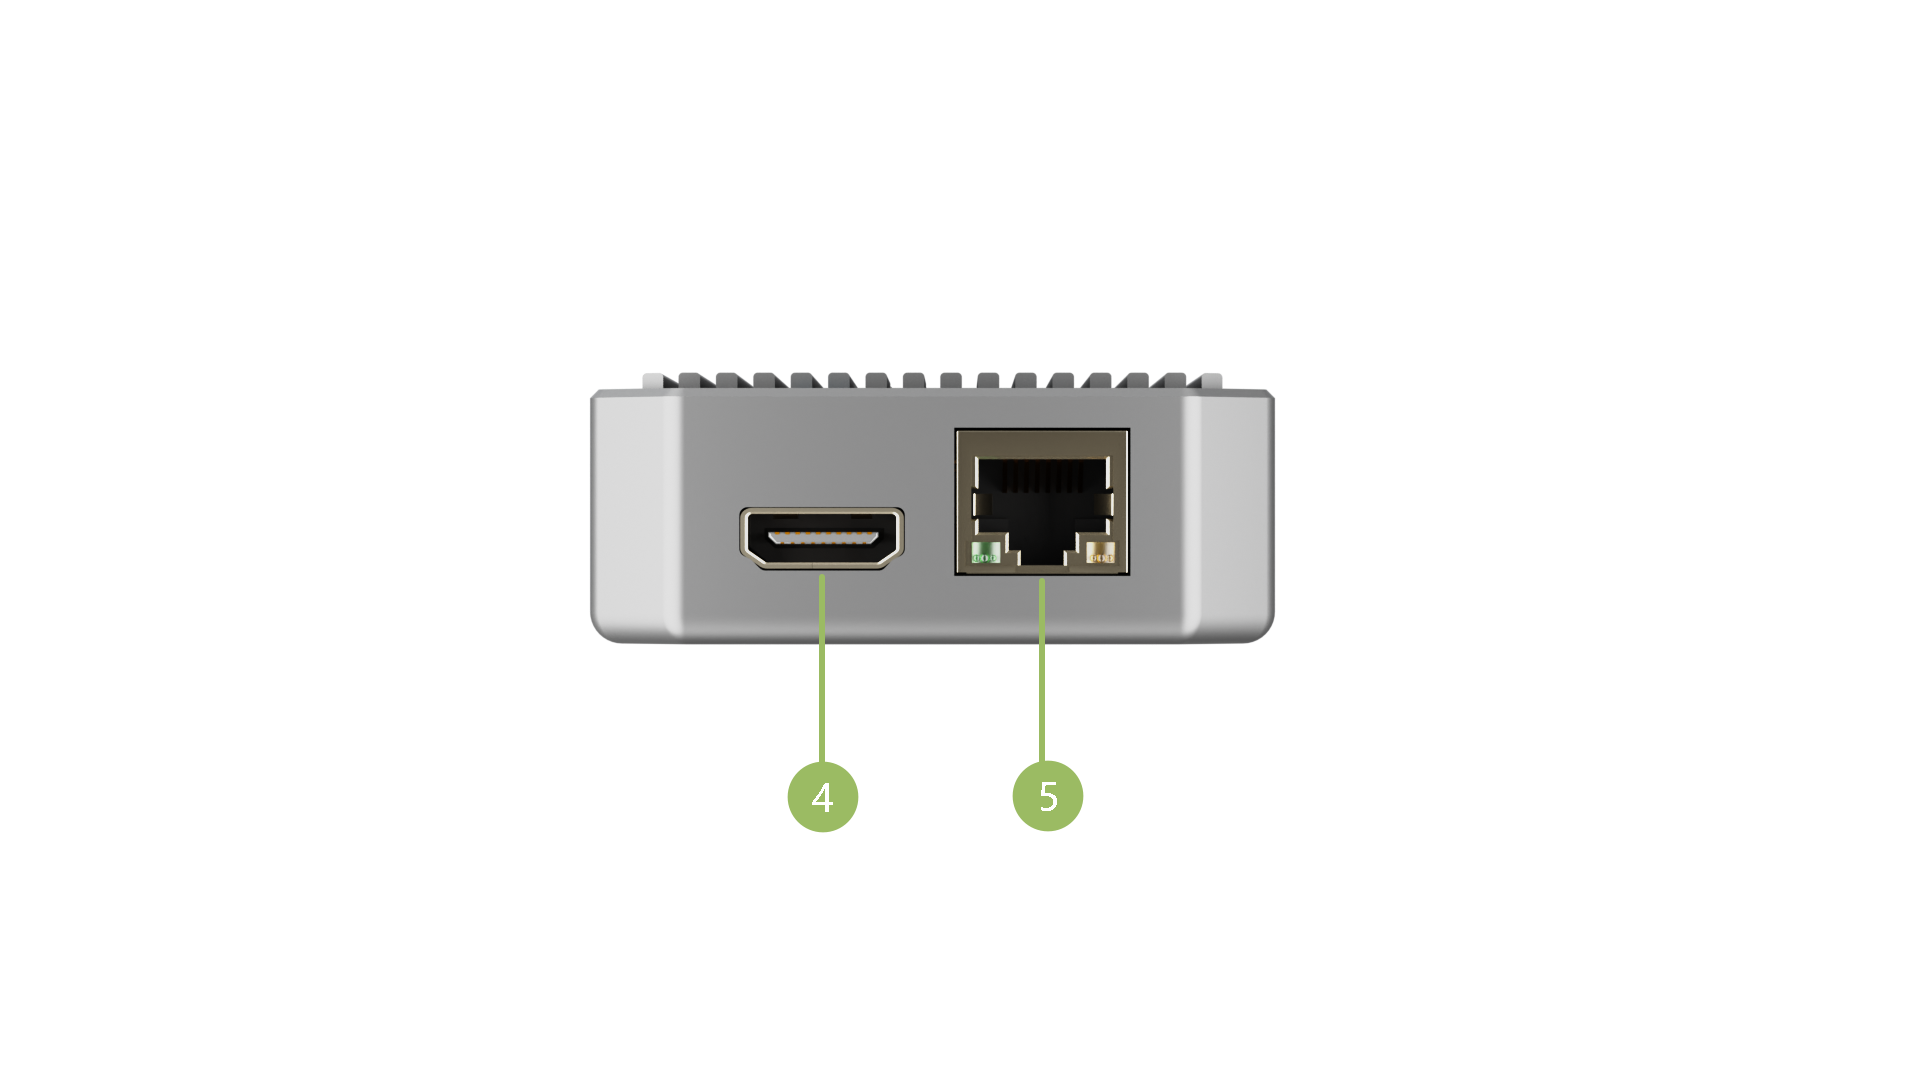
2.1.2Potrs Info

No.Description
①Type C Power Input
②USB 2.0 Input Port (Up to 2K)
③USB Type C Input Port (Up to 4K)
④HDMI 2.0 Output Port
⑤Gigabit Ethernet Port
📢  Important

The power adapter used must provide at least 9V/2A.

Using a computer's USB port for power is strictly prohibited.

2.2Use Your Product

Get started with the key steps for using your product.

2.2.1Connect Your Product

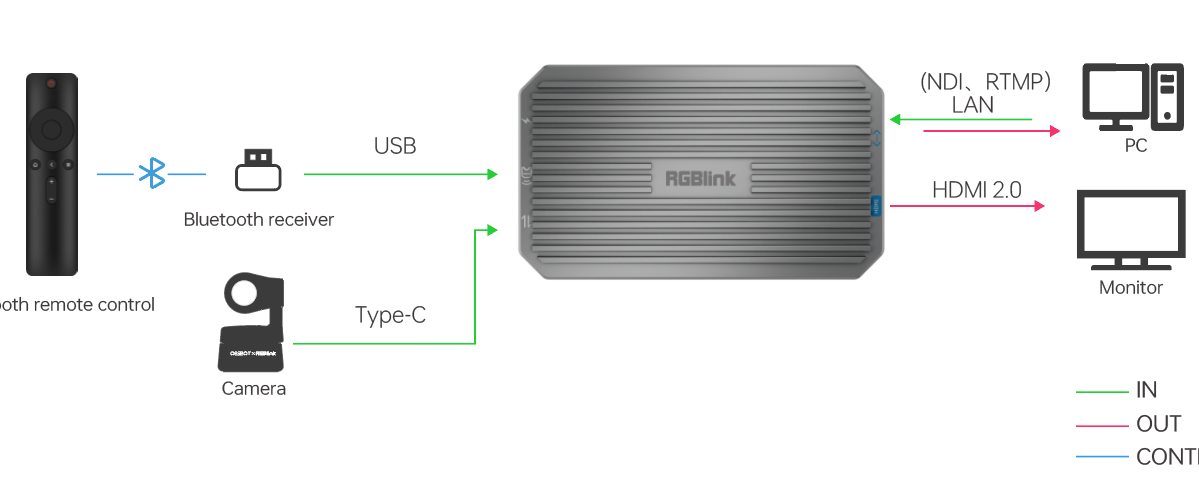
Connect a USB Camera to TAO 1tiny 2

  1. Power the TAO 1tiny 2 using a USB-C power cable.
  2. Connect the USB camera to the USB-C input port using a USB-C cable (The TAO 1tiny 2 can supply power to the USB camera: 5V/1A).
  3. Connect the HDMI 2.0 output port to a display using an HDMI cable.

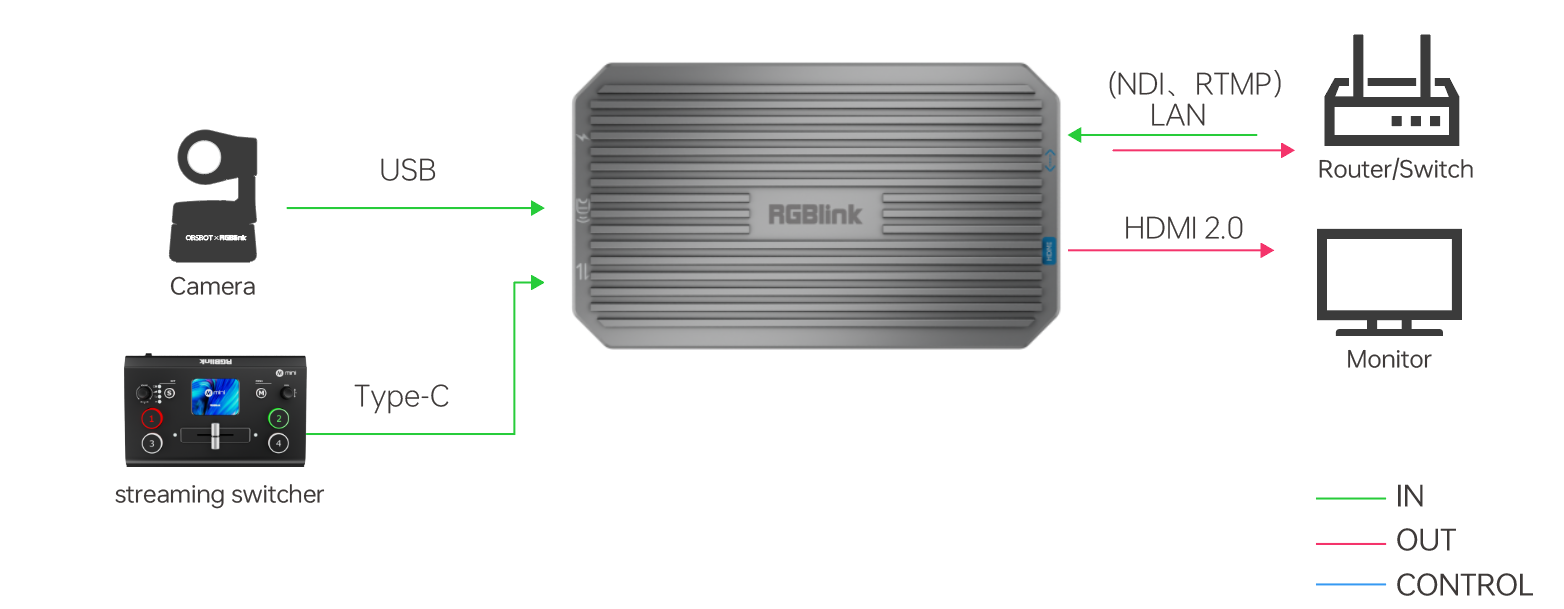
Using TAO 1tiny 2 with mini Series Product

  1. Power the TAO 1tiny 2 using a USB-C power cable.
  2. Connect the mini device to the USB-C input port using a USB 3.0 to USB-C cable.
  3. Connect the HDMI 2.0 output port to a display using an HDMI 2.0 cable.

2.2.2Device Management

Accessing the Web Management Interface

The web management interface for TAO 1tiny 2 v2 can be accessed using the device's IP address. The default static IP address is 192.168.5.100.

  1. Power on TAO 1tiny 2 and connect its HDMI output to a monitor using an HDMI cable. The device's default IP address should appear on the monitor.
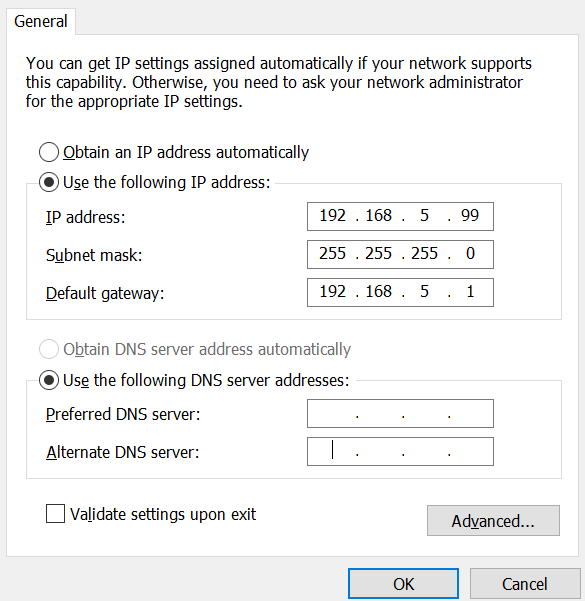
  2. Disconnect the computer from its current network and assign it a static IP address in the same subnet as TAO 1tiny 2, such as 192.168.5.x, where x is any value from 2 to 254.
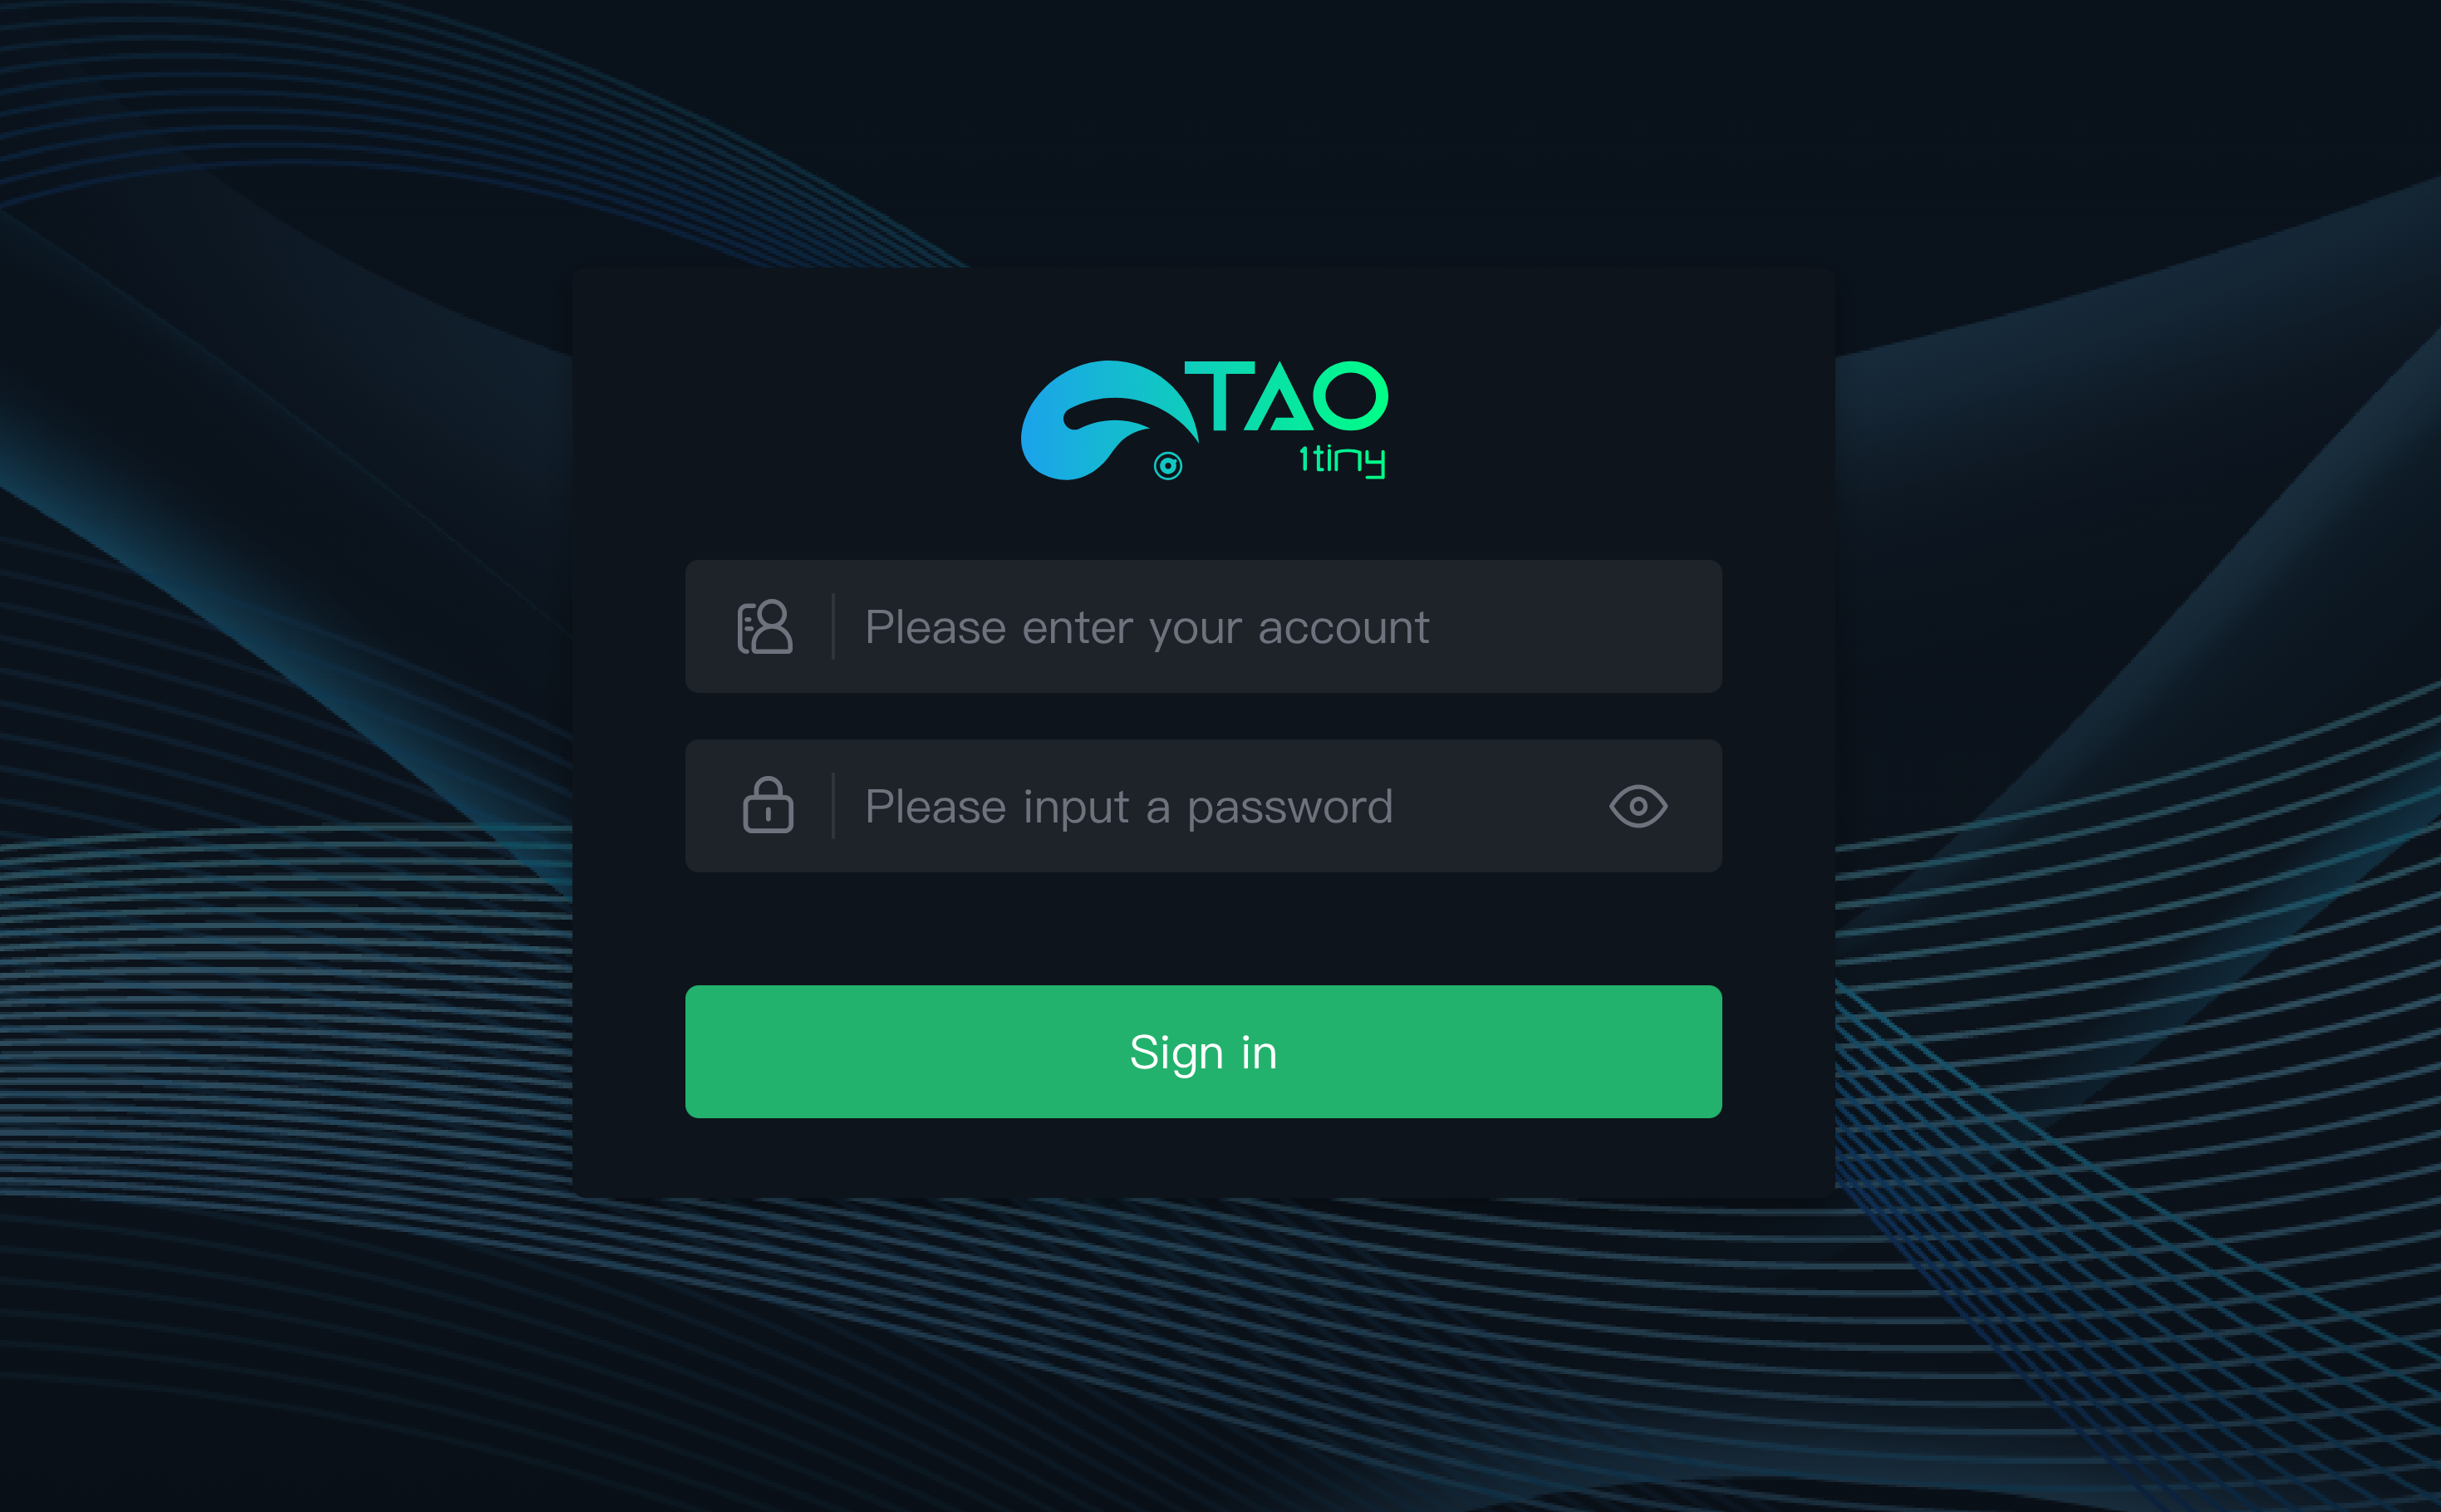
  3. Open a web browser and enter the device's IP address to access the web management interface.
  4. Log in using the default credentials:
    • Username: admin
    • Password: admin

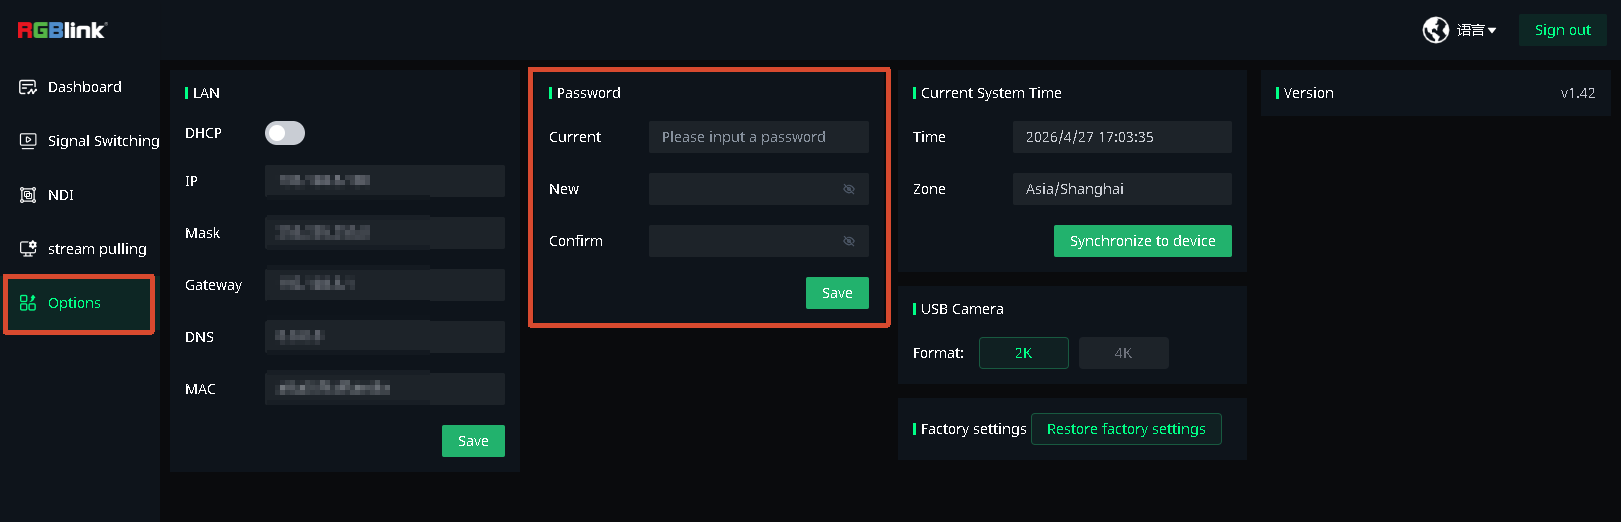
For security, change the default password under Options after the first login.

Network Configuration

DHCP (automatic IP address assignment) is disabled by default on TAO 1tiny 2.

After logging in using the default static IP address for the first time, go to Options > LAN and enable DHCP to allow the device to obtain an IP address from the router and connect to the network.

Choose one of the following connection methods:

Method 1: Connect via a router

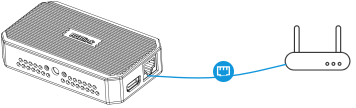
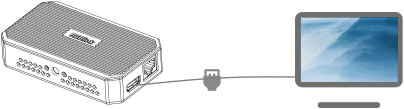
  1. Connect TAO 1tiny 2 to the router using an Ethernet cable.
  2. Connect the computer to the same router via Wi-Fi.

Once both devices are connected to the same network, no further network configuration is required.

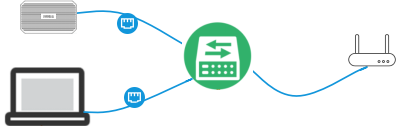
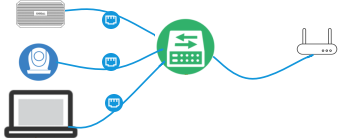
Method 2: Connect via a switch

  1. Connect the router to the switch using an Ethernet cable.
  2. Connect both TAO 1tiny 2 and the computer to the switch using Ethernet cables.

Once both devices are connected to the same network, no further network configuration is required.

2.2.3NDI Encoding and Decoding

NDI encoding and decoding cannot be performed simultaneously on TAO 1tiny 2.

NDI encoding and decoding are disabled by default. Enable the required function manually in the web management interface.

NDI Encoding

  1. Connect a USB camera to TAO 1tiny 2 and configure the computer and TAO 1tiny 2 to use the same subnet.
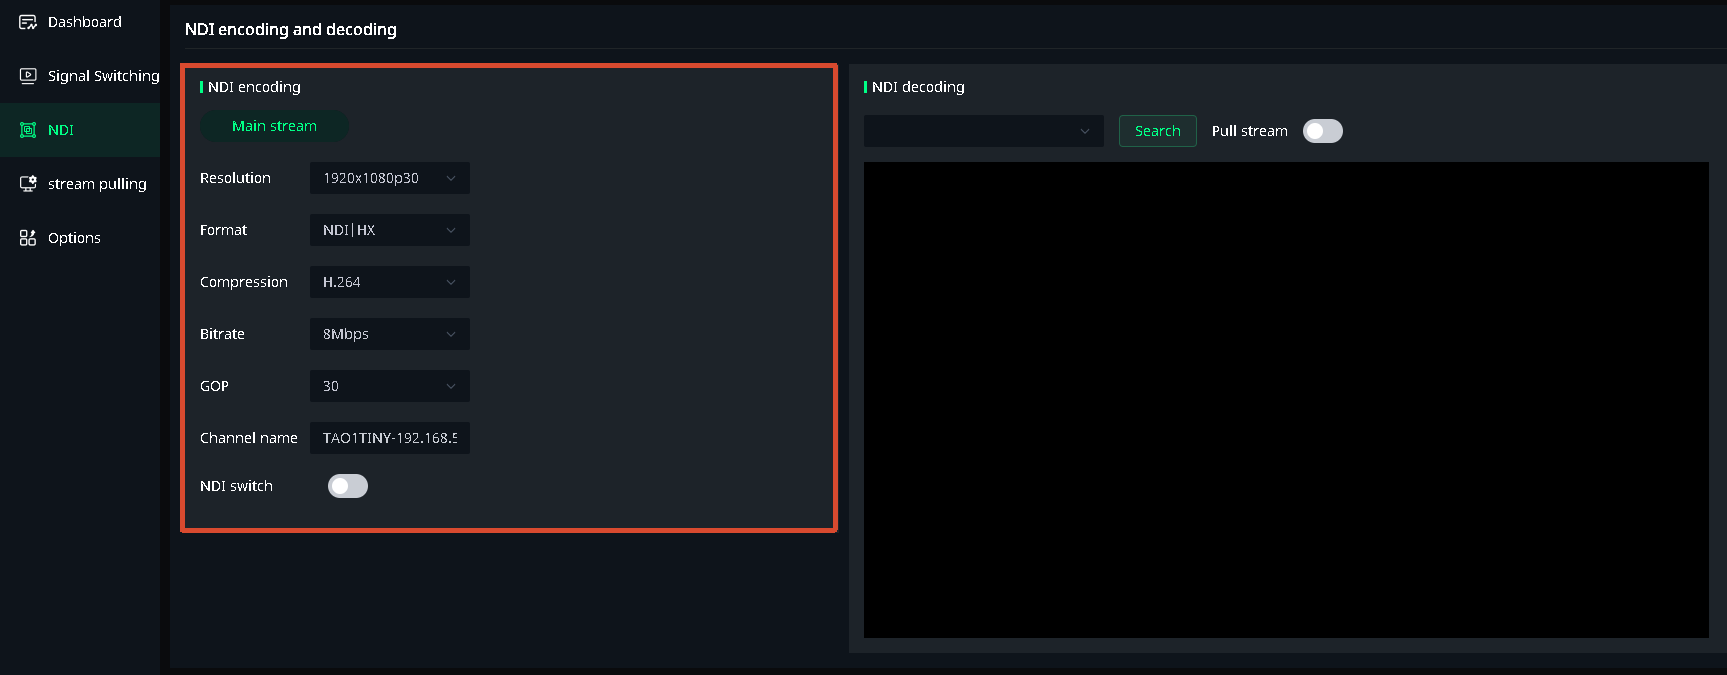
  2. Configure the NDI encoding format and enable NDI Switch.
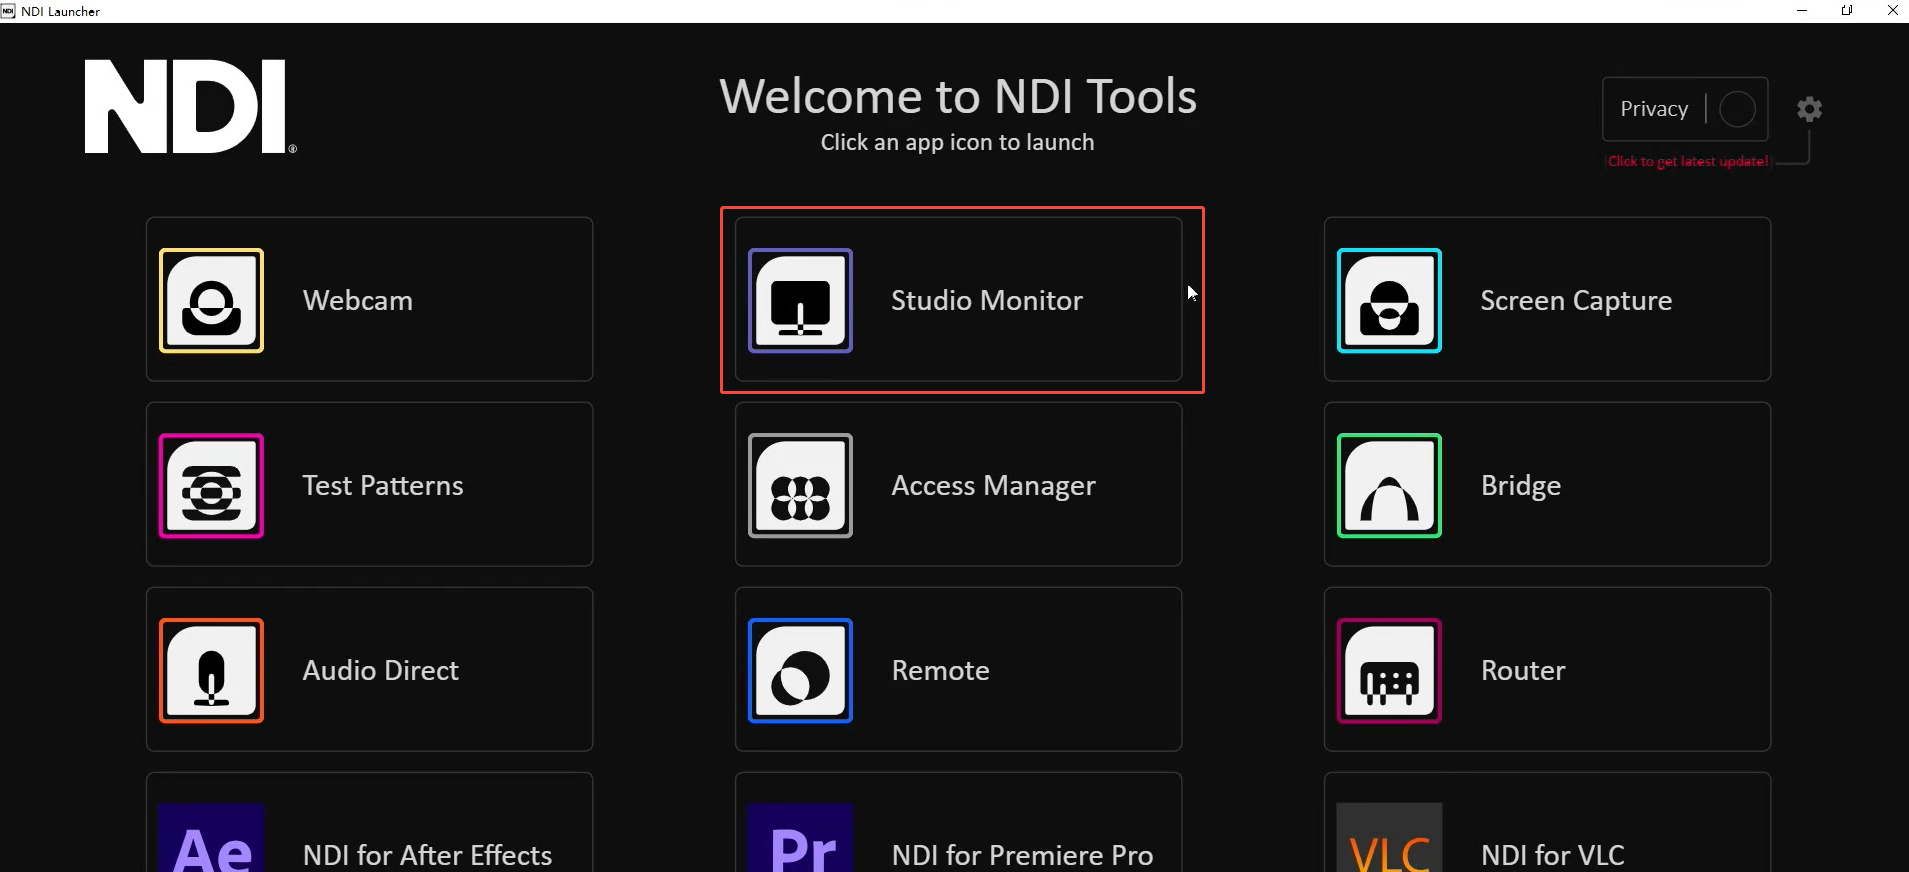
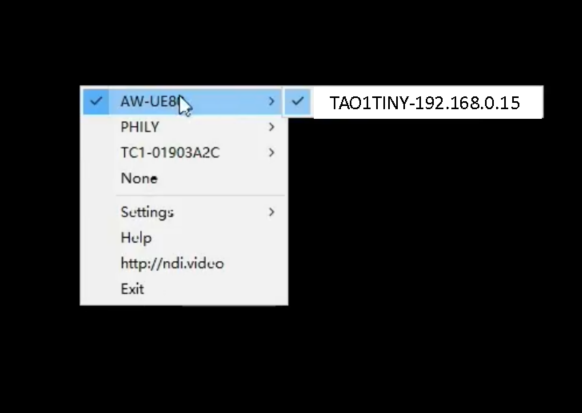
  3. Use NDI Tools (https://www.newtek.com/ndi/tools/) to output the NDI source. Use NewTek Studio Monitor to monitor and record the NDI stream.

NDI Decoding

  1. Connect the switch to the router using an Ethernet cable. Then connect TAO 1tiny 2, the NDI camera, and the computer to the switch to place all devices on the same local area network (LAN).
  2. Under NDI Decoding on the NDI page, click Search and select an NDI source. Enable Pull Stream. The corresponding NDI video will appear in the preview window.
  3. The decoded NDI video is then available as a video source. Go to the Signal Switching page to switch the main HDMI output to this source.

2.2.4Network Input

TAO 1tiny 2 supports network video sources via RTMP, RTSP, and NDI streaming protocols. Enter the corresponding stream URL to receive the video feed.

Viewing a PTZ Camera Feed

Ensure that TAO 1tiny 2 and the PTZ camera are on the same subnet (i.e., the first three octets of their IP addresses match).

  1. Configure IP Addresses on the Same Subnet
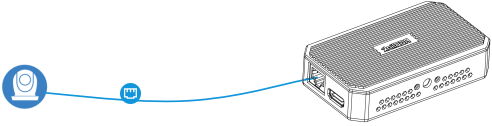
    1. Connect the PTZ camera directly to TAO 1tiny 2 using an Ethernet cable.
    2. Obtain the PTZ camera's IP address from its user manual or device panel.
    3. Log in to the web management interface and go to Options. Disable DHCP, manually configure the device IP address to match the first three octets of the PTZ camera's IP address, and click Save.
  2. Add and Enable the Stream URL
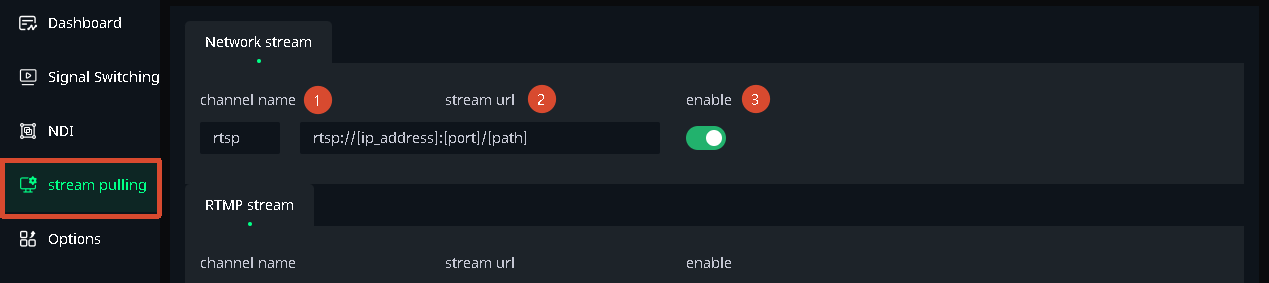
    1. Go to Stream Pulling and enter the stream URL using the appropriate format, such as rtsp://[ip_address]:[port]/[path], replacing the variables with the corresponding values.
    2. Enter a descriptive name in the channel field and enable the corresponding stream URL.
  3. Switch and Output the Video Feed
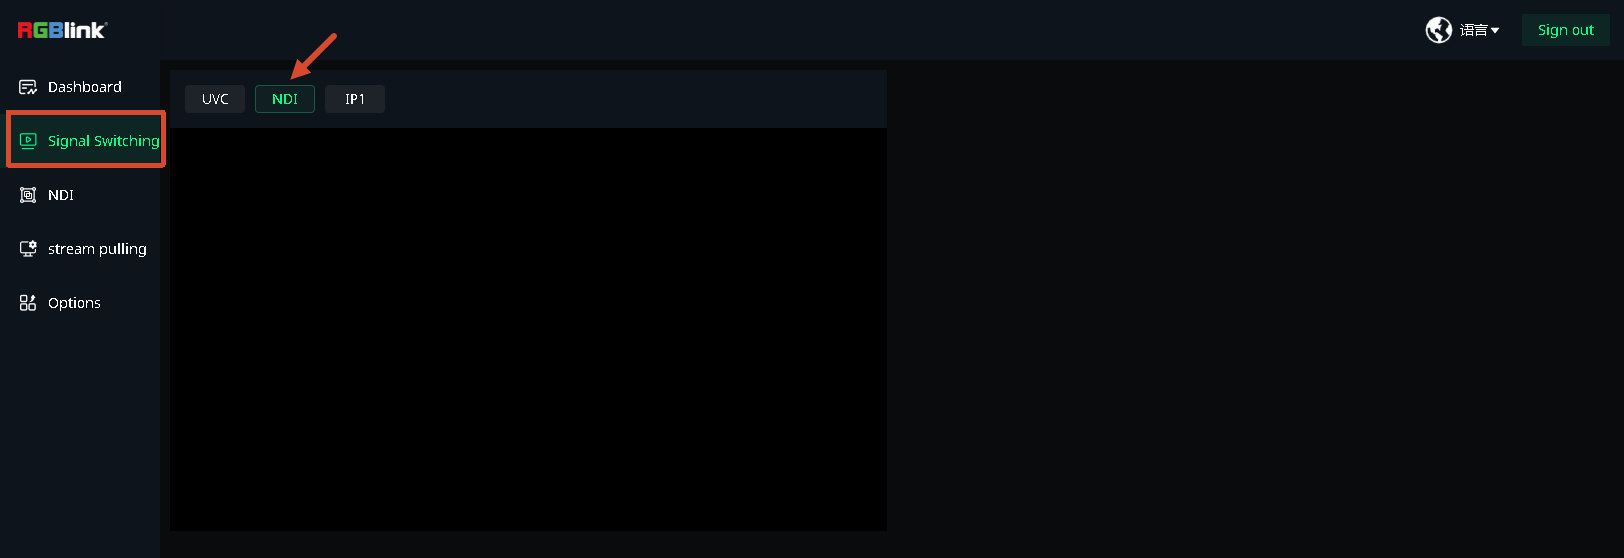
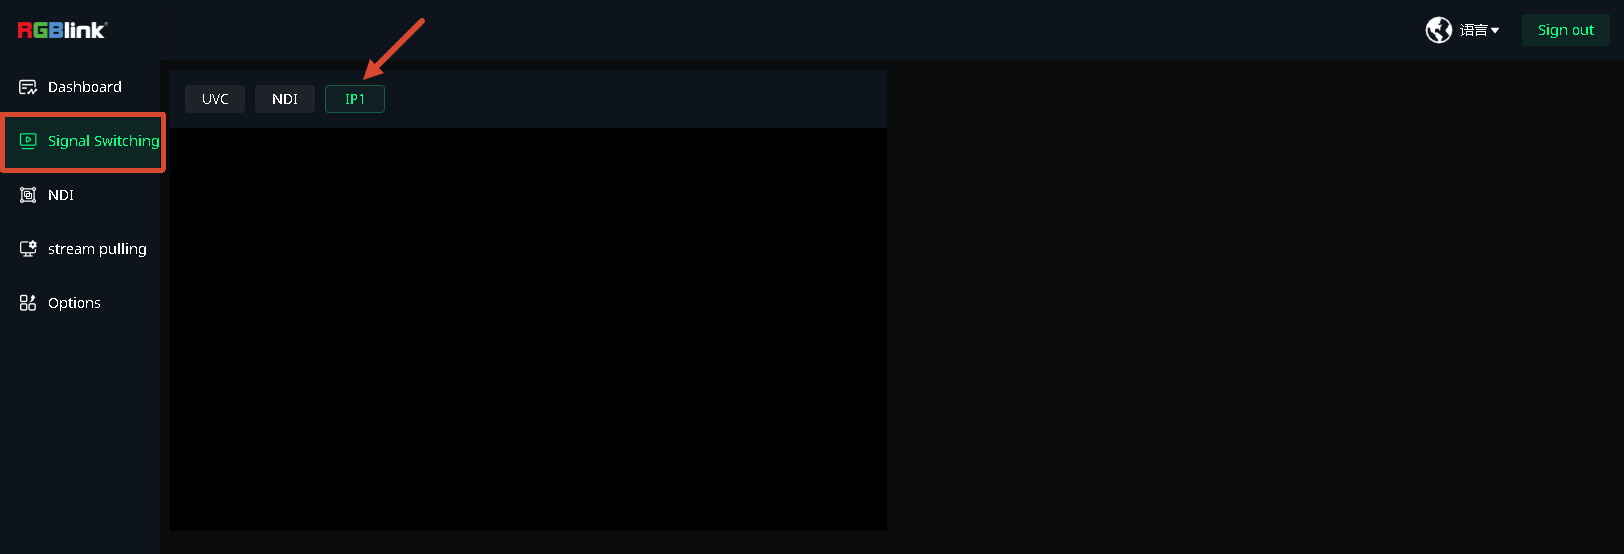
    1. Go to Signal Switching and select IP1.
    2. The PTZ camera's live video feed will appear on the HDMI output monitor.

Phone Casting

Currently, only Android phones are supported, and screen mirroring is available in landscape mode only.

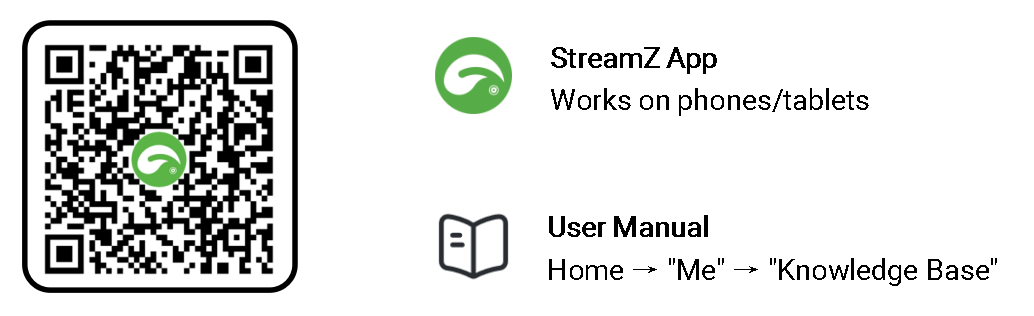
  1. Install the TAO App
  • Scan the QR code to download the app.

  • Download from an app store: The TAO App is available on major mobile app platforms. Search for TAO or TAO RGBlink to download it.
  1. Connect the Devices to the Same Network

Ensure that TAO 1tiny 2, the mobile phone, and the wireless router are connected to the same network and that the network has internet access.

  1. Select the IP1 Input

Open the TAO 1tiny 2 web management interface and go to Signal Switching. Switch the input source to IP1.

  1. Enable the RTMP Stream

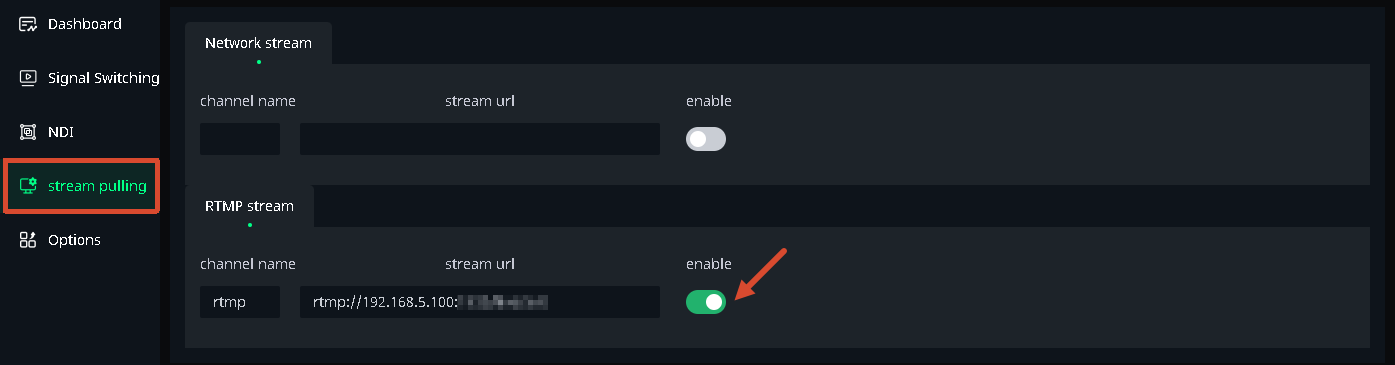
Go to Stream Pulling page, locate the RTMP stream URL (fixed and not editable), and enable the corresponding stream.

  1. Configure Wireless Screen Mirroring

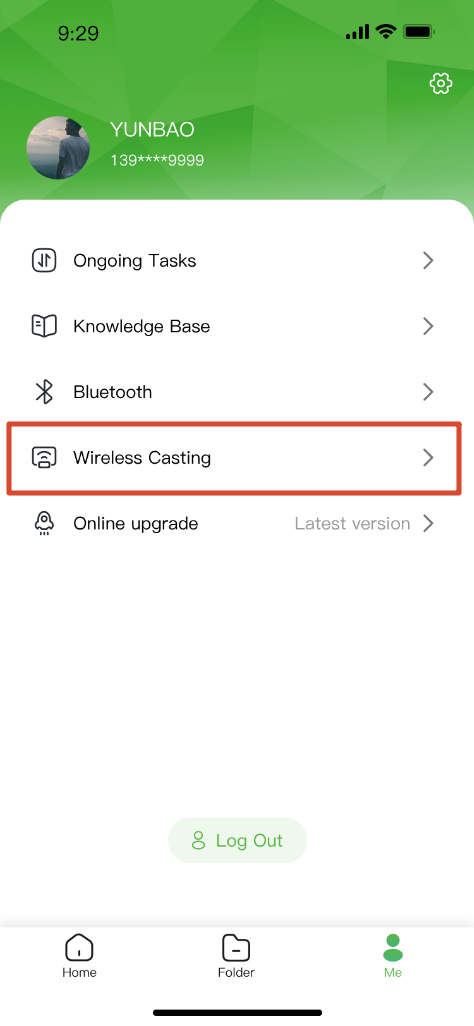
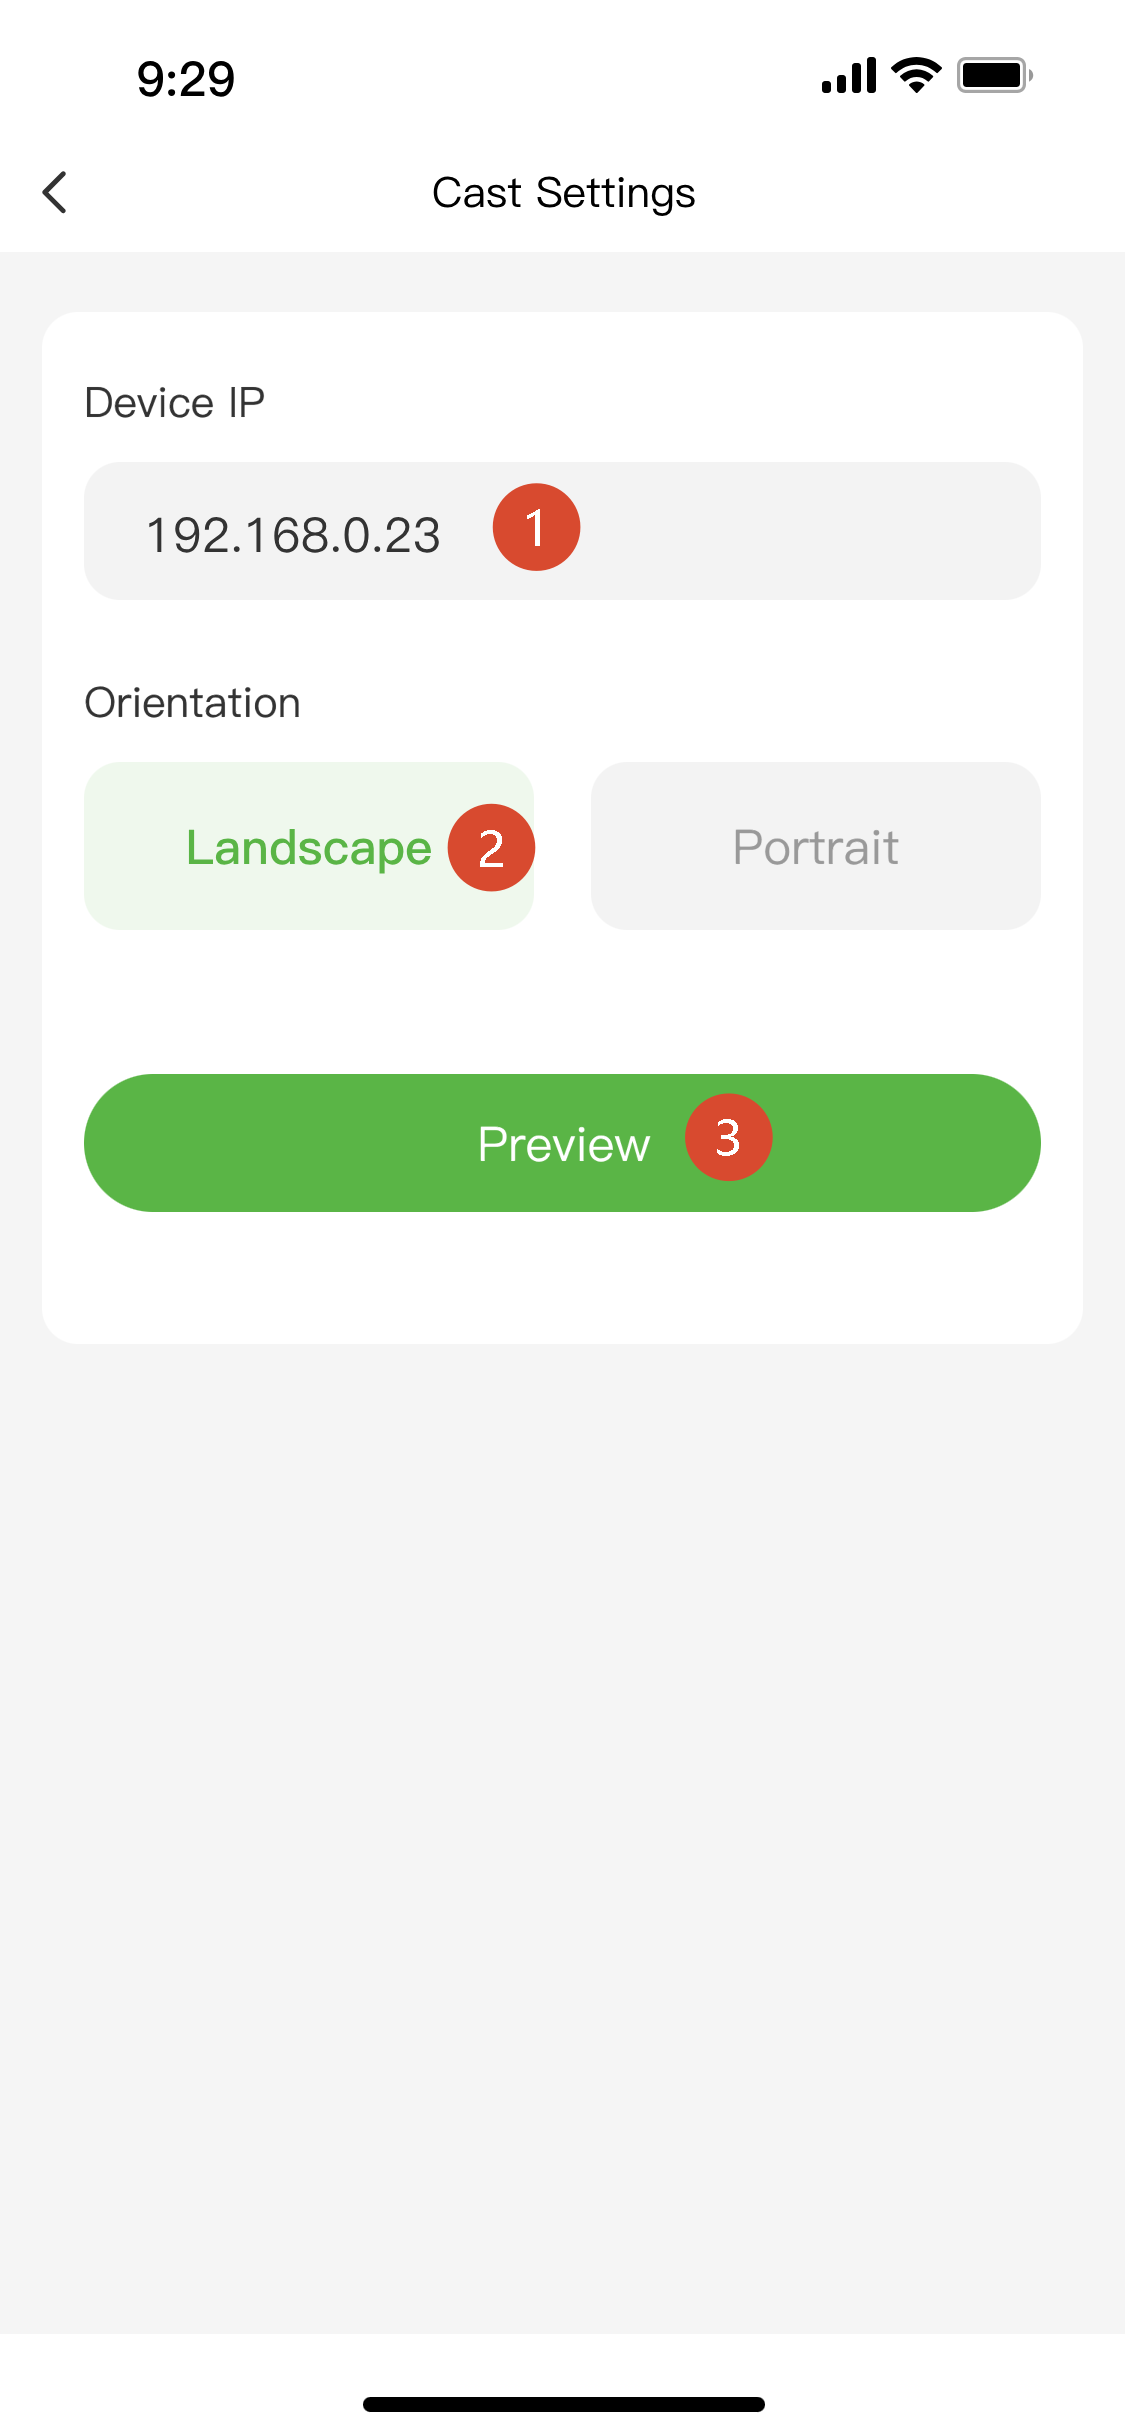
Open the TAO App and navigate to Me > Wireless Casting. Enter the device IP address, select Landscape as the orientation, and choose either Camera or Mirroring as the mode.

  1. Start Casting

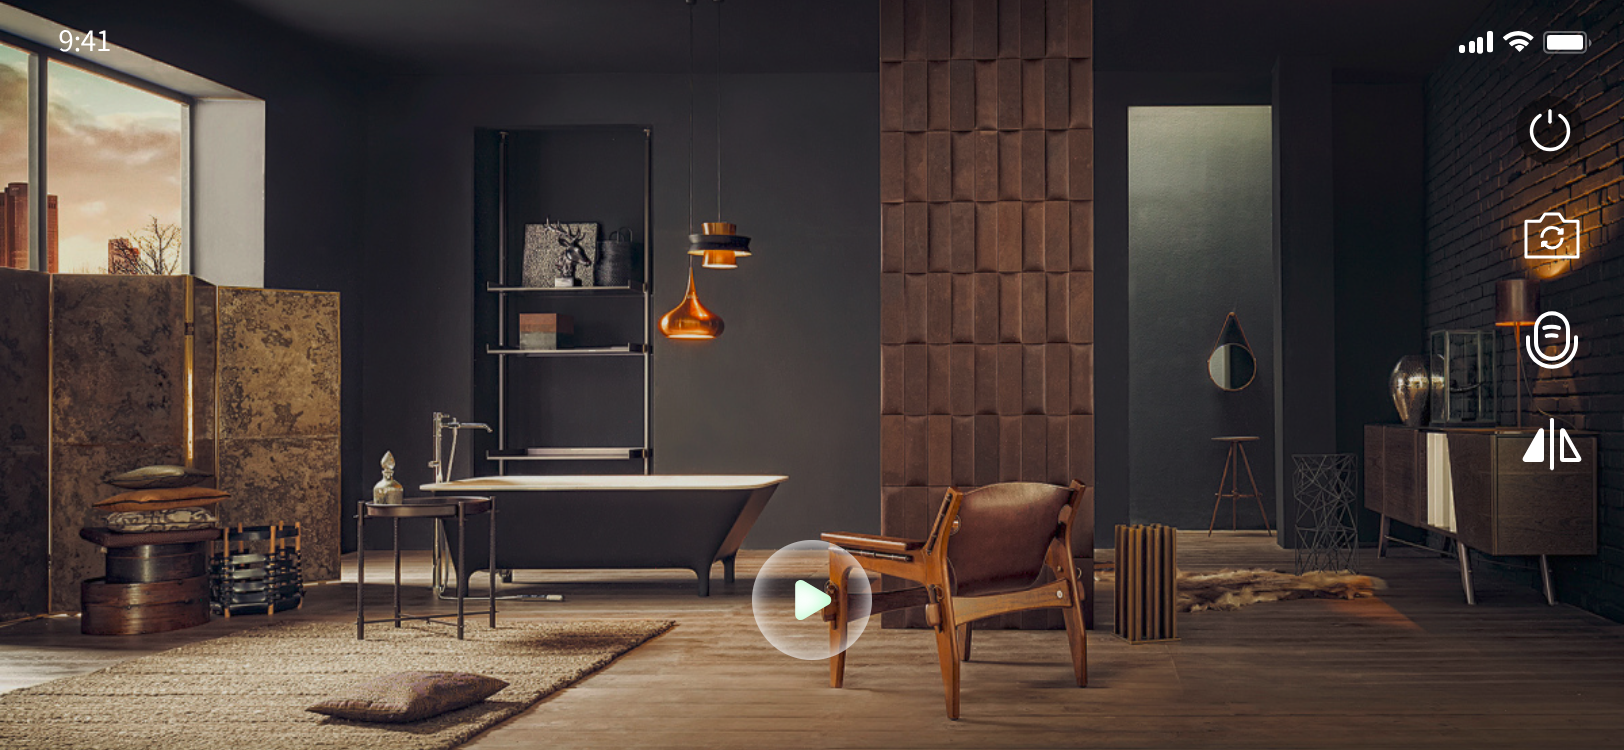
Tap Preview to open the preview screen, then tap the play icon to start.

Once mirroring starts, check the HDMI output monitor to verify that the output matches the current camera view on the mobile phone.

3TAO 1tiny 2_User Manual

Thank you for choosing RGBlink TAO 1tiny 2.

This manual provides information on the device features, installation and operation.

Before using the device for the first time, please read this manual carefully to ensure safe and proper use of the product.

3.11. About Your Product

This chapter includes product overview, notes and ports info.

1.1Product Overview

RGBlink introduces the new TAO 1tiny 2 Gen 2 UVC to HDMI smart converter, keeping all the great features of the first version while adding important improvements.

The upgraded model features a stylish silver-gray metal body with better cooling for more reliable performance, plus a new Gigabit Ethernet port for sending high-quality video over networks (with NDI support).

Its easy-to-use web interface lets you control settings and switch signals remotely. It works perfectly with RGBlink mini devices and supports popular UVC cameras - ideal for professional streaming and video production.

The TAO 1tiny 2 converts USB 3.0 (UVC compatible) video to HDMI 2.0 and also handles NDI encoding. It can:

  1. Change video from USB cameras or mini devices into HDMI output or NDI streams;
  2. Turn NDI signals into HDMI 2.0 output.

This means you can use regular USB cameras as professional NDI sources, or show NDI streams on monitors - a flexible solution for live production, meetings, and more.

📢 Important

  1. Download the latest firmware

This user manual applies to TAO 1tiny 2 with firmware v1.42 or later. To ensure compatibility, make sure the device firmware is updated to the latest version before use.

Visit Dropbox_TAO 1tiny 2_V1.42.1 to download the latest firmware. You can also see section 2.4 Firmware Upgrade and obtain the latest version of the user manual.

  1. The TAO 1tiny 2 prioritizes the recognition and output of signals from physical interfaces (TypeC/USB-A). By default, the NDI encoding and decoding features are disabled.

Please enable them manually via the Web management interface (refer to section 2.3.4 NDI Encoding and 2.3.5 NDI Decoding for more details).

1.2Potrs Info

No.Description
①Type C Power Input
②USB 2.0 Input Port (Up to 2K)
③USB Type C Input Port (Up to 4K)
④HDMI 2.0 Output Port
⑤Gigabit Ethernet Port
📢  Important

The power adapter used must provide at least 9V/2A.

Using a computer's USB port for power is strictly prohibited.

3.22. Use Your Product

Refer to this chapter for operating instructions.

The interfaces, images, and illustrations in this chapter are for reference only. Actual displays may vary by version. Please refer to the actual interface on your device.

2.1Product Connection

Connect a USB Camera to TAO 1tiny 2

Please connect the TAO 1tiny 2 and the USB camera(e.g., DJl PK3, Action 5 and insta360 X5, etc.) as shown in the diagram below :

  1. Power the TAO 1tiny 2 using a USB-C power cable.
  2. Connect the USB camera to the USB-C input port using a USB-C cable (The TAO 1tiny 2 can supply power to the USB camera: 5V/1A).
  3. Connect the HDMI 2.0 output port to a display using an HDMI cable.
📢  Note

The time interval between powering off and then powering on the TAO 1tiny 2 must be greater than 30 seconds; otherwise, recognition issues may occur.

Using TAO 1tiny 2 with mini Switchers

Please connect the TAO 1tiny 2 and the BMD ATEM as shown in the diagram below:

  1. Power the TAO 1tiny 2 using a USB-C power cable.
  2. Connect the mini-pro to the USB-C input port using a USB 3.0 to USB-C cable.
  3. Connect the HDMI 2.0 output port to a display using an HDMI 2.0 cable.

2.2Compatible Products

TAO 1tiny 2 is compatible with the following products:

RGBlinkmini, mini-pro, mini-edge, mini-mx, vue PTZ 2K
Blackmagic DesignATEM mini
DJIOsmo Action 5, Osmo Action 4, POCKET 3
Insta 360insta 360 X3, link UHD4KAI WEBCAM
OBSBOTtiny 2K, tiny 4K, meet 2K, meet 4K

3.2.32.3 Device Management

This chapter includes device management.

2.3.1Access the Device Management Page

The device management page for TAO 1tiny 2 is accessed via the device's IP address. Its default factory IP is 192.168.5.100.

For initial setup, you need to set the IP address of your management computer (e.g., PC) to be in the same LAN as the TAO 1tiny 2's fixed IP, i.e., 192.168.5.x (the first three segments of the IP must match, x can be any number from 0 to 254).

Proceed as follows:

  1. After powering on the TAO 1tiny 2, connect it to a display's HDMI port using an HDMI cable. The display should show the TAO 1tiny 2's fixed IP address: ETH: 192.168.5.100
  2. Disconnect the computer from other networks and set a static IP address on the computer that is in the same LAN as the TAO 1tiny 2.
    1. Configure the computer's network settings: Go to System Settings > Network & Internet > Network and Sharing Center .

    2. Click Change adapter settings > Right-click Ethernet > Properties > Select Internet Protocol Version 4 (TCP/IPv4) > Click Properties .

    3. Select Use the following IP address . Enter an IP address (first three segments matching the TAO 1tiny 2's IP, e.g., 192.168.5.x), mask (255.255.255.0), and Default gateway (usually the router's IP, e.g., 192.168.5.1).

      After confirming the settings, the computer and TAO 1tiny 2 will be on the same LAN.

  1. Open a web browser, access the web management page using the IP address (192.168.5.100). The default username and password are both: admin.

  1. It is recommended to change the password after first login to enhance security.

📢  Notes

During device management, ensure the network connection is stable and do not disconnect the router from the TAO 1tiny 2.

2.3.2Network Configuration

The TAO 1tiny 2 and the computer must be on the same local area network (LAN), meaning the first three segments of their IP addresses must be identical. Out of the factory, the DHCP function (automatic IP address acquisition) on the TAO 1tiny 2 is disabled by default.

After initially logging in using the static IP, you need to go to Options page >Network Port to enable DHCP. This allows the device to obtain an IP address assigned by the router and join the network.

Wireless Network

After connecting the router and the TAO 1tiny 2 with an Ethernet cable, set the computer's WiFi to the same SSID as the router. The TAO 1tiny 2 and the computer will then be on the same LAN without further configuration.

Wired Network

Connect the router to a switch using an Ethernet cable. Then connect both the TAO 1tiny 2 and the computer to the same switch using Ethernet cables. The TAO 1tiny 2 and the computer will be on the same LAN.

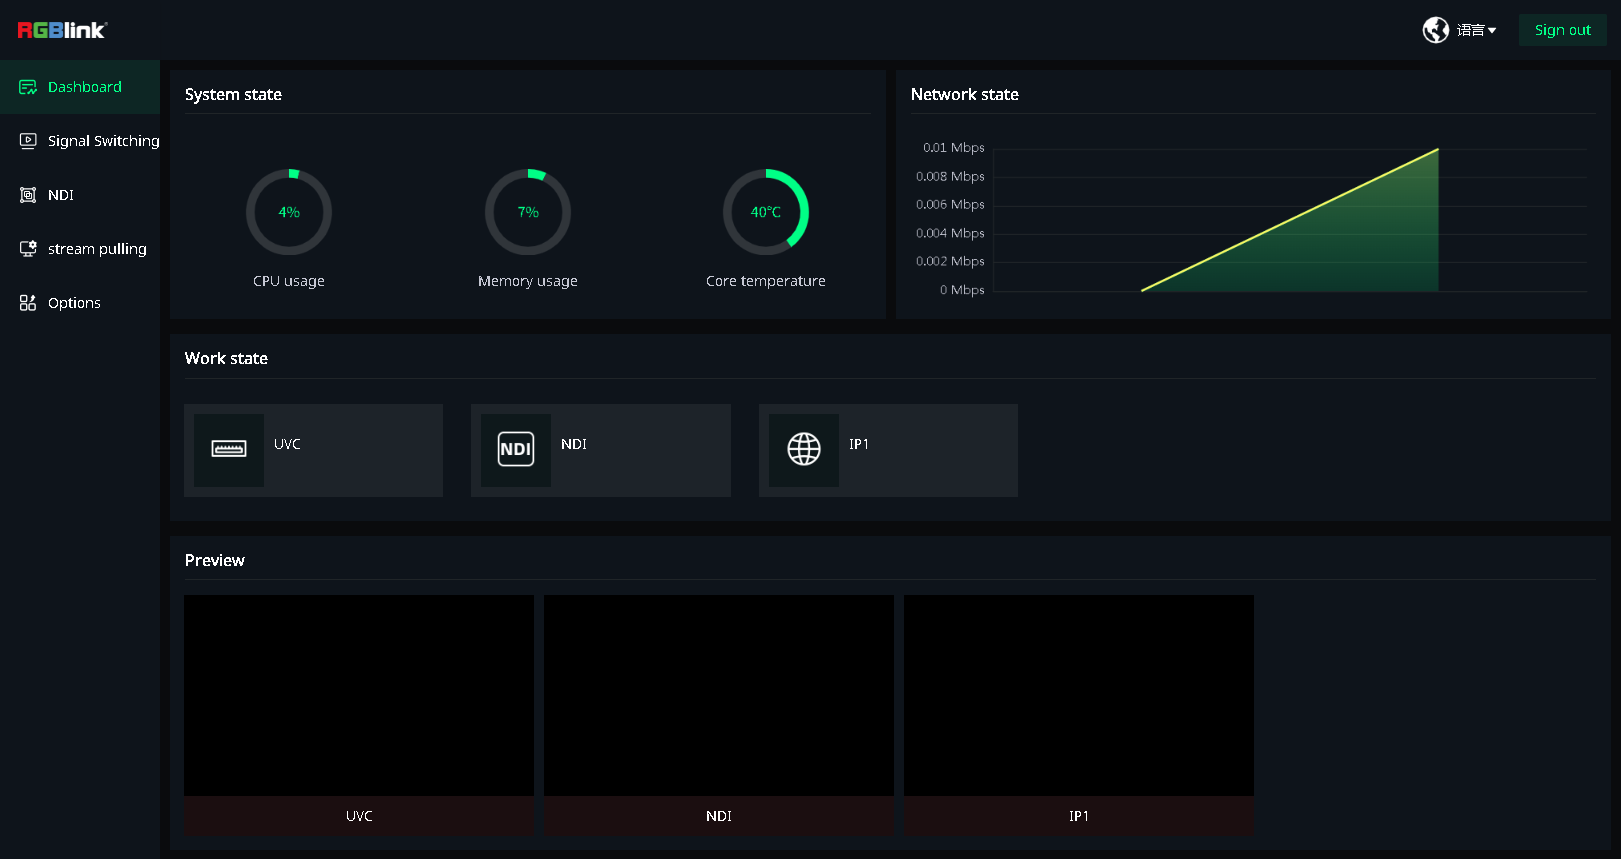
2.3.3Monitor Device Status

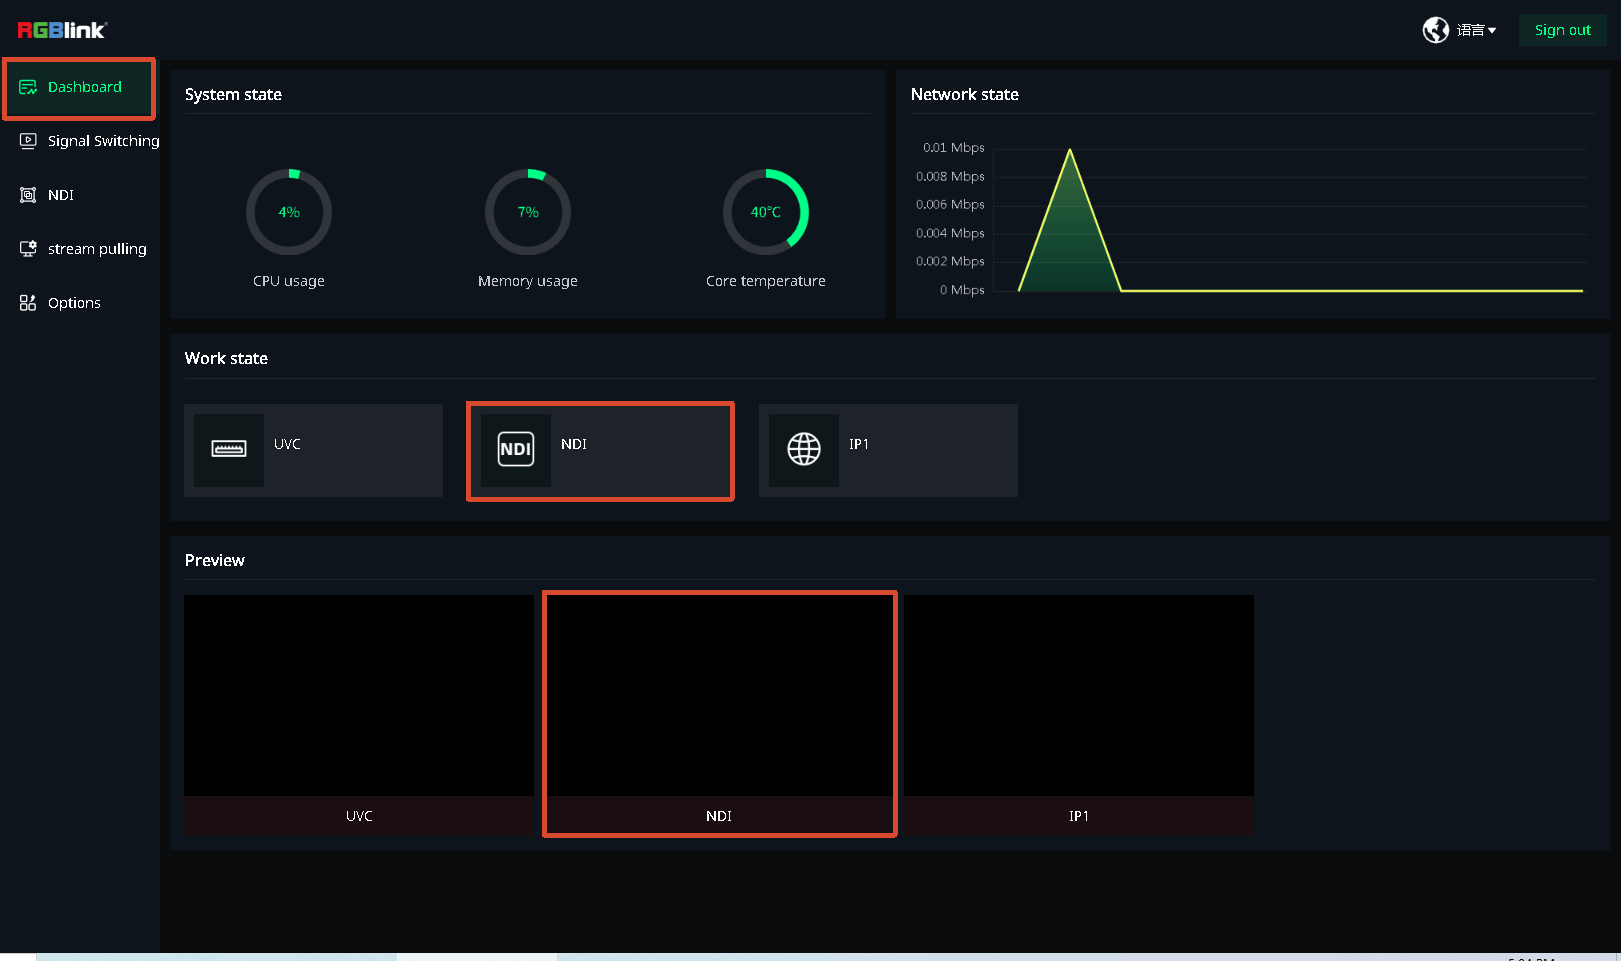
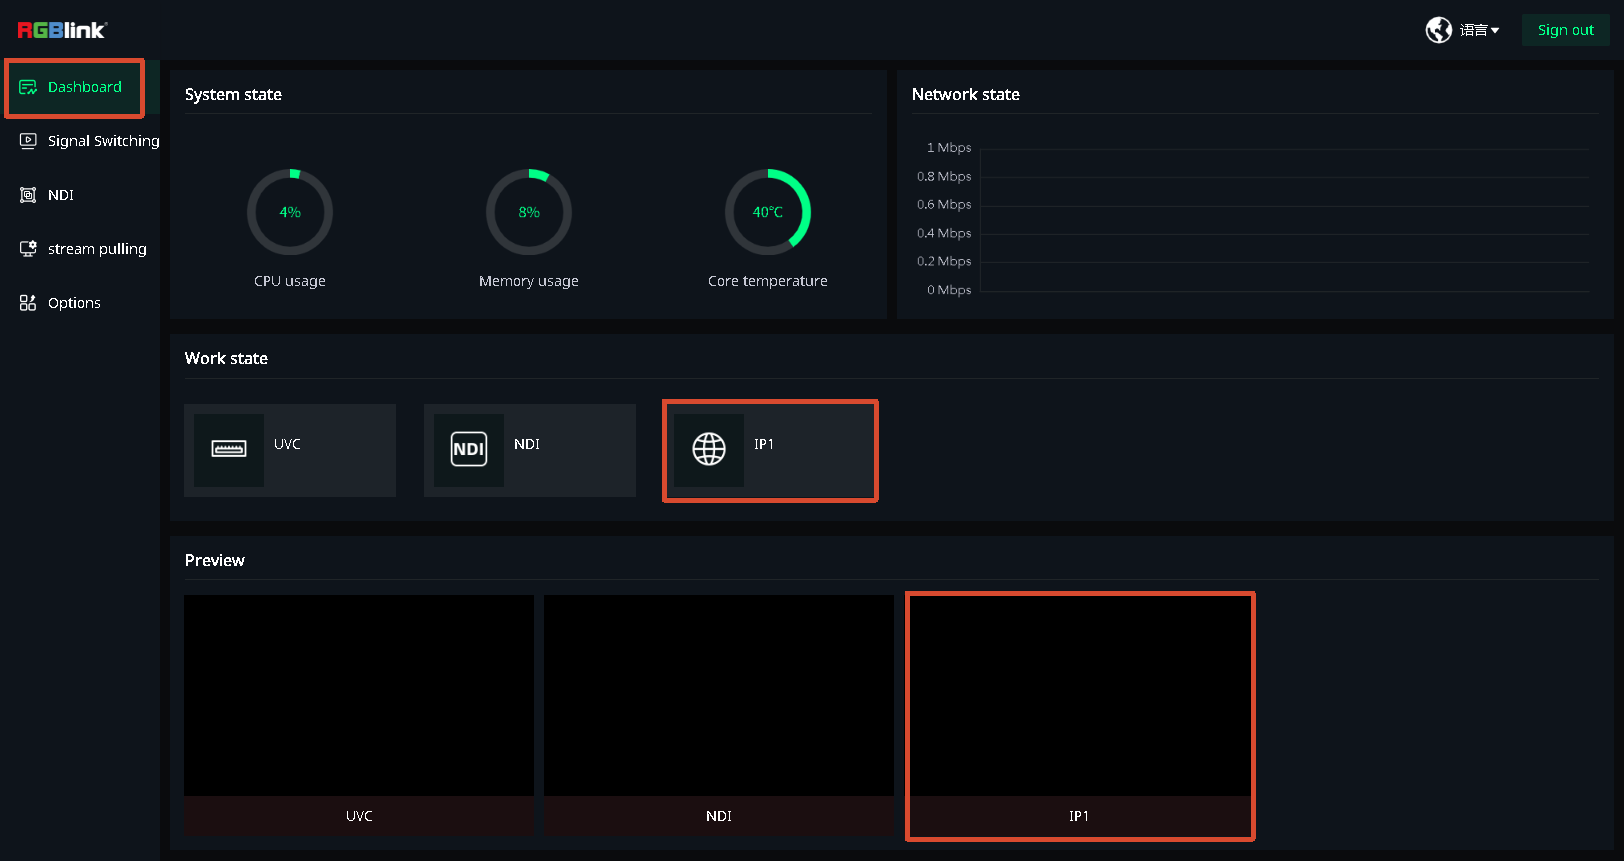
After accessing the device management page, you can monitor the current operational status, port status, signal preview, and network status of the device.

2.3.4NDI Encoding

The TAO 1tiny 2 adds NDI encoding feature, converting the signal from a USB camera into an NDI signal via the Ethernet port.

📢  Important

NDI encoding and decoding cannot be performed simultaneously.

By default, the NDI encoding and decoding features are disabled. 

Proceed as follows:

  1. Connect the USB camera to the TAO 1tiny 2 and ensure the computer and TAO 1tiny 2 are on the same LAN. Refer to section 2.3.2 Network Configuration.
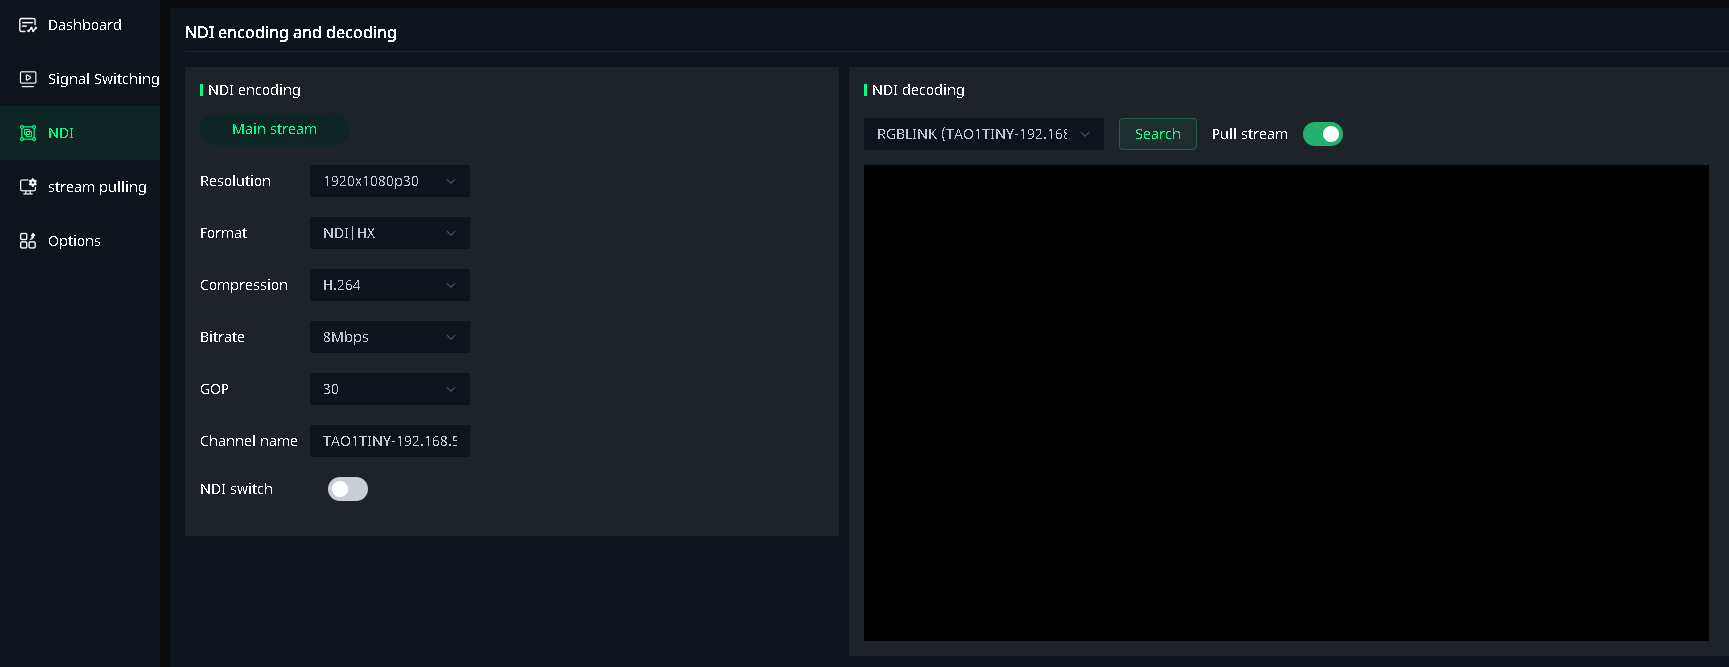
  2. Configure the NDI encoding settings. Set the NDI resolution, format, compression format, bitrate, etc., and click Save.

a. Resolution: Displays the input source resolution, fixed at 1920x1080p@30Hz.

b. Encoding Format: Default is NDI|HX.

c. Compression Format: Default is H.264.

d. Bitrate: Default is 8Mbps.

  1. Use NDI Tools to Receive the NDI Source

a. Download from: https://www.newtek.com/ndi/tools/

b. Open the NewTek Studio Monitor software.

c. Click the icon in the top left corner to display the list of discovered NDI source names. Select the device you want to connect to (TAO 1tiny 2+IP), and it will begin pulling and playing the selected video stream. After successfully pulling the video stream, you can click on a blank area of the device display to view the NDI resolution.

2.3.5NDI Decoding

The TAO 1tiny 2 adds NDI decoding feature, converting the input NDI signal to an HDMI 2.0 output.

TAO 1tiny 2 NDI decoding specifications:

  1. Decoding format: NDI |HX,NDI |HX2,NDI | HX3
  2. Resolution: 3840 x 2160@60Hz
  3. Please Note that the current NDI decoding feature does not support FULL NDI.
📢 Important

NDI encoding and decoding cannot be performed simultaneously.

By default, the NDI encoding and decoding features are disabled. 

Proceed as follows:

  1. Connect a switch and a router with an Ethernet cable. Then connect the TAO 1tiny 2, NDI camera, and computer to the switch, placing them on the same LAN.

  1. On the NDI Encode/Decode page, under NDI Decode, click Search for NDI Source. Then click Pull Stream, and the preview window will display the NDI source video.

  1. The decoded NDI video now becomes an input source. You can switch the HDMI main output signal on the Signal Switching page.

2.3.6Network Input

The TAO 1tiny 2 supports network streams as input sources, compatible with RTMP/RTSP/NDI protocols. Enter the stream URL to receive video.

This section covers:

  • PTZ Camera Stream
  • Mobile Casting

3.2.3.6.1PTZ Camera Stream

This example shows how to connect an IP-based PTZ camera.

The device and camera must be on the same network.

Using Static IP

  1. Connect the PTZ camera and TAO 1tiny 2 to the same network switch.
  2. Obtain the camera IP address from the manual or control panel.
  3. Go to the Options page and disable DHCP.
  4. Manually set the device IP. Make the first three segments identical to the PTZ camera IP to ensure both are on the same network.
  5. Click Save .

Adding a Stream URL

Ensure TAO 1tiny 2 and the PTZ camera are on the same network.

The device supports ingesting PTZ camera video via standard network protocols. A valid stream URL is required for connection.

  1. Most stream URLs follow a common format, for example: rtsp://[ip_address]:[port]/[path]. Replace variables as follows.

    a. IP address: static IP configured for the PTZ camera, or dynamic IP assigned by the router.

    b. The username, password, and stream path: refer to the PTZ camera manual.

  2. On the Streaming Pulling page, enter the channel name and stream URL.

  1. Enable the switch for this stream URL, you can see the video feed in the preview area under the Dashboard page.

  1. On the Signal Switching page, select IP1.

  1. The HDMI output will switch to the camera feed.

3.2.3.6.2Mobile Casting

Requirements

  1. Only Android devices are supported, and landscape mode is required.
  2. Install the TAO App (version 2.6.5 or later):
  3. Scan the QR code

  1. Download from app stores (search TAO or TAO RGBlink)
  2. The device, mobile phone, and wireless router must be on the same network, with normal internet access.

Steps

  1. Power on TAO 1tiny 2 and log in to the web interface.
    Go to Signal Switching page and select IP1.
  2. Go to Stream Pulling, locate the RTMP URL (fixed and not editable), and enable the stream.

  1. On the mobile device:
    1. Install and open the TAO App
    2. Connect to the same Wi-Fi network as TAO 1tiny 2
    3. Navigate to: Me > Wireless Casting
    4. Enter the device IP address
    5. Select Landscape mode and tap Preview
  1. In the preview screen:

    a. Shows mobile camera feed

    b. Tap the Play icon to start casting

Once casting starts, verify that the HDMI output matches the mobile camera feed.

Interface Guide

IconFunction
Play.
Stop the current stream.
Switch between front and rear cameras.
Turn microphone on/off.
Flip image horizontally.

2.4Firmware Upgrade

The TAO 1tiny 2 is upgraded via USB drive. Proceed as follows:

  1. Download the latest TAO 1tiny 2 firmware from the RGBlink website (http://www.rgblink.com) and copy it to a USB drive.

  2. Insert the USB drive (containing the latest upgrade package) into the USB 2.0 port. The device will upgrade automatically.

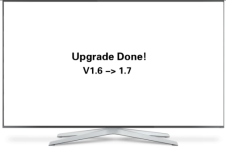
    Upon successful upgrade, the device will reboot automatically. The USB drive will automatically generate a prompt file indicating a successful upgrade.

    You can also see Upgrade Done and the version number information on the HDMI output display.

📢  Important

Do not disconnect the device during the firmware upgrade process.

3FAQ

Q: Why can't I use the NDI feature?

A: TAO 1tiny 2 supports NDI encoding and decoding. If you cannot discover or connect the signals, check the following:

  1. Default configuration: NDI features are disabled by default. Log in to the web management interface and enable the required feature manually. See section NDI Encoding and NDI Decoding for details.
  2. Network environment: the device has been tested with tools such as NDI Tools and RGBlink Vue PTZ. If the connection still fails, ensure that TAO 1tiny 2 and your computer are on the same local network. See section Network Configuration for details.

Q: Why does the receiver display 1080p when the input signals is 4K and streamed via NDI?

A: When performing NDI encoding, the TAO 1tiny 2 outputs video at a fixed resolution of 1920x1080@30Hz.

This is a hardware design characteristic, not a malfunction. Ensure that the receiving device is configured to accept a 1080p signal.


Q: Why can't OBS or Studio Monitor detect the video, or why is the screen black?

A: The TAO 1tiny 2 NDI decoding freature supports NDI |HX, NDI |HX2, NDI | HX3, but does not support FULL NDI.

If your source device is transmitting FULL NDI, the device cannot decode or display the stream.


Q: Why is there no HDMI output when a USB camera (such as a USB webcam or OBSBOT camera) is connected through the USB-A port?

A: In earlier firmware versions, TAO 1tiny 2 did not support UVC video input via USB-A. This issue has been resolved in firmware v1.42.

If you encounter connection issues, update the device to the latest firmware. See section Firmware Upgrade for details.


Q: Why can't a third-party video switcher detect the video signals?

A: Compatibility has been improved in the latest firmware version.

If you encounter connection issues, update the device to the latest firmware. See section Firmware Upgrade for details.
4Technical Support

5Revise History

VersionDateDescriptionAuthor
V1.22026-04-27Content update: section Mobile CastingZYL
V1.12026-03-13Firmware version: V1.42 Content update: + Add the Dropbox link: Add the Dropbox link for the latest firmware. + UVC video input via USB-A: Resolved HDMI output issue when using UVC video input (e.g., USB webcams, OBSBOT cameras) via USB-A port. + Third-Party Switcher Compatibility: Improved compatibility with third-party switchers. + NDI Function Verification and Documentation Update: Verified NDI connectivity via NDI Tools and RGBlink Vue PTZ. + Documentation and User Guidance: User manual and FAQ updated to reference firmware to prevent user confusion or incorrect operation.ZFH & ZYL
V1.02025-08-25First Release. Firmware version: V1.41FMY

About Us / Find Support

Xiamen RGBlink Science & Technology Co., Ltd. designs and manufactures professional video processing, switching, streaming and LED display control products for live events, broadcast, education and fixed installations.

Need help?

Choose one of the following support options:

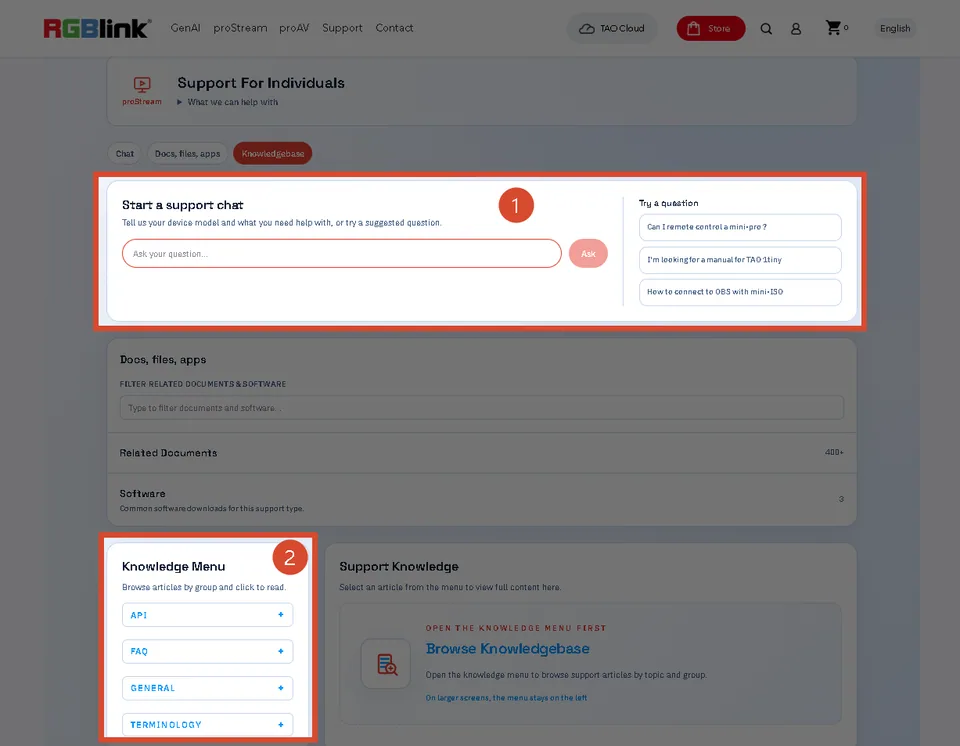
  • AI Support Search (Recommended): Visit Support > Support proStream/proAV/proEvents on the RGBlink official website and ask the RGBlink AI Bot for quick answers.
  • FAQs: Visit Support > Support proStream/proAV/proEvents on the RGBlink official website and browse Knowledge Menu > FAQ.
  • Contact Technical Support: Visit the Technical Support page of this manual or the RGBlink official website for our contact details.
Document image

RGBlink

www.rgblink.com

© Copyright Xiamen RGBlink Science & Technology Co Ltd