Export PDF

RGBlink
Ystreamer

User Manual

Ystreamer

230-0013-01-0

RGBlink

www.rgblink.com

November 2026

1Specification

Document imageDocument image
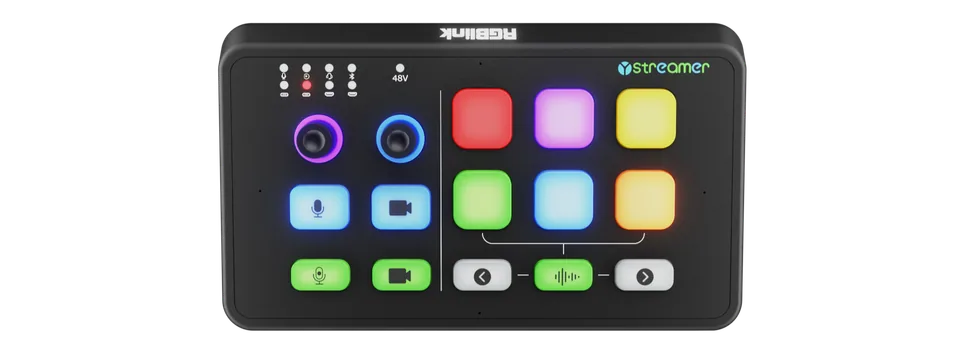
Leverages Next-Generation Dual-Channel Capture in One UVC
Key Features + Dual-Channel HDMI 2.0 Video Capture Card & 9-Channel Audio Mixer + Dual HDMI 2.0 Inputs with Independent Loop-through Outputs + Captures dual 4K UVC streams on a single USB-C cable to the software such as OBS and vMIX + 9-Channel Professional Audio Mixer + Supports 48V Phantom Power for condenser microphones, dynamic microphones, and instruments (e.g., electric guitar, bass) + User-friendly Control Keyboard featuring dedicated keys for volume adjustment, mute, recording, privacy (black screen), and page navigation, plus 6 customizable user keys.
Application
Document image
Dimension
Document image
Connectors
InputVideoHDMI2×HDMI-A
Audio AnalogLine In1×6.35mm TRS
Mic1×XLR Combo Jack (Mic/Instrument), 48V
Headset (I/O)1×3.5mm TRRS
Audio DigitalEmbedded audio2×HDMI-A (sharing ports with video)
Built-in mic4×Digital MIC
Bluetooth 5.21×built-in bluetooth receiver
UAC (I/O)2×USB-C
OutputVideoHDMI Loop2×HDMI-A
Dual UVC stream1×USB-C
Audio AnalogStereo unbalanced Line out1×6.35mm TRS
1×3.5mm TRRS Headset (I/O)
2×built-in speaker (4Ω3W )
Audio DigitalUAC (I/O)2×USB-C
PowerType-C1×USB-C
Performance
VideoResolutionInput &LoopUp to 4096×2160@60Hz
Capture (dual UVC)RGB241920×1080@25/30/40/60
YUY23840×2160@25/30, 2560×1440@60, 2560×1080@60, 1920×1080@25/30/40/60
NV123840×2160@30, 2560×1440@60, 2560×1080@60, 1920×1080@25/30/40/60/100/120
I4203840×2160@30, 1920×1080@60/100/120
P0101920×1080@60
MJPEG3840×2160@25/30/45/50/60, 2560×1440@60/144, 2560×1080@60, 1920×1080@25/30/40/60/100/120/144/240
SubsamplingRGB /YCbCr 444/YCbCr 422/YCbCr 420
AudioAnanlogInput Dynamic range115dBu
Microphone Input Impedance1.2KΩ
Instrument Input Impedance1MΩ
Preamplifier Gain Range0~60 dB
Phantom Power48V
Headphone Output Power125mW
DigitalSound TrackStereo
Sampling Rate48KHz
Bit Depth16bit ,24bit
Supported StandardHDMI 2.0
HDCP 2.3
Power
Power RequirementsPD12V 2.5A
Environment
Working Temperature0℃~60℃
Working Humidity10%~85%
Physical
WeightDevice Weight0.45kg
Packaged Weight0.80kg
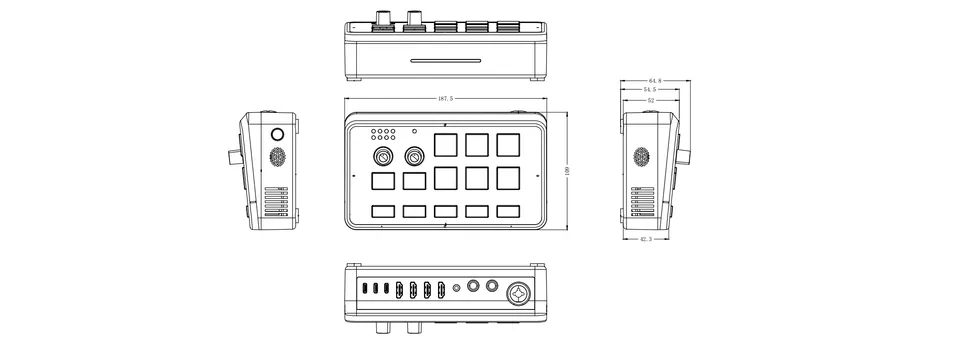
DimensionDevice Dimension187.5×109×64.8mm
Packaged Dimension255×145×86mm
Product CodeItem
230-0013-01-0Ystreamer

1.1Revision History

VersionDateDescriptionAuthor
V1.02026-04-03First release.ZFH & ZYL
V1.12026-04-13Update partial specifications.ZYL

2Quick Start

Welcome to the Quick Start Guide.
Follow the steps in this guide to quickly set up your device and get started.

2.1Product Overview

Ystreamer integrates dual HDMI 2.0 capture and professional audio control, supporting simultaneous dual-channel audio and video capture, independent track editing, and efficient live production with a user-firendly control keyboard.

2.1.1In the Box

  • 1×35W PD Power Adapter
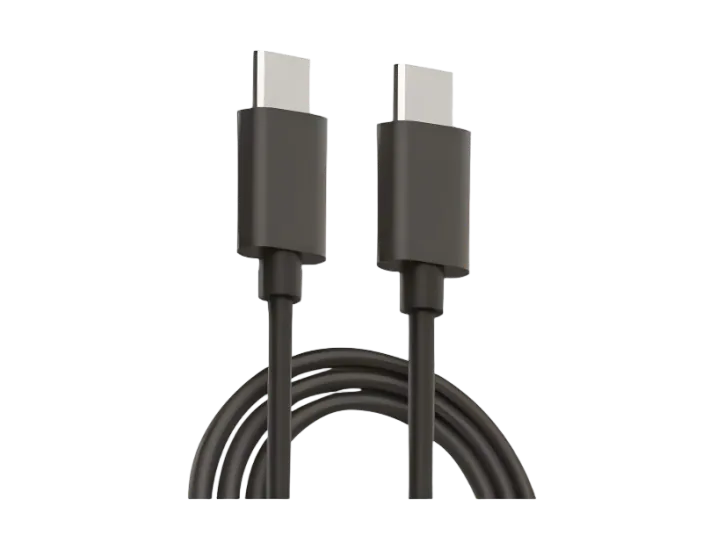
  • 1×5A USB-C Cable
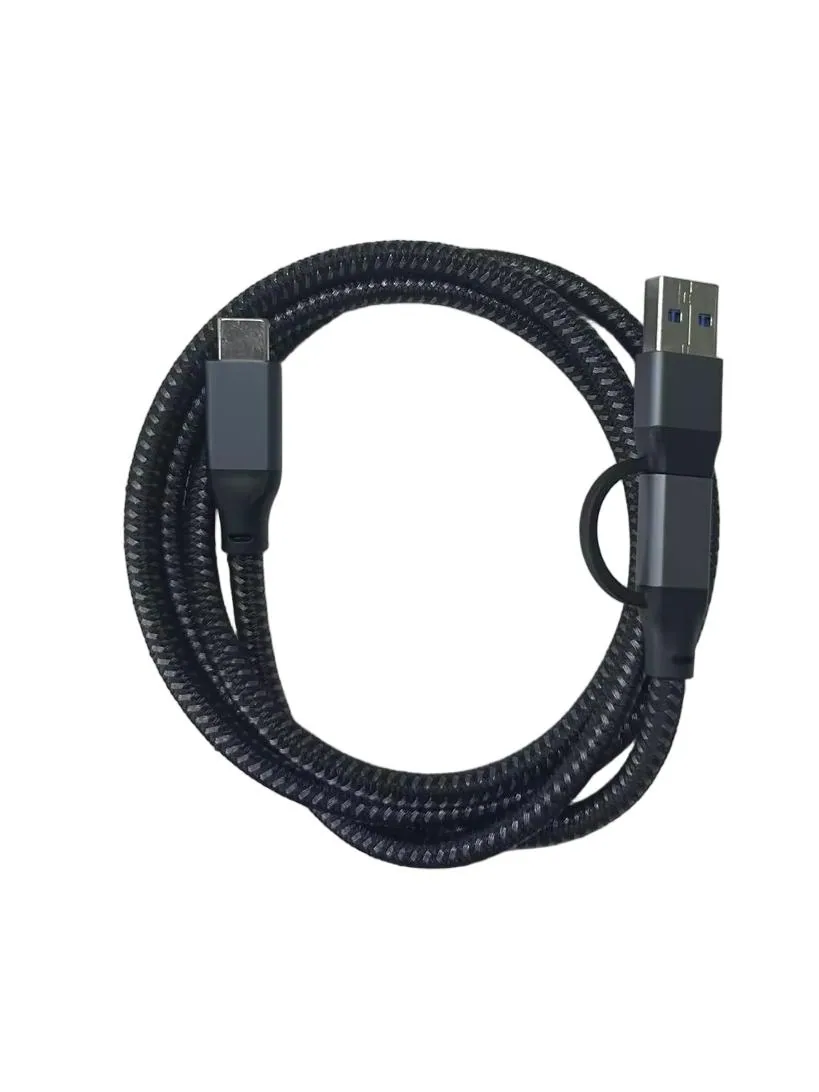
  • 1×USBA/C-C Cable

2.1.2Ports Info

This chapter includes ports information.

2.1.2.1Rear Panel

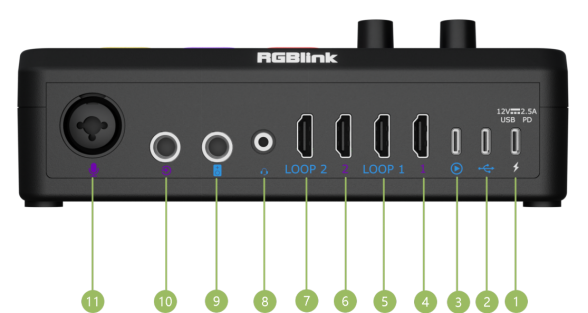
NO.ItemsDescription
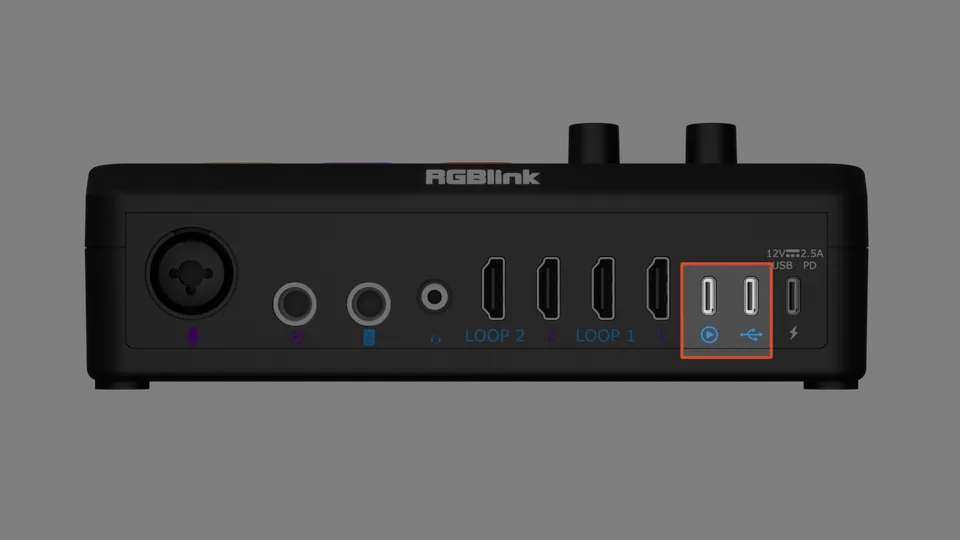
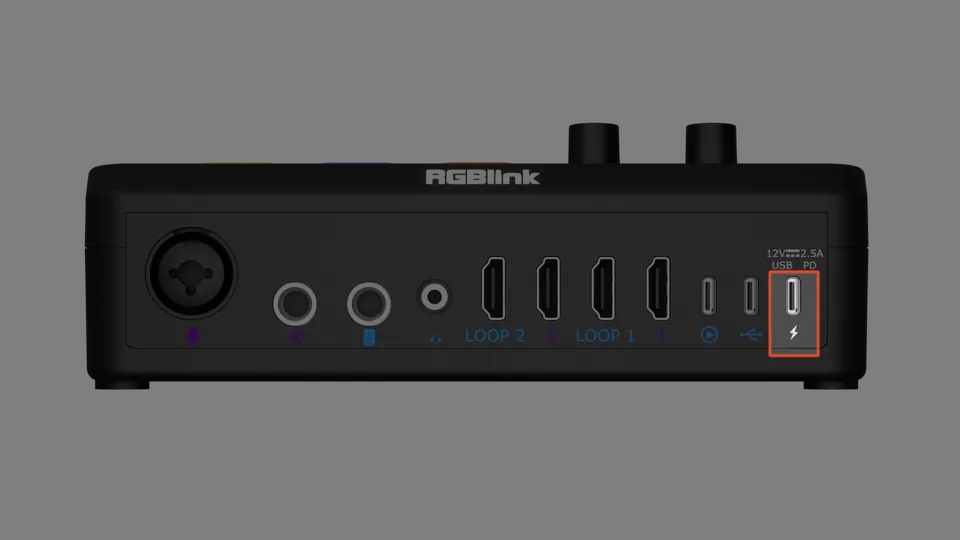
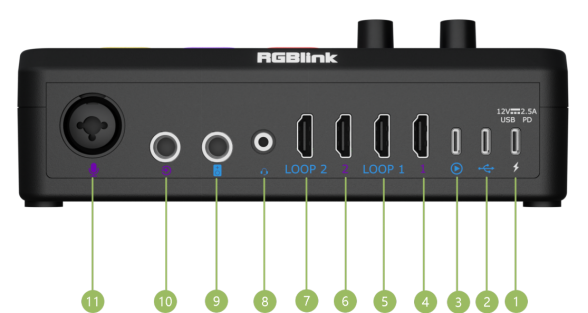
①USB-C Power PortSupports PD protocol, 12V 2.5A.
②UAC Input & OutputAs audio input, can be connected to lavalier microphone input. Mix Mode available Mixes all input audio for output.
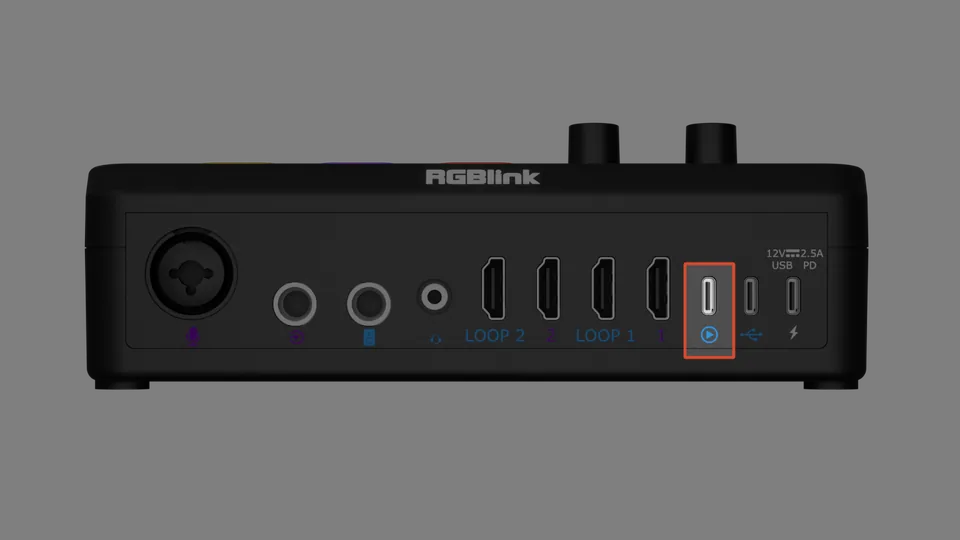
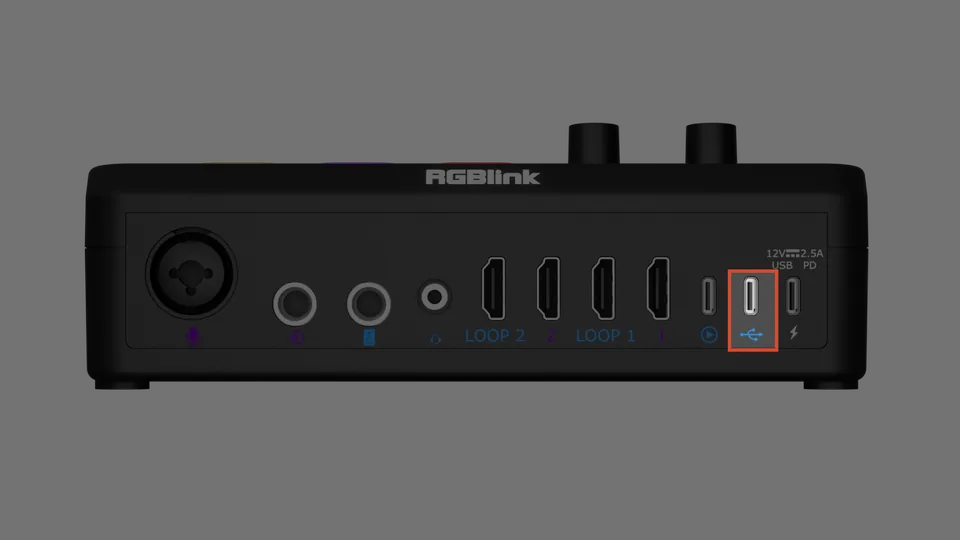
③UVC Output & UAC Input/Output1. As UVC output, can simultaneously capture 2 HDMI 2.0 inputs. When connected to PC streaming software or video editing software, can capture two channels up to 3840×2160@60Hz in MJPEG encoding, or 2 channels of 3840×2160@30Hz in YUY2 encoding. 2. As audio input, can be connected to lavalier microphone input. 3. As auxiliary audio output, fixed to mix output of all input audio. Input sources can be muted/unmuted, and output volume is adjustable.
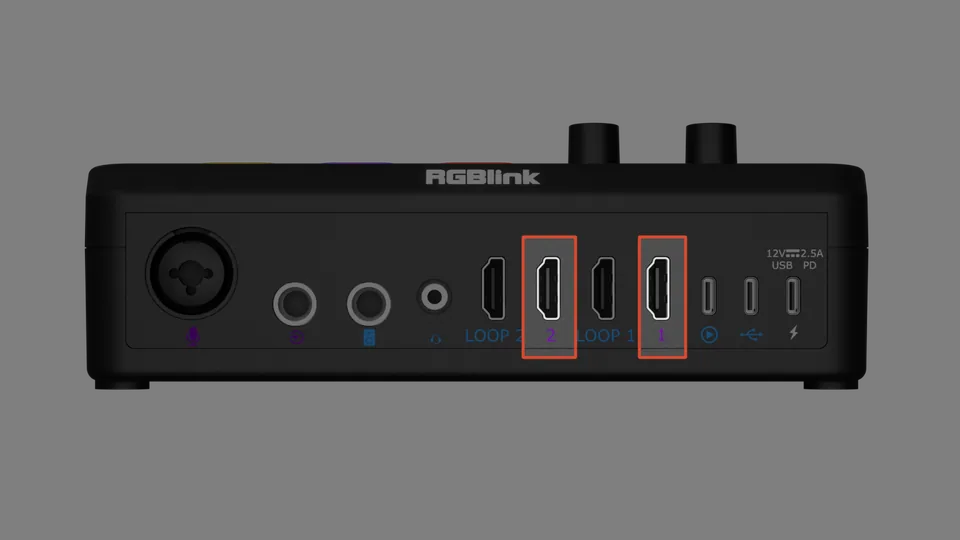
④HDMI 1 InputHDMI 2.0 standard, can be connected to PC graphics cards, 4K cameras, etc.
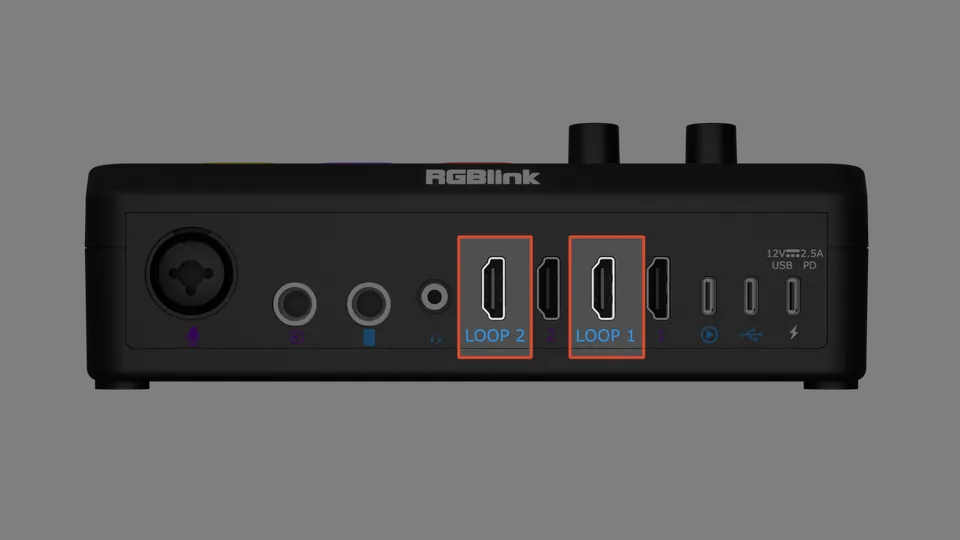
⑤LOOP 1Loop-through output of HDMI 1, can be connected to 4K monitor.
⑥HDMI 2 InputHDMI 2.0 standard, can be connected to PC graphics cards, 4K cameras, etc.
⑦LOOP 2Loop-through output of HDMI 2, can be connected to 4K monitor.
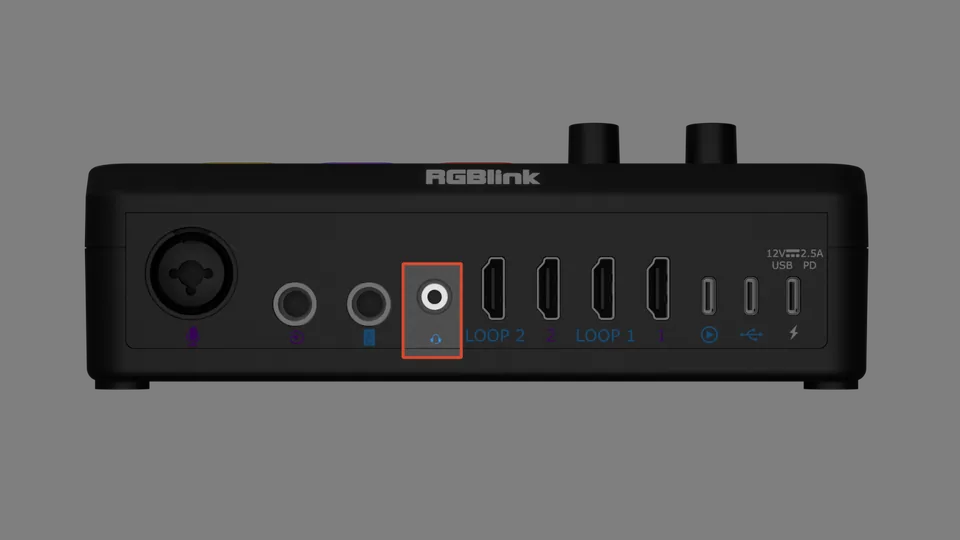
⑧Analog Audio Input & Output3.5mm TRRS port, for connecting headsets.
⑨Analog Audio Output6.35mm TRS port, can be connected to headphones or active speakers.
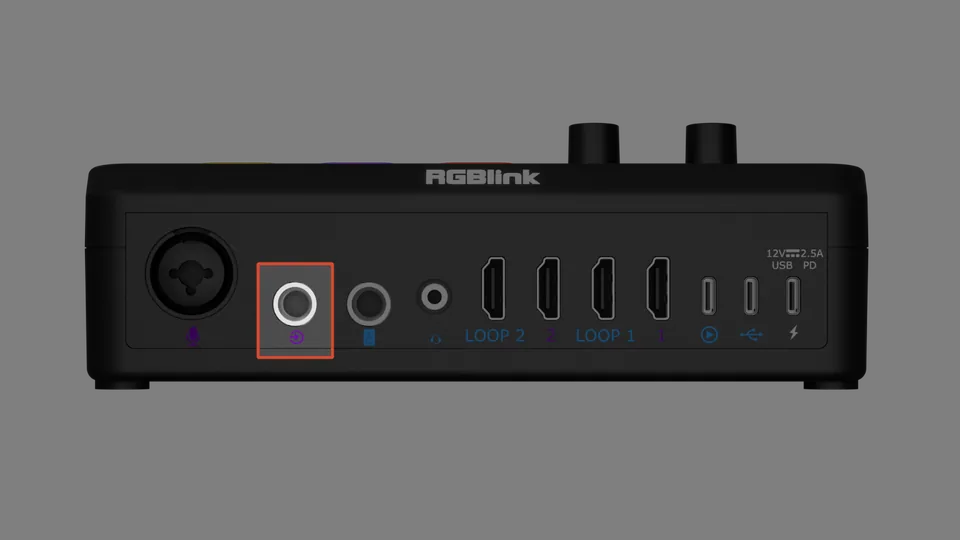
⑩Analog Audio Input6.35mm TRS port, for external audio input from mobile phones, tablets, computers, or other playback devices.
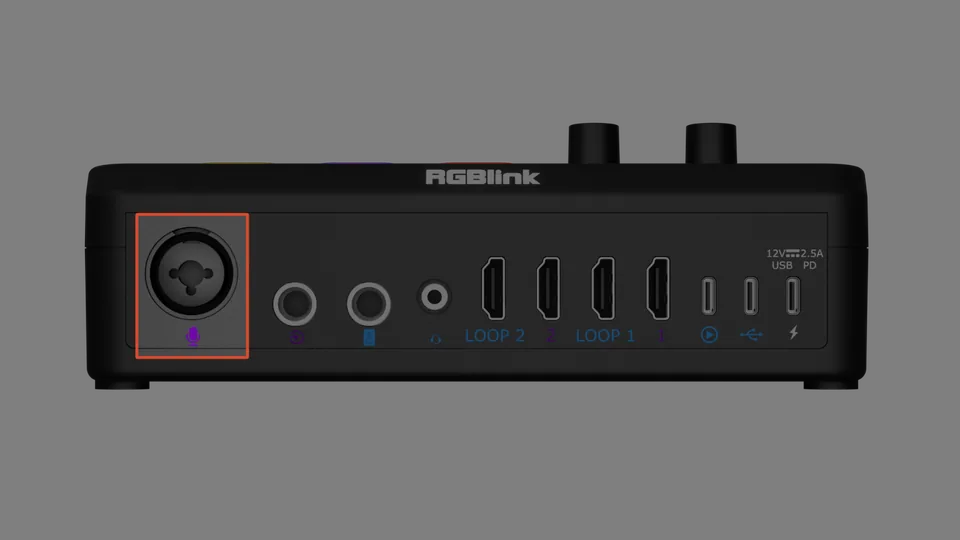
⑪Microphone InputXLR+TRS (¼-inch) Combo input port, for connecting microphones, supports 48V phantom power.

2.1.2.2Front Panel

No.ItemsDescription
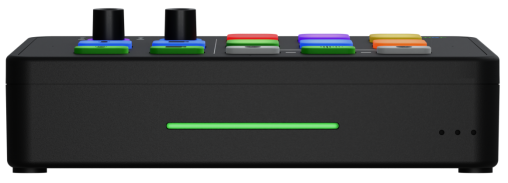
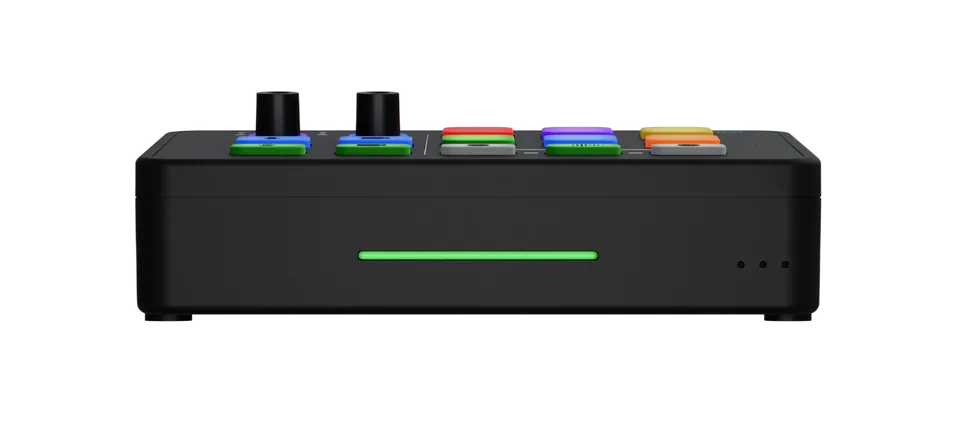
①LED Light BarHDMI Input Lock Indicator Red: No input on either of the 2 HDMI channels Green: At least 1 HDMI channel has active input

2.1.2.3Right Panel

No.ItemsDescription
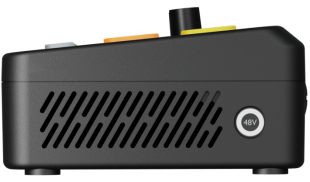
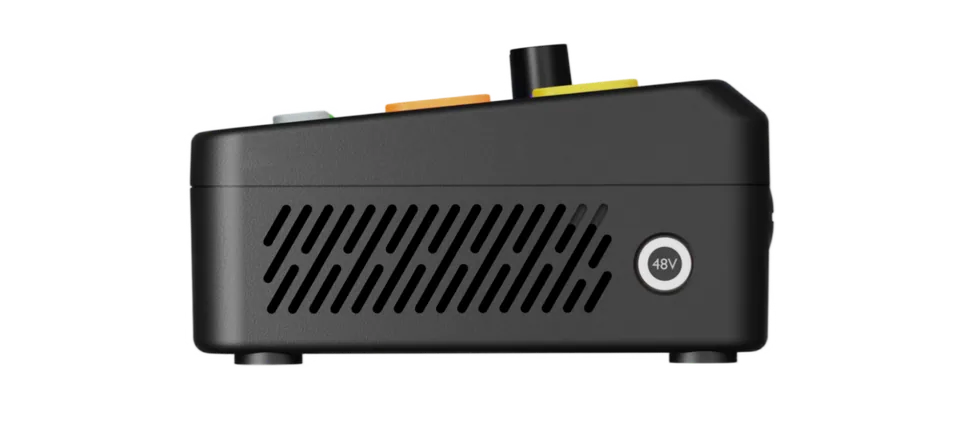
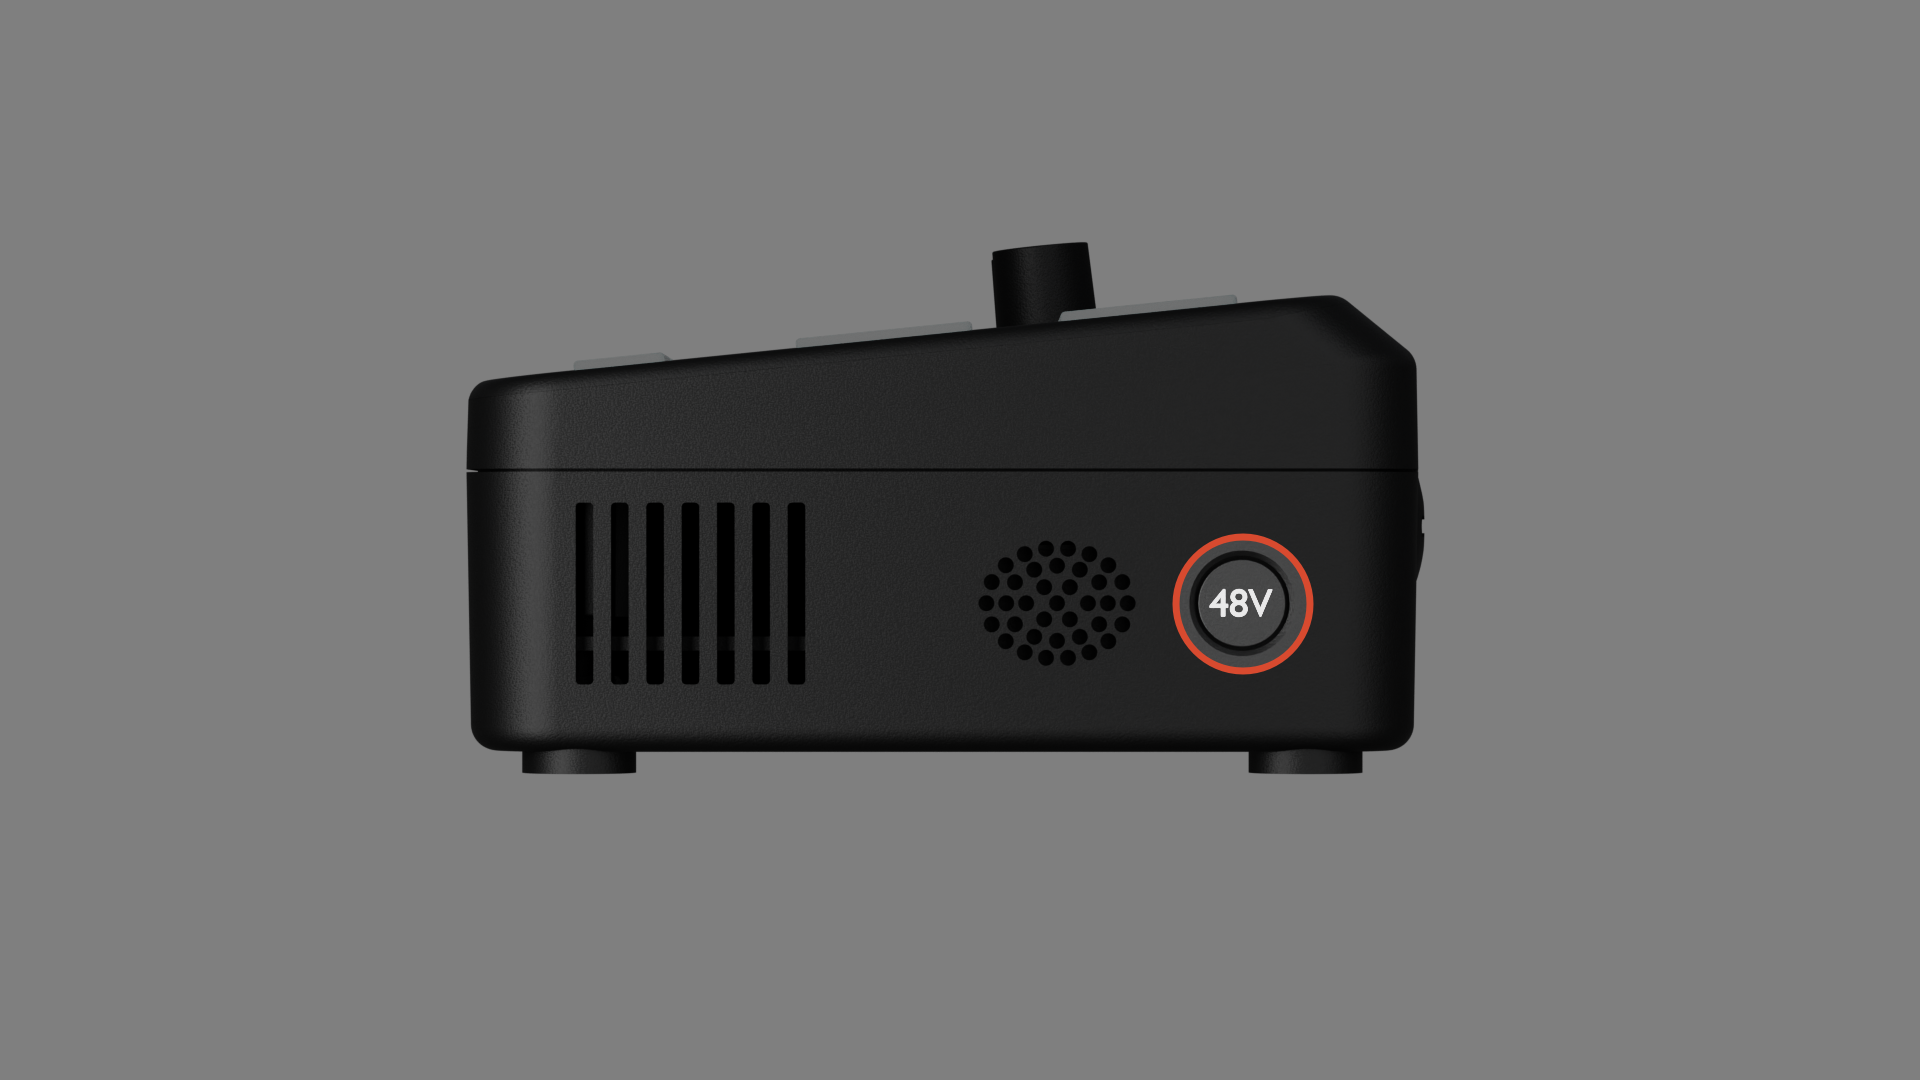
①+48V Phantom Power Switch48V power supply switch for condenser microphone . Press and hold for 3 seconds to enable 48V output. The 48V indicator on the panel shows the on/off status.

2.1.2.4Button Panel

No.ItemsDescription
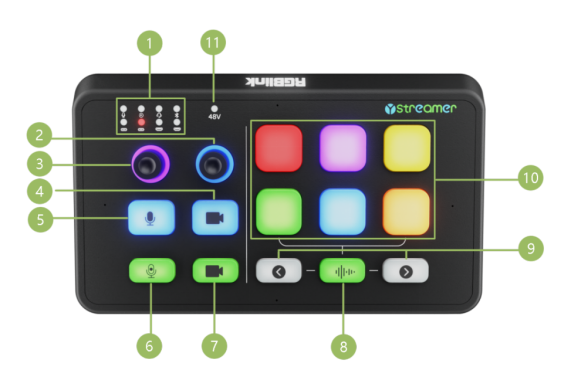
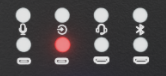
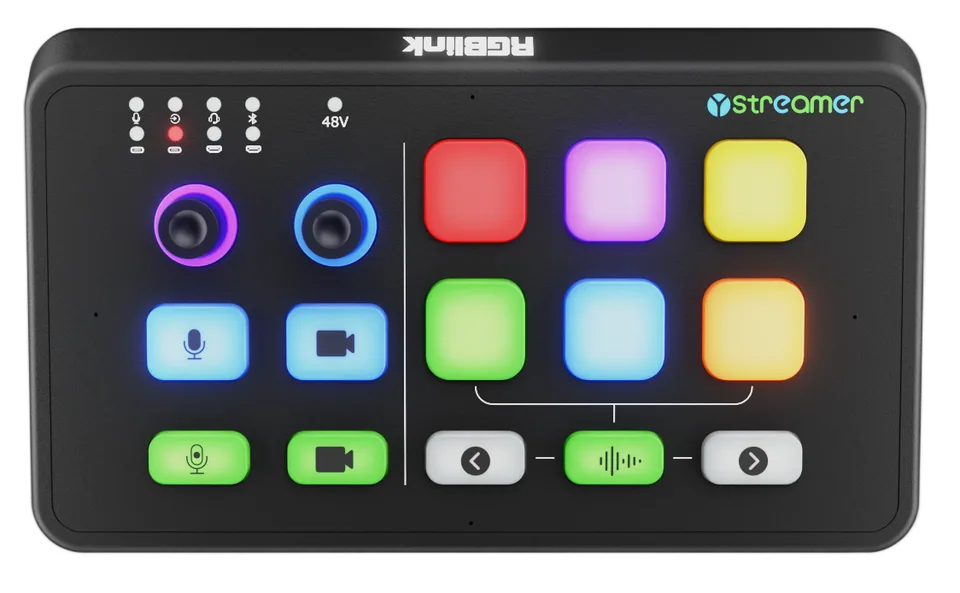
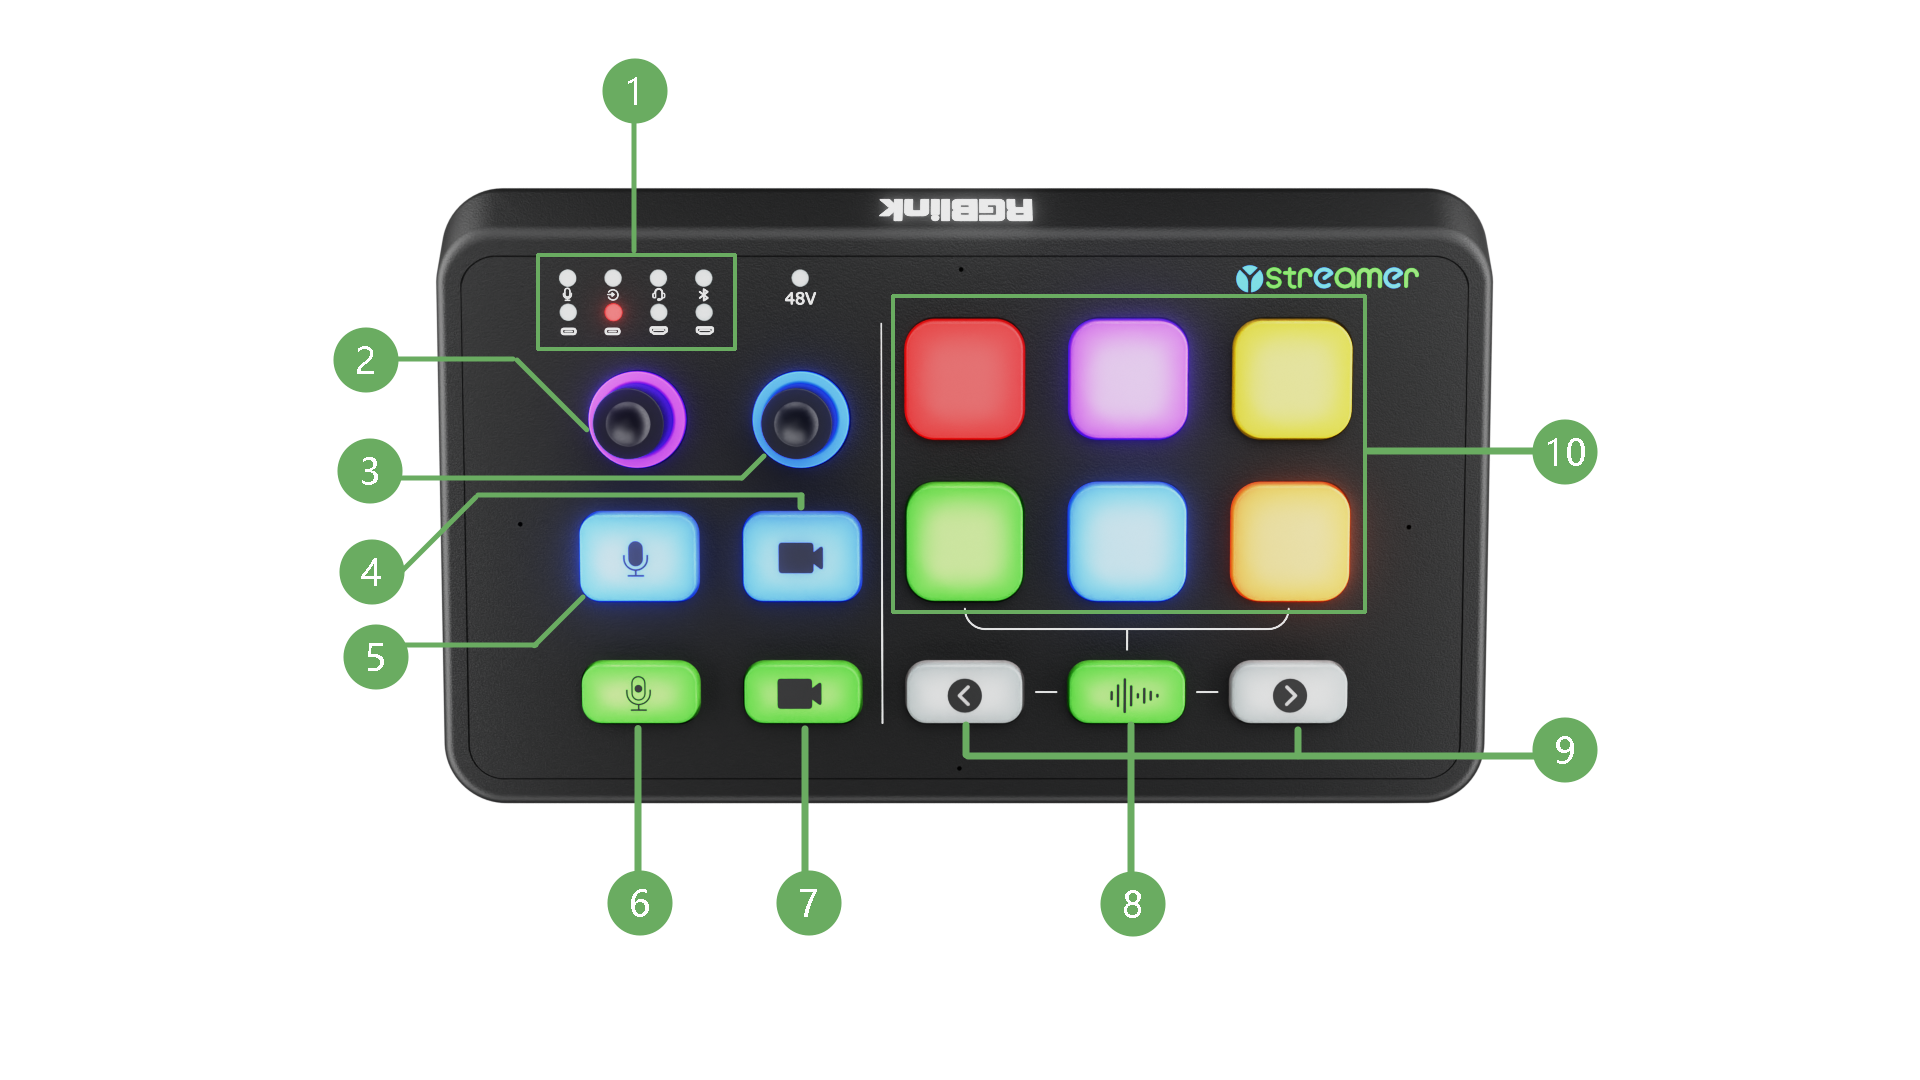
①Audio Input Source Selection IndicatorGreen light indicates the source is selected. The input sources, from top to bottom and left to right, are: XLR, TRS, TRRS, Bluetooth; UAC 1, UAC 2, HDMI 1, HDMI 2
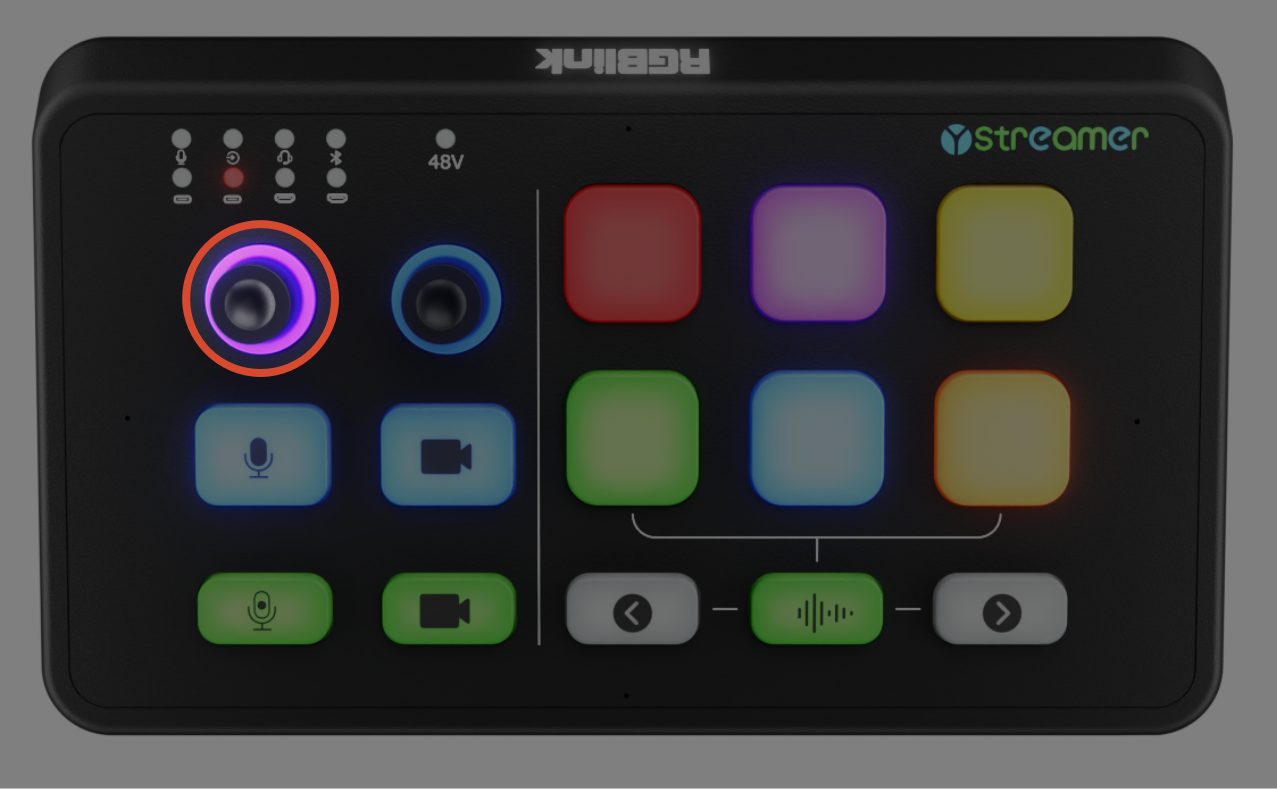
②Output Volume AdjustmentPress to toggle output mute. • Active volume portion: Purple • Inactive volume portion: Red • Mute: All red
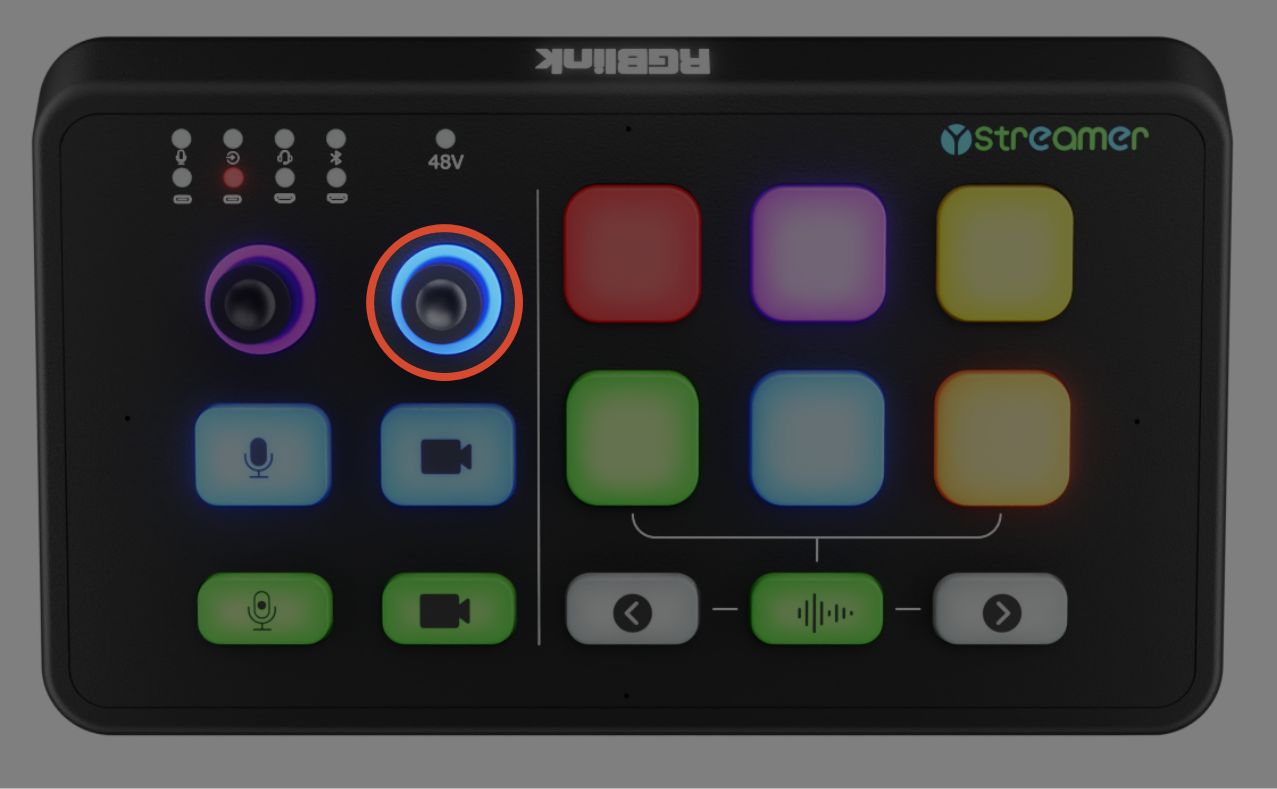
③Input Volume AdjustmentRotate the input knob to select a source, press to confirm, then rotate to adjust the selected source's volume. Volume level is indicated by the ring light around the knob: • Active volume portion: Blue • Inactive volume portion: Red • Mute: All red
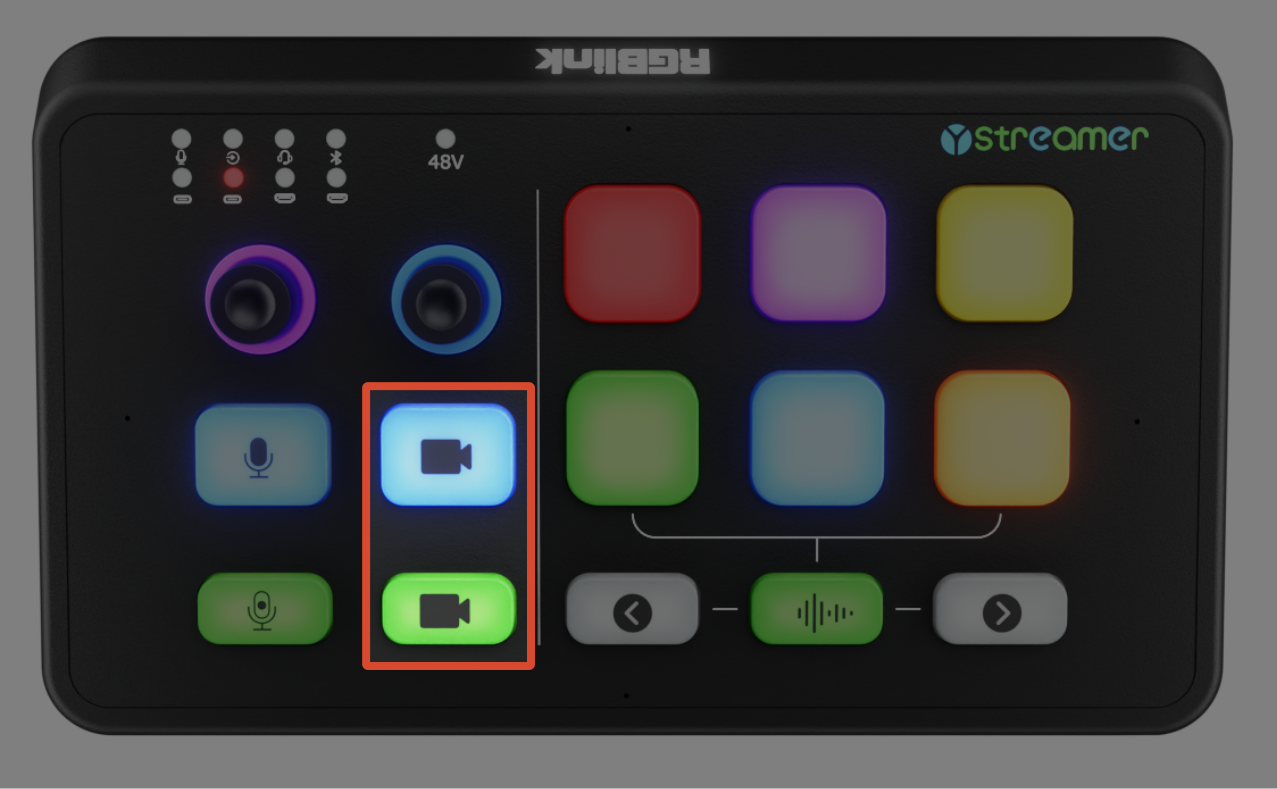
④HDMI 1 UVC Output Black Screen Control• Output active: Blue • Black screen output: Red
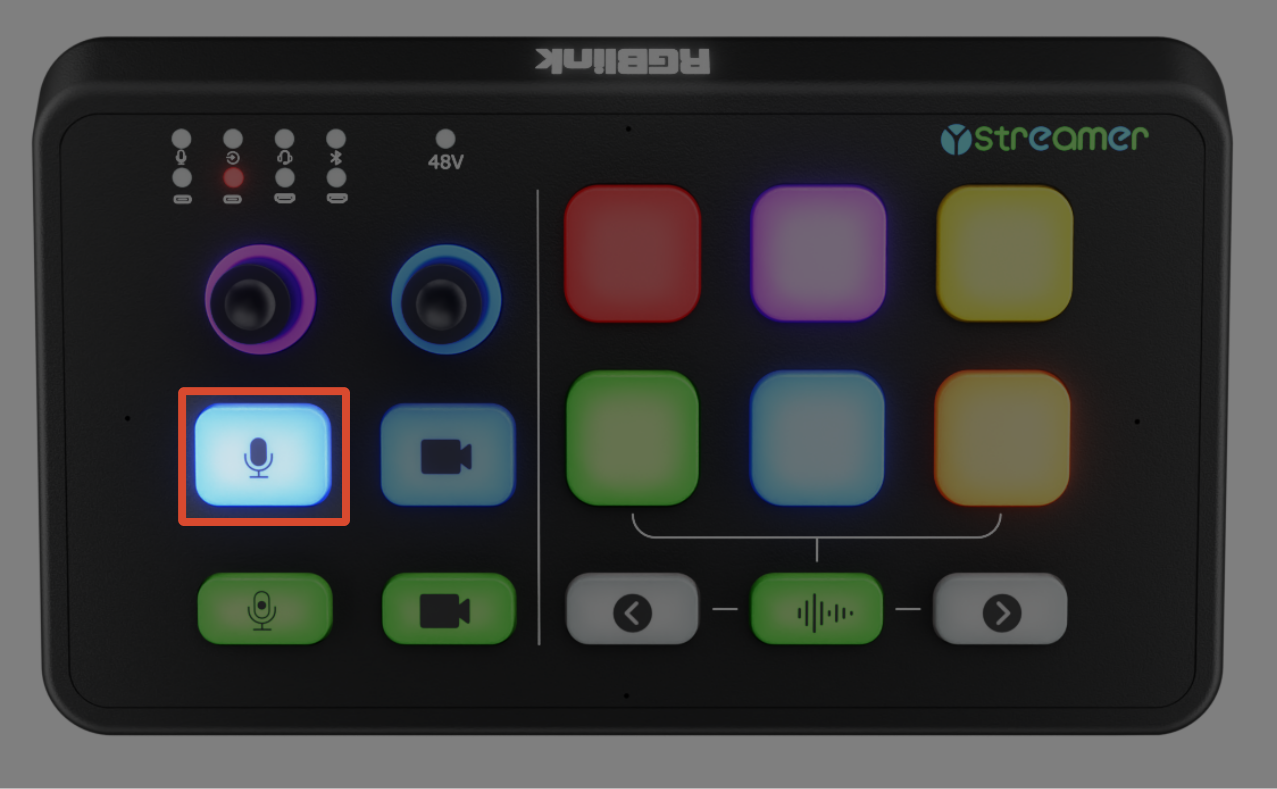
⑤One-Key MutePress to instantly mute the selected input source. • Audio output: Blue • Mute: Red
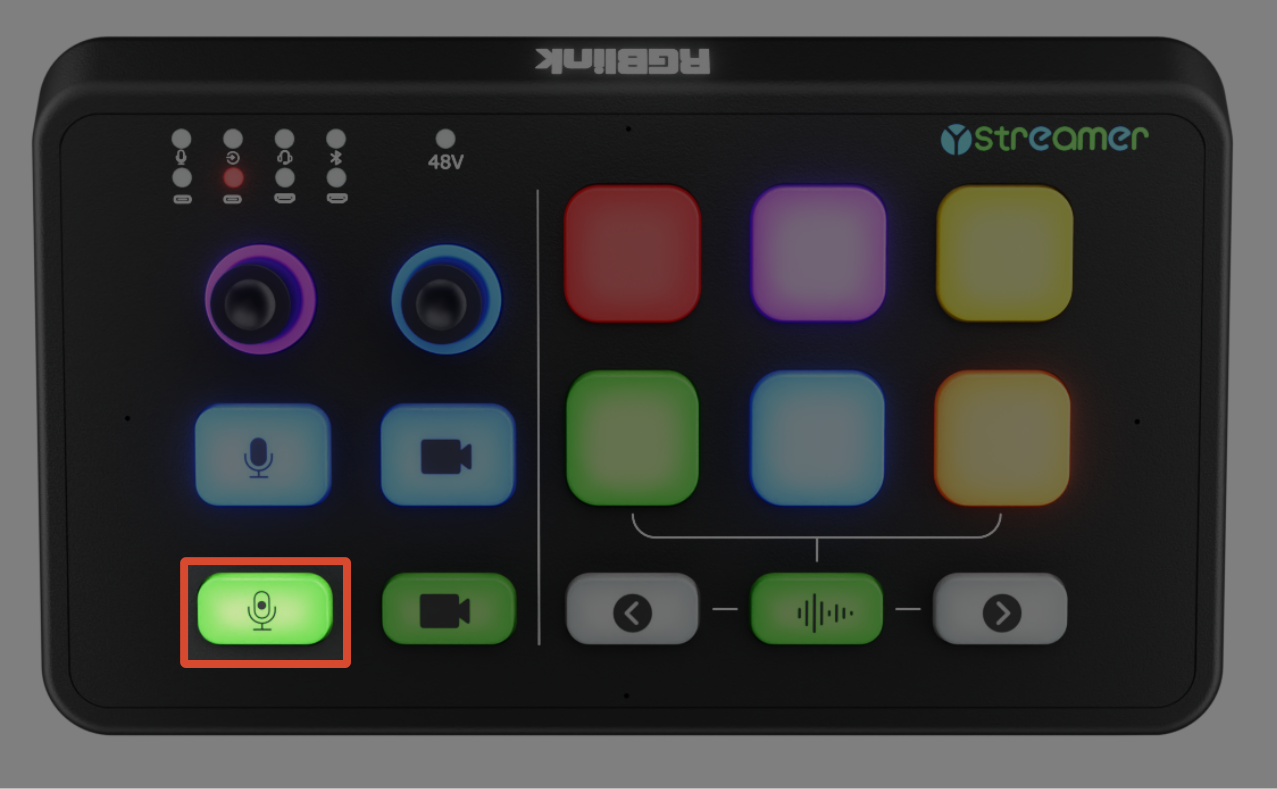
⑥Audio Recording Switch• Recording: Red • Stop recording: Blue
⑦HDMI 2 UVC Output Black Screen Control• Output active: Blue • Black screen output: Red
⑧Built-in Microphone On/Off Switch/
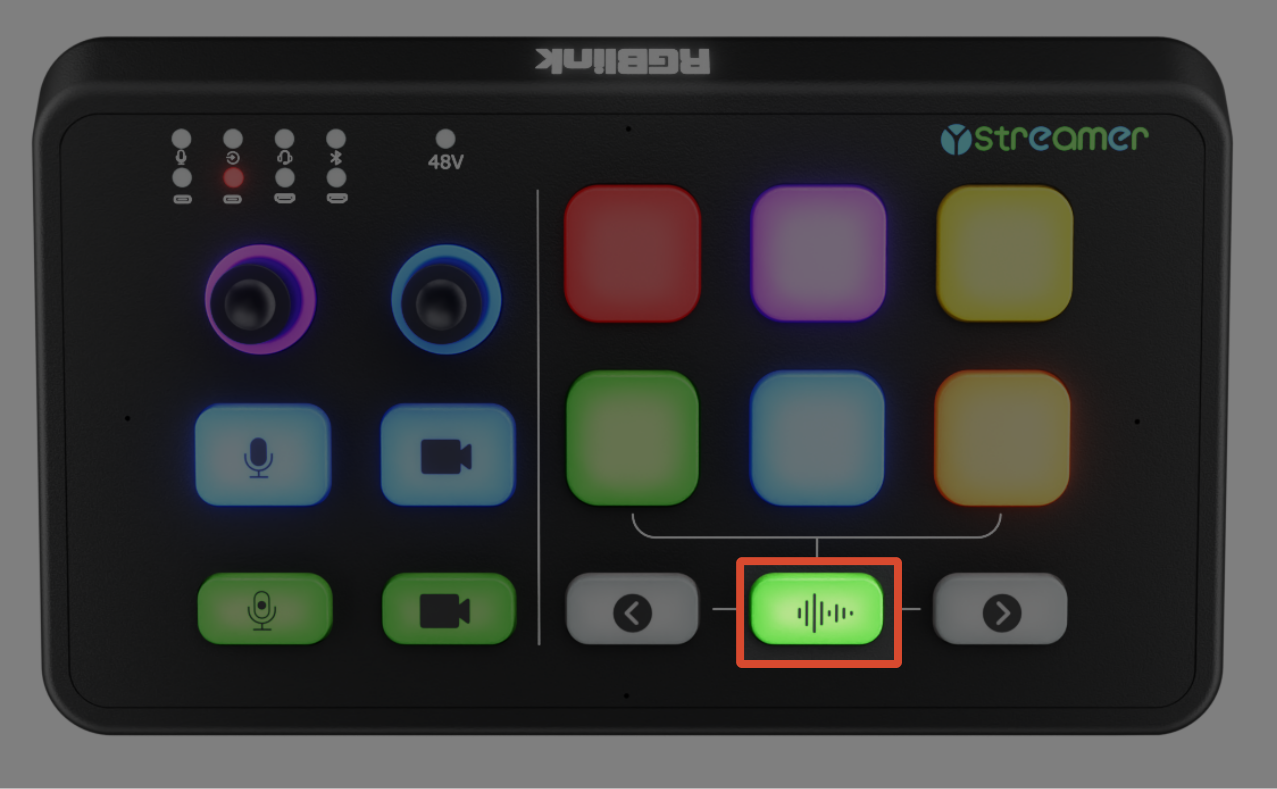
⑨Page Up / Page DownNavigate up/down one page
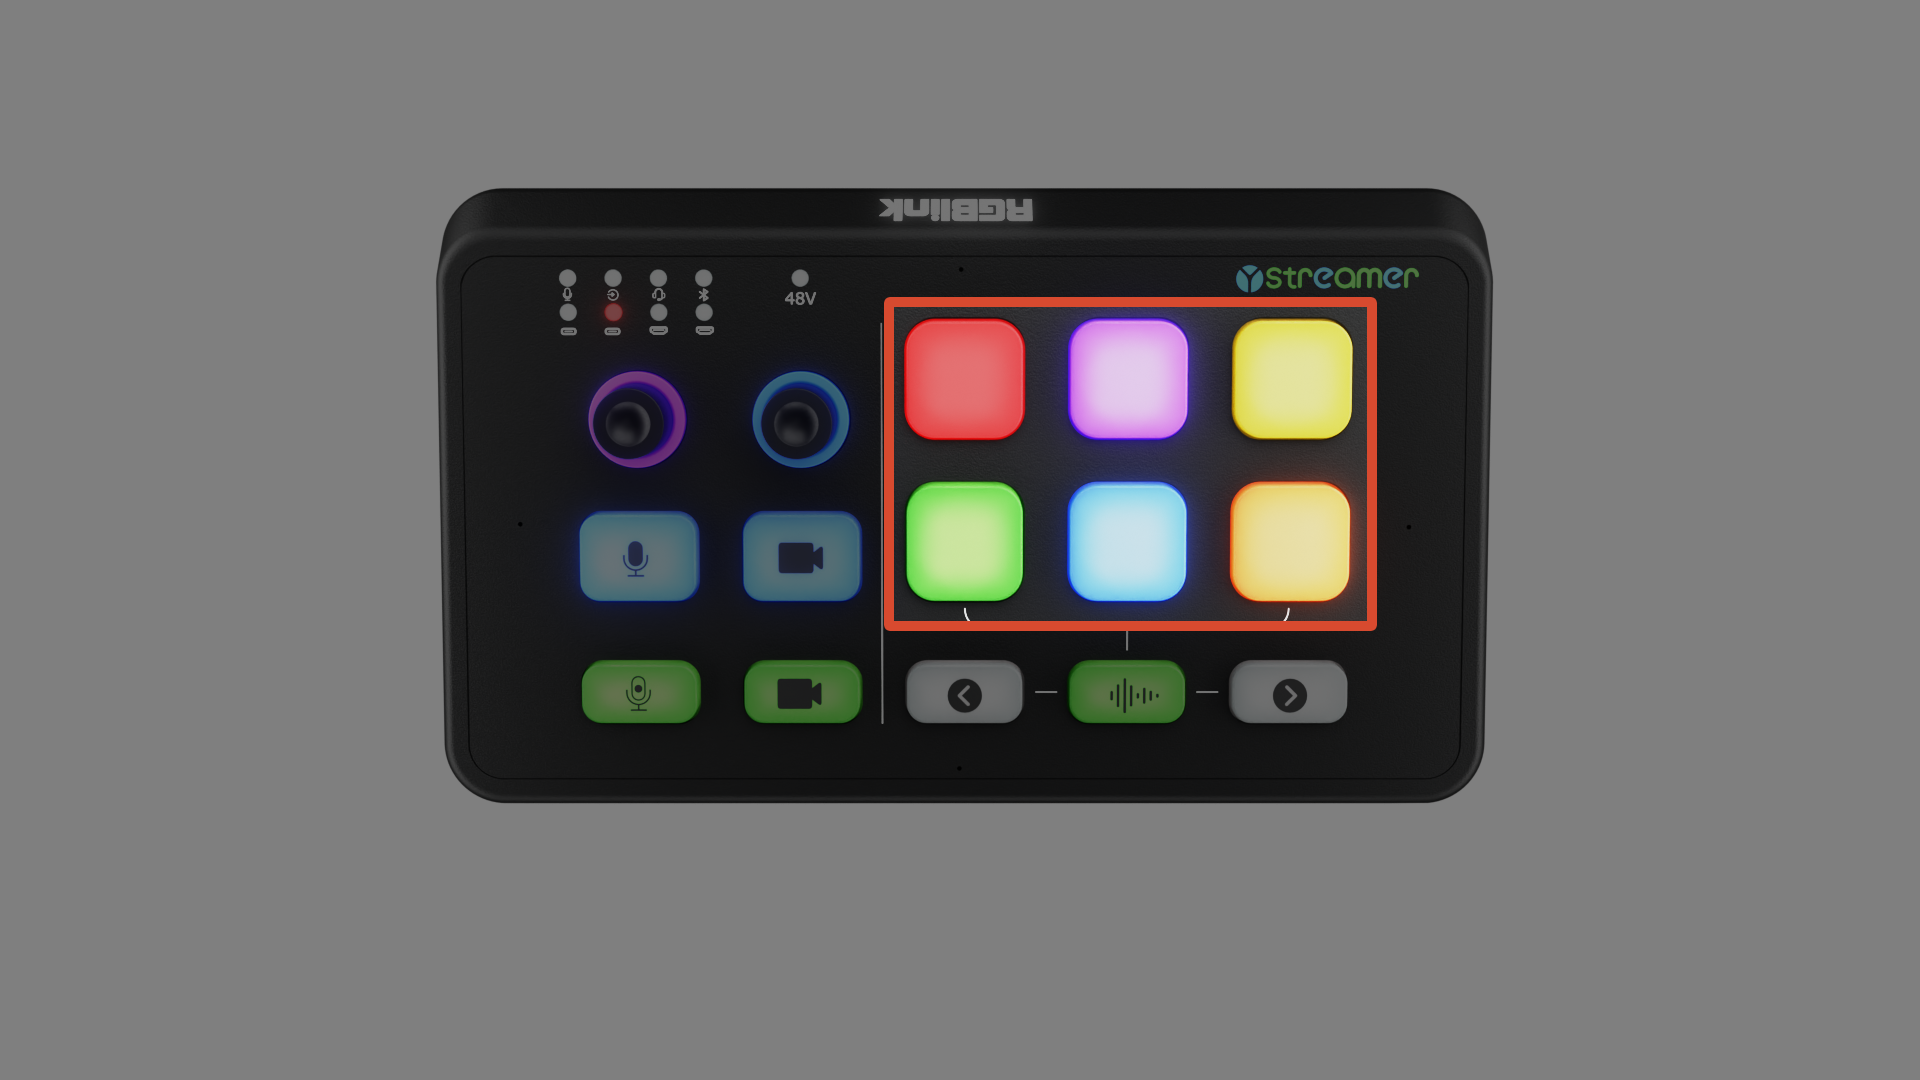
⑩6 Customizable ButtonsSupports 4 pages. 8 factory default sound effects included; all others can be customized via software. Each sound effect is replaceable.
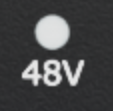
⑪48V Phantom Power IndicatorRed light on when phantom power is enabled; red light off when disabled.

2.2Computer Configuration Requirements

Please follow the table for computer configuration.

HardwareDesktop computerNotebook computer
CPUIntel Core i5-6XXX 8G or aboveIntel Core i7-7700HQ 8G or above
GraphicsNVIDIA GeForce GTX 1060 8G or above
RAM8G or above
PortUSB 3.0/USB 3.1/USB 3.2
SystemWindows® 10 / Windows 8.1 / Windows 7(SP1) / macOS10.15 and above

2.3Use Your Product

Device Application

First-Time Use

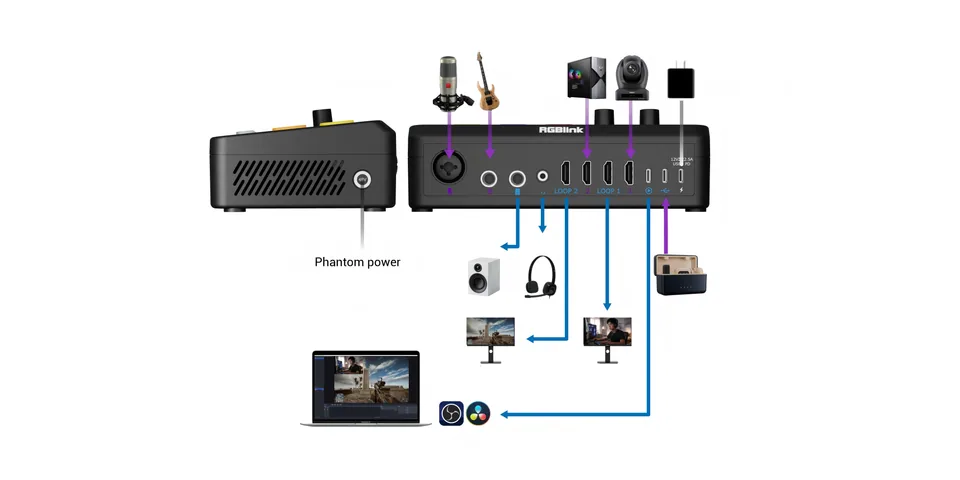
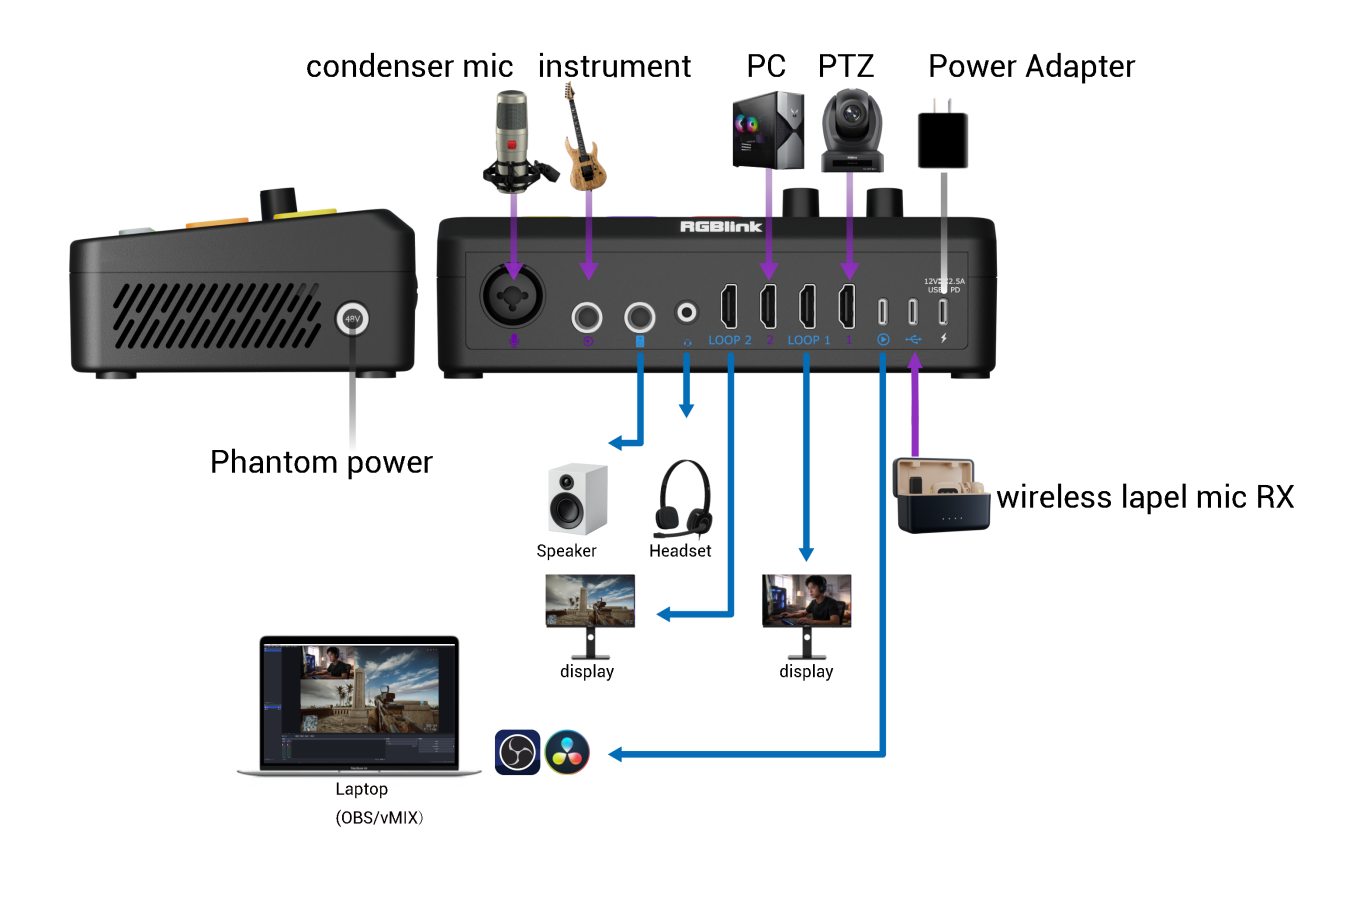
Refer to the diagram above for the overall device connection.

For first-time use, connect in the following order.

Connect signal sources

Use high-quality HDMI cables to connect your PC or camera to HDMI 1 and HDMI 2.

Connect video monitoring devices

Use high-quality HDMI cables to connect LOOP 1 and LOOP 2 to monitors respectively, to monitor the video feeds from HDMI 1 and HDMI 2.

Connect microphones

Connect condenser microphones and electric guitars to XLR and 6.35mm TRS respectively; connect wireless microphone receivers to the corresponding input.

Connect audio monitoring/playback devices

Connect speakers to the 6.35mm TRS port; connect headsets to the 3.5mm TRRS port. Important: If the speakers are powered, to avoid damage during connection, first unplug the speaker power, then connect to Ystreamer, and finally power on the speakers.

Connect outputs
🚨 Before Connecting

The UVC output must be connected directly to a computer. Connection through a USB hub, or other intermediary device is not supported.

Using unsupported intermediary devices may cause the computer to fail to detect the device, or detect it as a USB 2.0 device, which may affect normal operation.

Use a high-quality USB A-C or full-featured USB C-C cable to connect the UVC output port to your streaming host (desktop or laptop).

Connect power

Use the included USB-C cable to connect the power port to the included power adapter (PD 35W), then plug the power adapter into a desktop or wall power outlet.

2.4Revision History

VersionDateDescriptionAuthor
V1.02026-04-13First release.ZFH & ZYL

3III_Ystreamer_User Manual

Thank you for choosing RGBlink Ystreamer.

This manual provides information on the device features, installation and operation.

Before using the device for the first time, please read this manual carefully to ensure safe and proper use of the product.

3.1Declarations

FCC/Warranty

Federal Communications Commission (FCC) Statement

This equipment has been tested and found to comply with the limits for a class A digital device, pursuant to Part 15 of the FCC rules. These limits are designed to provide reasonable protection against harmful interference when the equipment is operated in a commercial environment. This equipment generates, uses, and can radiate radio frequency energy and, if not installed and used in accordance with the instruction manual, may cause harmful interference to radio communications. Operation of this equipment in a residential area may cause harmful interference, in which case the user will be responsible for correcting any interference.

Guarantee and Compensation

RGBlink provides a guarantee relating to perfect manufacturing as part of the legally stipulated terms of guarantee. On receipt, the purchaser must immediately inspect all delivered goods for damage incurred during transport, as well as for material and manufacturing faults. RGBlink must be informed immediately in writing of any complains.

The period of guarantee begins on the date of transfer of risks, in the case of special systems and software on the date of commissioning, at latest 30 days after the transfer of risks. In the event of justified notice of compliant, RGBlink can repair the fault or provide a replacement at its own discretion within an appropriate period. If this measure proves to be impossible or unsuccessful, the purchaser can demand a reduction in the purchase price or cancellation of the contract. All other claims, in particular those relating to compensation for direct or indirect damage, and also damage attributed to the operation of software as well as to other service provided by RGBlink, being a component of the system or independent service, will be deemed invalid provided the damage is not proven to be attributed to the absence of properties guaranteed in writing or due to the intent or gross negligence or part of RGBlink.

If the purchaser or a third party carries out modifications or repairs on goods delivered by RGBlink, or if the goods are handled incorrectly, in particular if the systems are commissioned operated incorrectly or if, after the transfer of risks, the goods are subject to influences not agreed upon in the contract, all guarantee claims of the purchaser will be rendered invalid. Not included in the guarantee coverage are system failures which are attributed to programs or special electronic circuitry provided by the purchaser, e.g. interfaces. Normal wear as well as normal maintenance are not subject to the guarantee provided by RGBlink either.

The environmental conditions as well as the servicing and maintenance regulations specified in this manual must be complied with by the customer.

Operators Safety Summary

The general safety information in this summary is for operating personnel.

Do Not Remove Covers or Panels

There are no user-serviceable parts within the unit. Removal of the top cover will expose dangerous voltages. To avoid personal injury, do not remove the top cover. Do not operate the unit without the cover installed.

Power Source

This product is intended to operate from a power source that will not apply more than 230 volts rms between the supply conductors or between both supply conductor and ground. A protective ground connection by way of grounding conductor in the power cord is essential for safe operation.

Grounding the Product

This product is grounded through the grounding conductor of the power cord. To avoid electrical shock, plug the power cord into a properly wired receptacle before connecting to the product input or output terminals. A protective-ground connection by way of the grounding conductor in the power cord is essential for safe operation.

Use the Proper Power Cord

Use only the power cord and connector specified for your product. Use only a power cord that is in good condition. Refer cord and connector changes to qualified service personnel.

Use the Proper Fuse

To avoid fire hazard, use only the fuse having identical type, voltage rating, and current rating characteristics. Refer fuse replacement to qualified service personnel.

Do Not Operate in Explosive Atmospheres

To avoid explosion, do not operate this product in an explosive atmosphere.

Installation Safety Summary

Safety Precautions

For all product installation procedures, please observe the following important safety and handling rules to avoid damage to yourself and the equipment.

To protect users from electric shock, ensure that the chassis connects to earth via the ground wire provided in the AC power Cord.

The AC Socket-outlet should be installed near the equipment and be easily accessible.

Unpacking and Inspection

Before opening product shipping box, inspect it for damage. If you find any damage, notify the shipping carrier immediately for all claims adjustments. As you open the box, compare its contents against the packing slip. If you find any shortages, contact your sales representative.

Once you have removed all the components from their packaging and checked that all the listed components are present, visually inspect the system to ensure there was no damage during shipping. If there is damage, notify the shipping carrier immediately for all claims adjustments.

Site Preparation

The environment in which you install your product should be clean, properly lit, free from static, and have adequate power, ventilation, and space for all components.

1About Your Product

Meet Ystreamer

Ystreamer is a capture and production device that combines dual HDMI 2.0 video capture, professional audio mixing, and creator controls in a single unit.

A single USB-C connection delivers two HDMI video streams (up to 4K60) with embedded audio to your computer, where they appear as two independent UVC video sources for streaming, recording, or video conferencing applications such as OBS Studio, vMix, and so on.

Ystreamer also supports XLR microphones, instrument inputs, Bluetooth audio, monitoring outputs, and customizable shortcut buttons, making it ideal for live streaming, podcasting, online meetings, and other content creation workflows.


Key Features

  • Dual HDMI 2.0 Capture
    Capture two HDMI video sources with embedded audio simultaneously. Both video streams are delivered to the computer over a single USB-C connection and appear as independent UVC devices.
  • All-in-One Audio and Video Workflow
    Combines video capture, audio mixing, monitoring, recording, and hardware controls in one compact device, reducing equipment and cable clutter.
  • Professional Audio Connectivity
    Supports 48 V phantom power, XLR microphones, instruments, TRRS headsets, Bluetooth audio, and other audio sources.
  • Optimized Audio Modes
    Includes Call, Streaming, Gaming, Bluetooth, and Custom modes for different production scenarios.
  • Creator Controls
    Provides dedicated controls for mute, HDMI black screen, recording, page navigation, and customizable shortcut buttons.

Typical Applications

  • Game Streaming
    Capture gameplay and camera video simultaneously with synchronized audio for live streaming.
  • Video Conferencing
    Combine presentation content and a camera feed while providing echo cancellation and audio monitoring.
  • Video Podcasting
    Record professional podcasts with XLR microphones and dual-camera video.
  • Online Teaching
    Capture the instructor and presentation content simultaneously for remote learning.
  • Music Performance
    Record vocals and instruments such as electric guitar or bass in a single workflow.
  • And more...

1.1In the Box

1×Device1×Adapter1×USB-C Cable1×USBA/C-C Cable
Document imageDocument imageDocument imageDocument image
📢  Notes

Use the included power adapter whenever possible.

If a third-party adapter is used, ensure it provides at least 12 V/2.5 A to maintain stable system performance.

1.2Button Panel

NO.ItemsDescription
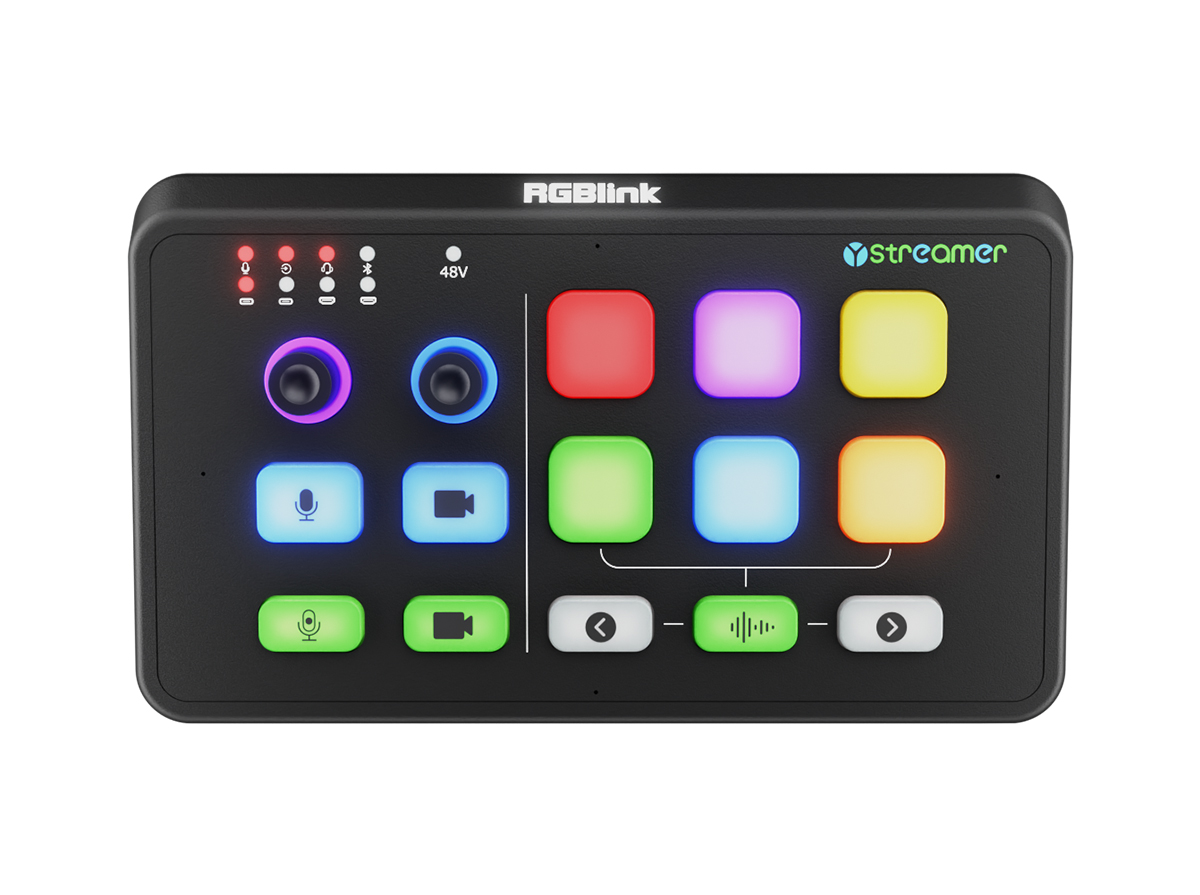
①Audio Input Source Selection IndicatorDefault state: Displays real-time audio level for 8 input channels. + Green (50%): Muted + Green: Normal level + Orange: High level + Red: Overload Selected state: Displays status of the currently selected input channel only. + Selected: Indicator is on and shows corresponding status + Not selected: Indicator is off. The input sources, from top to bottom and left to right, are: XLR, TRS, TRRS, Bluetooth; UAC 1, UAC 2, HDMI 1, HDMI 2
②Input Volume AdjustmentPress to select an audio input source, then rotate to adjust its volume. Knob LED Status: + Purple: Current volume level + Red: Remaining volume range + Solid Red: Muted
③Output Volume AdjustmentRotates to adjust the monitor output volume. Press to mute or unmute. Knob LED Status: + Blue: Current volume level + Red: Remaining volume range + Solid Red: Muted
④HDMI 1 UVC Output Black Screen ControlControl HDMI 1 video output to the computer. Status: + Blue (Default): Video output + Red: Black screen output
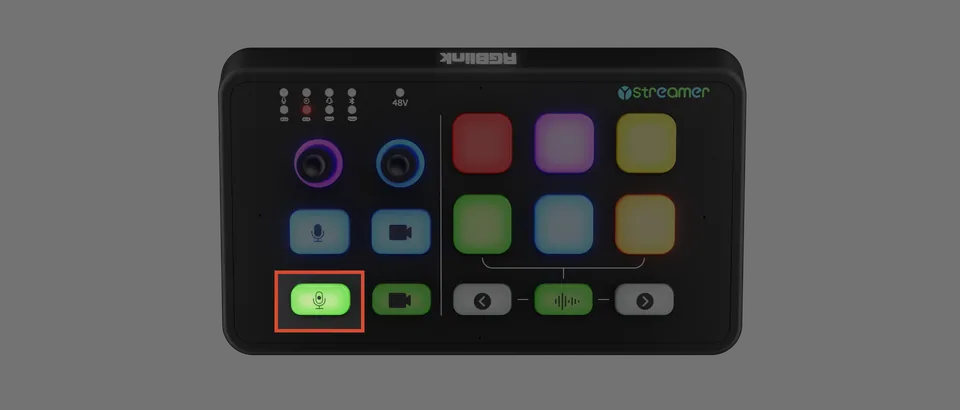
⑤MuteMutes or unmutes all the audio input. Status: + Blue: Unmuted + Red: Muted
⑥RecordStarts or stops audio recording. Status: + Red: Recording + Blue: Stopped If no USB storage device is connected, the indicator flashes rapidly three times and remains blue.
⑦HDMI 2 UVC Output Black Screen ControlControl HDMI 2 video output to the computer. Status: + Blue (Default): Video output + Red: Black screen output
⑧Built-in MicrophoneTurns the built-in microphone on or off.
⑨Page Up / Page DownMoves to the previous or next page.
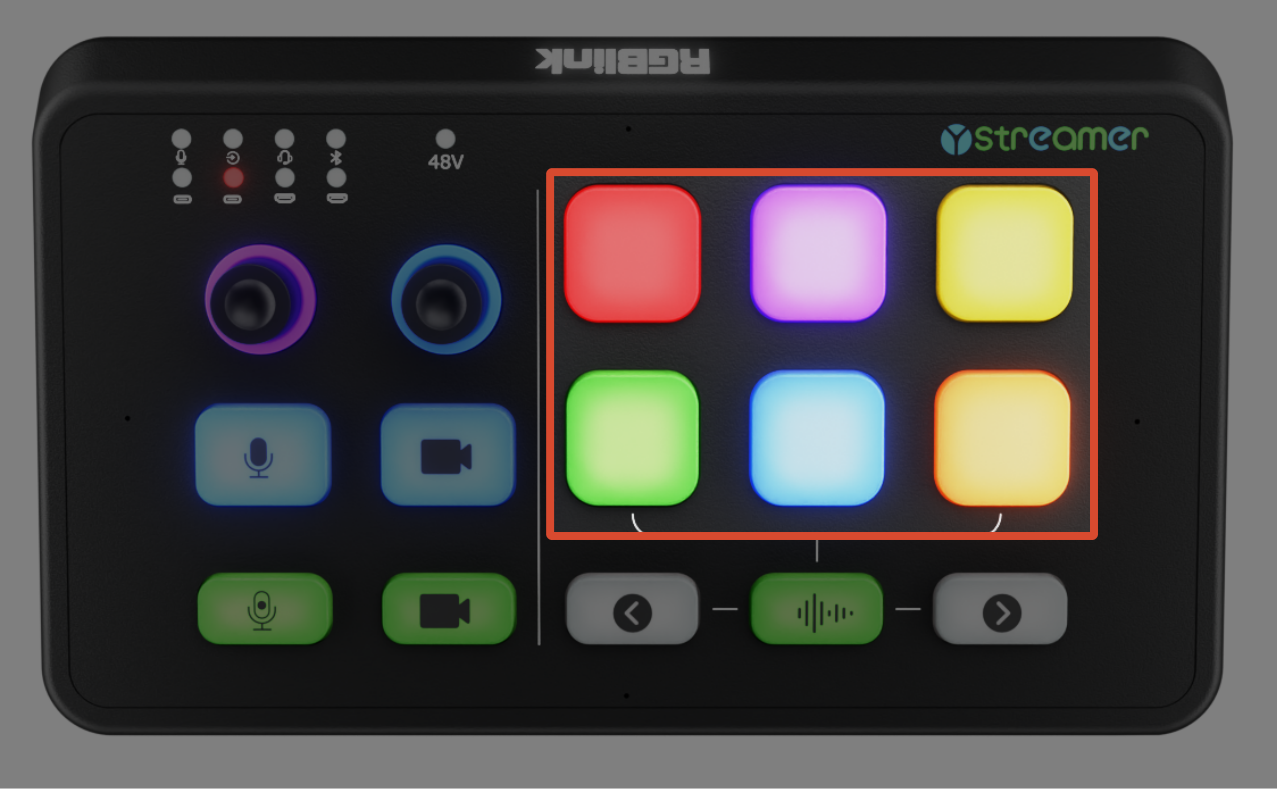
⑩6 Customizable ButtonsSix customizable shortcut buttons with built-in sound effects by default. Customizable buttons (3 pages, up to 18 buttons) can be configured via the TAO APP.
⑪48V Phantom Power IndicatorIndicates the 48 V phantom power status. Status: + Red: On + Off: Off

1.3Ports and Controls

Rear Panel

NO.ItemsDescription
①USB-C Power PortSupports PD protocol, 12V 2.5A.
②UAC Input & OutputAudio input and output.
③UVC Output & UAC Input/OutputVideo capture output, audio input, and auxiliary audio output.
④HDMI 1 InputHDMI video input.
⑤LOOP 1HDMI 1 loop-through output.
⑥HDMI 2 InputHDMI video input.
⑦LOOP 2HDMI 2 loop-through output.
⑧3.5 mm TRRSAnalog audio input and output.
⑨6.35 mm TRS OutputAnalog audio output.
⑩6.35 mm TRS InputAnalog audio input.
⑪XLR / 6.35 mm TS InputMicrophone or instrument input with 48 V phantom power support.

Front Panel

Document image

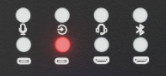
The LED light bar indicates the connection status of the HDMI input sources.

StatusLED Color
HDMI 1Green: Input connected Red: No input
HDMI 2Green: Input connected Red: No input
📢 Notes

The LED light bar indicates HDMI input connection status only. It does not indicate whether video is being output correctly. 

To verify the video output, check the UVC output or the HDMI loop output.  

Right Panel

Document image

A physical 48 V phantom power button is located on the right panel.

Press and hold for 3 seconds to turn phantom power on or off.

When enabled, the 48 V indicator on the control panel lights up, providing power to condenser microphones and other devices that support phantom power.

🚨  Warning

Do not plug or unplug microphones or audio cables while phantom power is enabled. This may damage the device.

📢 Notes

- Dynamic microphones do not require phantom power.
- Ensure connected devices support 48 V phantom power before enabling.

2Install Your Product

📢  Notes

Connect all cables before powering on the device.

Connecting Video Sources

Document image

Connect your video sources to the HDMI 1 and HDMI 2 inputs on the rear panel using HDMI 2.0 cables.

Supported sources include PCs, 4K cameras, PTZ cameras, and other HDMI devices.

If no HDMI signal is detected, the capture output displays a NO SIGNAL test screen.

📢  Notes

Use certified HDMI 2.0 cables (18 Gbps).

A single 4K@60 signal requires approximately 14.4 Gbps of bandwidth. Low-quality cables may cause image artifacts, frame drops, or signal loss.

Connecting Video Monitors

Document image

The HDMI Loop outputs provide a direct pass-through of the original HDMI signals for local monitoring.

  • Connect LOOP 1 to a monitor to view the HDMI 1 source.
  • Connect LOOP 2 to a monitor to view the HDMI 2 source.
📢  Notes

HDMI Loop output is available only after the computer successfully recognizes the UVC device. 

Connecting Microphones and Other Devices

🚨 Warining

Before enabling 48 V phantom power, make sure the connected microphone supports phantom power.  

Document image

Condenser Microphone (48 V Phantom Power Required)

  • Connect the microphone to the XLR Combo input using an XLR cable.
  • Press and hold the +48V button on the right panel for 3 seconds.
  • Wait until the 48 V indicator turns red.
  • Confirm the microphone is working properly.

Dynamic Microphone

  • Connect the microphone to the XLR Combo input using an XLR cable.
  • Do not enable 48 V phantom power.

Instrument (Electric Guitar / Bass)

  • Connect the instrument to the 6.35 mm TS jack of the XLR Combo input using a 6.35 mm TS cable.
  • Phantom power is not required.

External Audio Device (Line-in)

Document image

Connect the headphone or line output of a phone, tablet, or other audio device to the Line-in port using a 6.35 mm TRS cable.

📢  Tips

Some Line-out devices may introduce background noise. An audio isolator is recommended to reduce interference.  

Wireless Microphone Receiver (USB Audio)

Document image

Connect the USB receiver (such as a wireless lavalier receiver) to the UAC or UVC/UAC port on the rear panel.

Headset

Document image

Connect a 3.5 mm TRRS headset to the TRRS port for simultaneous audio input and monitoring.

Connecting Audio Monitoring Devices

Powered Speakers

🚨 Warning

Turn off the speakers before connecting them. Connect the 6.35 mm TRS cable first, then power the speakers on to avoid speaker damage caused by power-on transients.
Monitoring Headphones

Connect headphones using either:

  • a 6.35 mm TRS plug, or
  • a 3.5 mm TRRS plug.

Connecting Computers (UVC)

🚨 Warning

Connect the UVC port directly to the computer. Do not use a USB hub or other intermediary devices. 

Otherwise, the device may not be detected or may operate as a USB 2.0 device.  

Document image

Make sure your computer meets the Computer Configuration Requirements (Please check this chapter in Quick Start).

  • Connect the UVC Output port to a USB 3.0 (or later) port on the computer using a USB-A to USB-C cable or a full-featured USB-C cable.
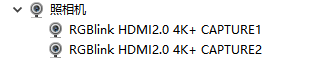
  • Once connected, RGBlink HDMI2.0 4K+ CAPTURE1/2 appears in Device Manager (Windows) or System Information (macOS). No driver installation is required.

Device Info Example

📢  Notes

USB 2.0 does not provide sufficient bandwidth for dual 4K video streams. Use a USB 3.0 port whenever possible. If your computer only has USB-C ports, use a **full-featured USB-C cable**, not a charging-only cable. 

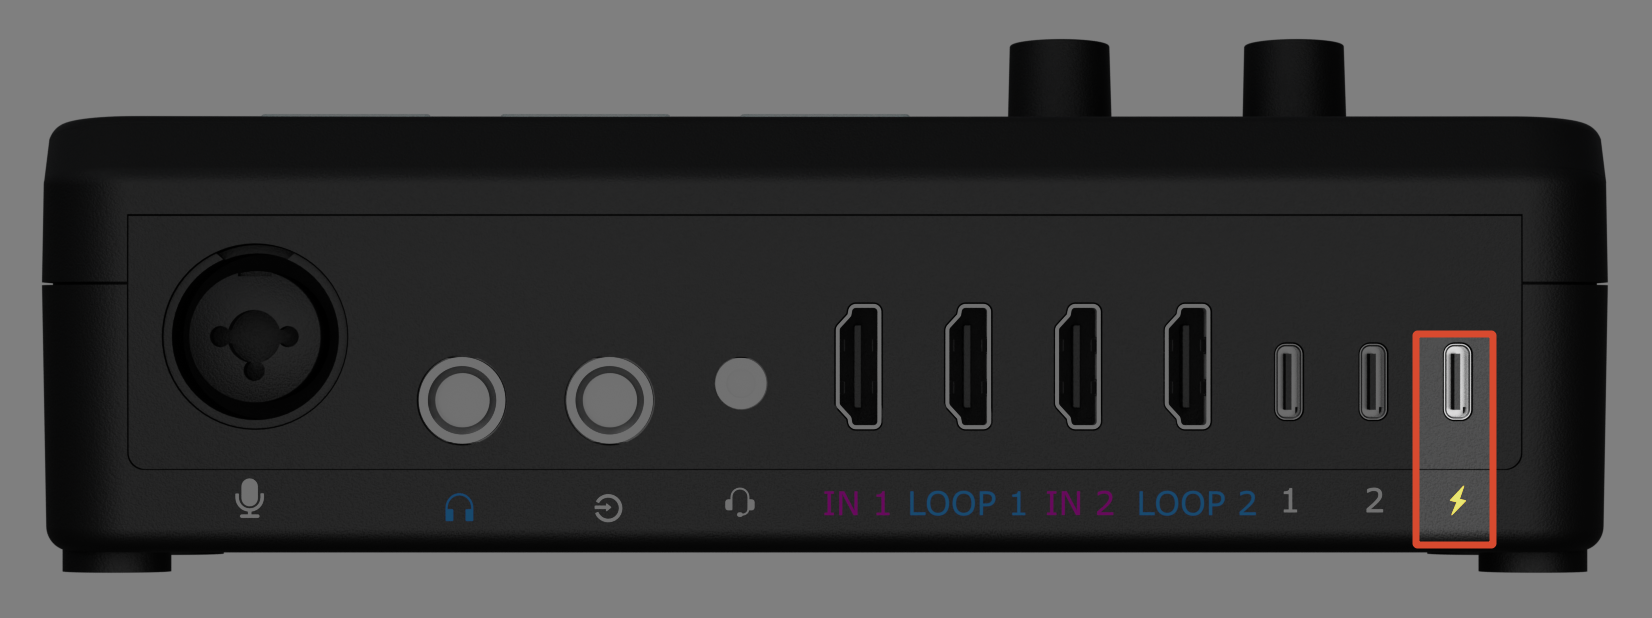
Connecting Power

Document image

  • Connect the supplied USB-C power cable to the USB-C Power port.
  • Connect the other end to the supplied PD power adapter, then plug the adapter into an AC outlet.
  • The device powers on automatically. No power switch is required.
  • The front-panel LED light bar illuminates in approximately 5 seconds, indicating the device is ready.
📢  Notes

The button panel may take up to 20 seconds to light up. Use the front-panel LED light bar to confirm that the device has started successfully.  

3Use Your Product

Once installation and setup are complete, refer to this chapter for operating instructions.

The interfaces, images, and illustrations in this chapter are for reference only. Actual displays may vary by version. Please refer to the actual interface on your device.

3.1Operation

Volume Control

Ystreamer let you adjust volumes of individual audio inputs and monitoring output independently.

Adjusting an Input Volume

  1. Rotate the Input Volume Adjustment knob to select an input channel. The corresponding input indicator lights green.
  2. Rotate the knob again to adjust the volume of the selected input.
  3. Press the knob to switch to the next input channel.

Knob Ring Light Status:

StatusDescription
PurpleCurrent volume level
RedRemaining volume range
Solid RedMuted
Adjusting the Monotoring Volume

Rotate the Output Volume Adjustment knob to adjust monitoring volume for connected speakers and headphones.

Knob Ring Light Status:

StatusDescription
BlueCurrent volume level
RedRemaining volume range
Solid RedMuted
Mute and Black Screen
Muting Audio Inputs

Press the Mute button to mute or unmute all audio inputs.

StatusDescription
BlueAudio active
RedMuted
Muting the Monitoring Output

Press the Output Volume Adjustment knob to mute or unmute the monitoring output.

HDMI Black Screen

Press the HDMI 1 or HDMI 2 UVC Output Black Screen Control to switch the corresponding UVC output between live video and a black screen.

StatusDescription
BlueVideo output enabled
RedBlack screen output enabled
📢  Notes

Volume settings and related parameters are saved automatically after approximately 5 seconds. The last saved settings are restored when the device restarts.

48V Phantom Power

🚨  Warning

Never enable 48V phantom power when using a dynamic microphone. Doing so may damage the microphone.

  1. Make sure 48V phantom power is turned off.
  2. Connect the XLR cable securely to the microphone and the device.
  3. Press and hold the 48 V phantom power button on the right panel for approximately** 3** seconds.
  4. Wait until the 48V Phantom Power Indicator turns red.
  5. To disable phantom power, press and hold the button again for 3 seconds until the indicator turns off.
  6. Wait approximately 5–10 seconds for any residual voltage to dissipate.
  7. Disconnect the XLR cable and remove the microphone.

Using the Built-in Microphone

Ystreamer features a built-in four-microphone array for audio capture without an external microphone. It is suitable for meetings, online classes, and similar applications.

  1. Press the Built-in Microphone button to enable the built-in microphone.
  2. Press the button again to disable it.
📢  Notes

- Built-in microphone audio is available only through USB audio. It is not routed to Line-out or the monitoring outputs.
- For live streaming, podcasting, and other applications requiring higher audio quality, an external XLR microphone is recommended.

Audio Recording

Audio recording saves the current mixed audio output to an external USB storage device.

🚨 Before Recording

- Connect a supported USB storage device before recording.
- Make sure the computer has recognized Ystreamer before starting recording.
- If no USB storage device is connected, pressing the Record button causes the indicator to flash rapidly three times and remains blue.
- Connect USB-A storage devices using an OTG adapter.

  1. Press the Record button. The indicator turns red and recording starts.
  2. Press the button again. The indicator turns blue and recording stops.
  • If recording is started or stopped from the device, the recording status in the TAO APP may not update immediately. Refresh the page if needed.
  1. The recording is saved automatically.
  • Audio files are saved in the Audio folder in the root directory of the storage device. A new subfolder is created automatically each day.
  • Audio is recorded at approximately 1.5 Mbps (about 663 MB per hour).
  • Recording files are split automatically when they reach 3.7 GB. Recording stops automatically when the storage device is full.
📢  Notes

- Supports FAT32 and exFAT. NTFS is not supported.
- External hard drives require an independent power supply for stable recording. 
- Wait a few moments after recording stops before disconnecting the storage device. Removing it too early may corrupt the recording. 
- If the device is not synchronized with an NTP server, recorded timestamps may be inaccurate. 

Customizable Buttons

Six customizable shortcut buttons with built-in sound effects by default.

Customizable buttons (3 pages, up to 18 buttons) can be configured via the TAO APP. Please update your TAO APP (Android) to version 2.10.11 or later. The iOS version will be available in future updates.

3.2Capture and Streaming

Ystreamer captures and outputs two HDMI sources simultaneously over a single USB-C connection.

When connected to a computer, Ystreamer will be recognized as two independent UVC video devices, corresponding to HDMI 1 and HDMI 2.

In live streaming or conferencing applications, both video streams appear as separate camera devices named RGBlink HDMI2.0 4K+ CAPTURE1 and RGBlink HDMI2.0 4K+ CAPTURE2, allowing them to be used independently in different layouts and workflows.

Supported Capture Formats

Each UVC video stream supports the following formats and resolutions. Both streams can be output simultaneously.

FormatSupported Resolutions
MJPEG1920×1080@25/30/40/60/100/120/144/240, 2560×1080@60, 2560×1440@60/144, 3840×2160@25/30/45/50/60
NV121920×1080@25/30/40/60/100/120, 2560×1080@60, 2560×1440@60, 3840×2160@30
YUY21920×1080@25/30/40/60, 2560×1080@60, 2560×1440@60, 3840×2160@25/30
RGB241920×1080@25/30/40/60
I4201920×1080@60/100/120, 3840×2160@30
P0101920×1080@60
📢  Notes

MJPEG is recommended format for the best streaming performance and lower USB bandwidth usage.

- 4K@60: MJPEG is required. 
- 4K@30: MJPEG or uncompressed formats such as YUY2 are supported.
- 1080p@60 and below: MJPEG is recommended. YUY2, NV12, I420, RGB24, and P010 are also supported.

Configuring Dual Video Capture

OBS Studio
  1. Create or select a scene.
  2. Add a Video Capture Device source.
  3. Select RGBlink HDMI2.0 4K+ CAPTURE1 for the HDMI 1 input.
  4. Set the preferred resolution, frame rate, and video format. 1920 × 1080, 60 fps, MJPEG is recommended.
  5. Add a second Video Capture Device source and selectRGBlink HDMI2.0 4K+ CAPTURE2. OBS automatically detects the HDMI 2 input.
  6. Arrange both video sources as needed.
📢  Tips

If OBS reports that the selected resolution is too high, manually reduce the capture resolution to 1920 × 1080 or lower.  

vMIX
  1. Add two Video inputs.
  2. Open the settings for one input.
  3. Select a layout in the Layers tab, such as Side by Side or Picture in Picture.
  4. Assign the second video source to an available layer.
  5. Adjust the layout as required.

For detailed instructions, refer to the vMix documentation: vMix User Guide

TikTok LIVE Studio
  1. Under the Scenes, select the Landscape.
  2. Click Add source > Camera.
  3. Select RGBlink HDMI2.0 4K+ CAPTURE1 for the HDMI 1 input.
  4. Add a second camera source and select the HDMI 2 input RGBlink HDMI2.0 4K+ CAPTURE2.
  5. If prompted, change the capture settings to 1920×1080, MJPEG, 60 fps.

For detailed instructions, refer to the TikTok documentation: LIVE Studio: Adding a camera source

Zoom

Zoom supports only one native camera input.

To display both HDMI sources simultaneously:

  1. Configure both video sources in OBS Studio.
  2. In Zoom, select OBS Virtual Camera as the camera source.
Microsoft Teams Rooms

Microsoft Teams Rooms supports multiple camera views and camera switching.

For detailed instructions, refer to the Microsoft documentation: Multiple camera view in Teams Rooms - Microsoft Teams

3.3TAO APP

Most Ystreamer functions can be operated directly from the front panel. For advanced configuration and device management, use the TAO APP.

3.3.3.13.3.1 TAO APP Configuration

Download the TAO APP

Option 1: Scan the QR code

TAO APP QR CODE

Option 2: Download from an app store

For the latest version and the best security, download TAO from an official app store.

🔔  Ystreamer is currently supported on TAO for Android 2.10.6 or later. Support for iOS will be available in a future release.  

Supported App Stores:

  • Huawei: AppGallery
  • Xiaomi: GetApps
  • OPPO: OPPO App Market
  • VIVO: V-Appstore
  • HONOR: HONOR App Market
  • Google: Pixel Google Play
  • ...
📢  Notes
If the TAO APP cannot be found or installed, update your phone's operating system and try again.

Sign Up and Log In

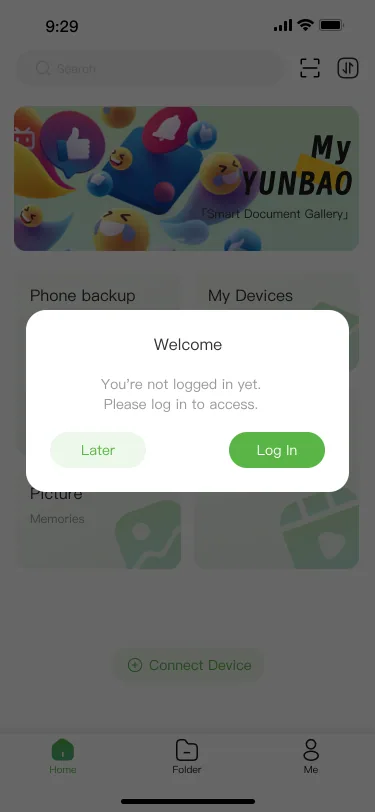
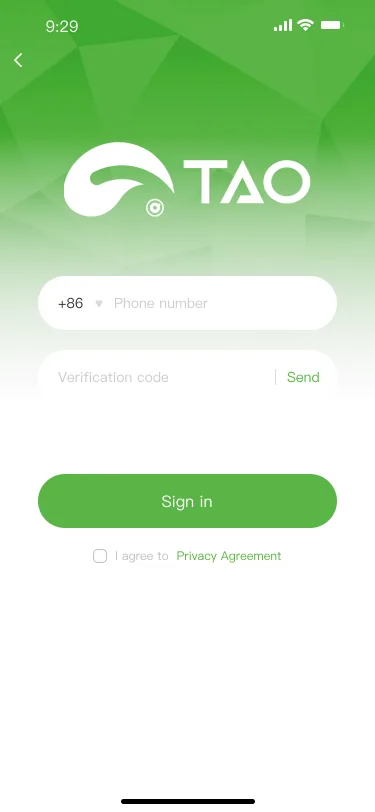
  • Launch the TAO APP and sign in with your mobile phone number.
  • Enter your phone number.
  • Tap Send Verification Code.
  • Enter the verification code.
  • Accept the Privacy Policy and complete sign-in.
①②③
Document imageDocument imageDocument image

Powering On

  • Connect the supplied USB-C cable to the power input.
  • Connect the supplied PD power adapter.
  • Plug the adapter into an AC outlet.

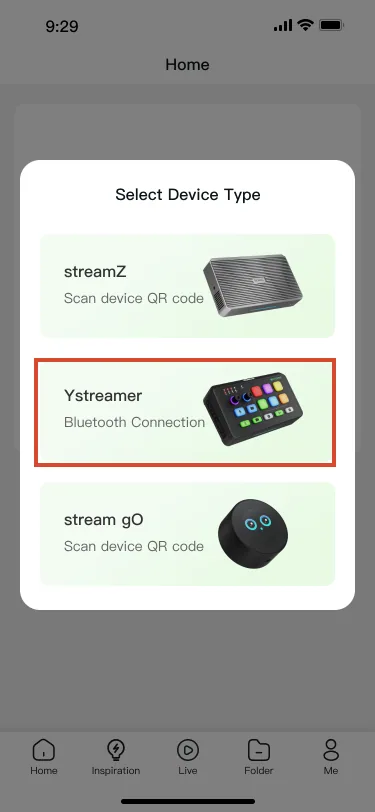
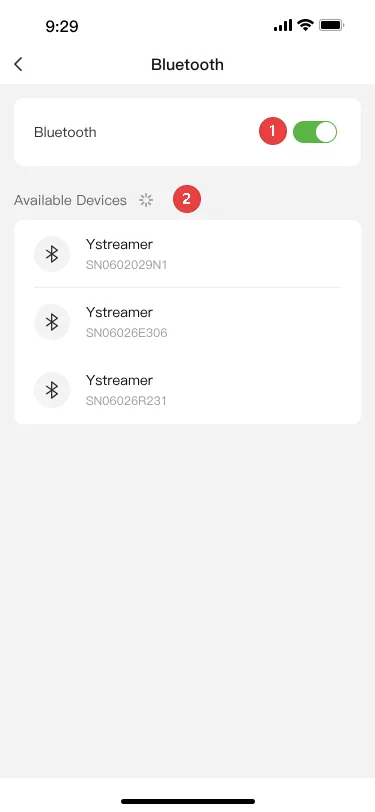
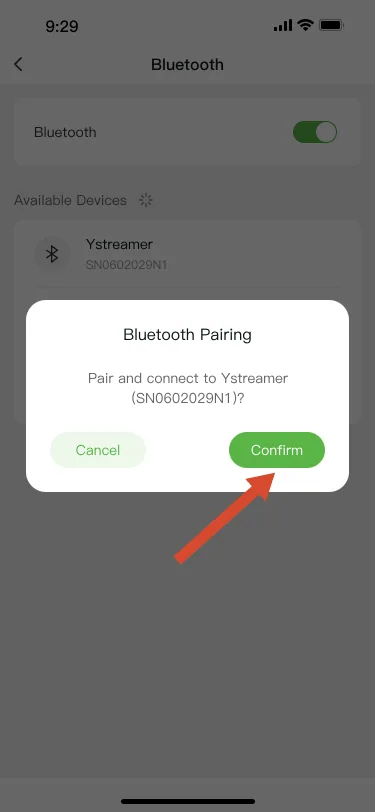
Pairing Ystreamer

①②③④
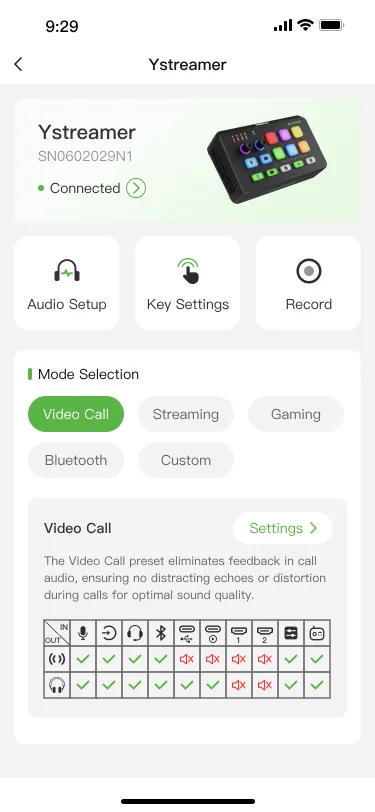
In the home page, select a device type.Enable Bluetooth, select Ystreamer from the list.Verify the device serial number (SN), then tap Confirm.After pairing, APP will opens the device control page in Video Call Mode.
Document imageDocument imageDocument imageDocument image

3.3.3.23.3.2 APP Operation

1. Device Information

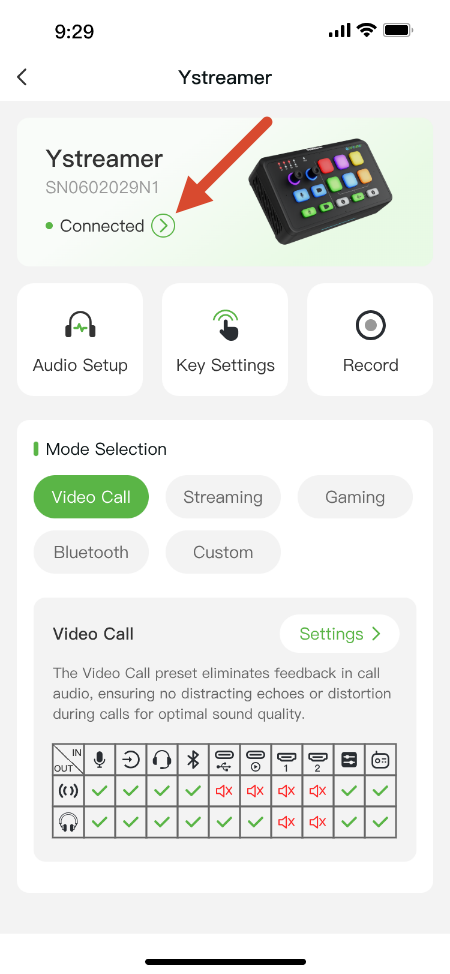
①②
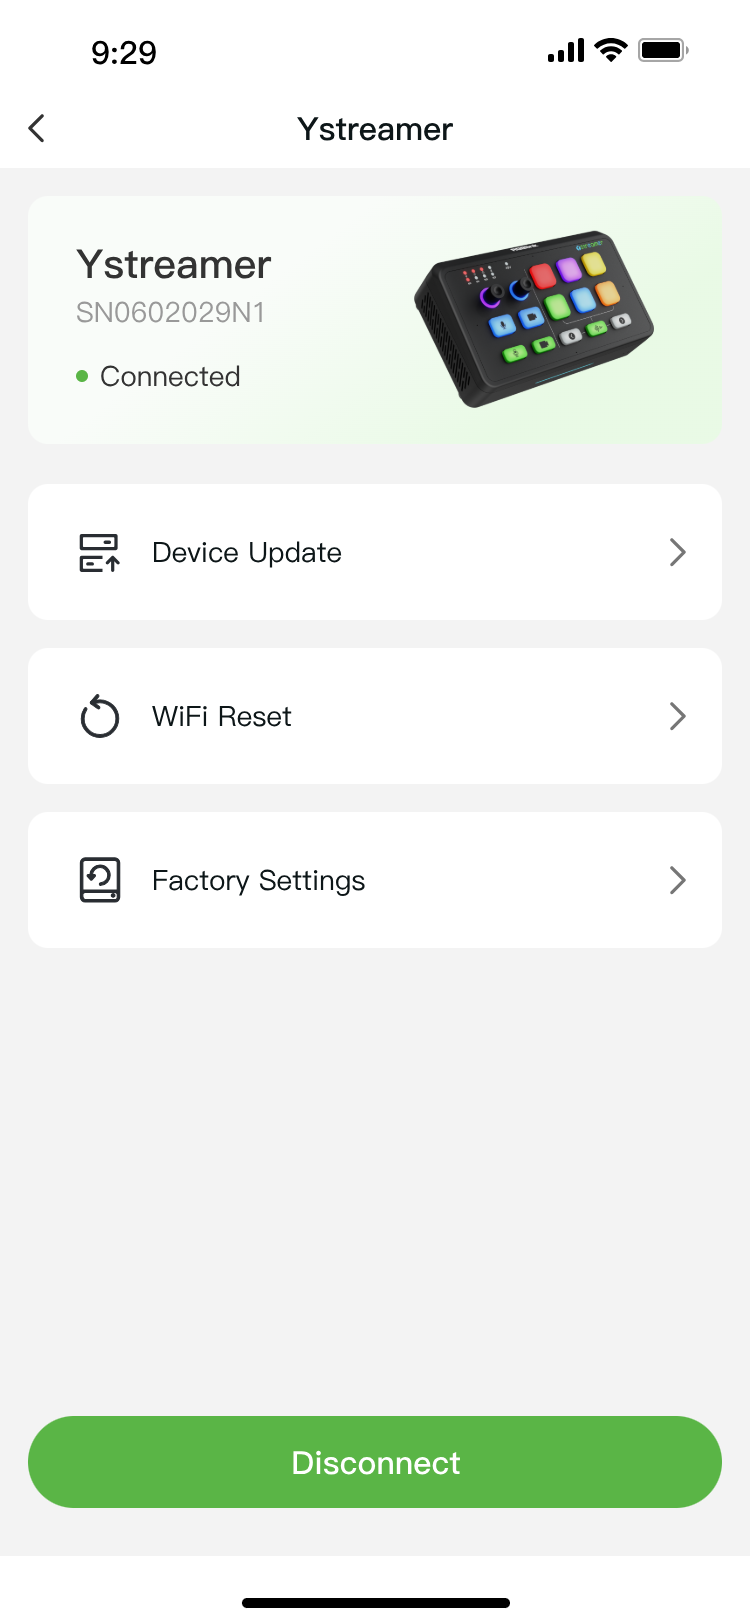
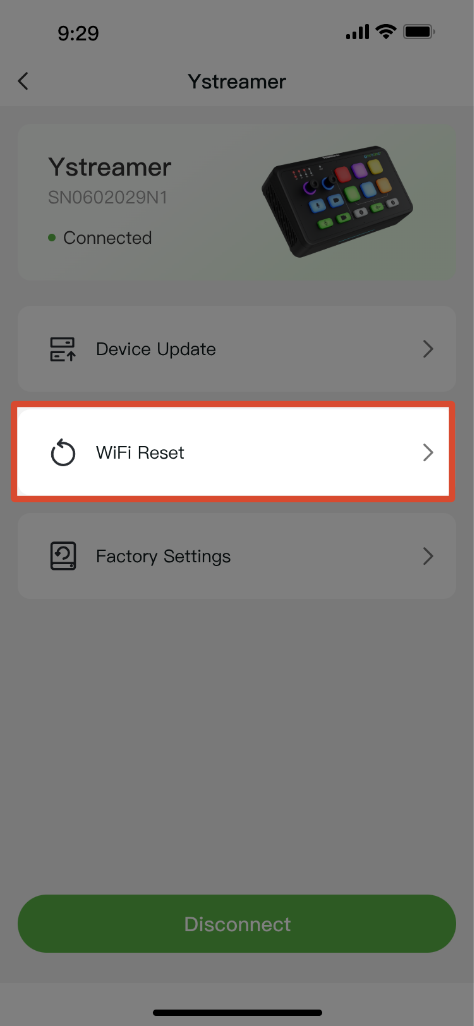
Tap Right Arrow to open the Device Information page.From this page, you can: + Device Update + Wi-Fi Reset + Factory Settings + Disconnect the device
1) Device Update
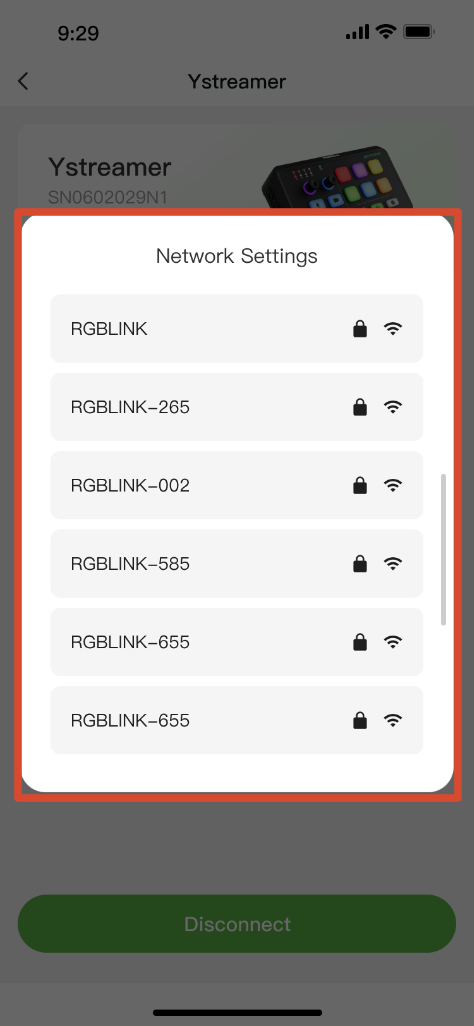
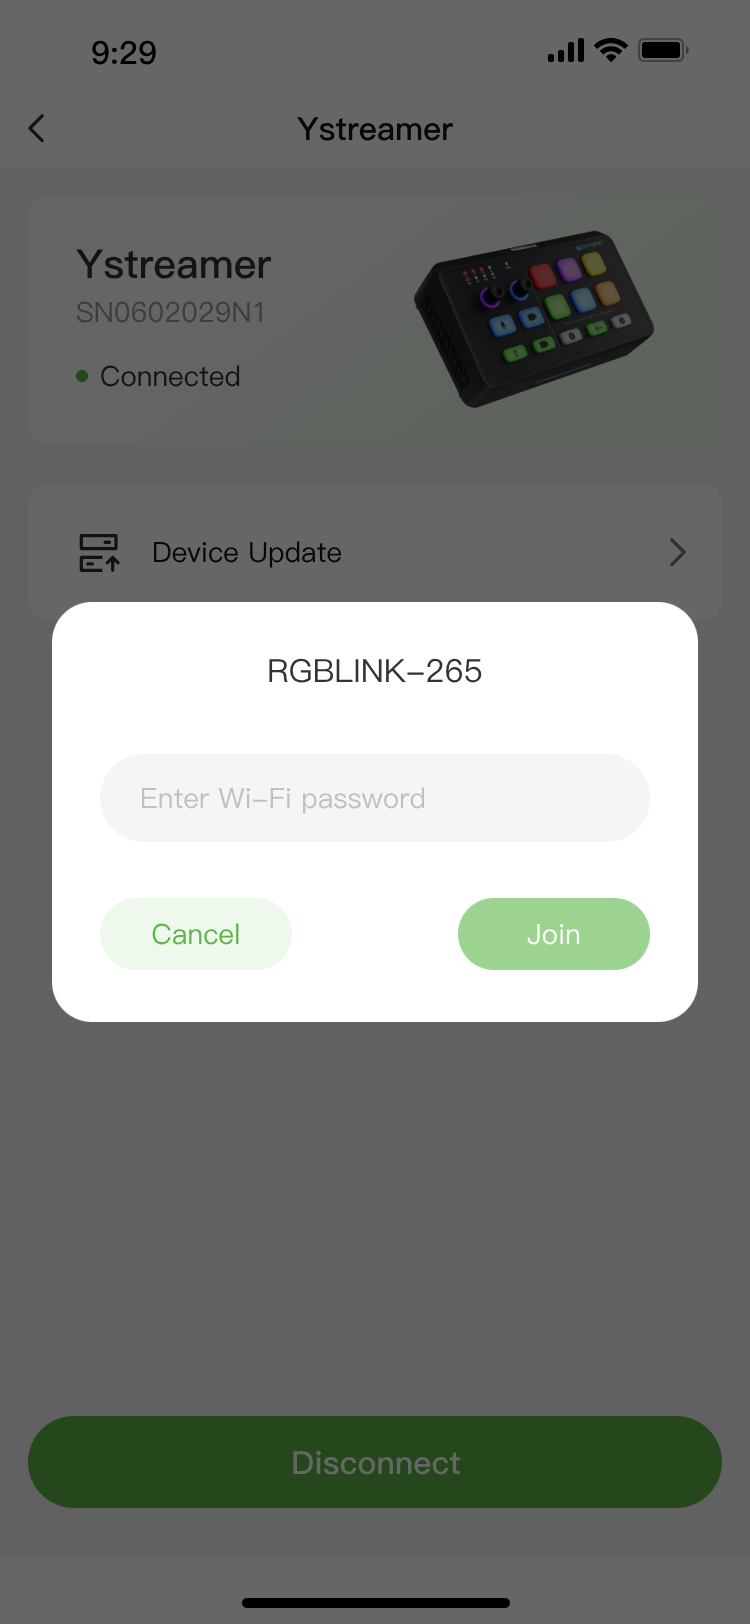
  • Connect to Wi-Fi
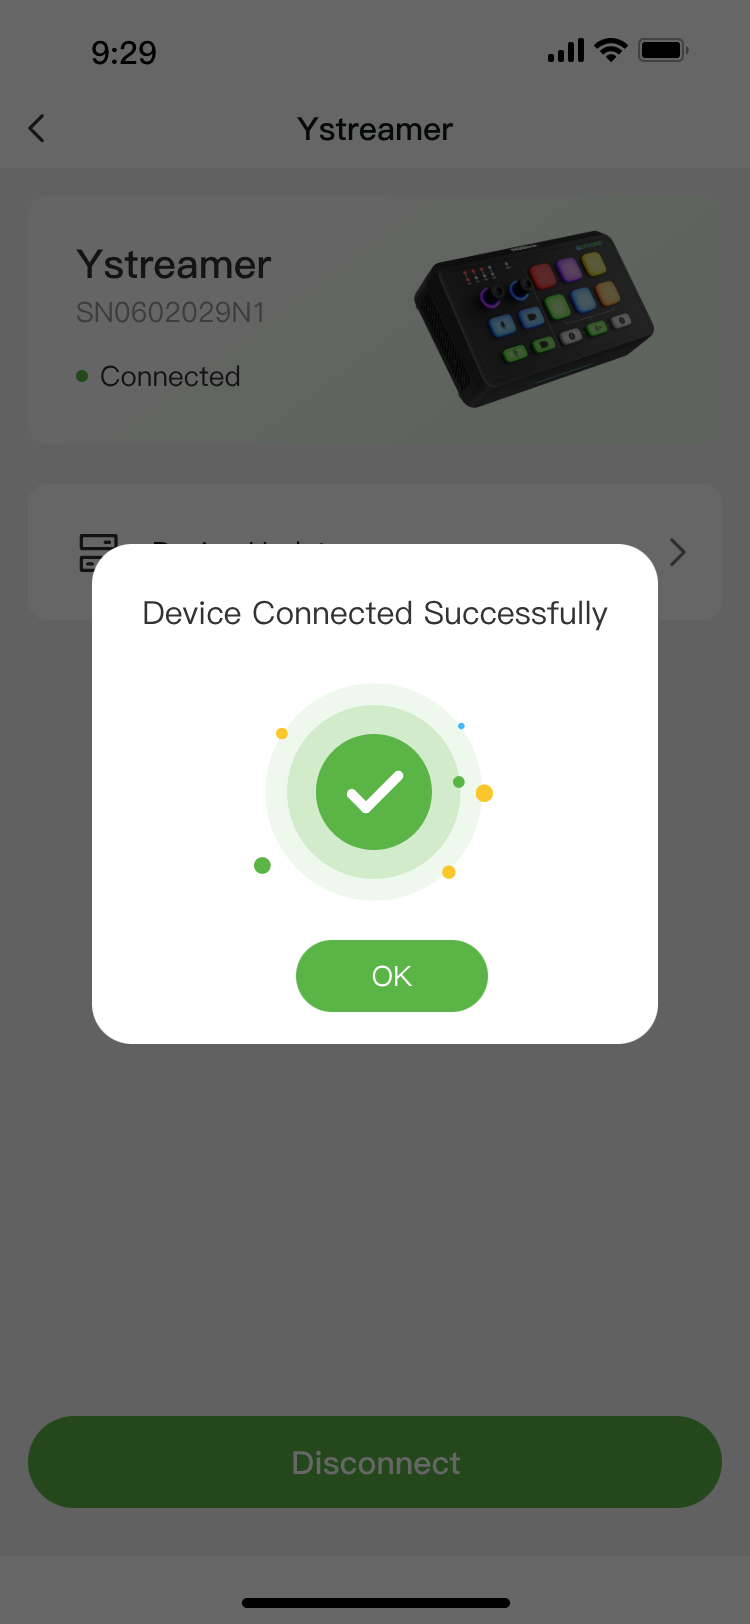
①②③
Tap Device Update. If the device is not connected to Wi-Fi, the Network Settings page appears automatically.Select a Wi-Fi network, enter the password, then tap Join.Wait until the device connects to the network.
  • Update the Device

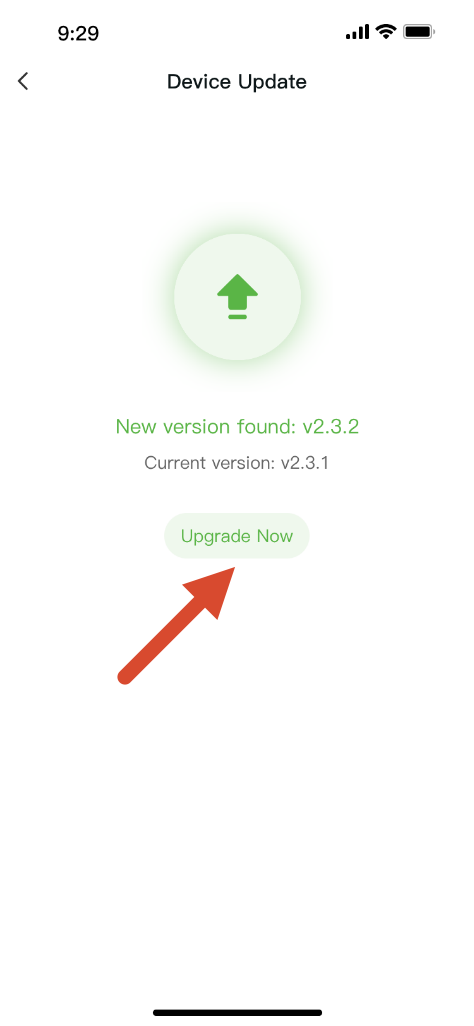
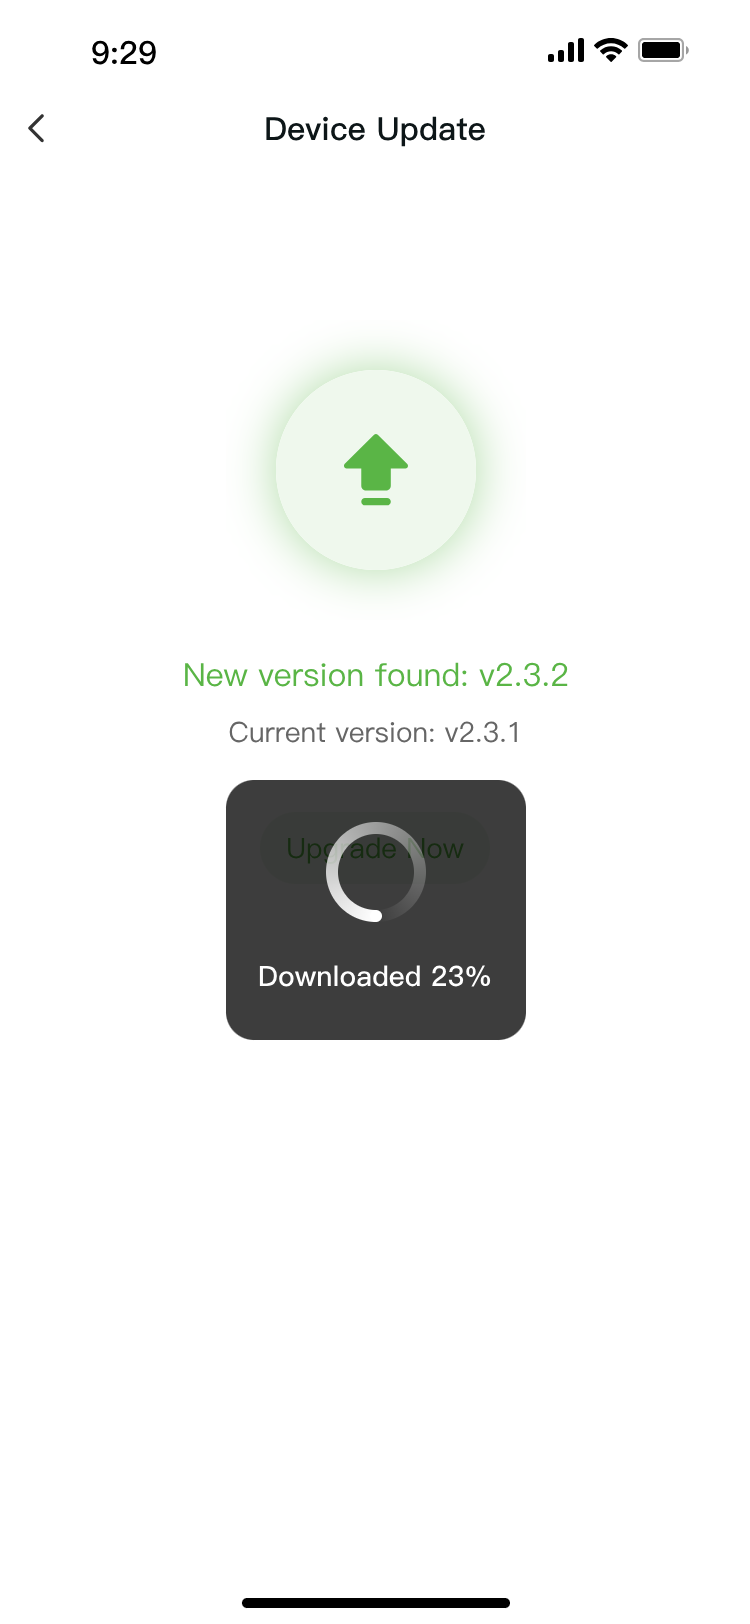
After connecting to Wi-Fi, the device automatically checks for the latest firmware.

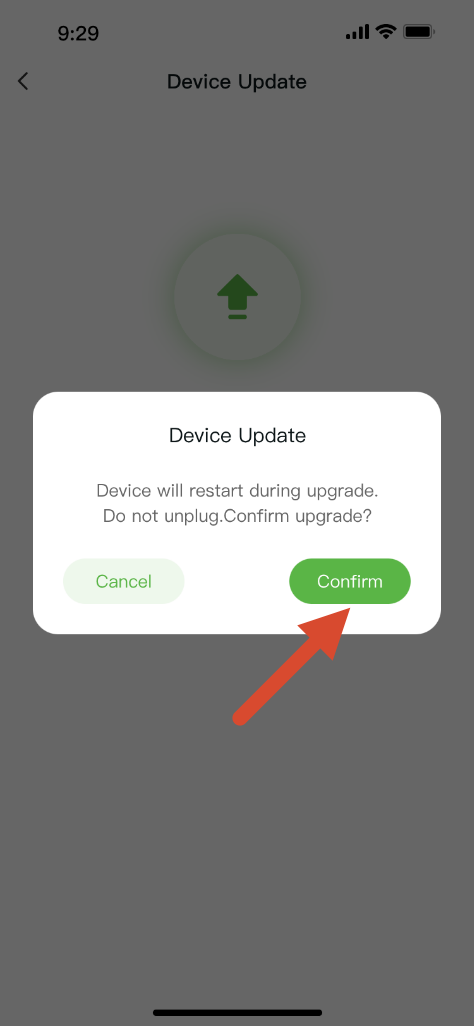
①②③
If a new version is available, tap Update Now.Tap Confirm to start the update.Wait for the download and installation to complete.
  • After the update finishes, the latest firmware version is displayed on the Device Information page.
2) Wi-Fi Reset

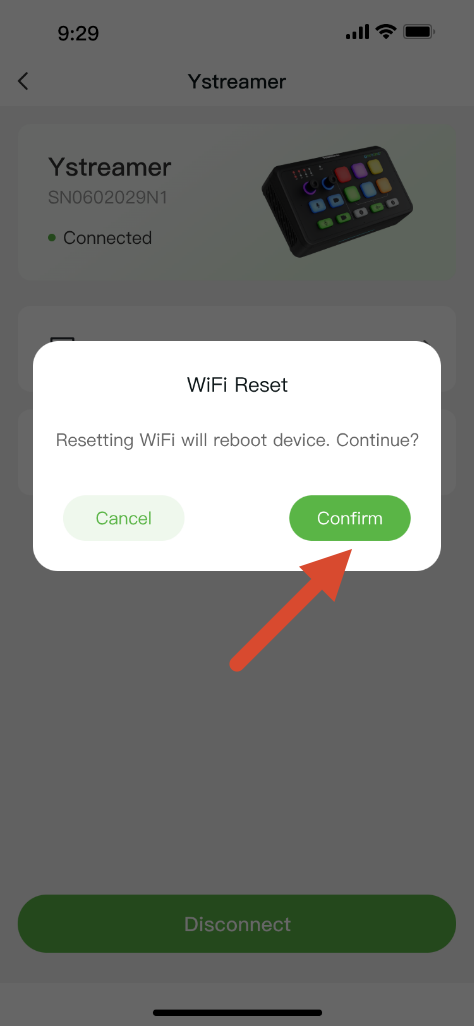
Reset the Wi-Fi connection if you need to connect the device to a different network or troubleshoot network issues.

①②③
Tap Wi-Fi Reset.Tap Confirm.Select a Wi-Fi network and complete the setup again. The device restarts automatically after the reset.
📢  Notes

- Do not disconnect the power, Wi-Fi, or Bluetooth connection during a update. Interrupting the update may prevent the device from starting properly.
- If the update fails, restart the device and try again. If the problem persists, contact RGBlink Technical Support. 
- If Bluetooth pairing fails after a restart, restart Ystreamer and pair the device again.

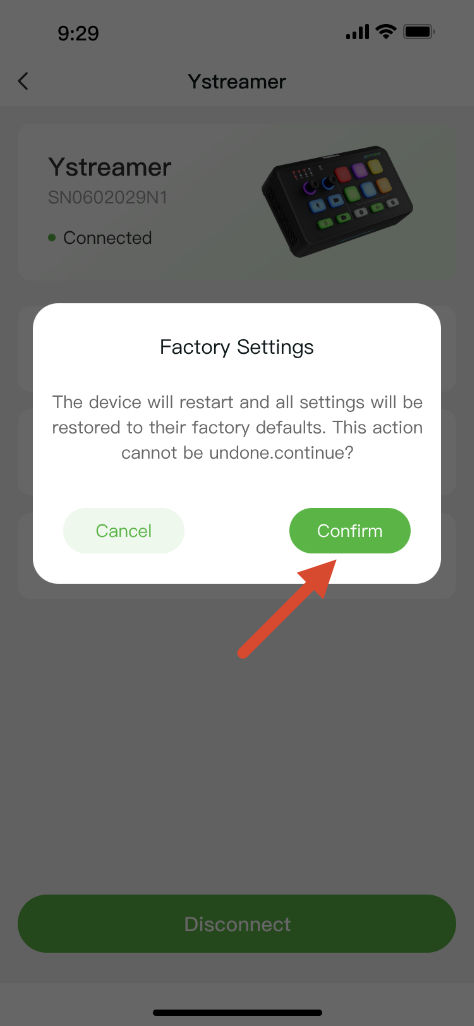
3) Factory Settings
🚨  Warning: This action cannot be undone.

After confirming the factory reset, all device settings will be restored to their defaults. This action cannot be undone. 

Tap Factory Settings, then tap Confirm in the pop-up window to complete the operation.

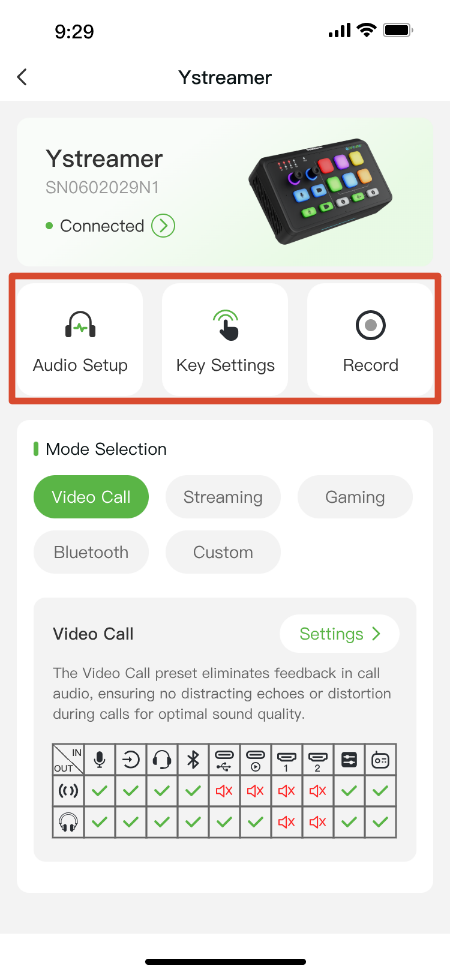
2. Quick Actions

Interfaces for reference
IconDescription
Audio Setup + Adjust the volume of each audio input. + Enable or disable the speaker independently. + Controls are unavailable when displayed in light gray.
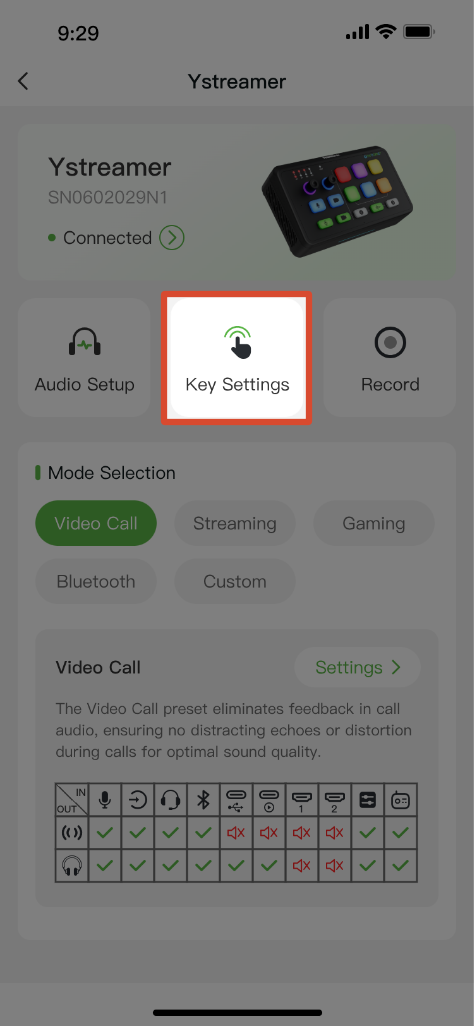
Key Settings Customizable button is currently supported on TAO for Android 2.10.11 or later. Support for iOS will be available in a future release.
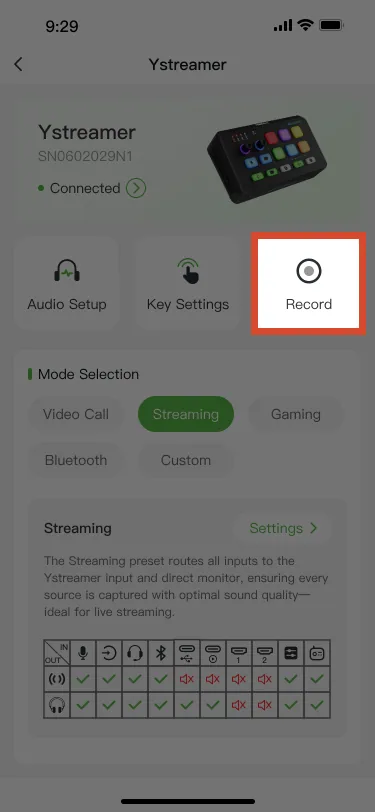
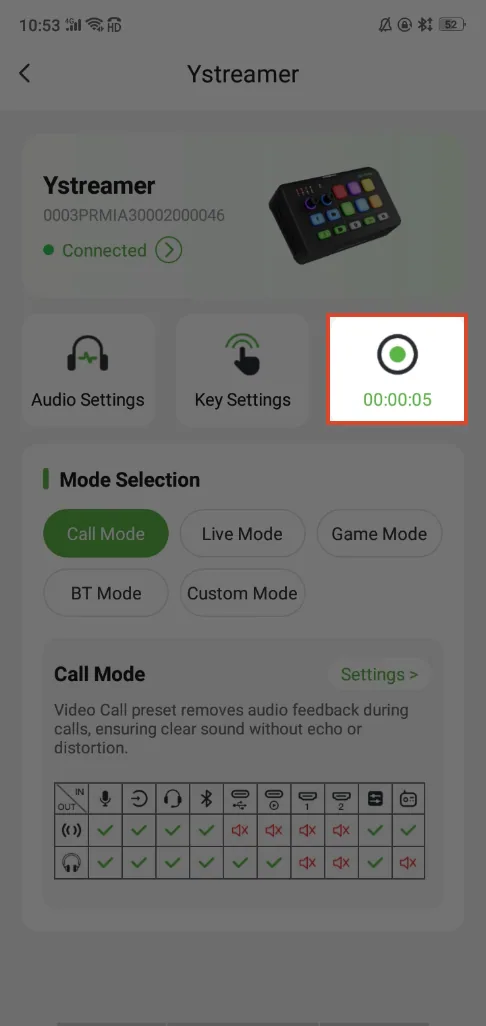
Record + Tap the Record icon to start recording. + The recording duration is displayed while recording. + Tap the icon again to stop recording. + Recordings are saved in WAV format.

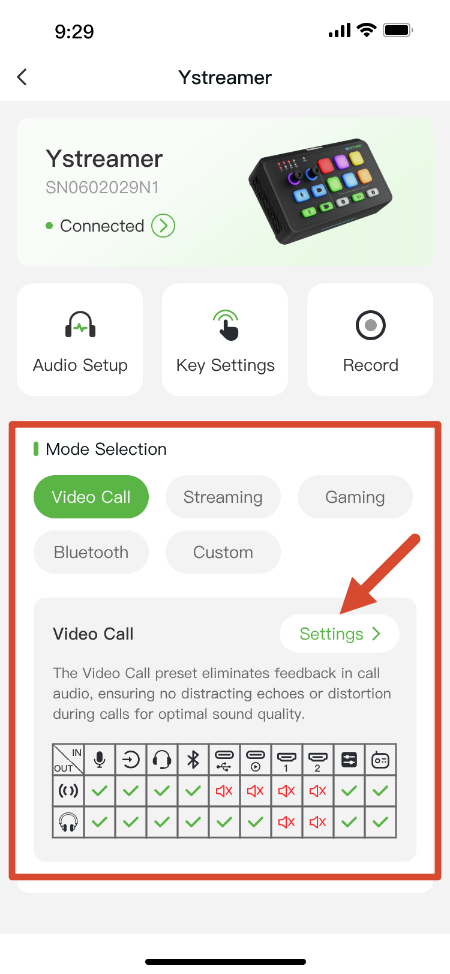
3. Mode Selection

Interfaces for reference
Video CallOptimized for video conferencing by reducing audio feedback and echo during calls.
StreamingProvides full audio routing for Ystreamer inputs and connected monitoring devices, ideal for live streaming.
GamingReduces audio feedback and unwanted game audio to provide clear communication during in-game chat and voice calls.
BluetoothBluetooth speaker mode is currently supported on TAO for Android 2.10.11 or later. Support for iOS will be available in a future release.
CustomAllows users to create custom audio routing presets for Ystreamer inputs and connected monitoring devices.

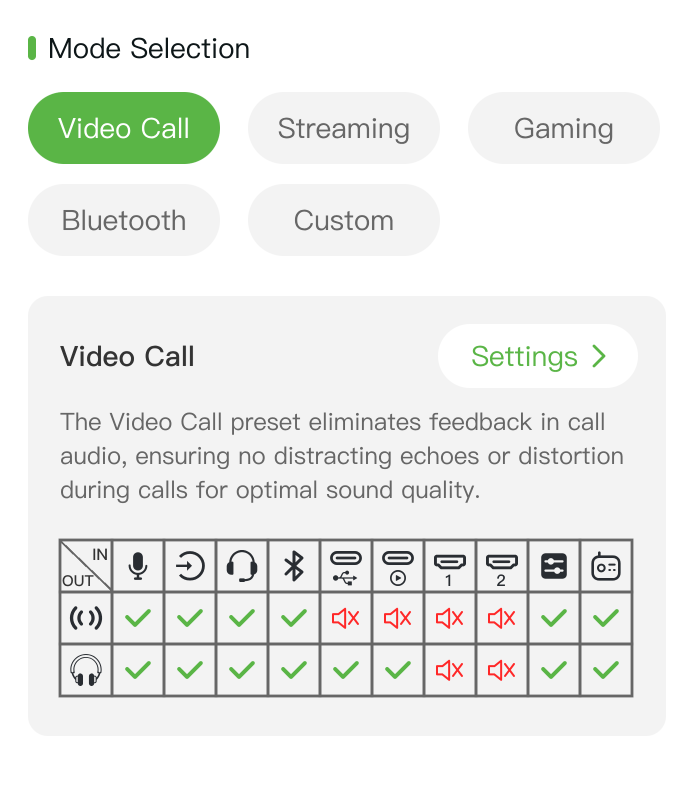
**4. Audio Routing Matrix (IN/OUT) **

1) Icon Description
IN
XLRTRSTRRSBLUETOOTHUAC 1UAC 2HDMI 1HDMI 2CLIPMIC
USB audioAudio clipBuilt-in microphone
OUT
Streaming MixerMonitoring Mixer
2) Audio Routing Matrix by Mode

The mode matrix is displayed in real time based on the device return status. The following section provides an example of the Video Call mode.

Interfaces for reference
Video Call Mode Example

3.3.3.33.3.3 Advanced Audio Settings

🔔  TAO APP(Android) must be updated to version 2.10.11 or later to use the Advanced Audio Settings feature. 
The iOS version will be available in future updates.  

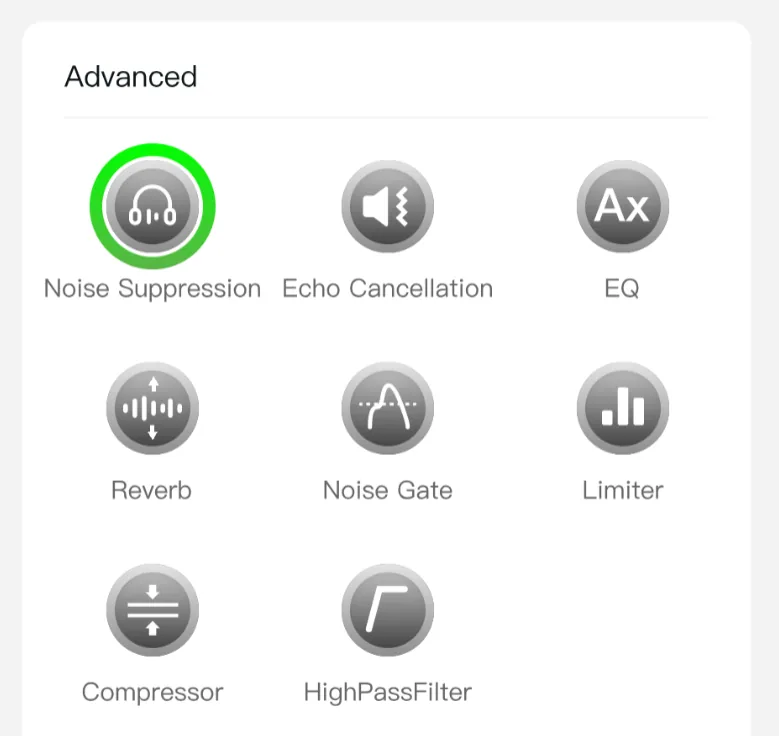
Ystreamer provides various audio processing features, allowing users to fine-tune different audio input channels and optimize sound quality for scenarios such as live streaming and conferencing.

Users can configure audio effects for each audio input, including Noise Suppression, Echo Cancellation, Equalizer, Reverb, Noise Gate, Limiter, Compressor, and HighPass Filter.

Interfaces for reference
Document image
📢  Notes

The available audio processing features vary depending on the audio input. The actual adjustable parameters are subject to the device operation page.  

The following section uses XLR port as an example to introduce the Advanced Audio Settings.

1. Access Audio Settings

  • On the device operation page, tap Audio Setup, or select a mode in the Mode Selection section and tap Settings.
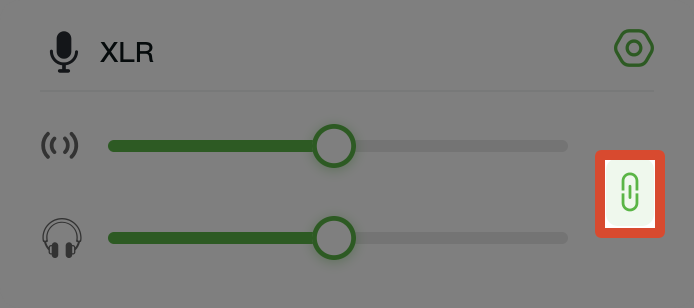
  • Tap the link icon in the audio input section to enable or disable parameter linking. When enabled, changing one parameter will automatically synchronize the corresponding parameter.

The link icon in the audio input section

2. Configure Audio Effects

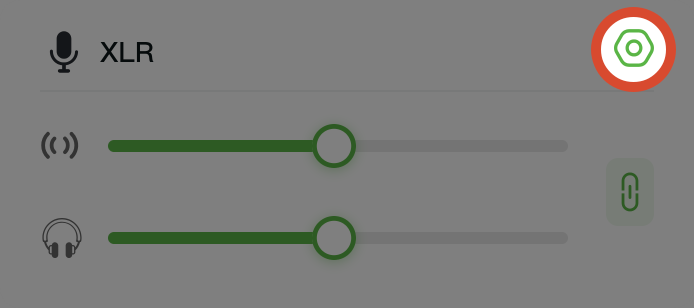
  • Tap the settings icon ⚙ in the upper-right corner of the audio input section.
  • Enable the required audio effects.
  • Adjust the corresponding parameters.
  • Tap the Reset button to restore default parameters.

the settings icon in the upper-right corner

3. Audio Processing Features

1) Noise Suppression

Noise suppression reduces background noise and improves vocal clarity.

Enable the Noise Suppression switch to activate this feature.

2) Echo Cancellation

Echo cancellation reduces echo caused by speaker audio being picked up by the microphone.

Enable the Echo Cancellation switch to activate this feature.

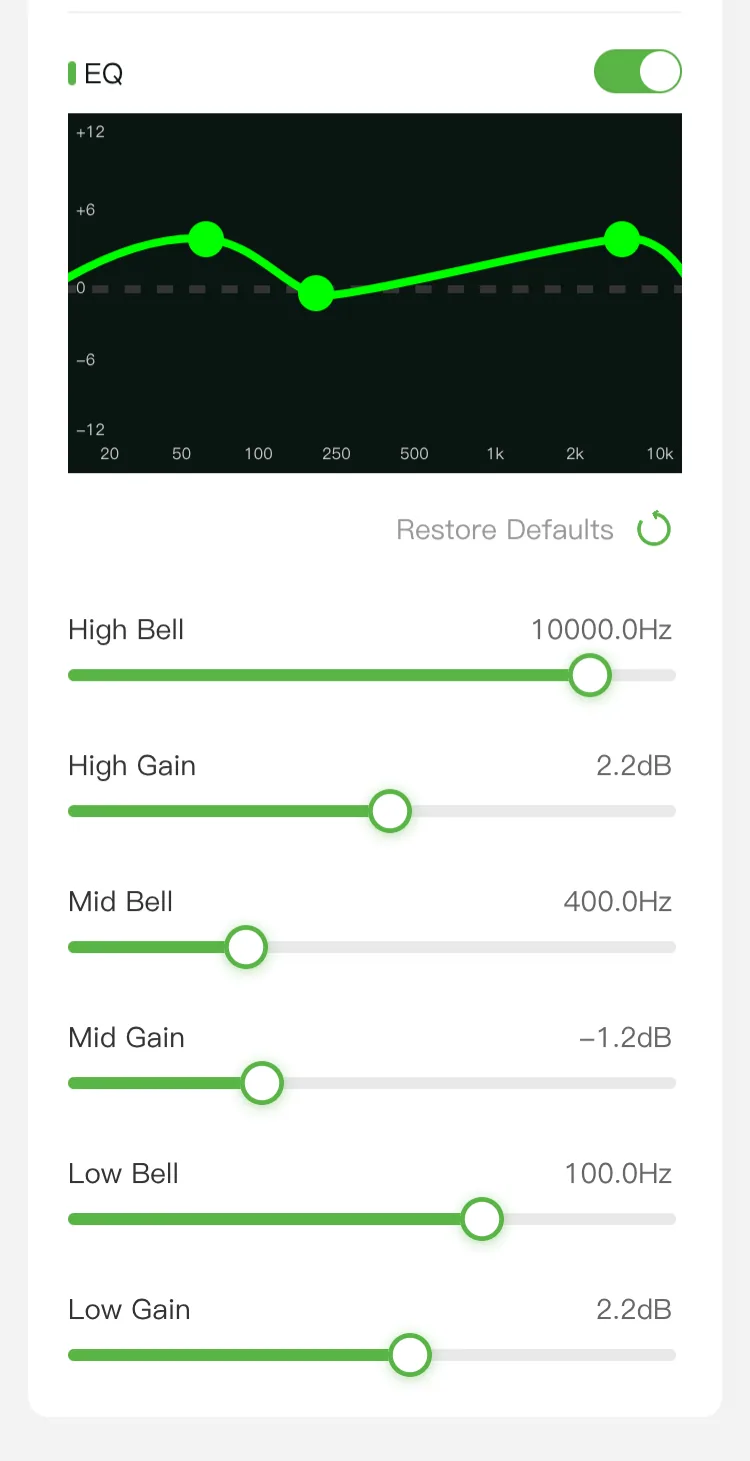
3) EQ: Equalizer

The Equalizer adjusts the sound characteristics of different frequency bands.

After enabling the EQ switch, users can adjust the bell filter frequency and gain for high, mid, and low frequencies.

The corresponding frequency curve is displayed in real time.

Interfaces for reference
Document image
4) Reverb

Reverb simulates sound effects in different acoustic environments.

After enabling the Reverb switch, users can adjust room size, high-frequency damping, and the dry/wet signal ratio.

5) Noise Gate

Noise gate reduces background noise below a set threshold, prevents audio crosstalk, and optimizes audio dynamics.

After enabling the Noise Gate switch, users can adjust parameters including threshold, attack time, hold time, release time, range, and hysteresis.

6) Limiter

Limiter limits audio peaks to prevent distortion.

After enabling the Limiter switch, users can adjust parameters including threshold, attack time, hold time, release time, and lookahead time.

7) Compressor

Compressor adjusts the audio dynamic range to provide more stable and clearer sound.

After enabling the Compressor switch, users can adjust parameters including threshold, ratio, attack time, release time, and gain.

8) HighPass Filter

The high-pass filter removes low-frequency noise and prevents low-frequency overload.

After enabling the HighPass Filter switch, users can adjust frequency and slope parameters

3.3.3.43.3.4 Custom Key Functions

🔔  TAO APP (Android) must be updated to version 2.10.11 or later to use the Custom Key Functions feature. The iOS version will be available in future updates.  

Ystreamer supports customizable shortcut keys, allowing users to assign frequently used functions based on scenarios such as live streaming, gaming, and conferencing, improving operation efficiency.

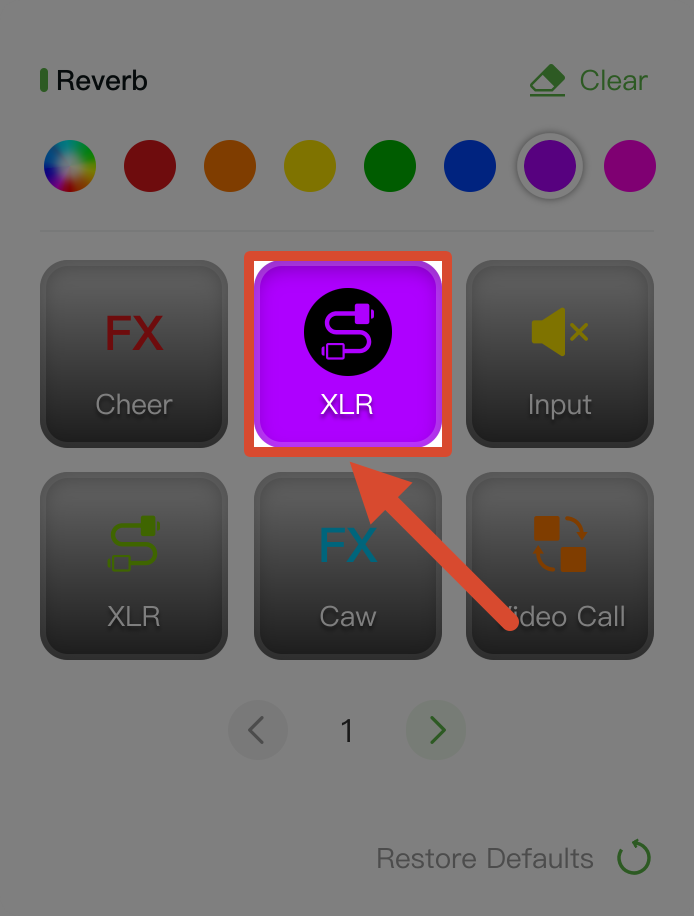
Each key supports custom colors and can be assigned functions such as input switching, mute control, sound effect , and mode switching.

1. Configure Key Functions

①②③④
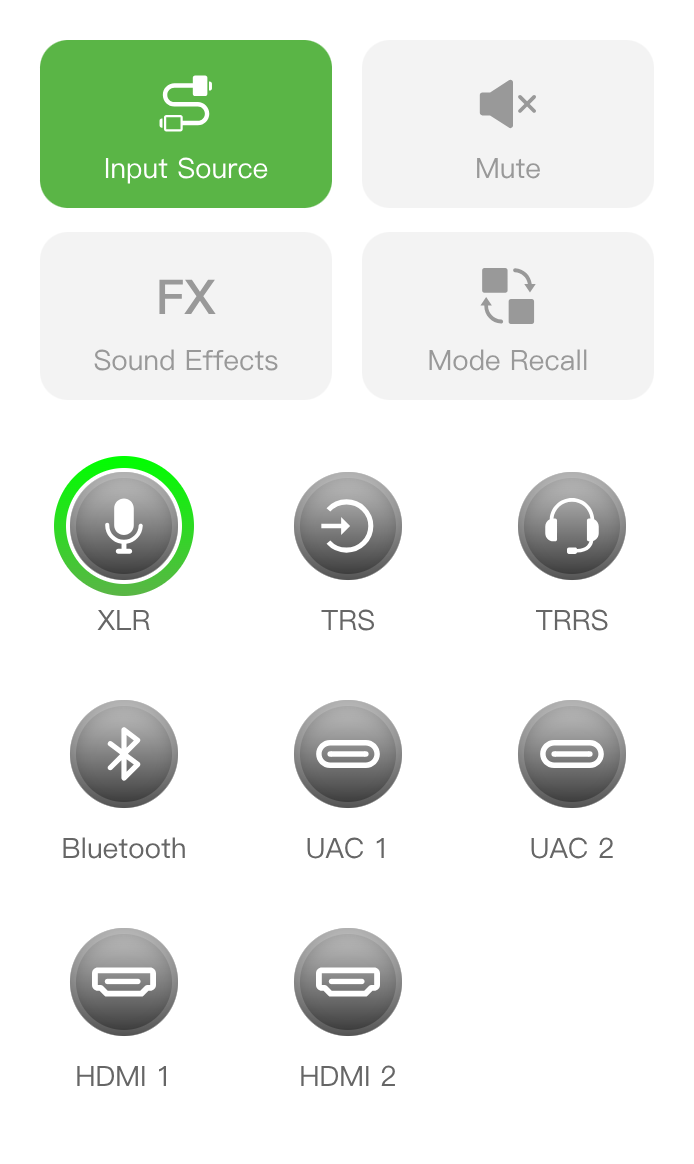
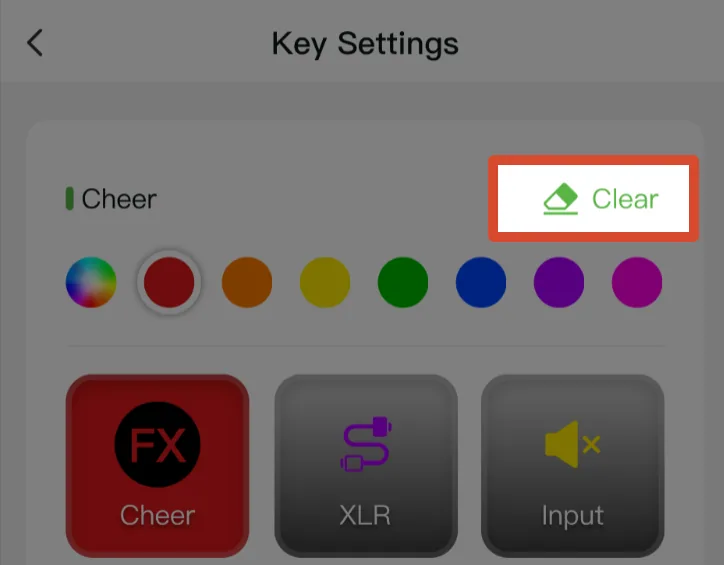
On the device operation page, tap Key SettingsSelect the key to configureSelect a function from the list (Image below takes Input Source as an example)Tap Clear in the upper-right corner to remove the current assignment.
Document image

2. Configure Key Colors

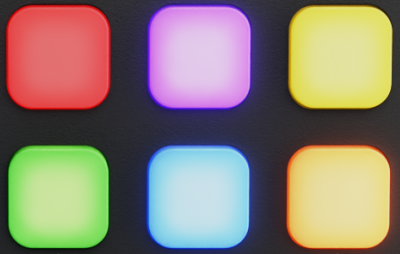
The device provides three pages of key settings, with six keys on each page.

Users can tap the color bar to customize colors. When switching between setting pages, the device keys display the color configuration of the corresponding page, as shown below.

APP InterfaceDevice
👉

3. Key Functions

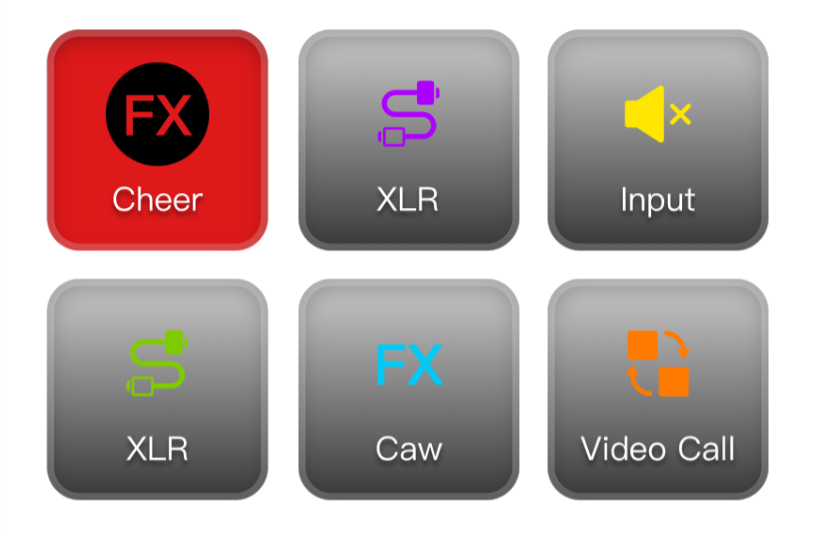
1) Input Source

Assign a key to switch to a specified audio input.

2) Mute

Assign a key for mute control. Supports:

  • Input Mute
  • Output Mute
3) FX: Sound Effects

Assign a key to play sound effects. Supports:
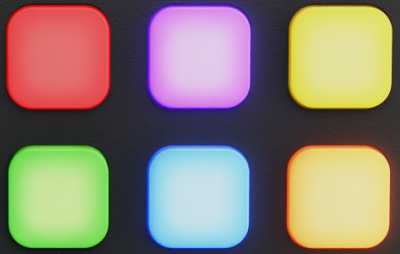
  • Selecting six default sound effects
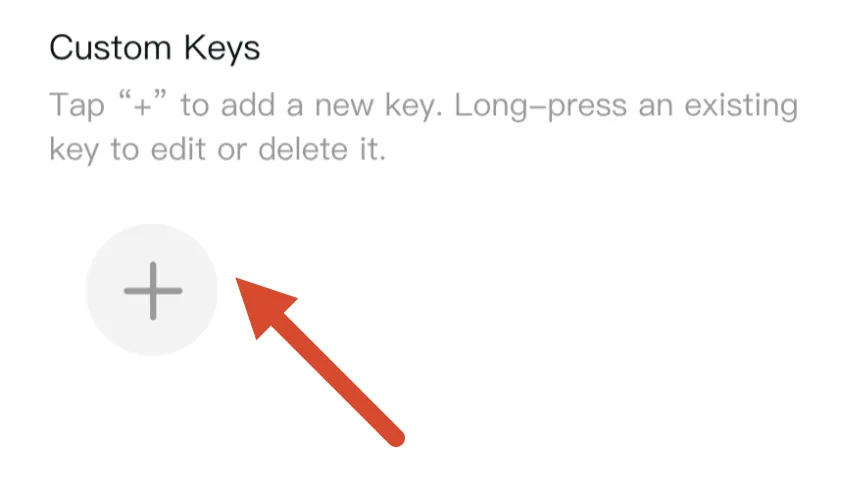
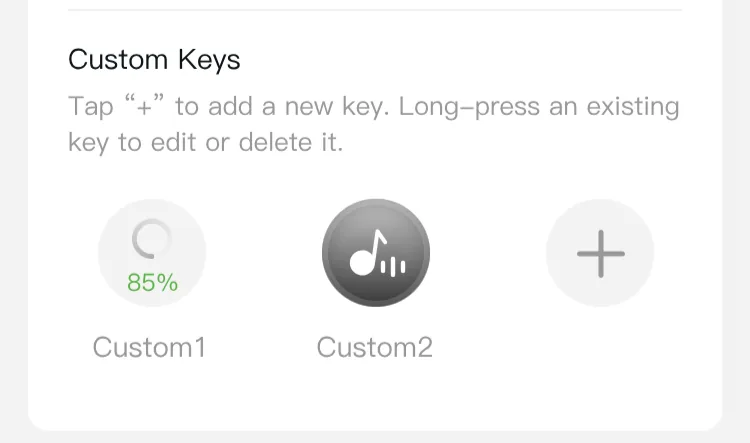
  • Tapping + to import custom audio files
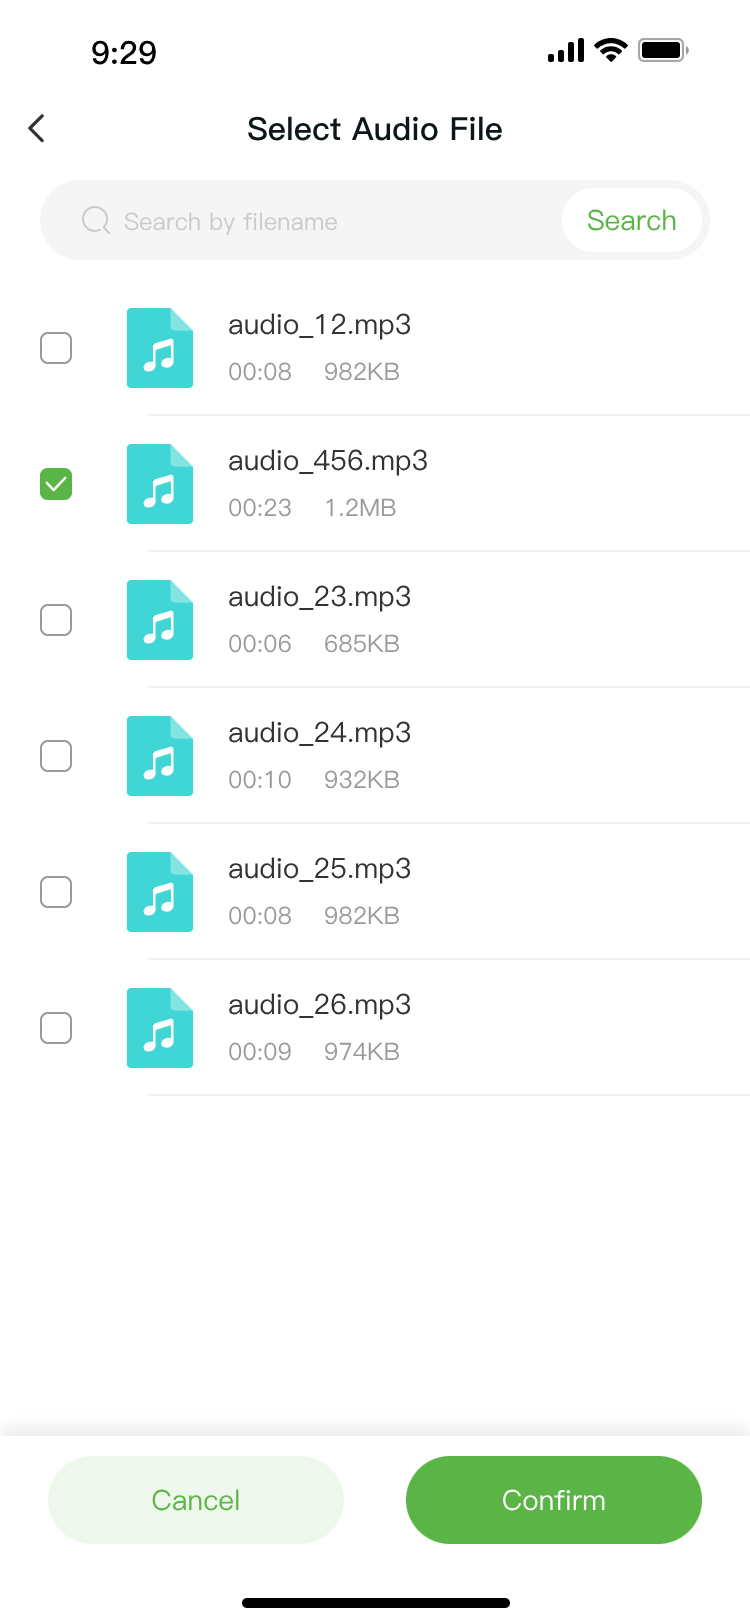
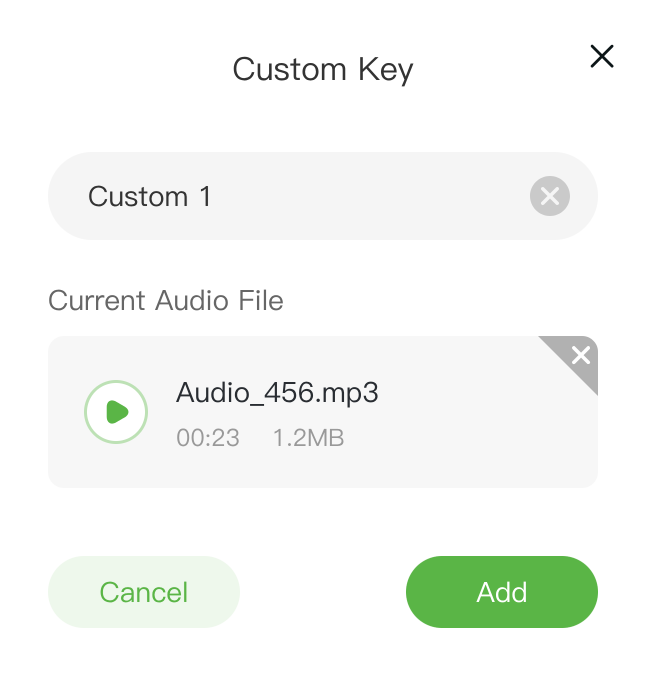
①②③④
Tap + on the Sound Effects setting pageSelect an audio file from the file list and tap ConfirmCustomize the key name in the pop-up window and tap Add to complete the processAfter adding, press and hold the key to edit or delete the sound effect.
Document imageDocument image
4) Mode Recall

Assign a key for quick mode switching, including Video Call mode, Streaming mode, Gaming mode, Bluetooth mode, and Custom mode.

3.3.43.4 Audio Recording

Ystreamer records audio inputs and the UAC mixed output as WAV files for storage and post-production.


🔔 Ystreamer supports multichannel audio recording, including nine audio inputs and one UAC mixed output.

The available recording channels depend on the connected audio sources.
Update the device to firmware V1.0.18 or later. See section 4. Upgrade.

3.4.1 Before Recording

Connect an external storage device to the UAC 1 port on Ystreamer, as shown below. Document image

📢 Notes

If UAC 1 is also needed for audio input during recording, connect a USB hub with a USB-C port. Due to compatibility requirements, this setup is not recommended.

Ystreamer supports the following external storage devices:

  • Unpartitioned USB drives formatted as FAT32 or exFAT.
  • Externally powered hard drives. Use a separate power supply to avoid interrupting UVC 2 output when connecting or disconnecting cables.

3.4.2 Record Button Indicator

The Record button indicator shows the following states:

IndicatorDescription
BlueDefault state when powered on
RedRecording
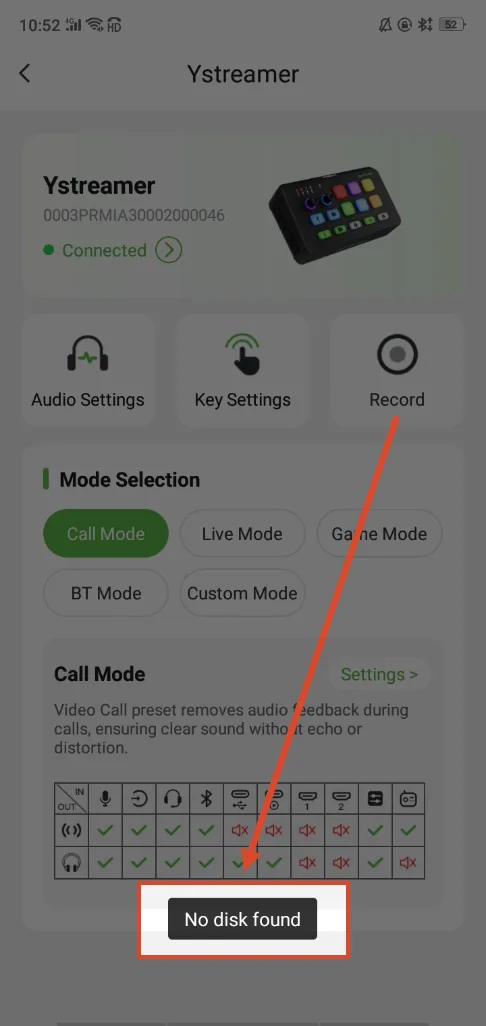
Flashes red three times, then turns blueNo external storage device detected; recording does not start

3.4.3 Start Recording

🚨 Caution

DO NOT disconnect the storage device during recording. Doing so may damage or delete the recording files.

Using the Device Panel

  1. Make sure an external storage device is connected.
  2. Press the Record button on the device panel.
  3. Confirm that the indicator turns red.
  4. Refresh the TAO App manually to check the recording status.
  5. Press the Record button again to stop recording. Document image

Using the TAO App

  1. Make sure an external storage device is connected.
  2. Open the TAO App and connect to Ystreamer.
  3. Tap the Record icon to start recording.
  4. Check the recording status in the TAO App.
  5. Tap the Record icon again to stop recording.
Record iconRecording timerNo storage device warning
Document imageDocument imageDocument image
📢 Tip

Wait a few moments after stopping recording before disconnecting the external storage device to avoid file corruption.

3.4.4 Record the Mixed Output

The computer must first capture the mixed audio output before it can be recorded.

In OBS and other software that supports audio capture, the audio signal appears as Capture Input terminal (Source/Sink). Add it as an audio source.

For setup instructions, see section 3.2 Video Capture and Streaming, which covers dual-channel capture configuration.

3.4.5 Recording Files

Recording Bitrates

The following table lists the recording bitrates for each input source and the mixed output.

Recording SourceIconBitrate (kbps)
BluetoothDocument image1411
HDMI 1Document image1536
HDMI 2Document image1536
MICDocument image1536
TRRSDocument image768
TRSDocument image1536
XLRDocument image768
UAC 1Document image768
UAC 2Document image1536
UAC 2 Mixed OutputDocument image1536
File Size

Each recording file can be up to 3.7 GB. When a file reaches this limit, Ystreamer automatically creates a new file and continues recording.

Recording stops automatically when the external storage device runs out of space.

Folder Structure

WAV files are saved in the Audio folder in the root directory of the external storage device. Ystreamer automatically creates a subfolder for each date.

Example:

Audio/
└── 20260929/
    ├── MIC_IN_20260929.wav
    ├── UAC2_OUT_20260929.wav
    └── ...
File Date and Time

Recording file dates and times are based on the device's system clock.

If the timestamps are incorrect, connect the device to a network and synchronize its clock through NTP.

4Upgrade

Ystreamer supports online firmware updates through the TAO APP.
For instructions, see 3.3 TAO APP > 3.3.2 APP Operation > 1) Device Update.

5FAQ

Q: Why can't my computer capture video?

A: Check the following:

  • Make sure the UVC cable is connected directly to a USB 3.0 (or later) port.
  • Check whether the device is recognized as USB 2.0.
  • Hot-plugging the USB-C cable may cause capture to fail. Restart Ystreamer and reconnect it.

Q: What device names should appear on my computer?

A: RGBlink HDMI2.0 4K+ CAPTURE1 and RGBlink HDMI2.0 4K+ CAPTURE2.


Q: Why does my capture software show a warning icon (!)?

A: The device is connected through a USB 2.0 port or a USB hub. Connect it directly to a USB 3.0 (or later) port.


Q: Why is there no video from the HDMI Loop output?

A: HDMI Loop output becomes available only after the computer detects and starts capturing the UVC video stream.


Q: Why does the Record indicator flash red three times and then turn blue?

A: No USB storage device is detected. Connect a FAT32 or exFAT USB storage device before recording.


Q: Why is the recording timestamp incorrect?

A: Connect the device to Wi-Fi so it can synchronize its clock with an NTP server.


Q: What should I do if 4K capture is not smooth?

A: Reduce the capture resolution to 1080p (MJPEG), or make sure your computer meets the recommended system requirements.

6Technical Support

7Revision History

VersionDateDescriptionAuthor
V1.22026-09-15Ystreamer V1.0.18 Feature Update: multichannel audio recording TAO App Compatibility: Android V2.10.14 and later versionsZYL
V1.12026-08-05Ystreamer V1.0.13 Feature Update: 1. Custom Key Functions 2. Advanced audio settings 3. Bluetooth mode TAO App Compatibility: Android V2.10.11 and later versionsZYL
V1.02026-07-07First release.ZYL

About Us / Find Support

Xiamen RGBlink Science & Technology Co., Ltd. designs and manufactures professional video processing, switching, streaming and LED display control products for live events, broadcast, education and fixed installations.
Need help?

Choose one of the following support options:

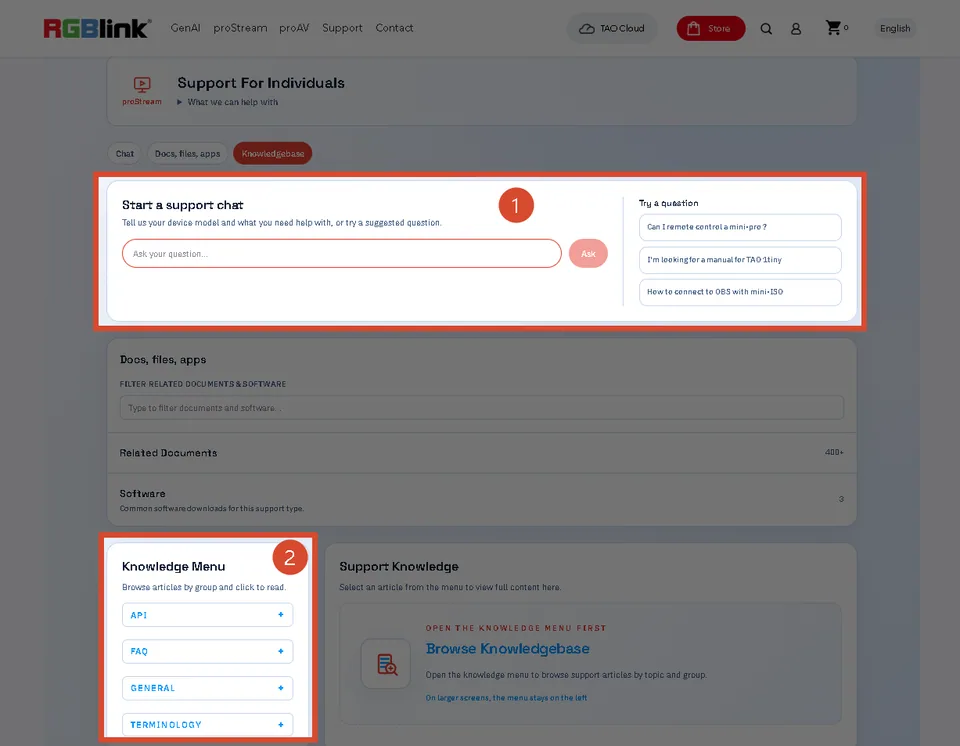
  • AI Support Search (Recommended): Visit Support > Support proStream/proAV/proEvents on the RGBlink official website and ask the RGBlink AI Bot for quick answers.
  • FAQs: Visit Support > Support proStream/proAV/proEvents on the RGBlink official website and browse Knowledge Menu > FAQ.
  • Contact Technical Support: Visit the Technical Support page of this manual or the RGBlink official website for our contact details.

Document image

RGBlink

www.rgblink.com

© Copyright Xiamen RGBlink Science & Technology Co Ltd