Export PDF

RGBlink
mini-pro

User Manual

mini-pro

mini-pro v3 User Manual

230-0003-03-0

RGBlink

www.rgblink.com

November 2026

1mini-pro v3 Specifications

Streaming Switcher
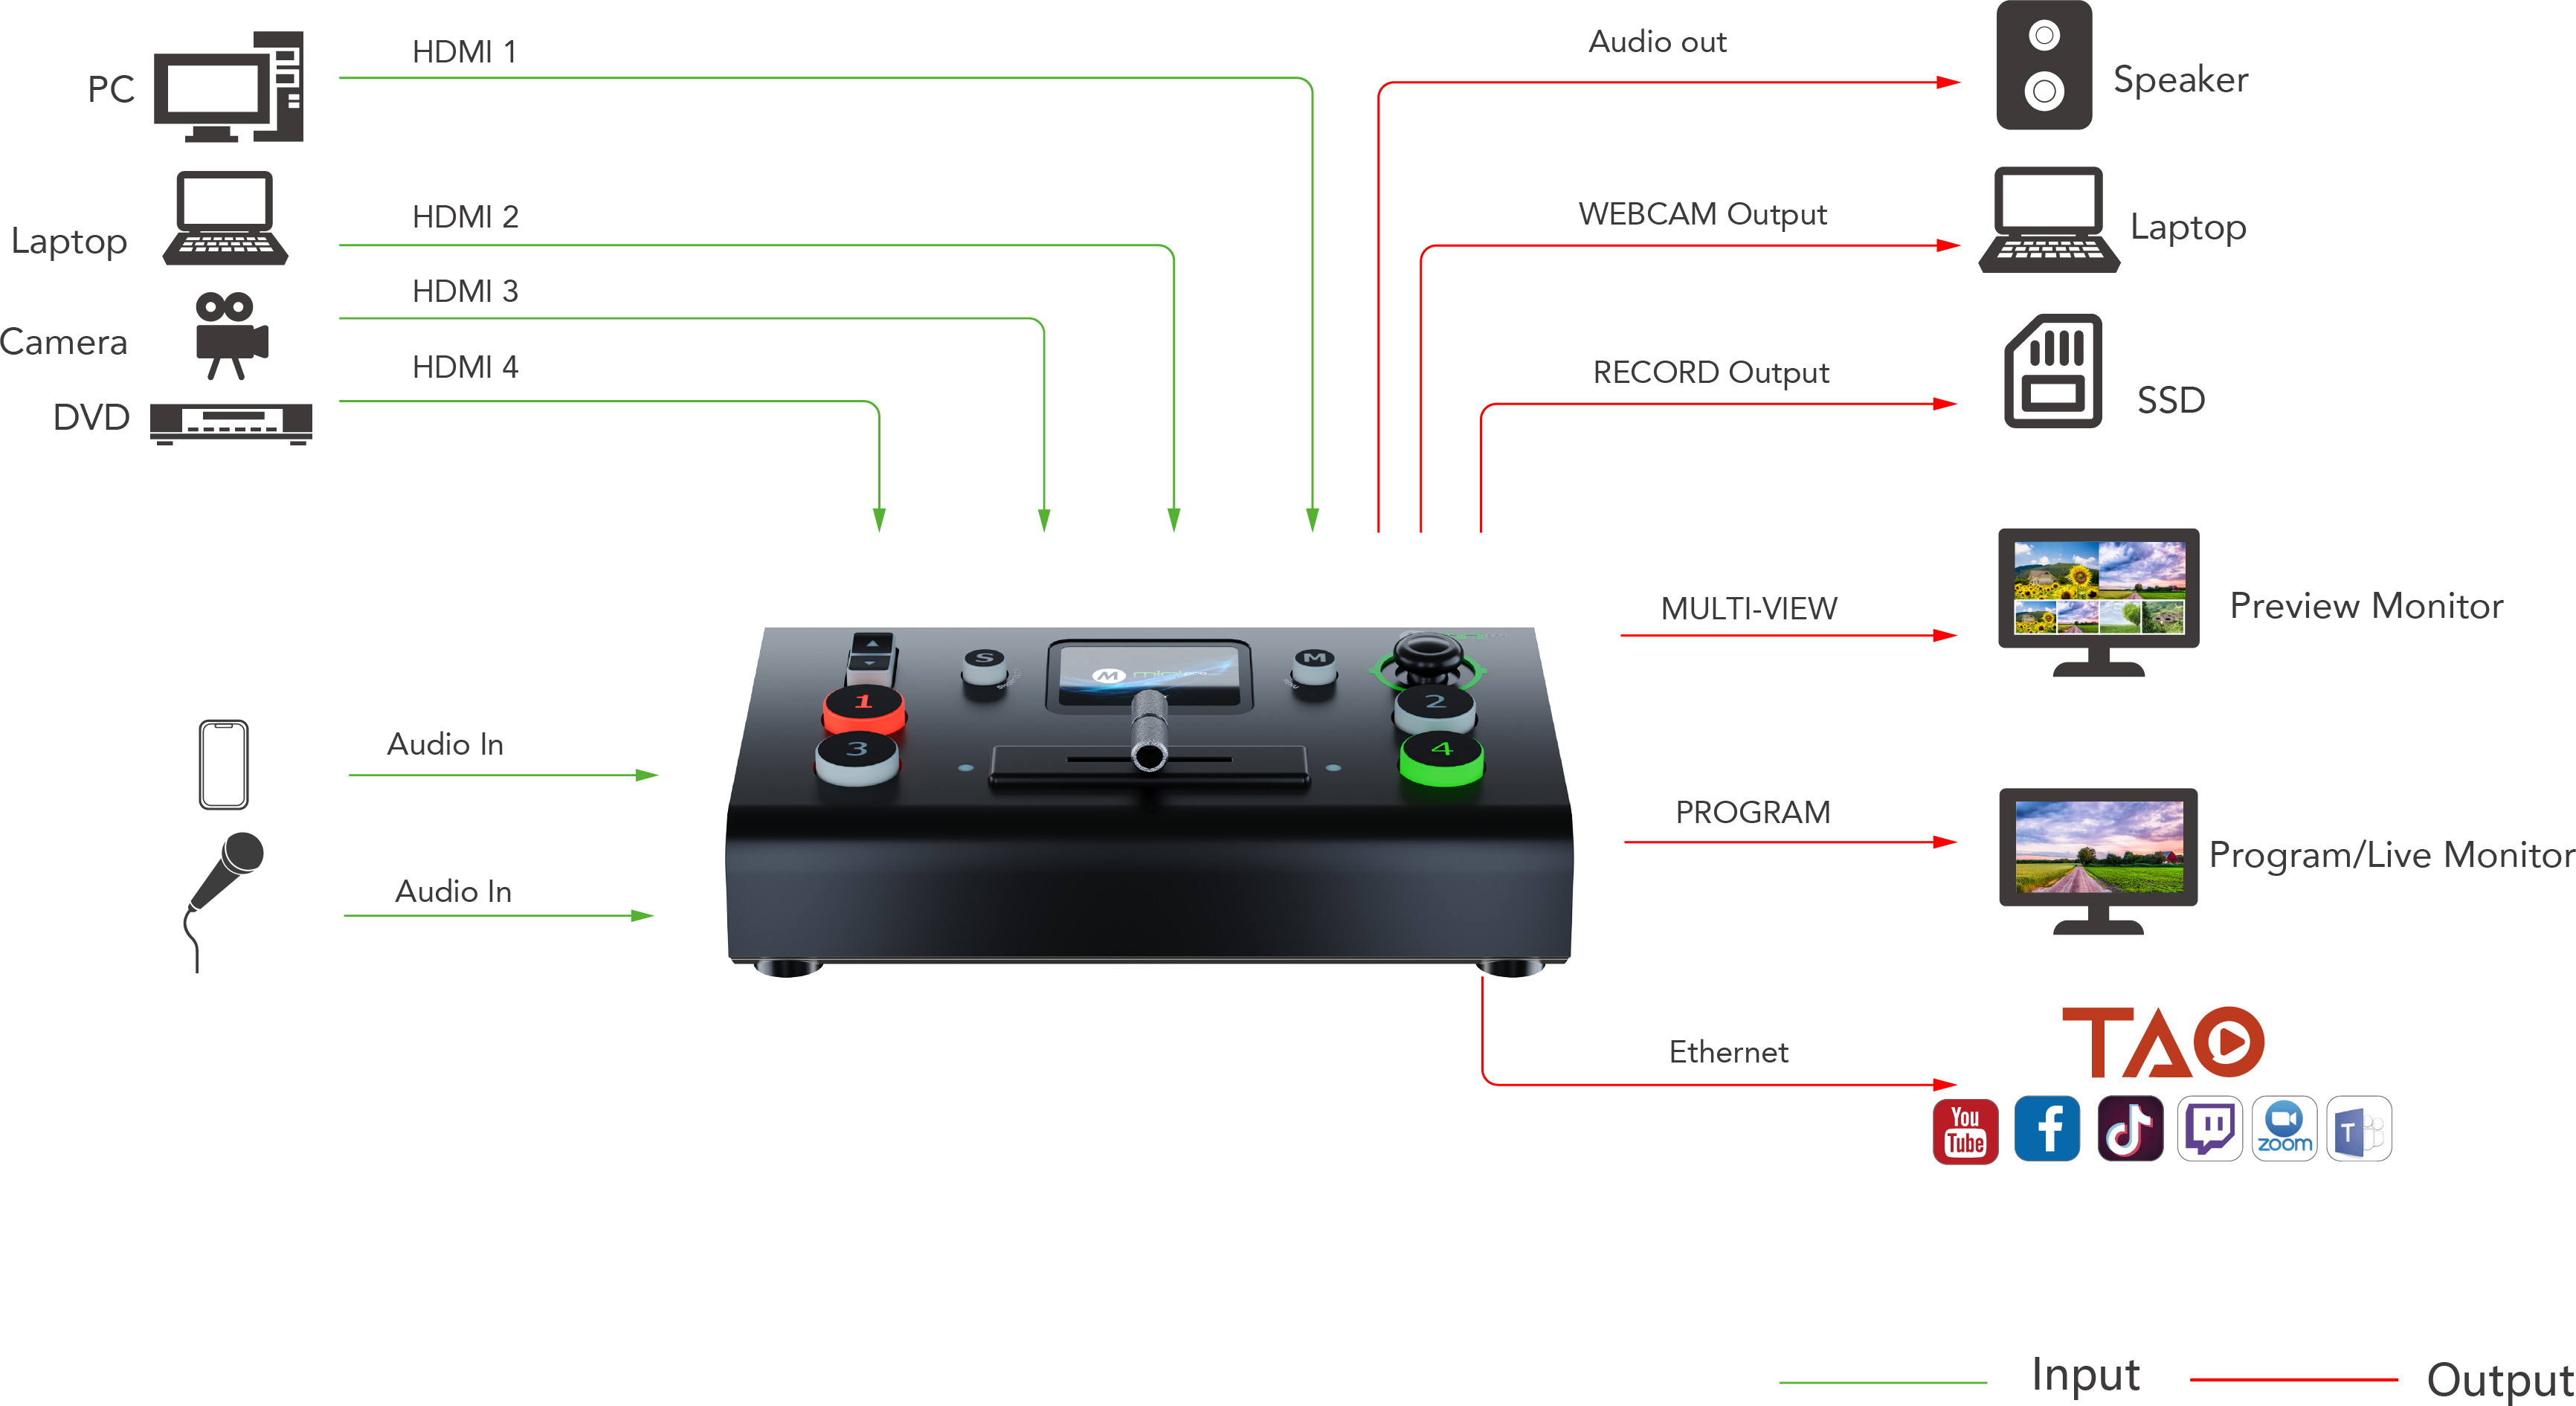
Key Features Video Input and Output + 4 × HDMI 2.0 inputs supporting video signals up to 4K@60, with HDCP 1.4 compatibility + 2 × HDMI outputs for Program output, multi-view monitoring, or independent input preview + Supports USB UVC video output Touchscreen and Operation + Built-in 2-inch TFT full-color touchscreen with intuitive icon-based menu navigation + Five-direction joystick and shortcut buttons provide quick access to switching, layer adjustment, and other essential controls Audio Features + Supports 4-channel HDMI embedded audio, MIC input, and LINE input + Provides multi-channel audio mixing with independent level adjustment Video Processing and Layout + Supports video scaling, cropping, and position adjustment + PIP (Picture-in-Picture) supports multiple customizable layout options + Chroma Key enables real-time background replacement Switching and Effects + Supports T-Bar transitions and instant cut mode + Provides up to 15 built-in transition effects Streaming and Recording + USB 3.0 UVC output allows connection to computers or mobile devices for live streaming as a USB camera; supports YUY2 and MJPEG formats + Supports RTMP(s) streaming to up to 4 platforms simultaneously + Supports USB recording with exFAT and FAT32 file system compatibility for extended recording and live streaming applications PTZ Control and Scene Management + Supports IP VISCA control of up to 4 PTZ cameras, including pan/tilt, zoom, and focus adjustment + Enables quick saving and recalling of PTZ scenes and camera position parameters Remote Control + Supports remote access and device control via Web App + Supports TAO Cloud for remote device management and multi-platform streaming distribution
Application
Dimension
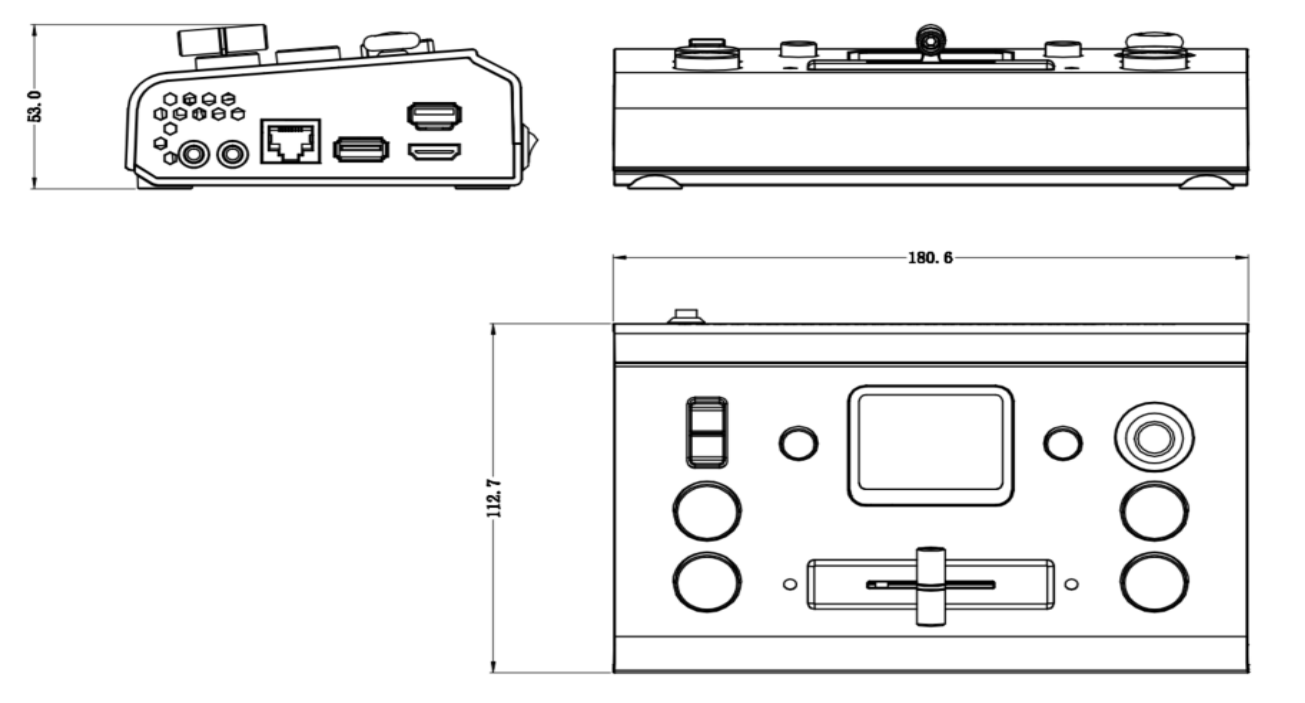
180.6mm × 112.7mm × 53mm

Connectors

ItemDescription
InputHDMI 4K4×HDMI-A
OutputHDMI 2K2×HDMI-A
USB (Record)1×USB-A
USB (Stream)1×USB-A
AudioInput2×3.5mm mini-Jack
Ouput1×3.5mm mini-Jack
Communication /StreamLAN1×RJ45
PowerPower Supply1×USB-C

Performance

ItemDescription
Input ResolutionsHDMI 2.01280×720p@50/60, 1280×768p@60, 1280×1024p@60, 1360×768p@60, 1366×768p@60, 1600×900p@60, 1920×1080i@50/60, 1920×1080p@30/50/60, 3840×2160p@23.97/24/25/29.97/30/50/59.94/60, 4096×2160@60
Output ResolutionsHDMI 1.31280×720p@50/60, 1920×1080p@24/30/50/60
USB1280×720p@60, 1920×1080p@24/25/30/50/60
VideoBit Depth8 bit
Video FormatsHDMI 2.0, HDCP 1.4
Color SpaceYUV 4:4:4, YUV 4:2:2, RGB 8bit
Video Latency<3 frames
AudioAudio FormatPCM/2ch/24bit/16bit/48kHZ
Record/StorageRecord FormatsMP4 (up to 16Mbps)
Disk FormatsFAT32(≤32 GB), exFAT(64GB~2T)
Supported StandardsHDMI2.0
USB3.0
H.265ITU-T H.265/ ISO/IEC 23008-2

Power

ItemDescription
CompatabilityUSB Power Delivery (PD) 3.0
Supported CablesCertified USB PD Aware
Input PowerPD 12V/2.5A
Recommended Adapter35W

Working Environment

ItemDescription
Temperature0℃~60℃
Humidity10%~85% RH

Physical

ItemDescription
WeightNet Weight0.42kg
Packaged Weight1.20kg
DimensionNet Dimension180.6mm × 112.7mm × 53mm
Packaged Dimension255mm × 145mm × 85mm

Order Codes

Order CodesItem
230-0003-03-1mini-pro v3

2mini-pro v3 User Manual

Thank you for choosing RGBlink mini-pro v3.

This manual provides information on the device features, installation and operation. A Glossary is provided at the end of this manual for reference.

Before using the device for the first time, please read this manual carefully to ensure safe and proper use of the product.

3Declarations

FCC/Warranty

Federal Communications Commission (FCC) Statement

This equipment has been tested and found to comply with the limits for a class A digital device, pursuant to Part 15 of the FCC rules. These limits are designed to provide reasonable protection against harmful interference when the equipment is operated in a commercial environment. This equipment generates, uses, and can radiate radio frequency energy and, if not installed and used in accordance with the instruction manual, may cause harmful interference to radio communications. Operation of this equipment in a residential area may cause harmful interference, in which case the user will be responsible for correcting any interference.

Guarantee and Compensation

RGBlink provides a guarantee relating to perfect manufacturing as part of the legally stipulated terms of guarantee. On receipt, the purchaser must immediately inspect all delivered goods for damage incurred during transport, as well as for material and manufacturing faults. RGBlink must be informed immediately in writing of any complains.

The period of guarantee begins on the date of transfer of risks, in the case of special systems and software on the date of commissioning, at latest 30 days after the transfer of risks. In the event of justified notice of compliant, RGBlink can repair the fault or provide a replacement at its own discretion within an appropriate period. If this measure proves to be impossible or unsuccessful, the purchaser can demand a reduction in the purchase price or cancellation of the contract. All other claims, in particular those relating to compensation for direct or indirect damage, and also damage attributed to the operation of software as well as to other service provided by RGBlink, being a component of the system or independent service, will be deemed invalid provided the damage is not proven to be attributed to the absence of properties guaranteed in writing or due to the intent or gross negligence or part of RGBlink.

If the purchaser or a third party carries out modifications or repairs on goods delivered by RGBlink, or if the goods are handled incorrectly, in particular if the systems are commissioned operated incorrectly or if, after the transfer of risks, the goods are subject to influences not agreed upon in the contract, all guarantee claims of the purchaser will be rendered invalid. Not included in the guarantee coverage are system failures which are attributed to programs or special electronic circuitry provided by the purchaser, e.g. interfaces. Normal wear as well as normal maintenance are not subject to the guarantee provided by RGBlink either.

The environmental conditions as well as the servicing and maintenance regulations specified in this manual must be complied with by the customer.

Operators Safety Summary

The general safety information in this summary is for operating personnel.

Do Not Remove Covers or Panels

There are no user-serviceable parts within the unit. Removal of the top cover will expose dangerous voltages. To avoid personal injury, do not remove the top cover. Do not operate the unit without the cover installed.

Power Source

This product is intended to operate from a power source that will not apply more than 230 volts rms between the supply conductors or between both supply conductor and ground. A protective ground connection by way of grounding conductor in the power cord is essential for safe operation.

Grounding the Product

This product is grounded through the grounding conductor of the power cord. To avoid electrical shock, plug the power cord into a properly wired receptacle before connecting to the product input or output terminals. A protective-ground connection by way of the grounding conductor in the power cord is essential for safe operation.

Use the Proper Power Cord

Use only the power cord and connector specified for your product. Use only a power cord that is in good condition. Refer cord and connector changes to qualified service personnel.

Use the Proper Fuse

To avoid fire hazard, use only the fuse having identical type, voltage rating, and current rating characteristics. Refer fuse replacement to qualified service personnel.

Do Not Operate in Explosive Atmospheres

To avoid explosion, do not operate this product in an explosive atmosphere.

Installation Safety Summary

Safety Precautions

For all product installation procedures, please observe the following important safety and handling rules to avoid damage to yourself and the equipment.

To protect users from electric shock, ensure that the chassis connects to earth via the ground wire provided in the AC power Cord.

The AC Socket-outlet should be installed near the equipment and be easily accessible.

Unpacking and Inspection

Before opening product shipping box, inspect it for damage. If you find any damage, notify the shipping carrier immediately for all claims adjustments. As you open the box, compare its contents against the packing slip. If you find any shortages, contact your sales representative.

Once you have removed all the components from their packaging and checked that all the listed components are present, visually inspect the system to ensure there was no damage during shipping. If there is damage, notify the shipping carrier immediately for all claims adjustments.

Site Preparation

The environment in which you install your product should be clean, properly lit, free from static, and have adequate power, ventilation, and space for all components.

1About Your Product

Meet mini-pro v3

mini-pro is a compact all-in-one switcher designed for live production, content creation,corporate events, and more. Combining video switching ,audio processing, streaming, recording and device control in a portable form factor, mini-pro provides a complete production workflow without the complexity of traditional broadcast systems.

With four HDMI 2.0 inputs and two HDMI outputs, mini-pro supports video sources up to 4K@60. Its dual HDMI outputs provide flexible monitoring options, including Program, Preview and independent input preview, making it easy to manage live production in a compact setup.

mini-pro supports both USB and network-based streaming workflows. The USB 3.0 UVC output enables plug-and-play connection to Windows and macOS computers for use with popular streaming, video conferencing, and content creation applications. For direct online streaming, RTMP(s) allows content to be delivered to up to 4 platforms simultaneously. When paired with RGBlink TAO Cloud, users can remotely manage devices and distribute streams across multiple platforms with greater efficiency.

Designed for professional audio performance, mini-pro features a fully differential balanced DAC architecture that delivers high-quality audio processing for MIC and LINE inputs. The built-in 2-inch TFT full-color touchscreen, five-direction joystick, and shortcut buttons provide intuitive control over essential operations, including switching, layer adjustment, PTZ control, chroma key, and PIP configuration. For remote workflows, mini-pro can also be accessed and controlled through Web App without requiring additional software installation.

Beyond live streaming, mini-pro supports USB recording, scene presets, and scene recall, enabling efficient operation for long-duration recording and multi-scene productions. From everyday content creation to professional live events, mini-pro delivers a streamlined and versatile production solution in a compact design.

Key Features

Video Input and Output

  • 4 × HDMI 2.0 inputs supporting video signals up to 4K@60, with HDCP 1.4 compatibility
  • 2 × HDMI outputs for Program output, multi-view monitoring, or independent input preview
  • Supports USB UVC video output

Touchscreen and Operation

  • Built-in 2-inch TFT full-color touchscreen with intuitive icon-based menu navigation
  • Five-direction joystick and shortcut buttons provide quick access to switching, layer adjustment, and other essential controls

Audio Features

  • Supports 4-channel HDMI embedded audio, MIC input, and LINE input
  • Provides multi-channel audio mixing with independent level adjustment

Video Processing and Layout

  • Supports video scaling, cropping, and position adjustment
  • PIP (Picture-in-Picture) supports multiple customizable layout options
  • Chroma Key enables real-time background replacement

Switching and Effects

  • Supports T-Bar transitions and instant cut mode
  • Provides up to 15 built-in transition effects

Streaming and Recording

  • USB 3.0 UVC output allows connection to computers or mobile devices for live streaming as a USB camera; supports YUY2 and MJPEG formats
  • Supports RTMP(s) streaming to up to 4 platforms simultaneously
  • Supports USB recording with exFAT and FAT32 file system compatibility for extended recording and live streaming applications

PTZ Control and Scene Management

  • Supports IP VISCA control of up to 4 PTZ cameras, including pan/tilt, zoom, and focus adjustment
  • Enables quick saving and recalling of PTZ scenes and camera position parameters

Remote Control

  • Supports remote access and device control via Web App
  • Supports TAO Cloud for remote device management and multi-platform streaming distribution

1.1In the Box

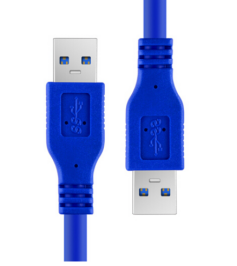
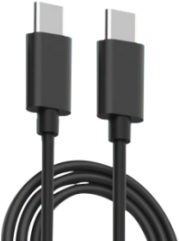
**1 x Power Adapter ** (PD 12V/2.5A)1 x USB-A Cable1 x USB-C Cable

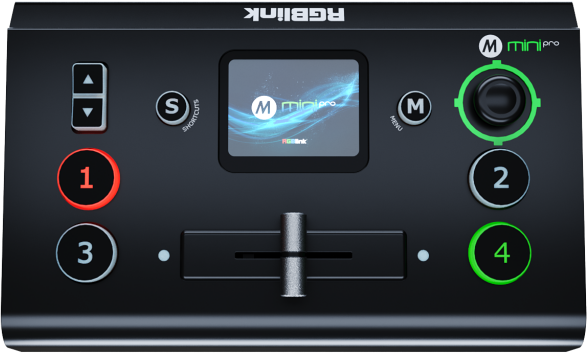
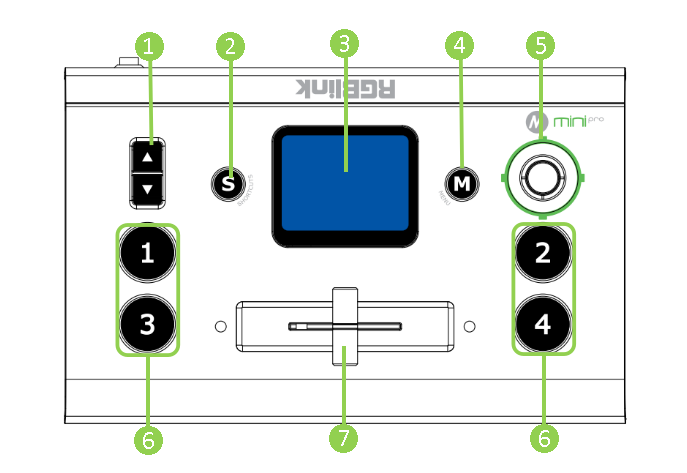
1.2Front Panel

No.ItemDescription
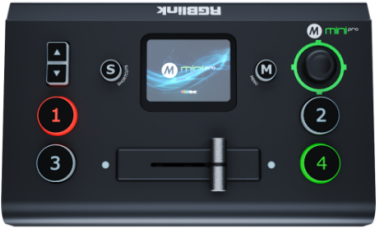
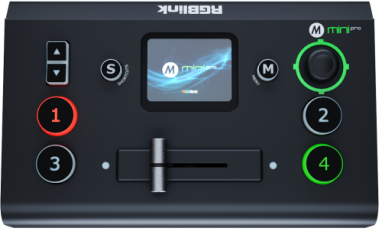
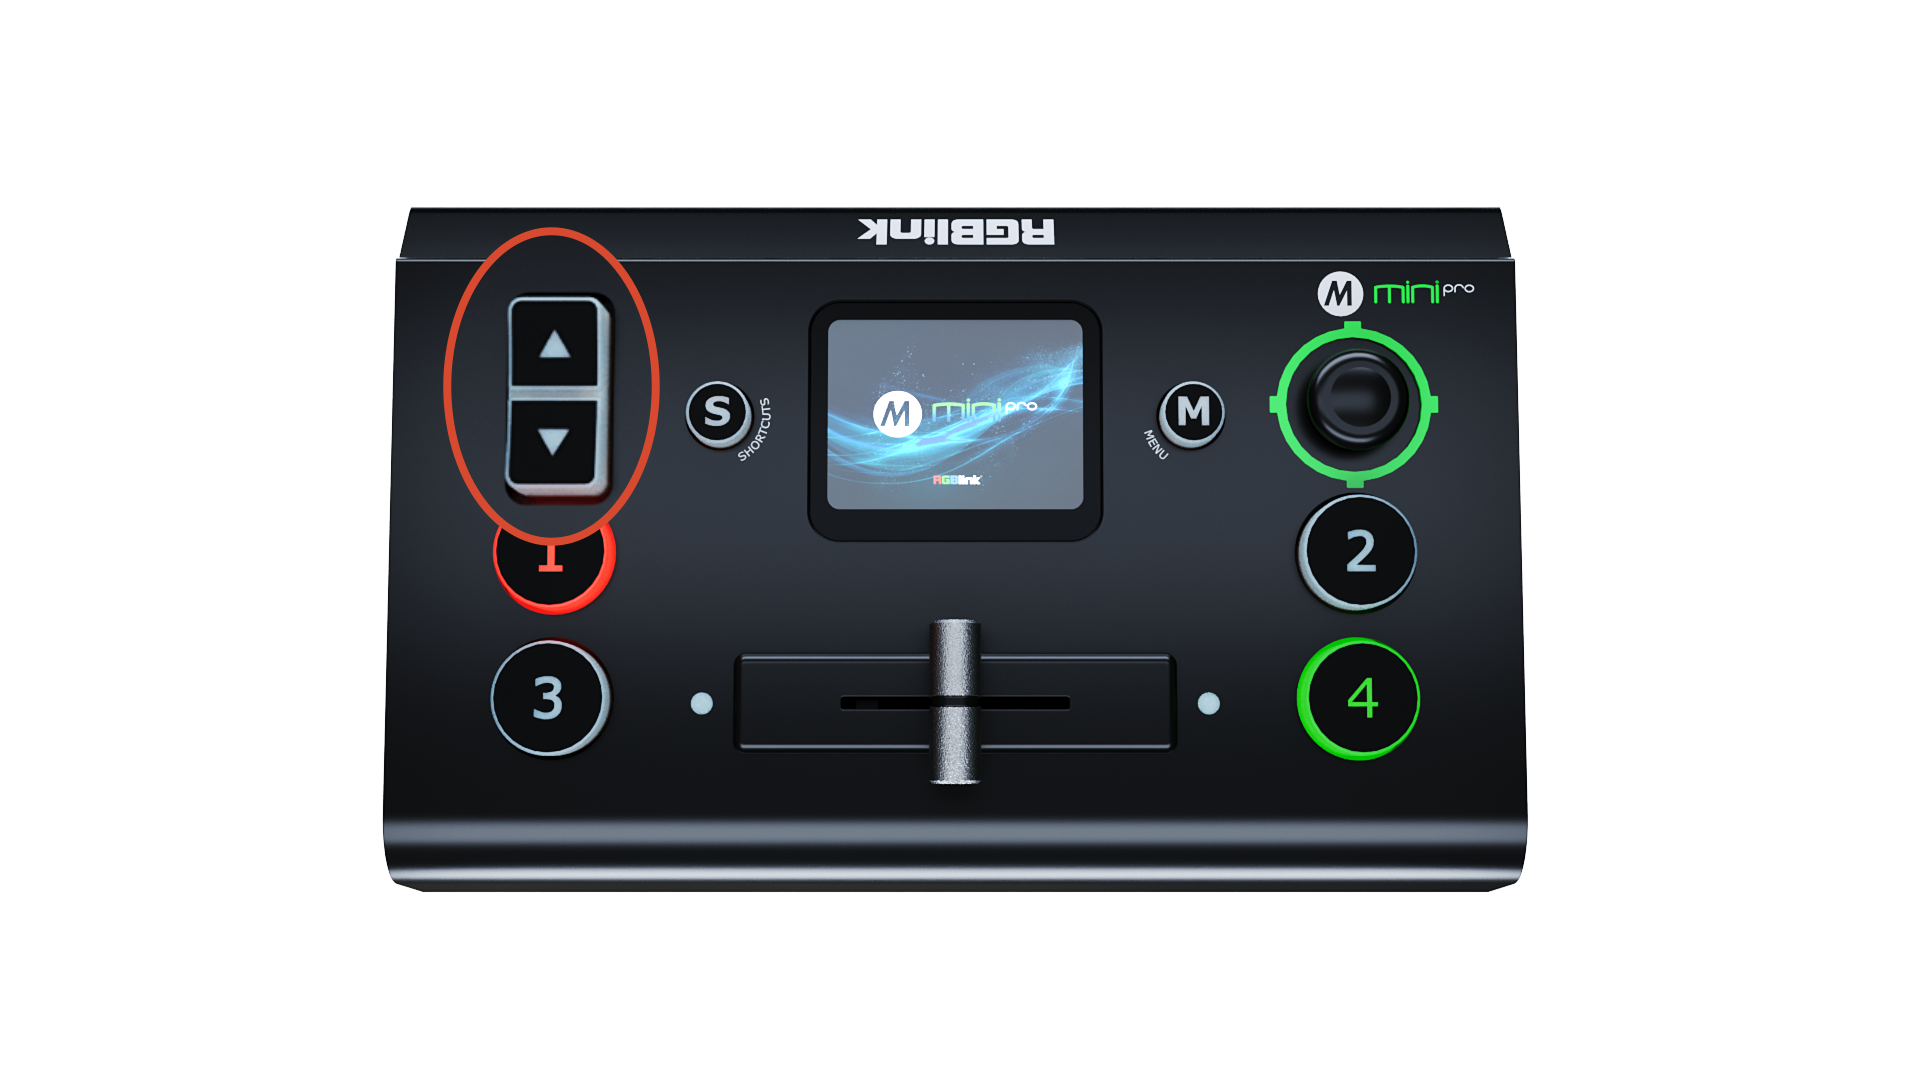
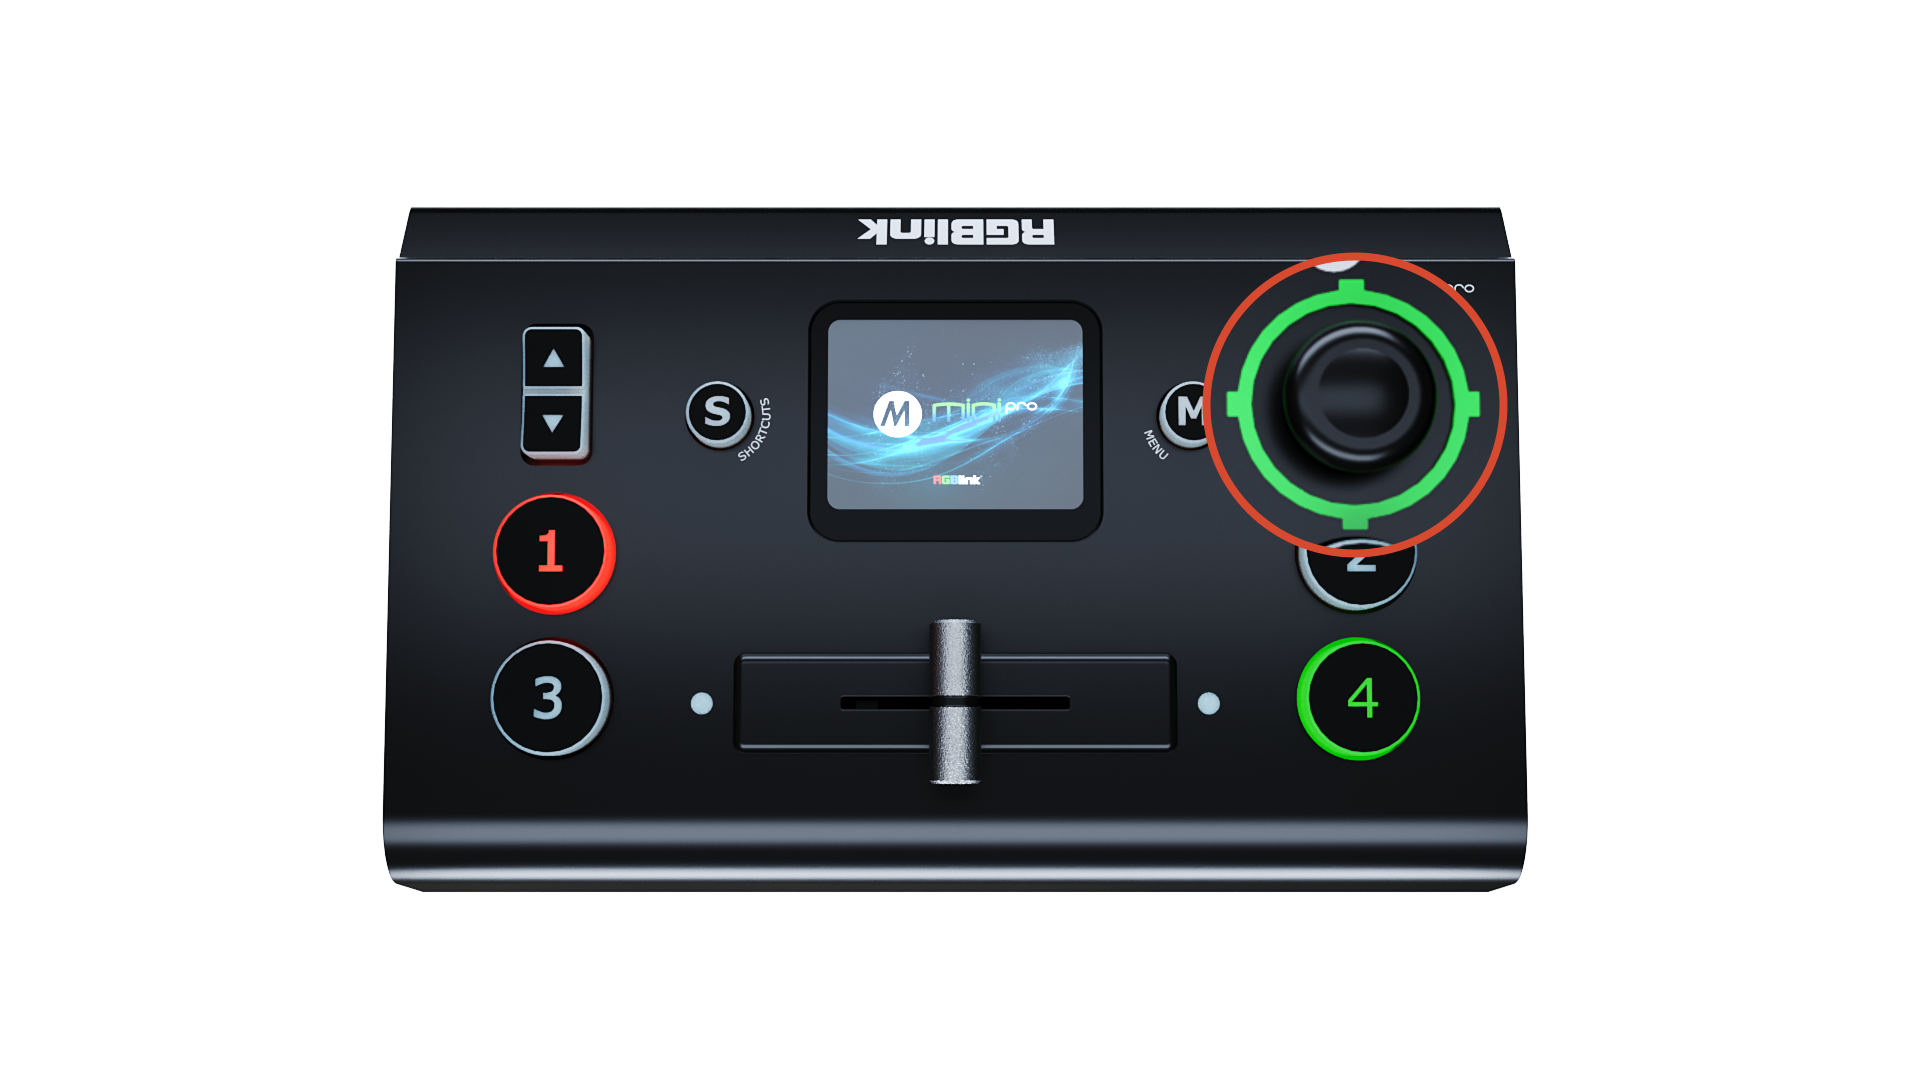
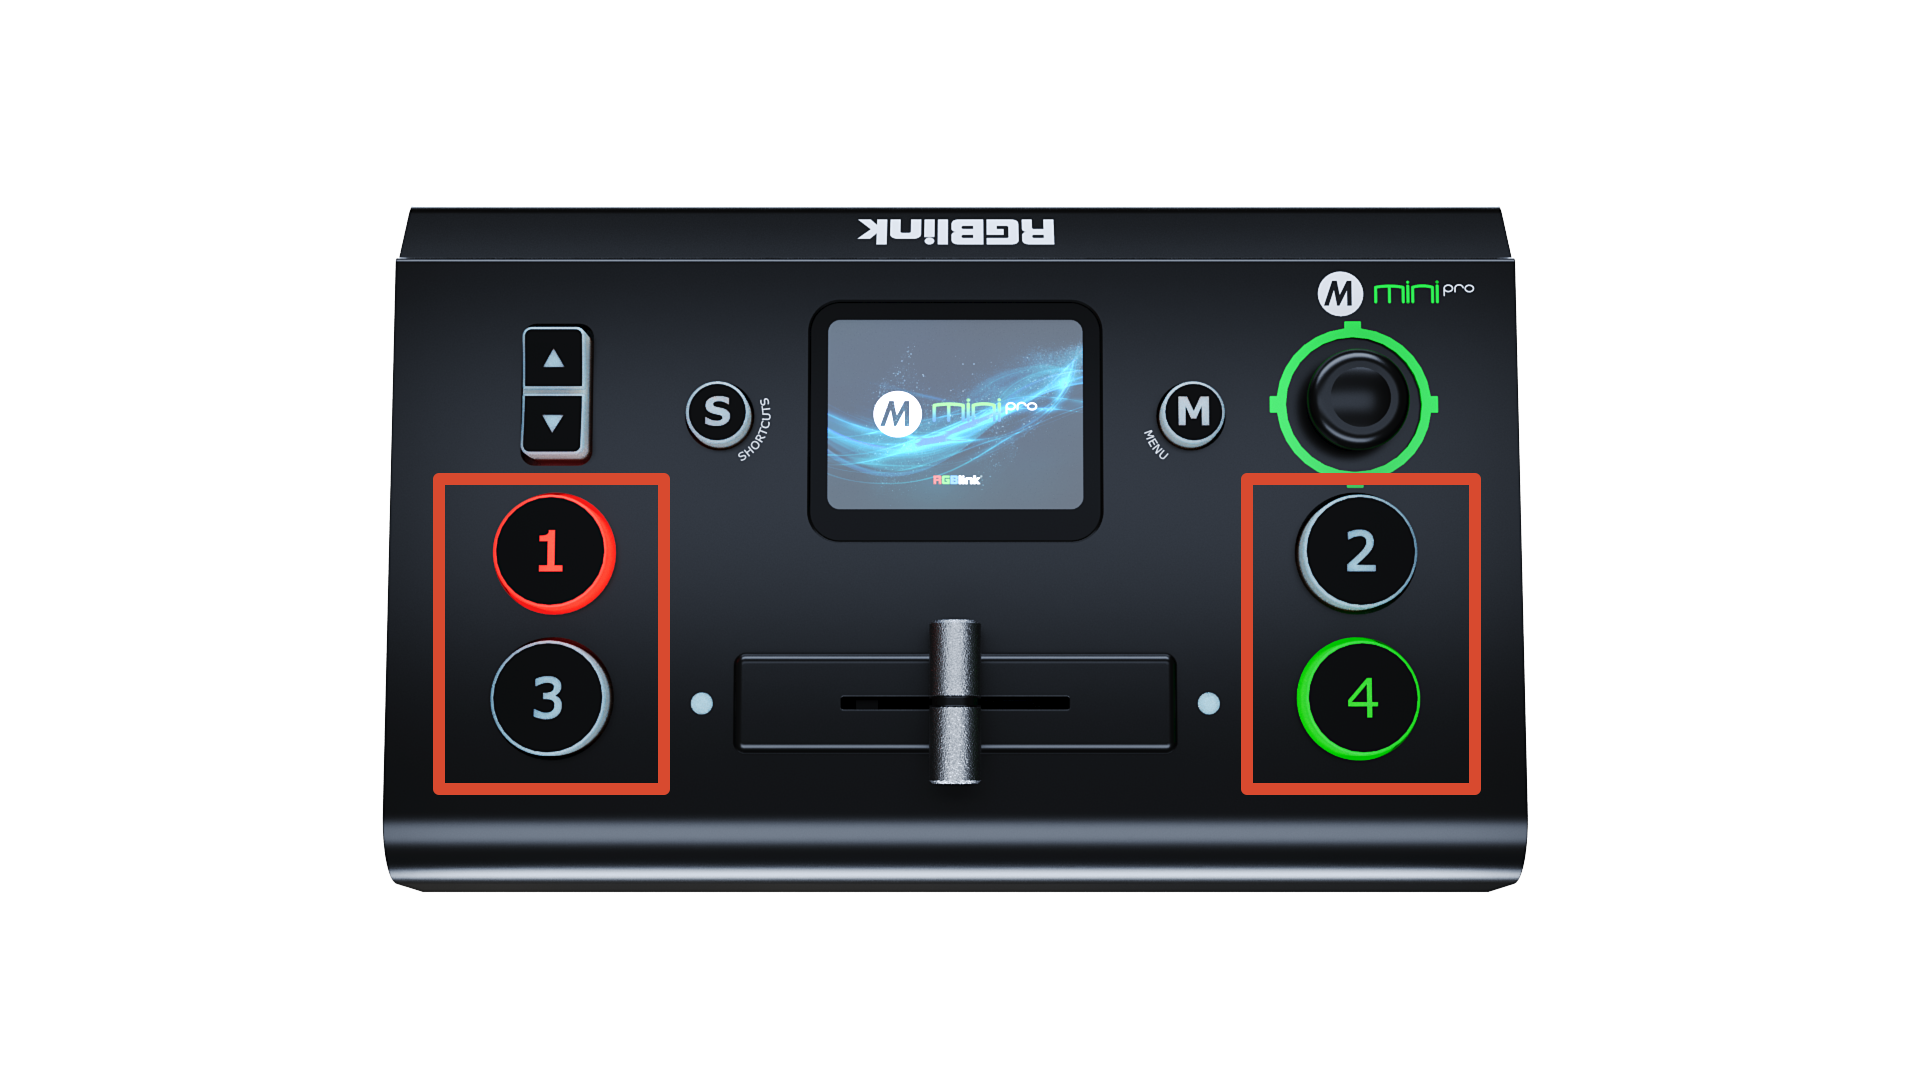
❶Toggle+ Preset Menu: Adjust Program volume. + PIP Mode: Proportionally adjust size of sub-picture. + PTZ Control: Zoom in and zoom out. + IP Setting: Adjust IP values.
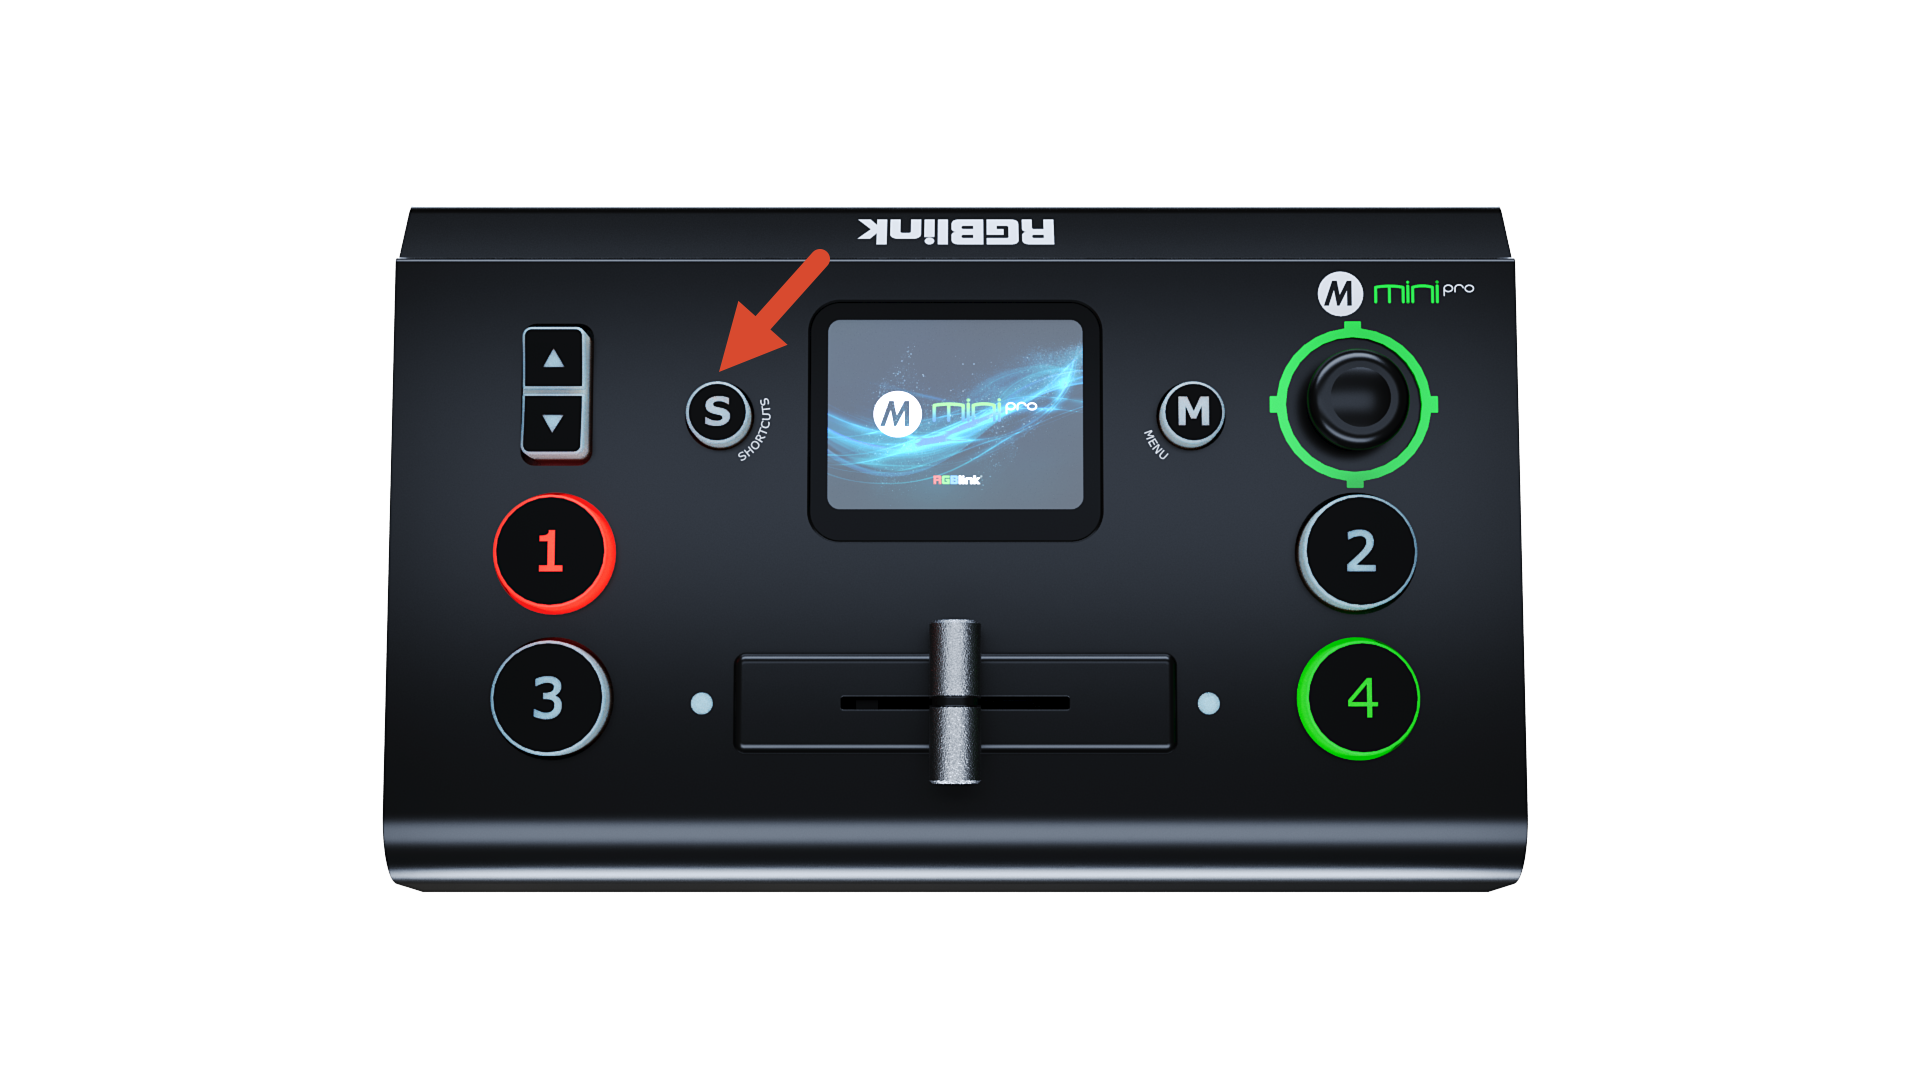
❷S ButtonPress shortcut button to enter quick operation interface, which includes 8 Presets to load, Audio, Record on/off, Stream on/off.
❸Touch Screen+ For menu operation and 4 inputs monitoring. + PTZ Control: Monitor the screen of the currently controlled camera, and save the currently set screen by tapping it, and a call button can be formed.
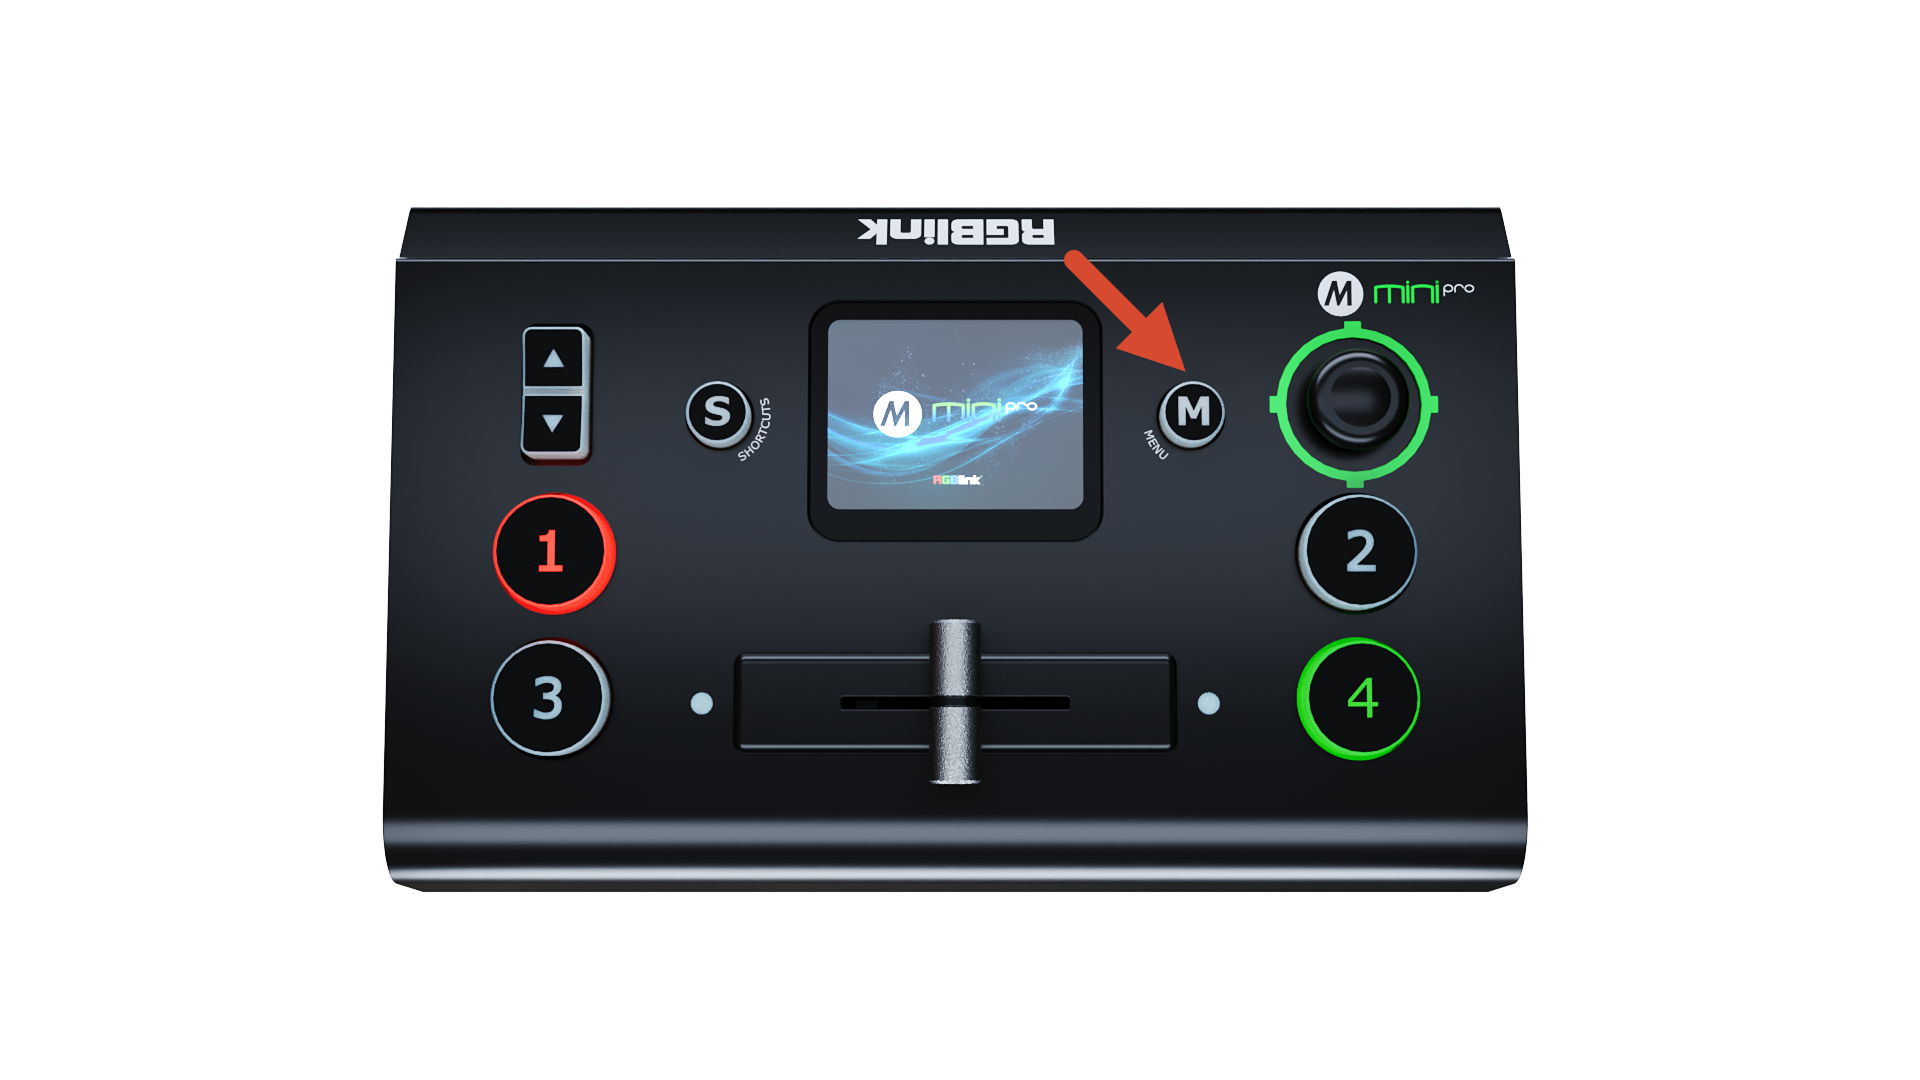
❹M Button+ Single Click - 4-window Monitoring Interface: Press to enter Menu Interface. - Menu Interface: Press to enter 4-window Monitoring Interface. - Others: Press to exit. + Long Press - 4-window Monitoring Interface: Press to lock control panel. - Others: Press to 4-window Monitoring Interface.
❺5-Direction JoystickMove Up/Down/Left/Right + PTZ Control: Set pan, tilt and zoom for PTZ camera. + Layer Adjustment: Position adjustment for sub-layer.
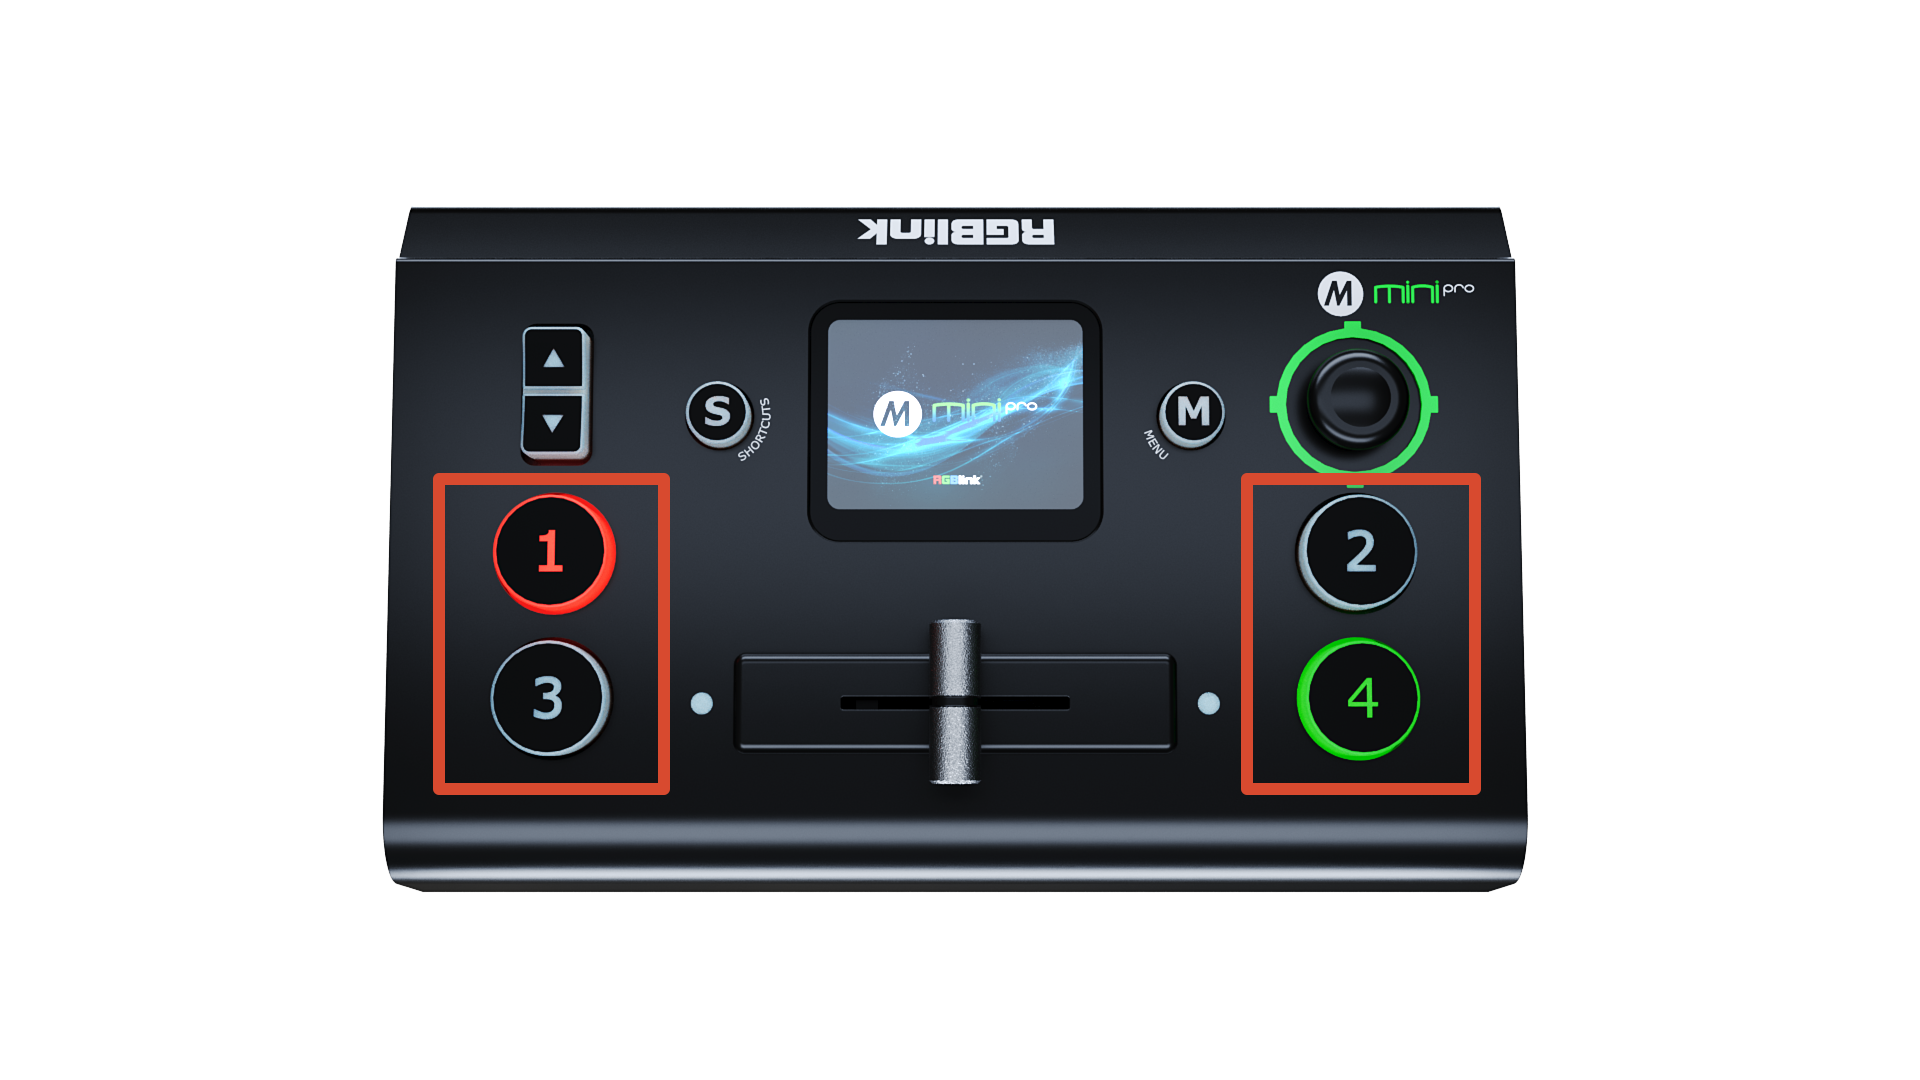
❻①②③④+ Button Unlit: no input signal. + Button Lit White: unselected input signal. + Button Blinked Green: Preview out. + Button Lit Red: Program out.
❼T-BarPreview and Program views can be transitioned by pushing T-Bar.

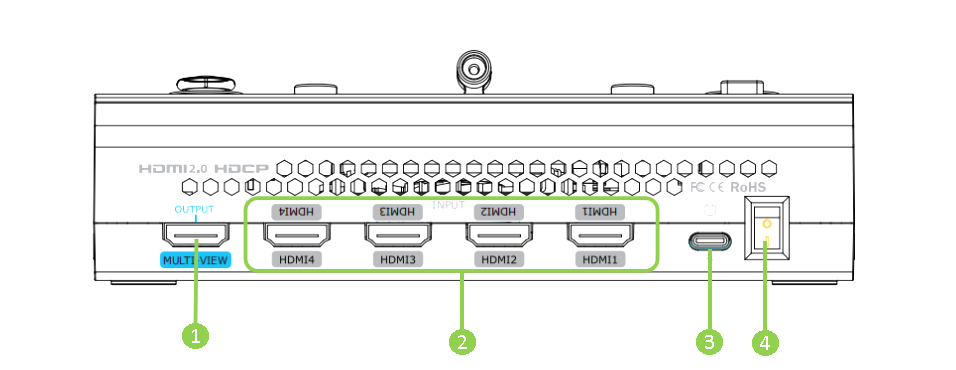
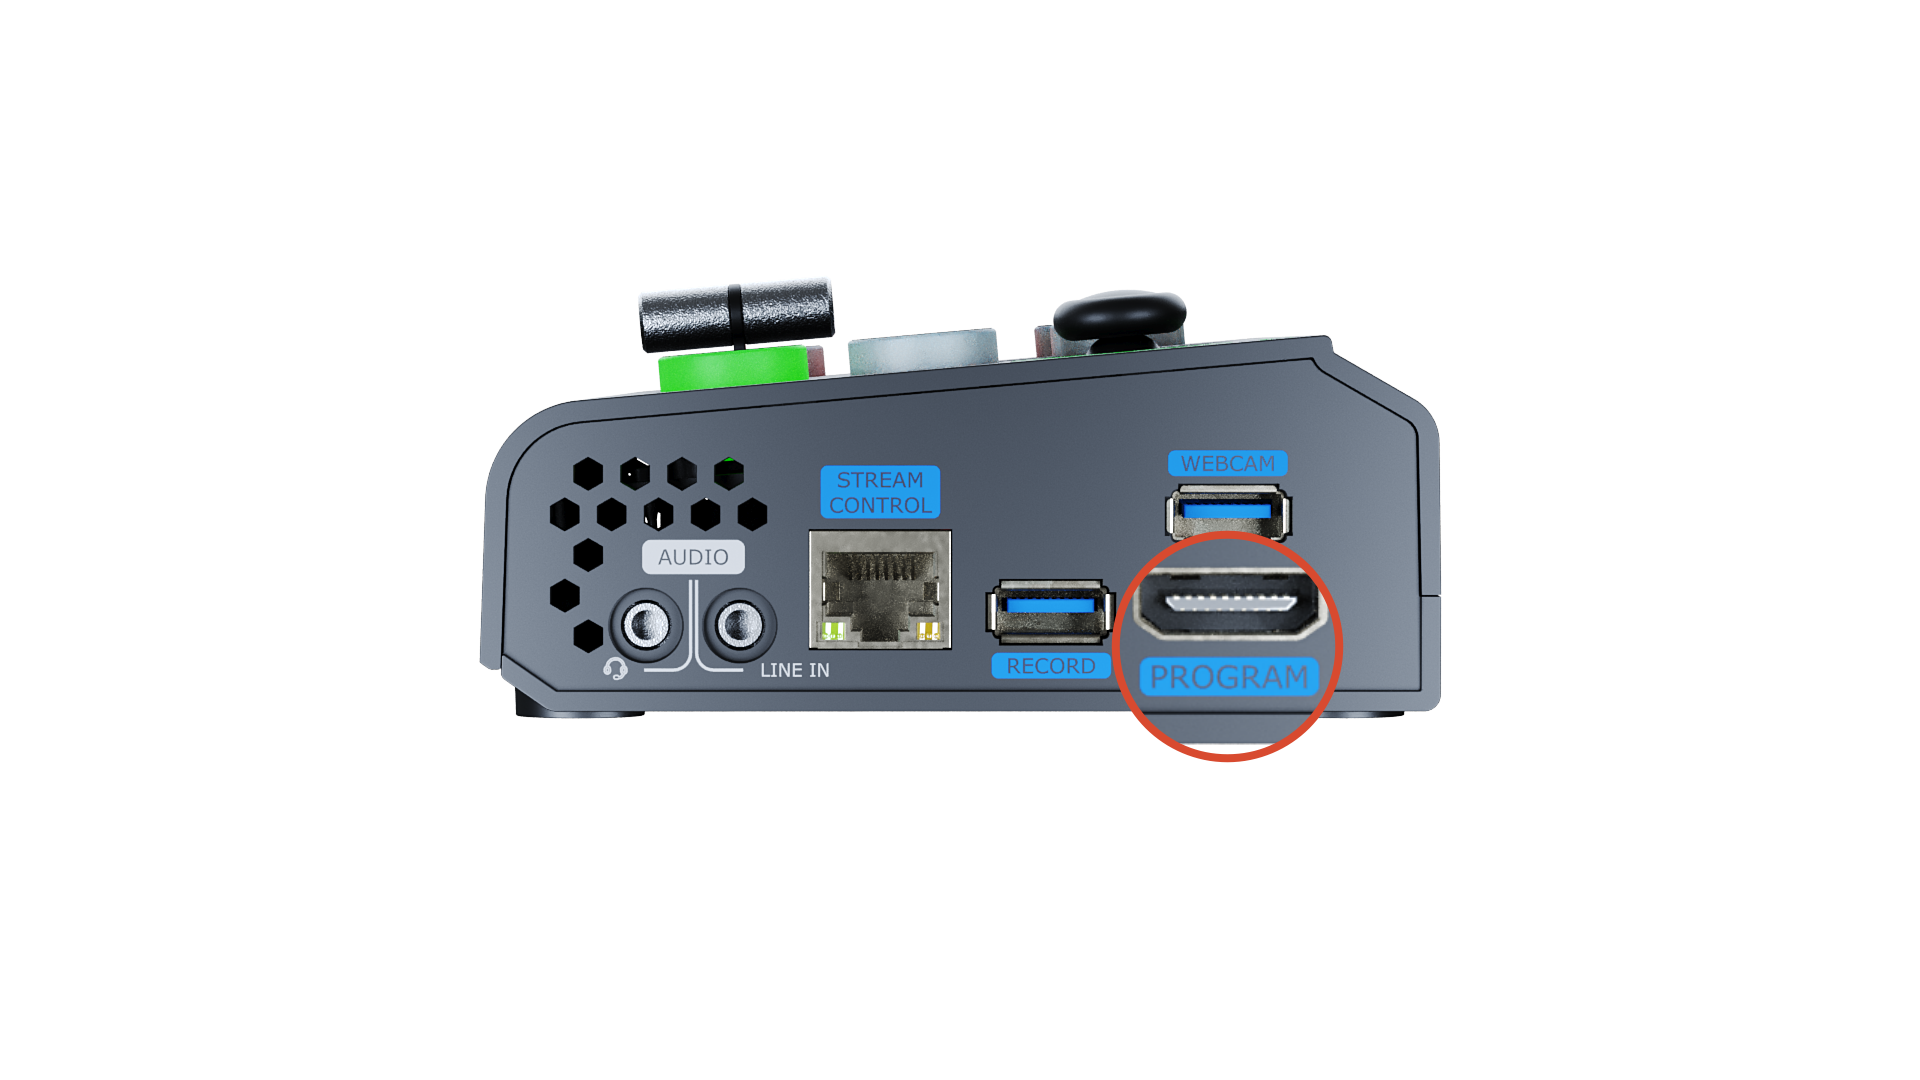
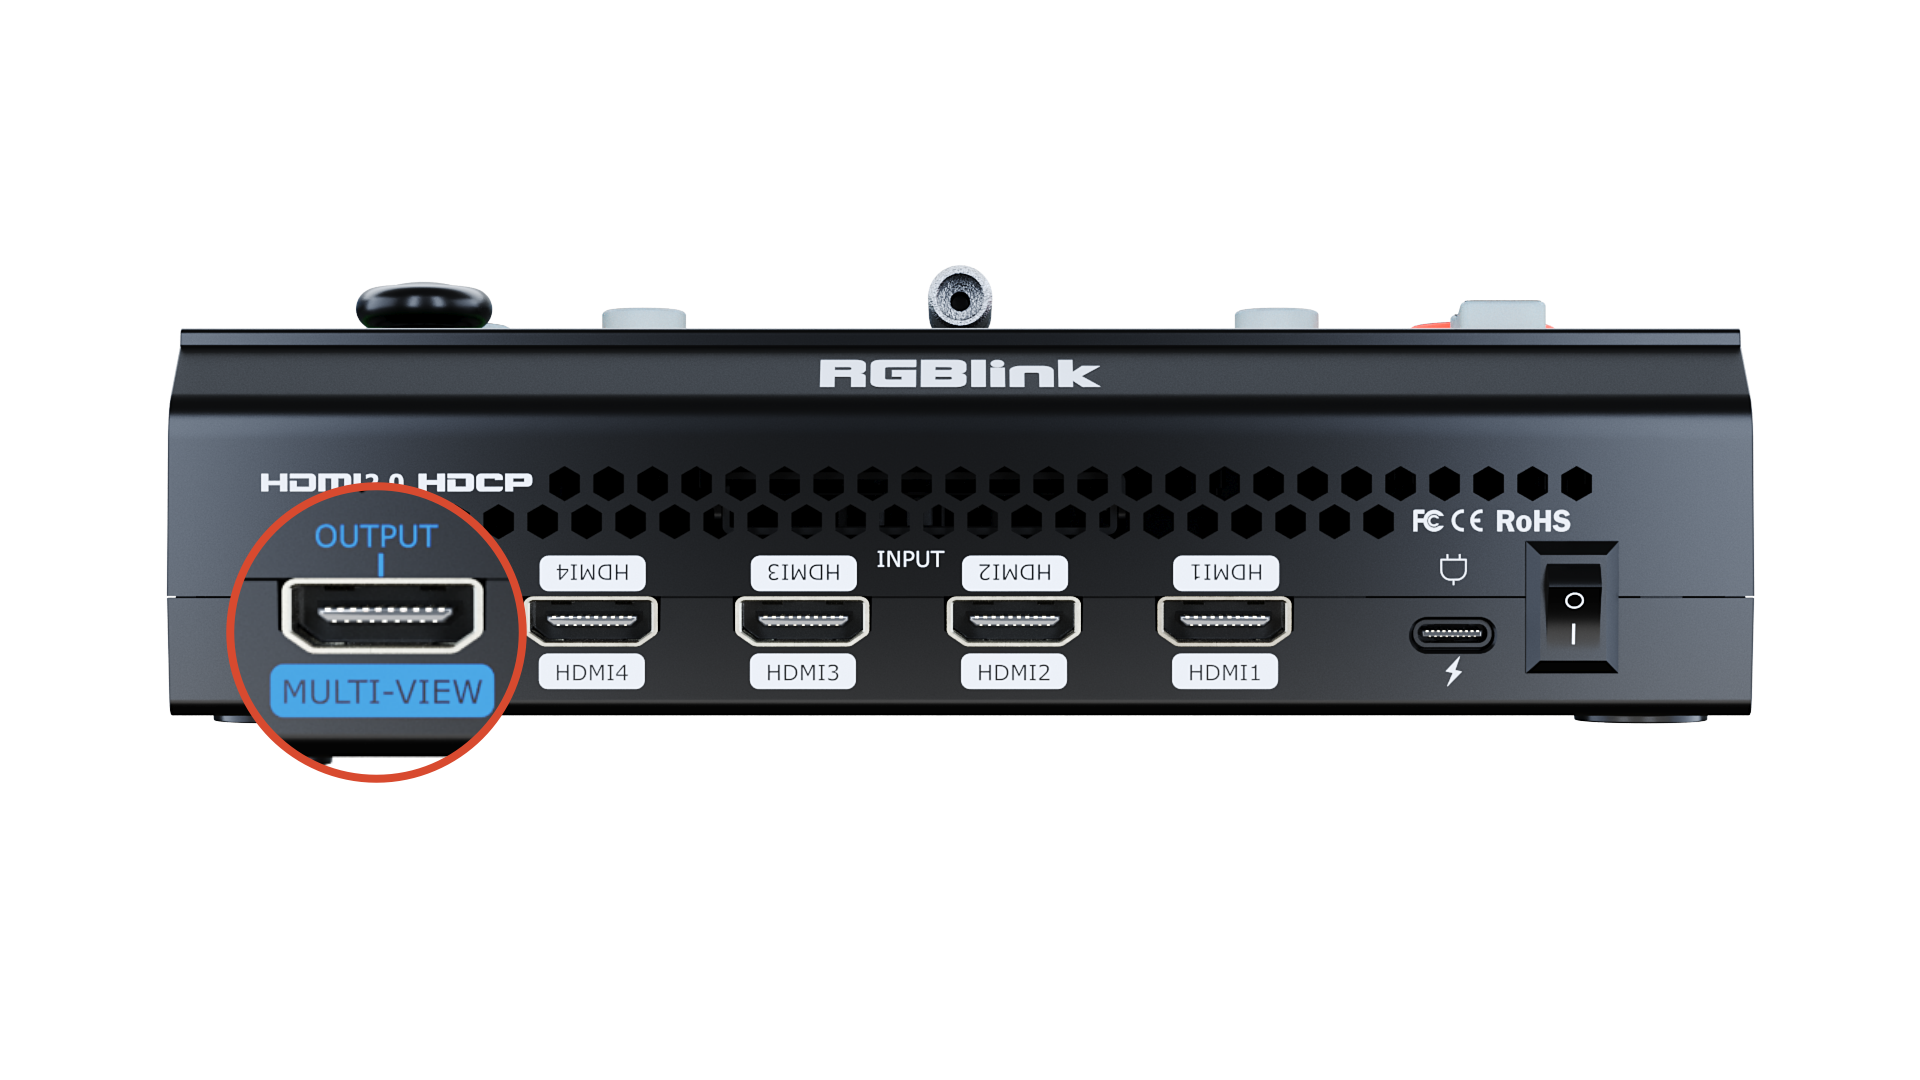
1.3Front Panel

No.ItemDescription
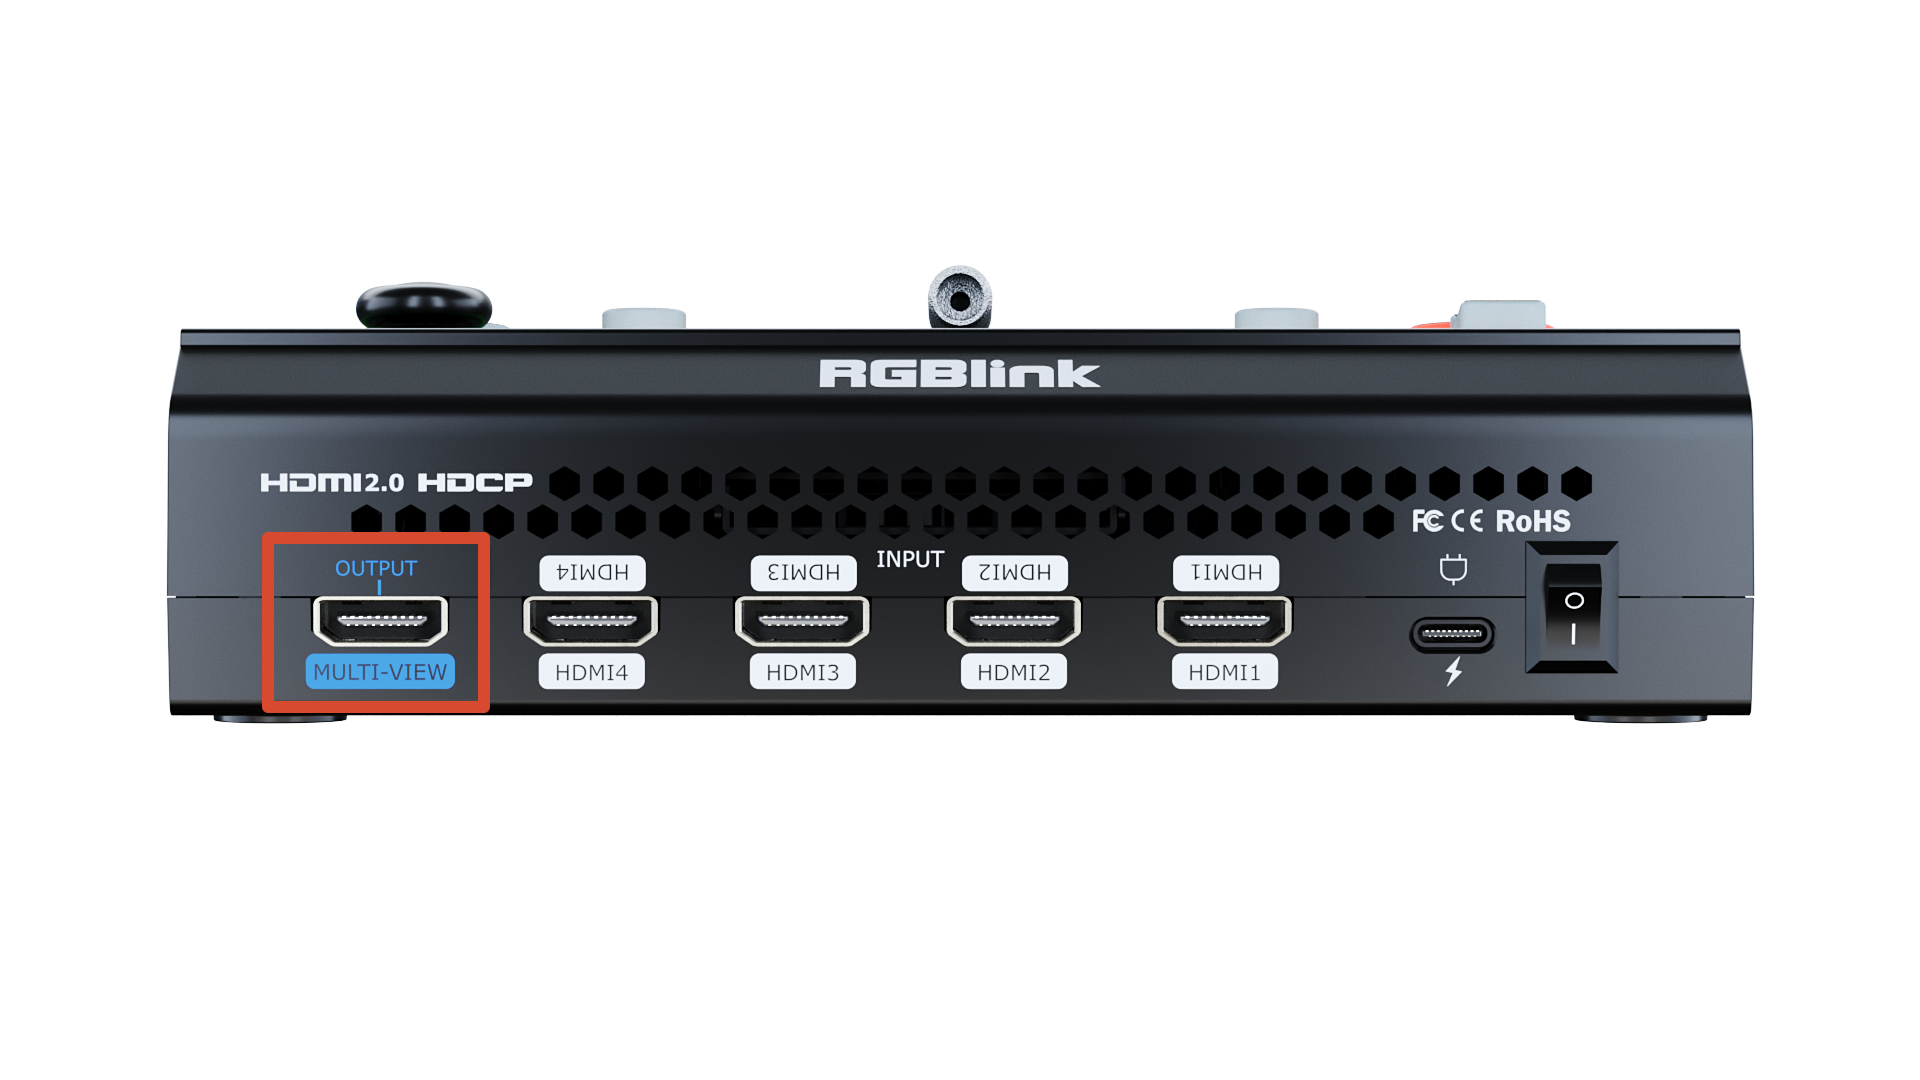
❶MULTI-VIEW OutputDefault as multi-view output, can set as Program, HDMI 1~4 or AUX output.
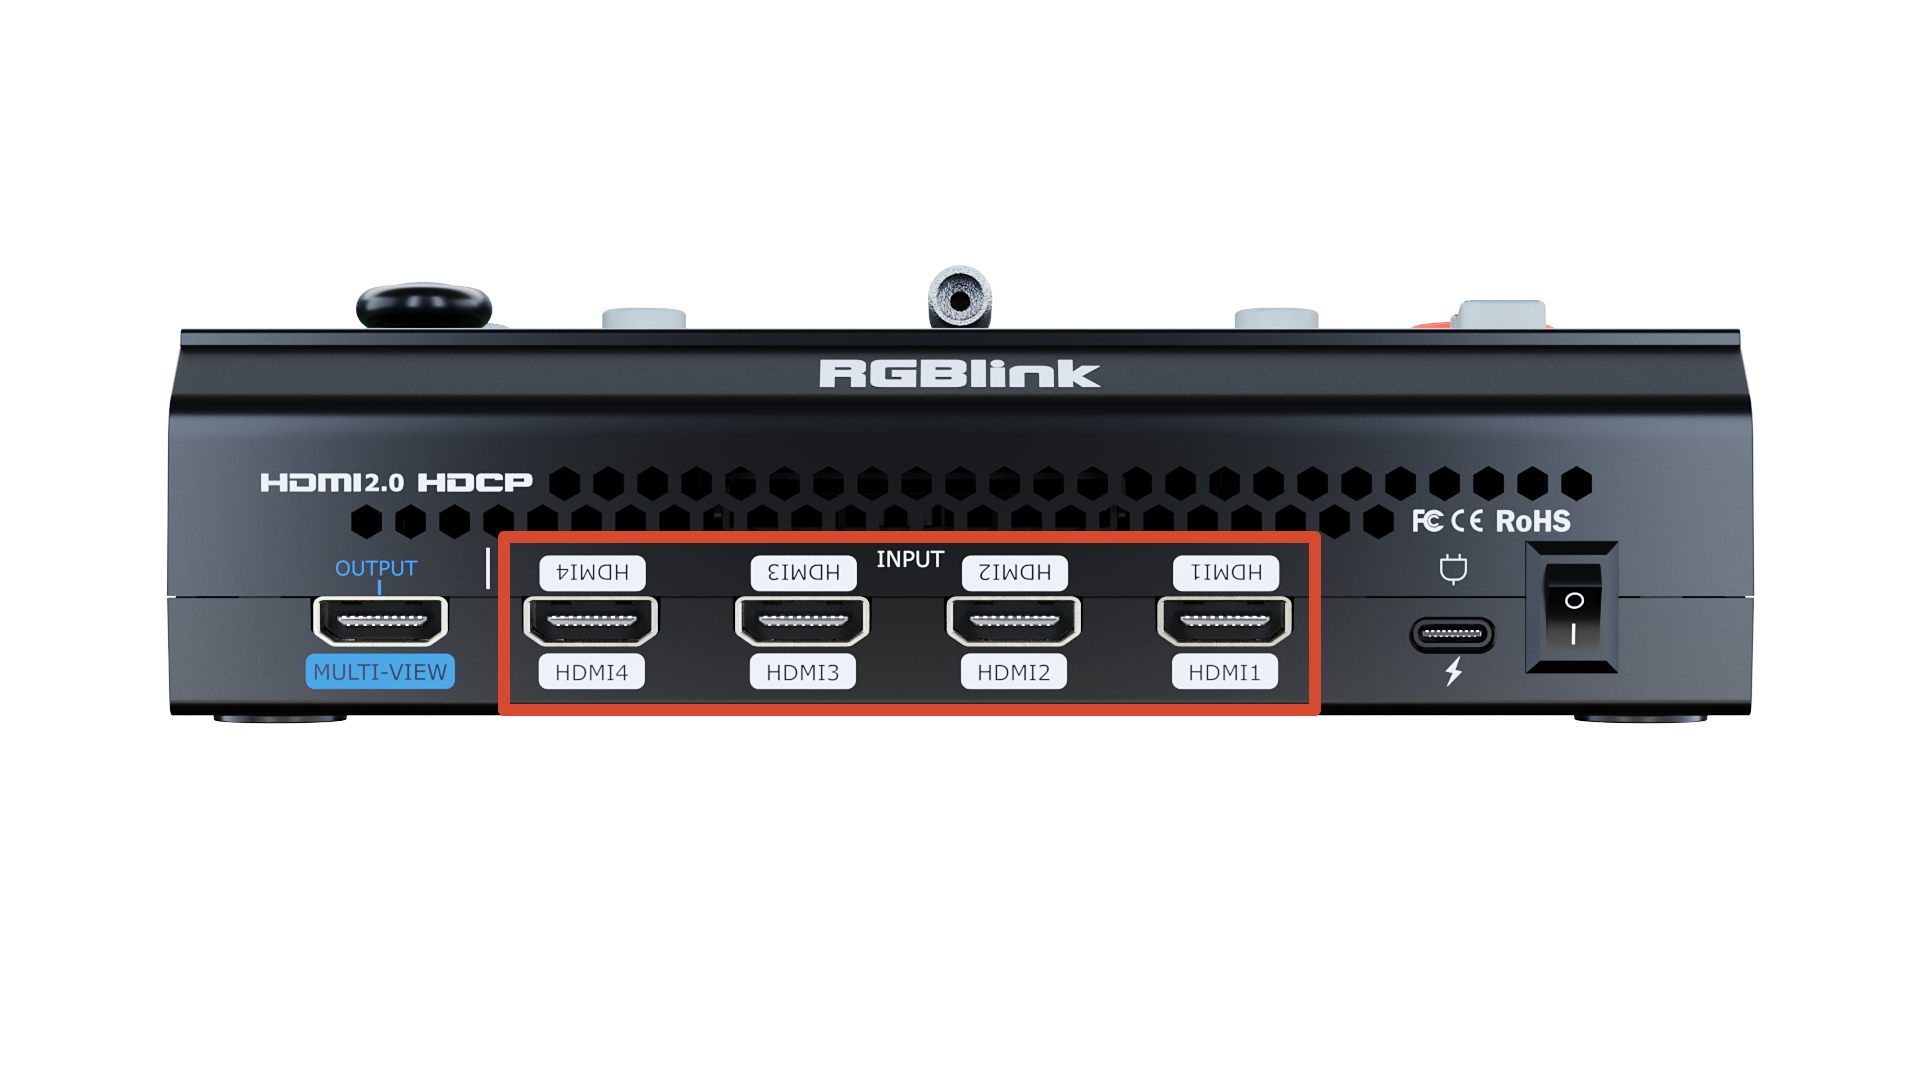
❷HDMI 1~4 Inputs+ Four HDMI input channels for connecting HDMI sources. + 4K resolution and downward compatible with all resolution.
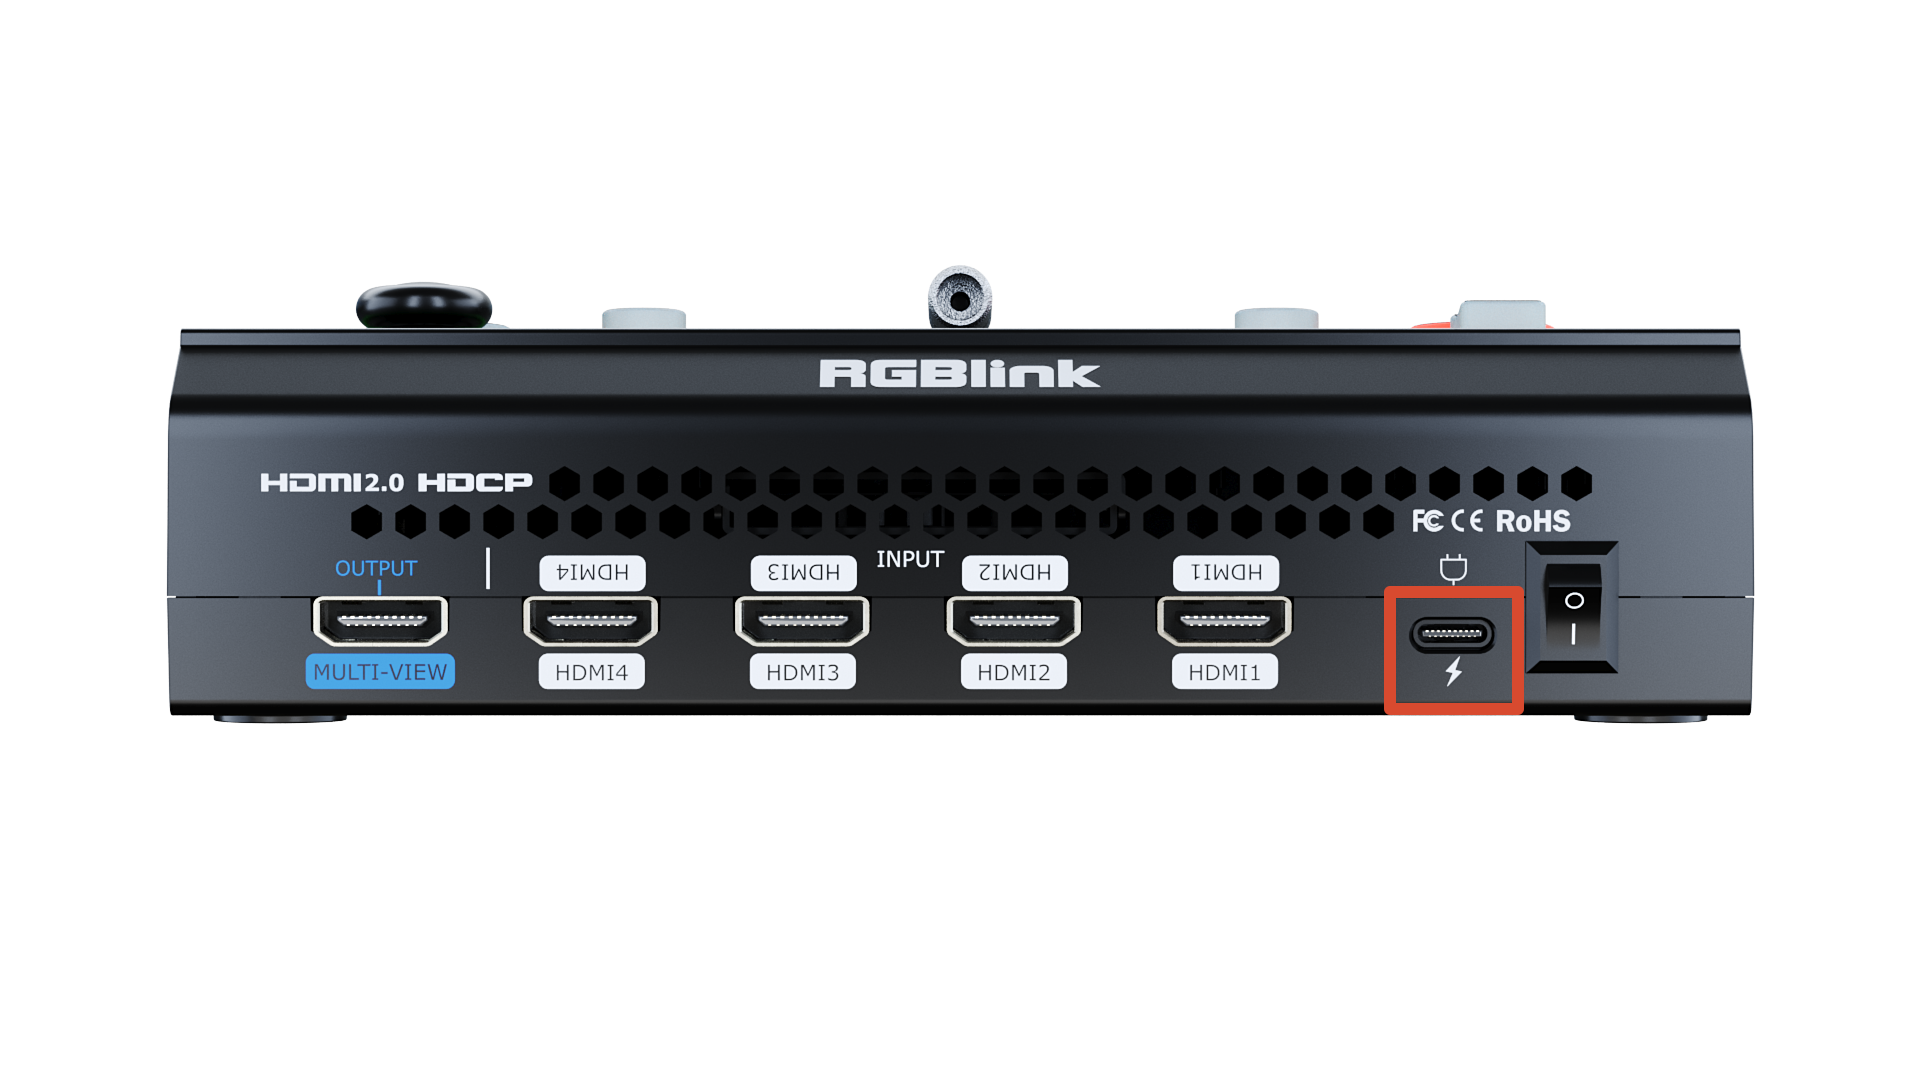
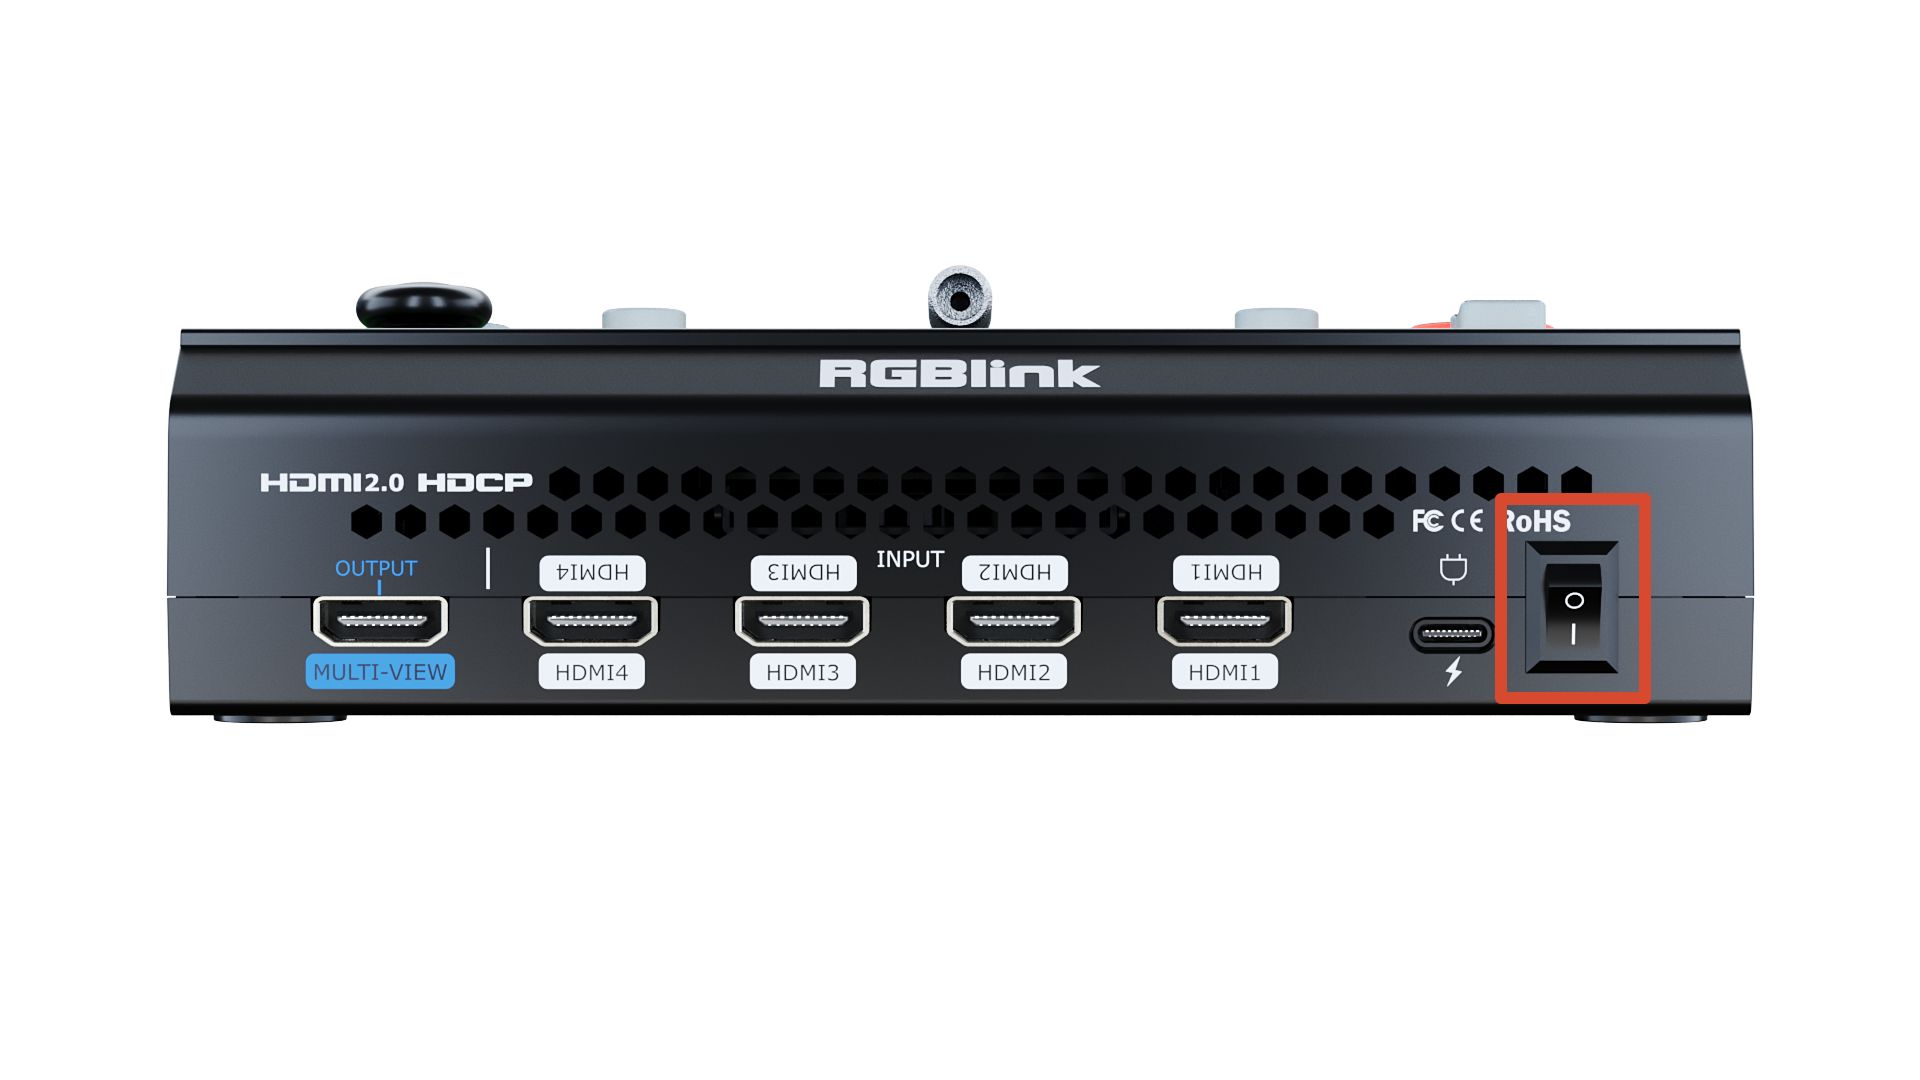
❸USB-C Power SocketPD protocol, 12V/2.5A.
❹Power SwitchRocker switch to power on or off the device.
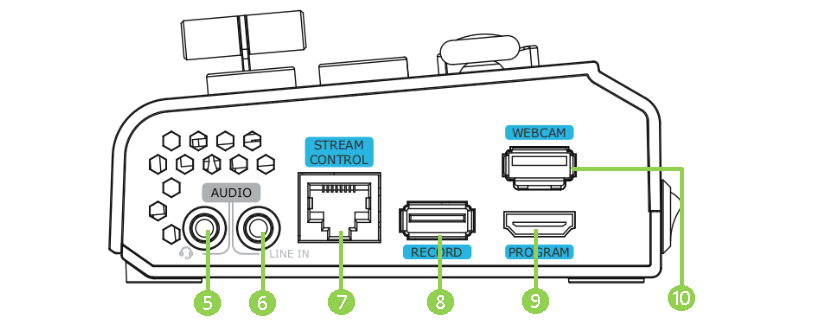
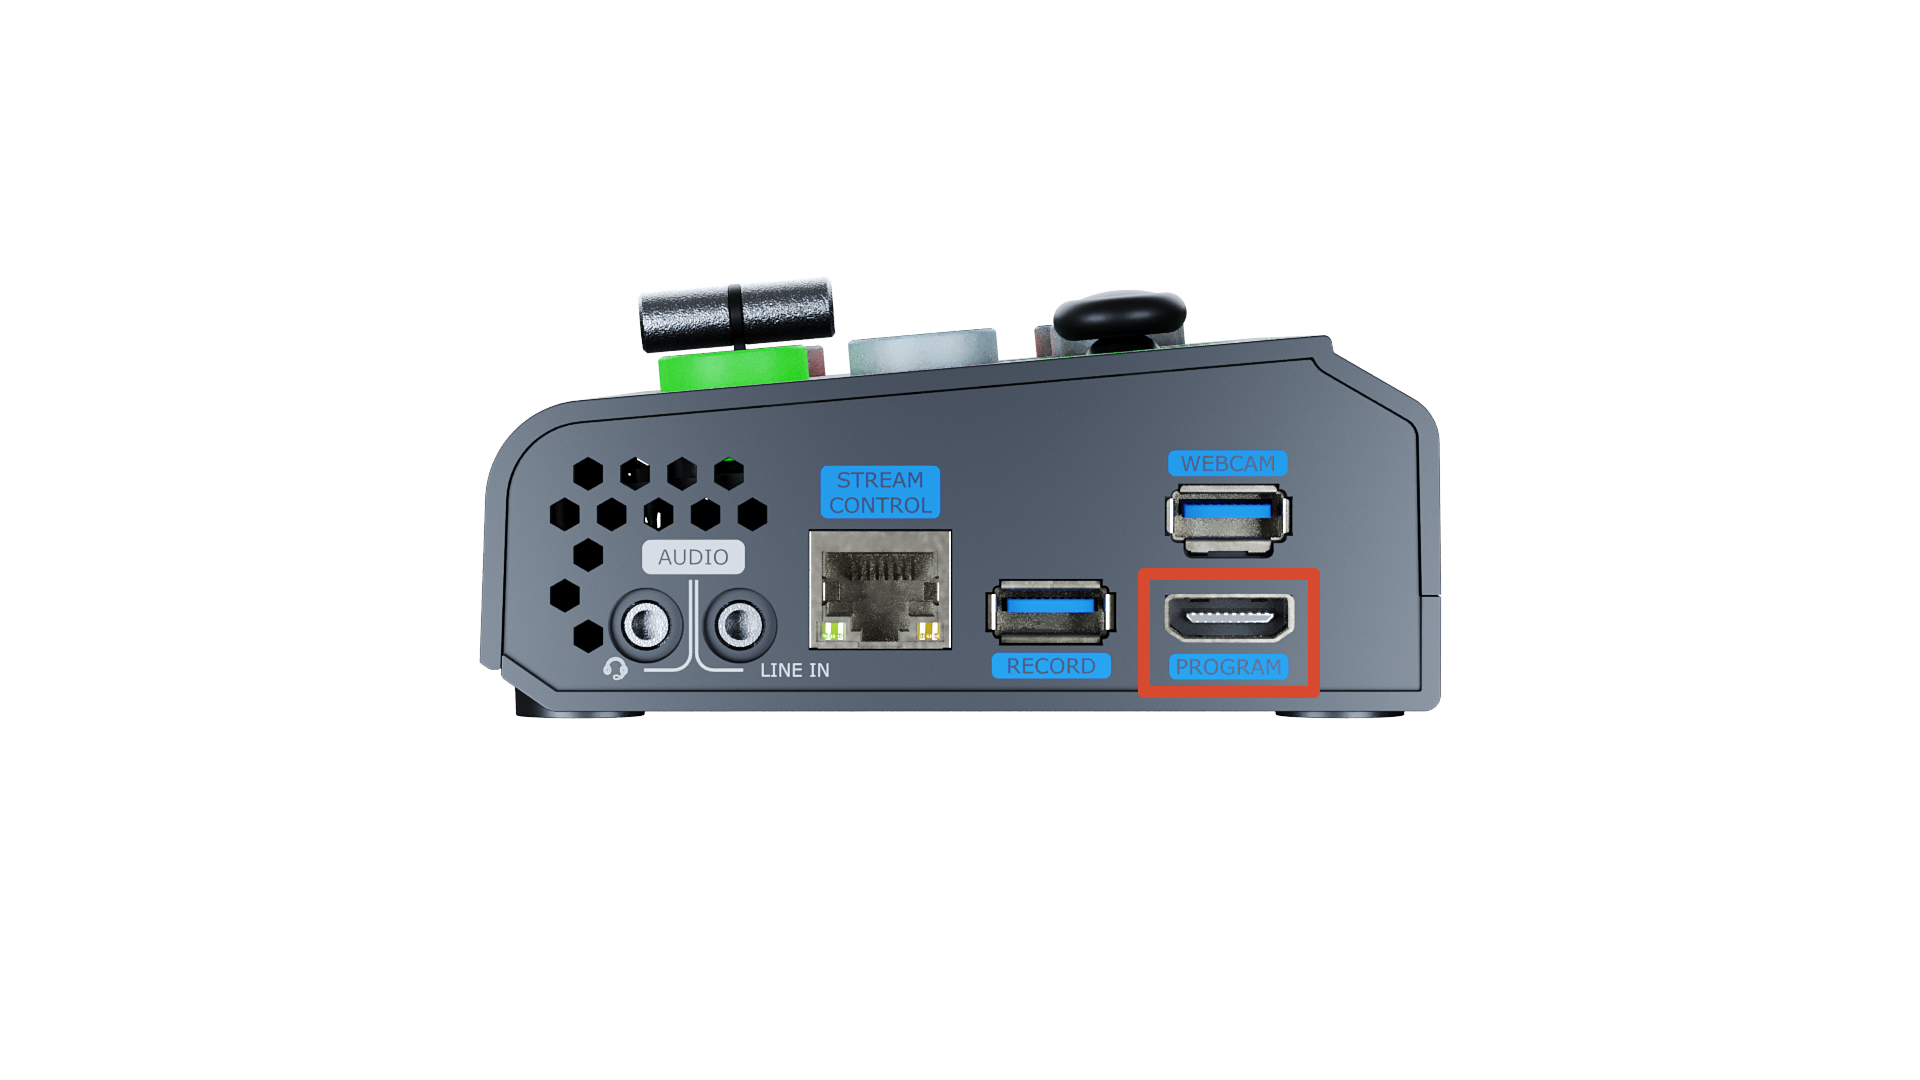
❺MIC In & Audio OutSupport one passive MIC input and one audio output via 2-in-1 audio split cable.
❻Line-inActive audio input, connect to mobile phone, computer or audio console.
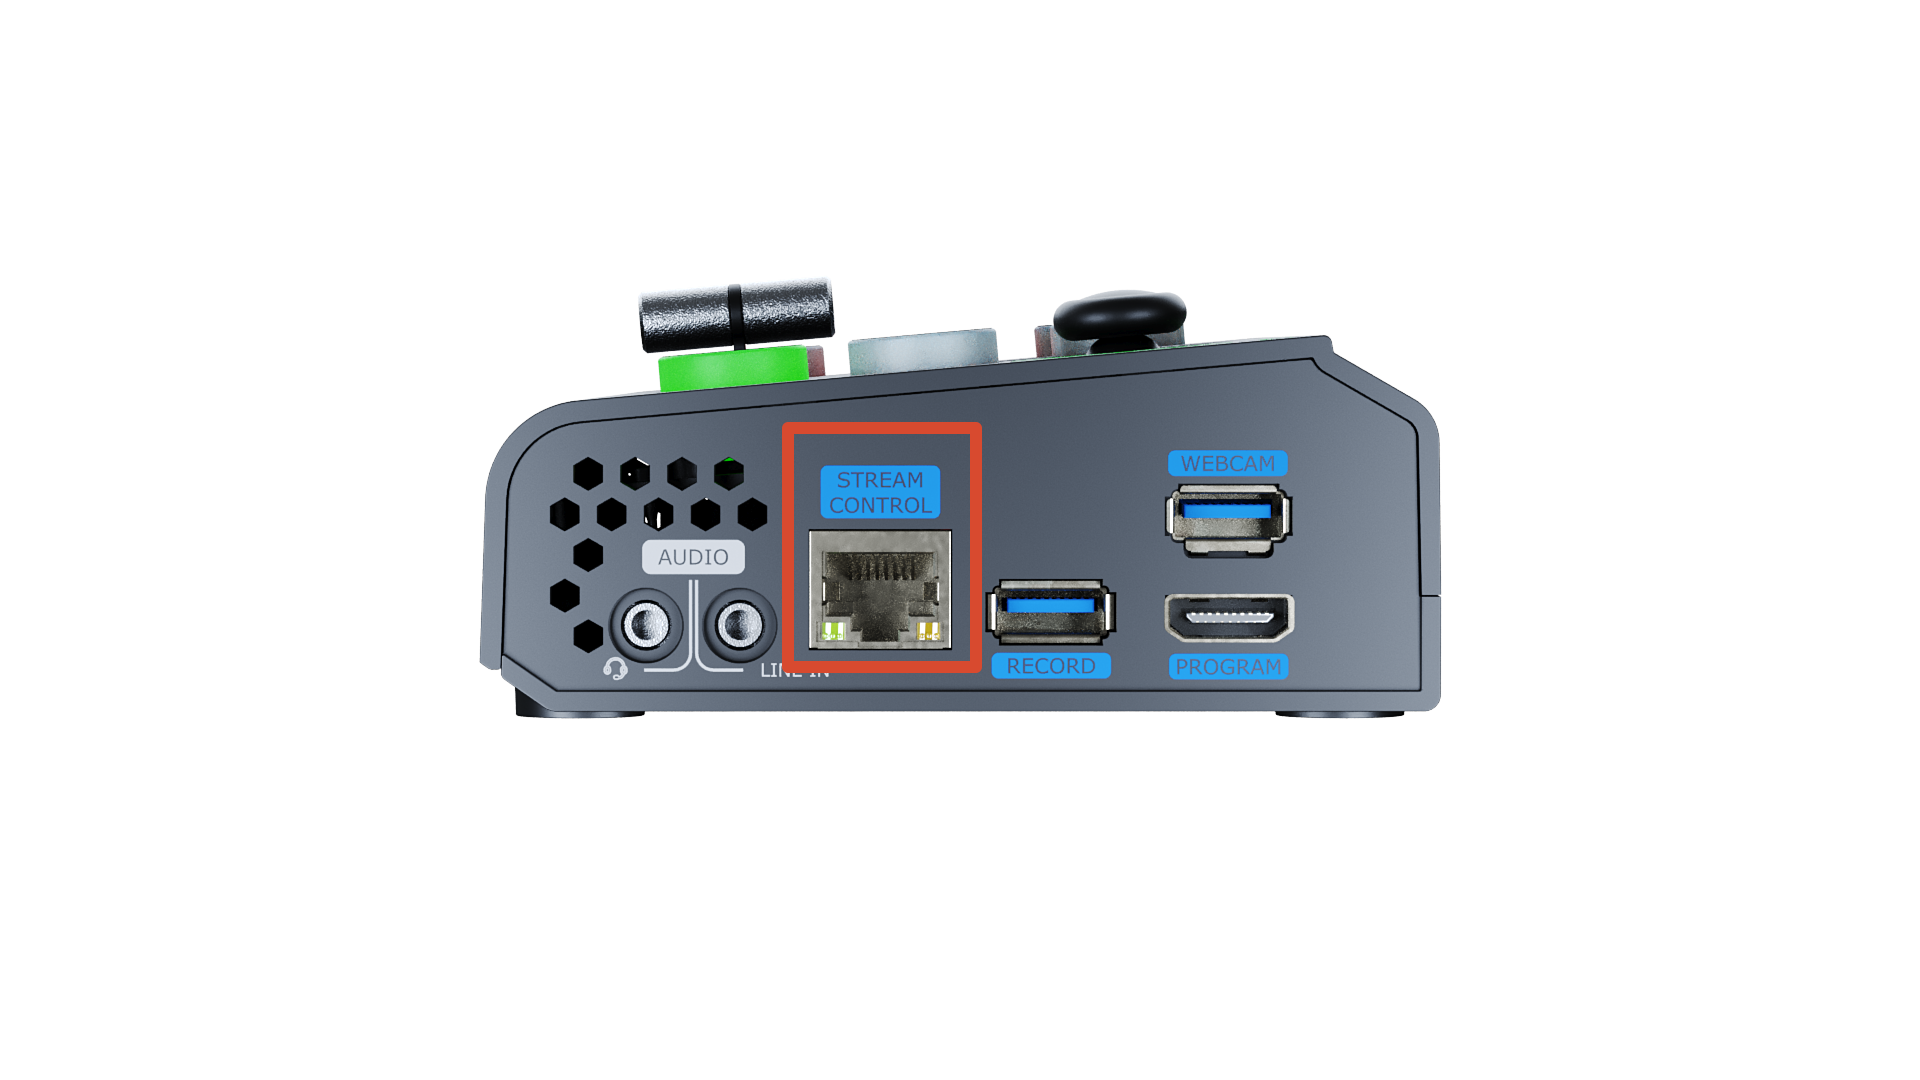
❼Ethernet Port+ Control: Connected to PTZ camera for direct control. + Stream: Access to internet for live streaming.
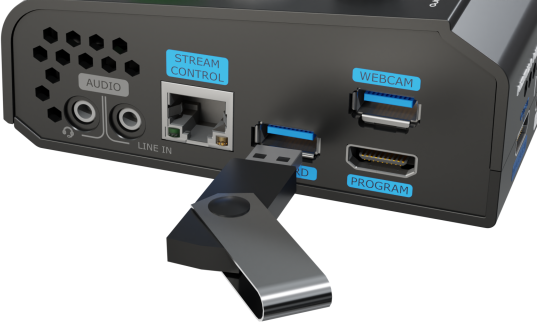
❽RECORDConnect to SSD or U disk to record audio and video from Program.
❾PROGRAM OutputDefault to output real-time scene, which can be set as Multi-view Preview or Test Pattern.
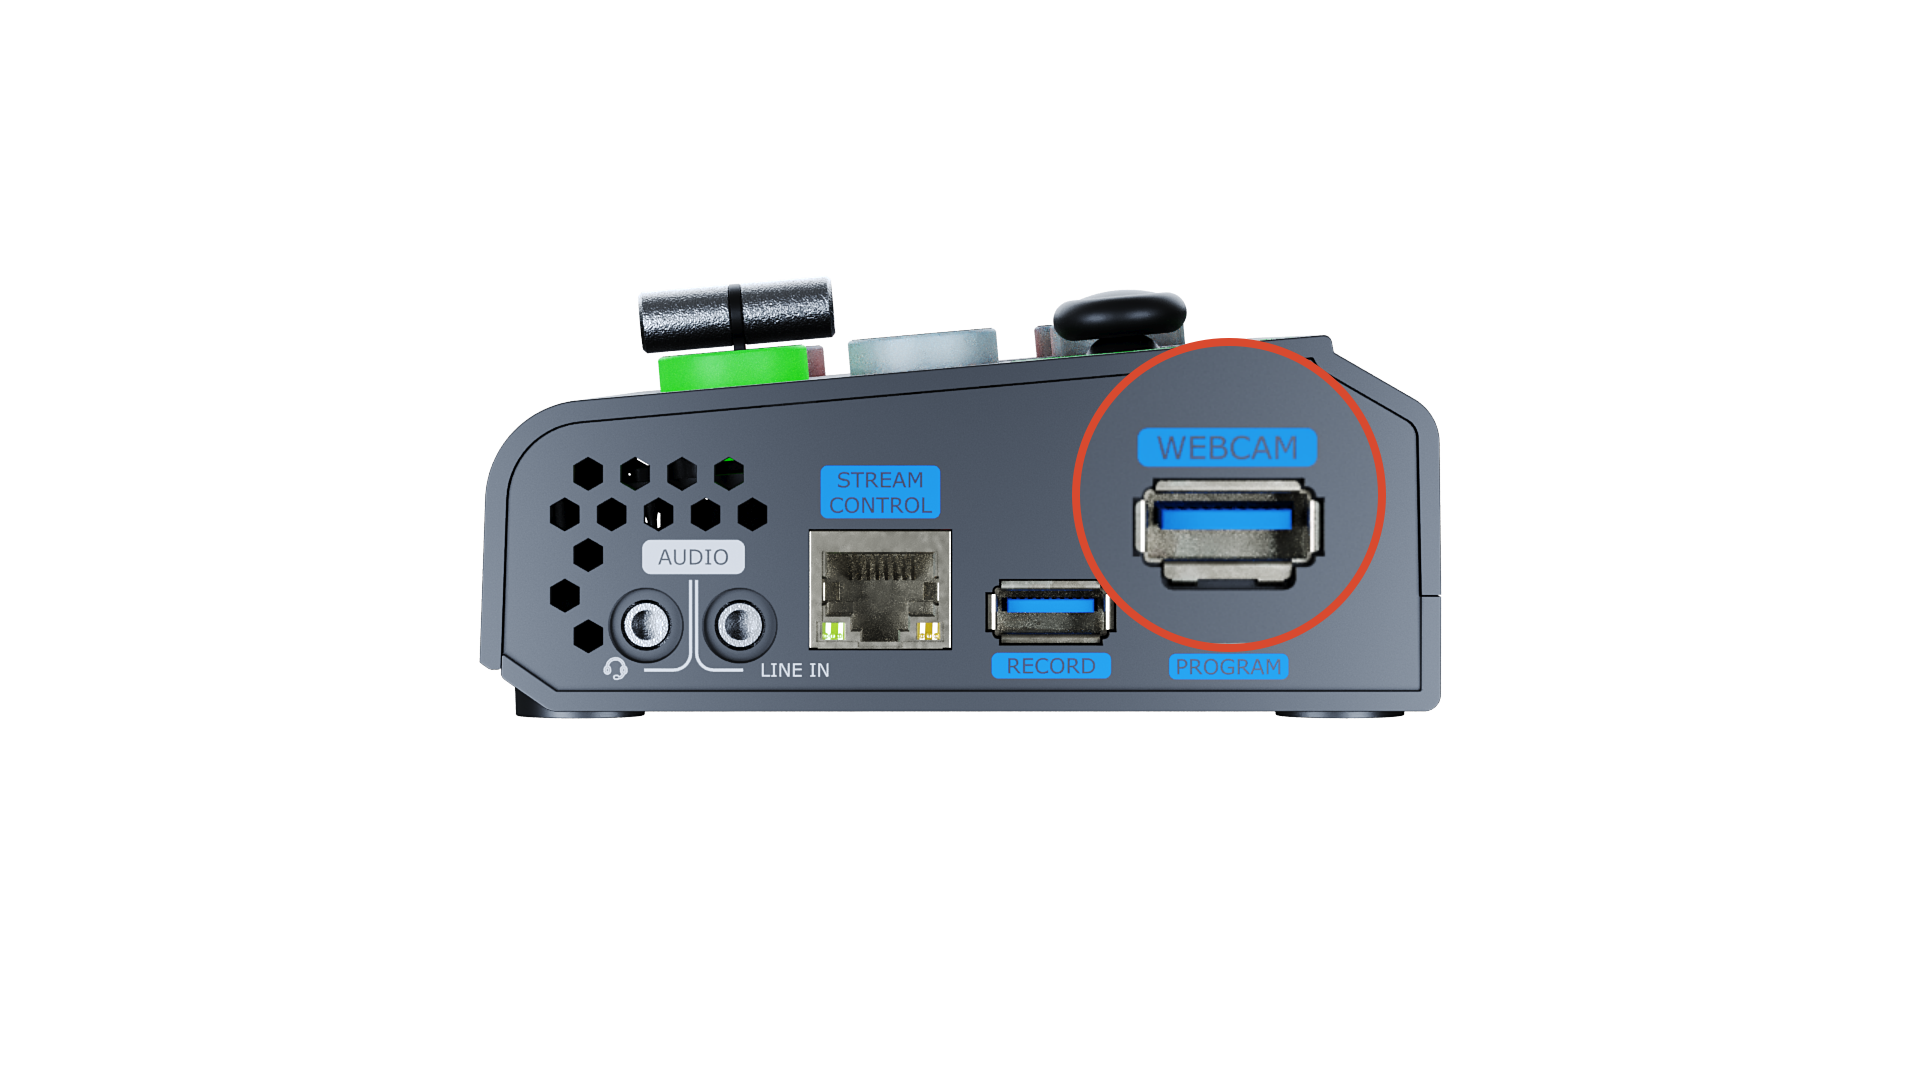
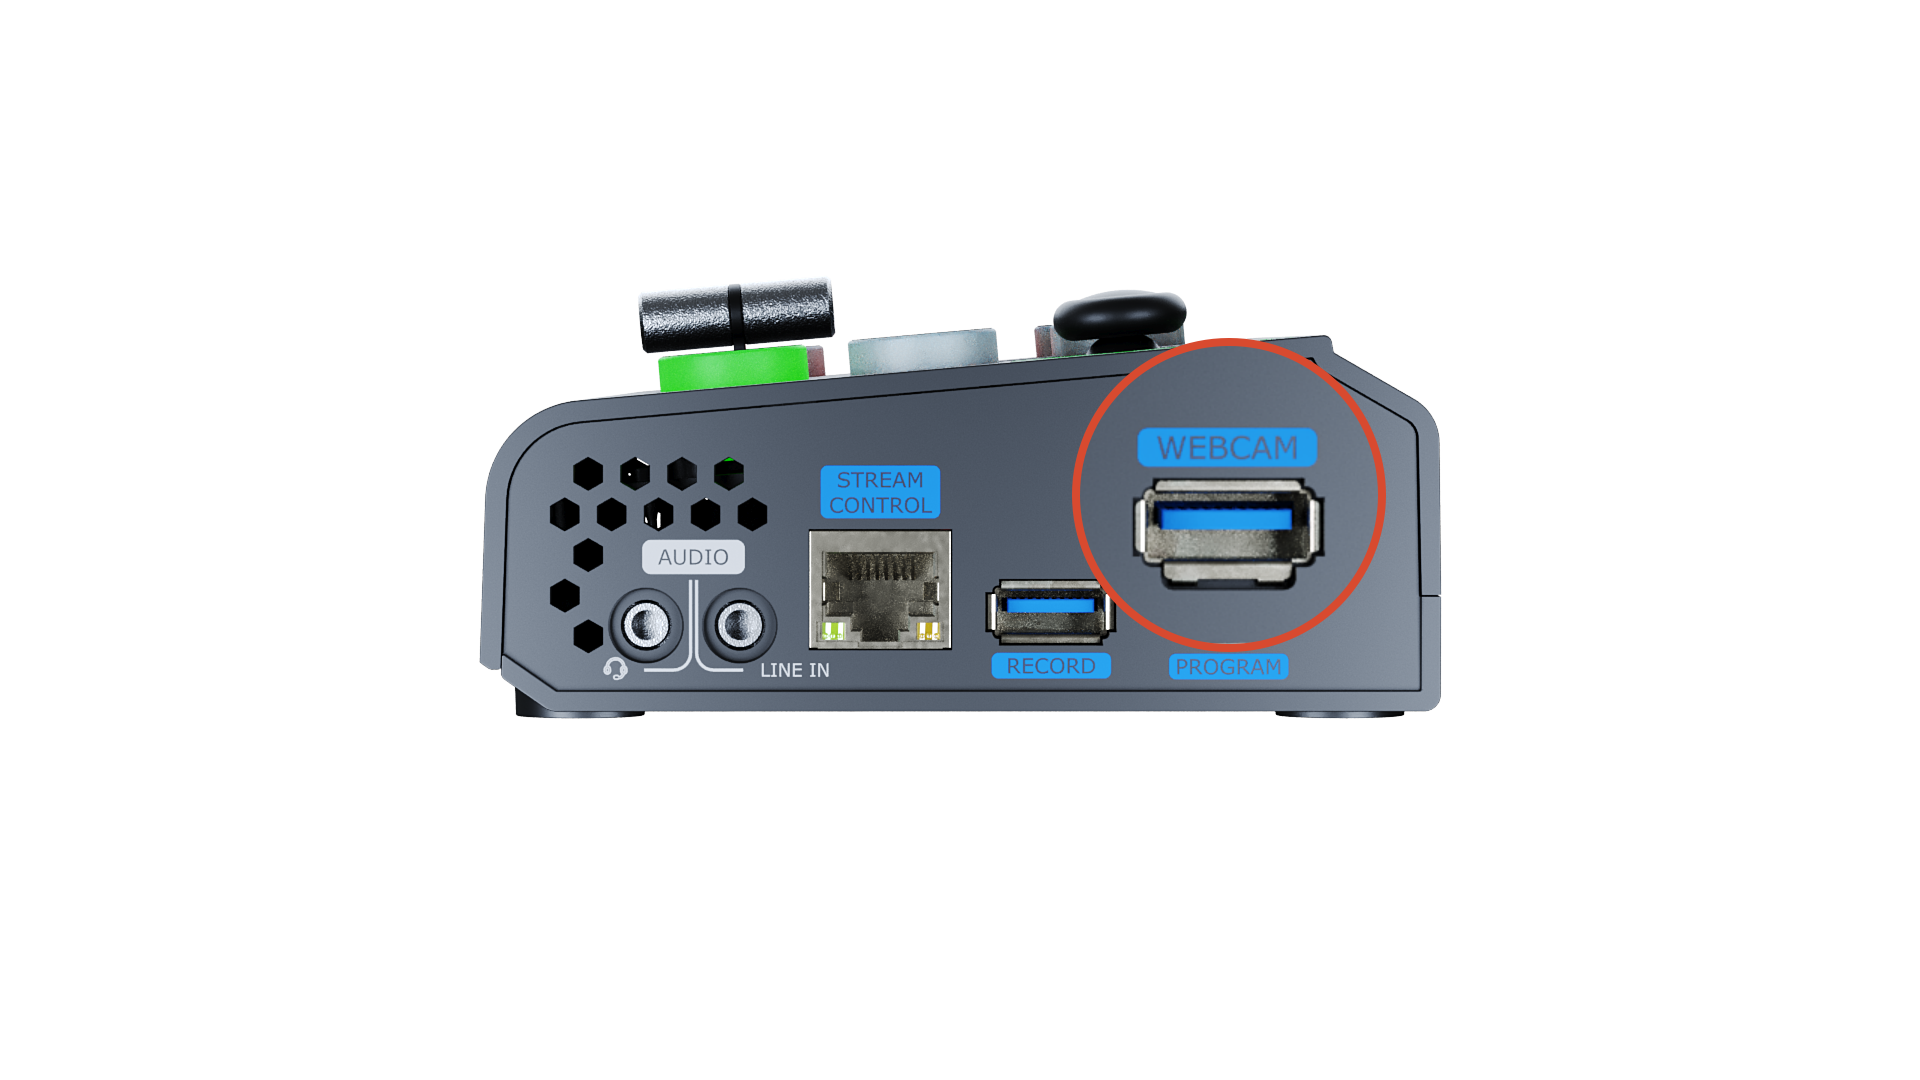
❿WEBCAMUSB Stream Output: Capture signal via third party streaming software and push to live broadcasting websites.

2Install Your Product

Connect Video Sources

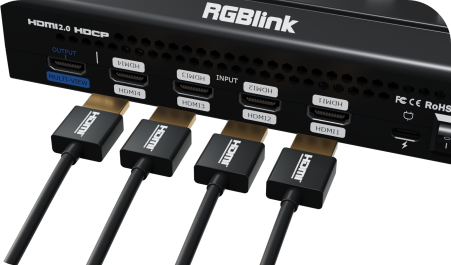
mini-pro provides 4 HDMI input ports and supports input resolutions** up to 4K@60Hz**.

The device supports automatic deinterlacing. Interlaced signals (i-format) connected through HDMI will be automatically converted to progressive scan.

You can connect any device with an HDMI output, such as a computer or camera, as an input source for mini-pro.

mini-pro features a built-in 2-inch display. After powering on and connecting a video source, the screen will automatically detect the input resolution and display the video feed.

👉
📢  Notes

HDMI cables are not included in mini-pro package and must be purchased separately.

Some cameras/camcorders use a mini-pro HDMI connector. When connecting these devices, an additional mini-pro HDMI-to-HDMI cable is required.

Connect HDMI Output

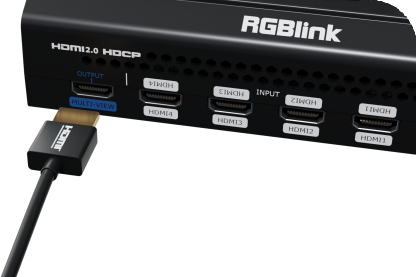
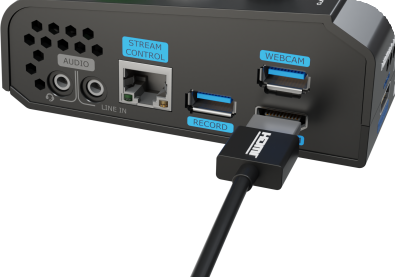
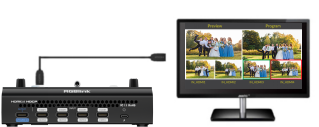
You can use HDMI cables to connect MULTI-VIEW output and PROGRAM output to HDMI monitors for simultaneous preview and program monitoring.

👉
👉

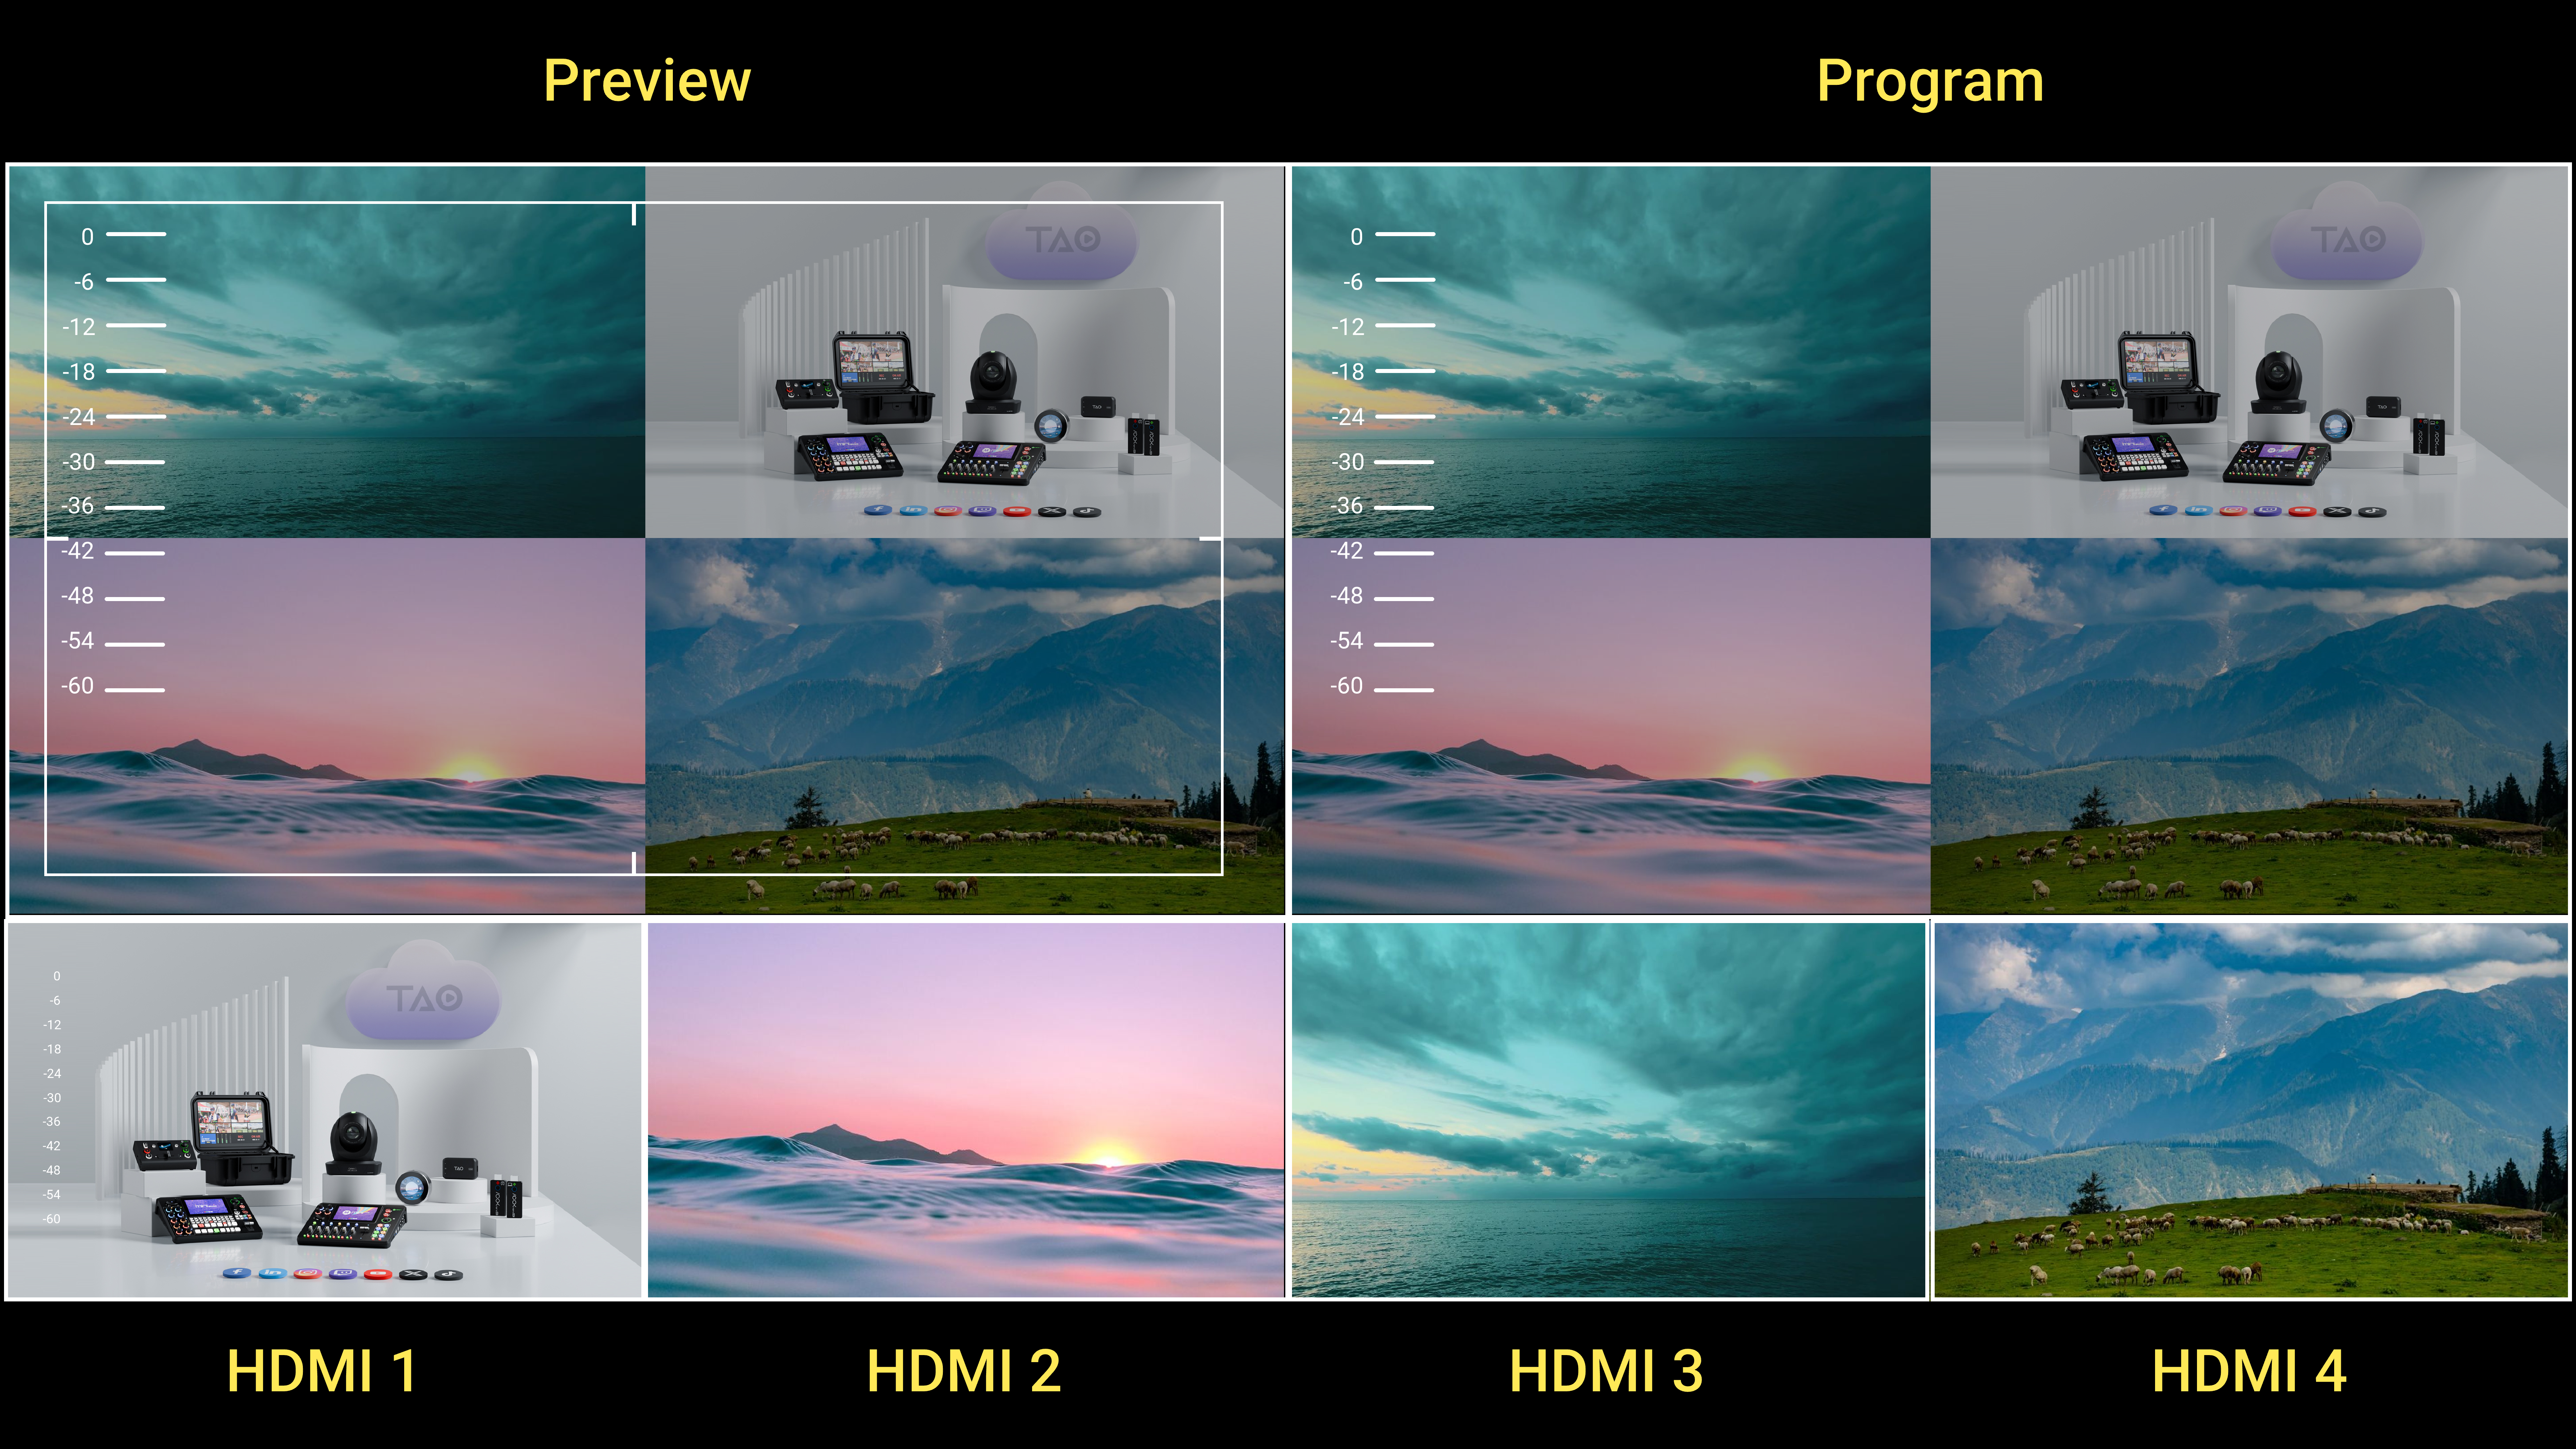
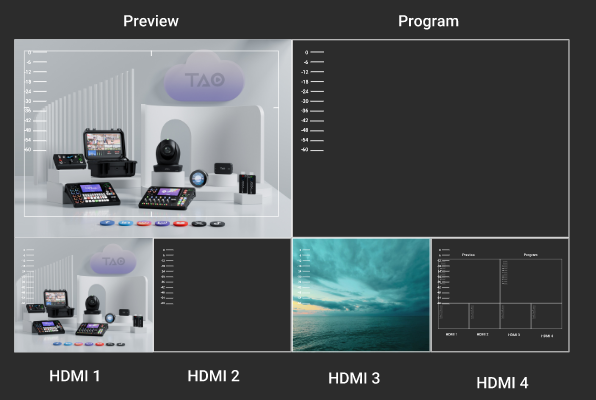
By default, the MULTI-VIEW output displays a multi-view monitoring interface, allowing you to view:

  • Audio and video status of all input sources
  • Current device status
  • Preview (PVW) output
  • Program (PGM) output
👉

In addition to multi-view monitoring, the MULTI-VIEW output can also:

  • Output a fixed input source
  • Output the PGM signal directly

You can switch between PVW, PGM, and input sources in the Video Output menu.

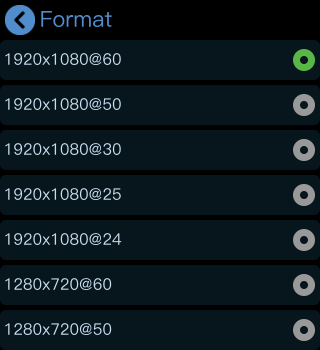
mini-pro also supports adjustable HDMI output resolution.

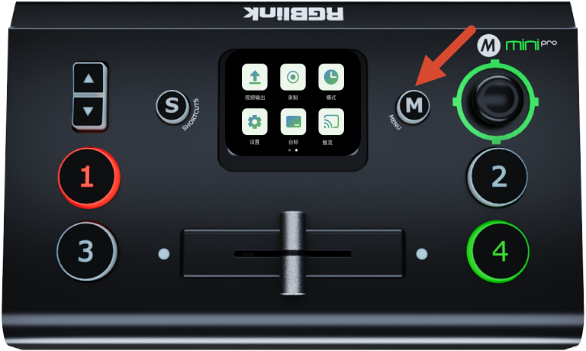
  • Press the M button and tap Video Output in the menu to select the output resolution format.
  • The HDMI output supports resolutions up to 1080p60.

Connect Microphone and External Monitoring Devices

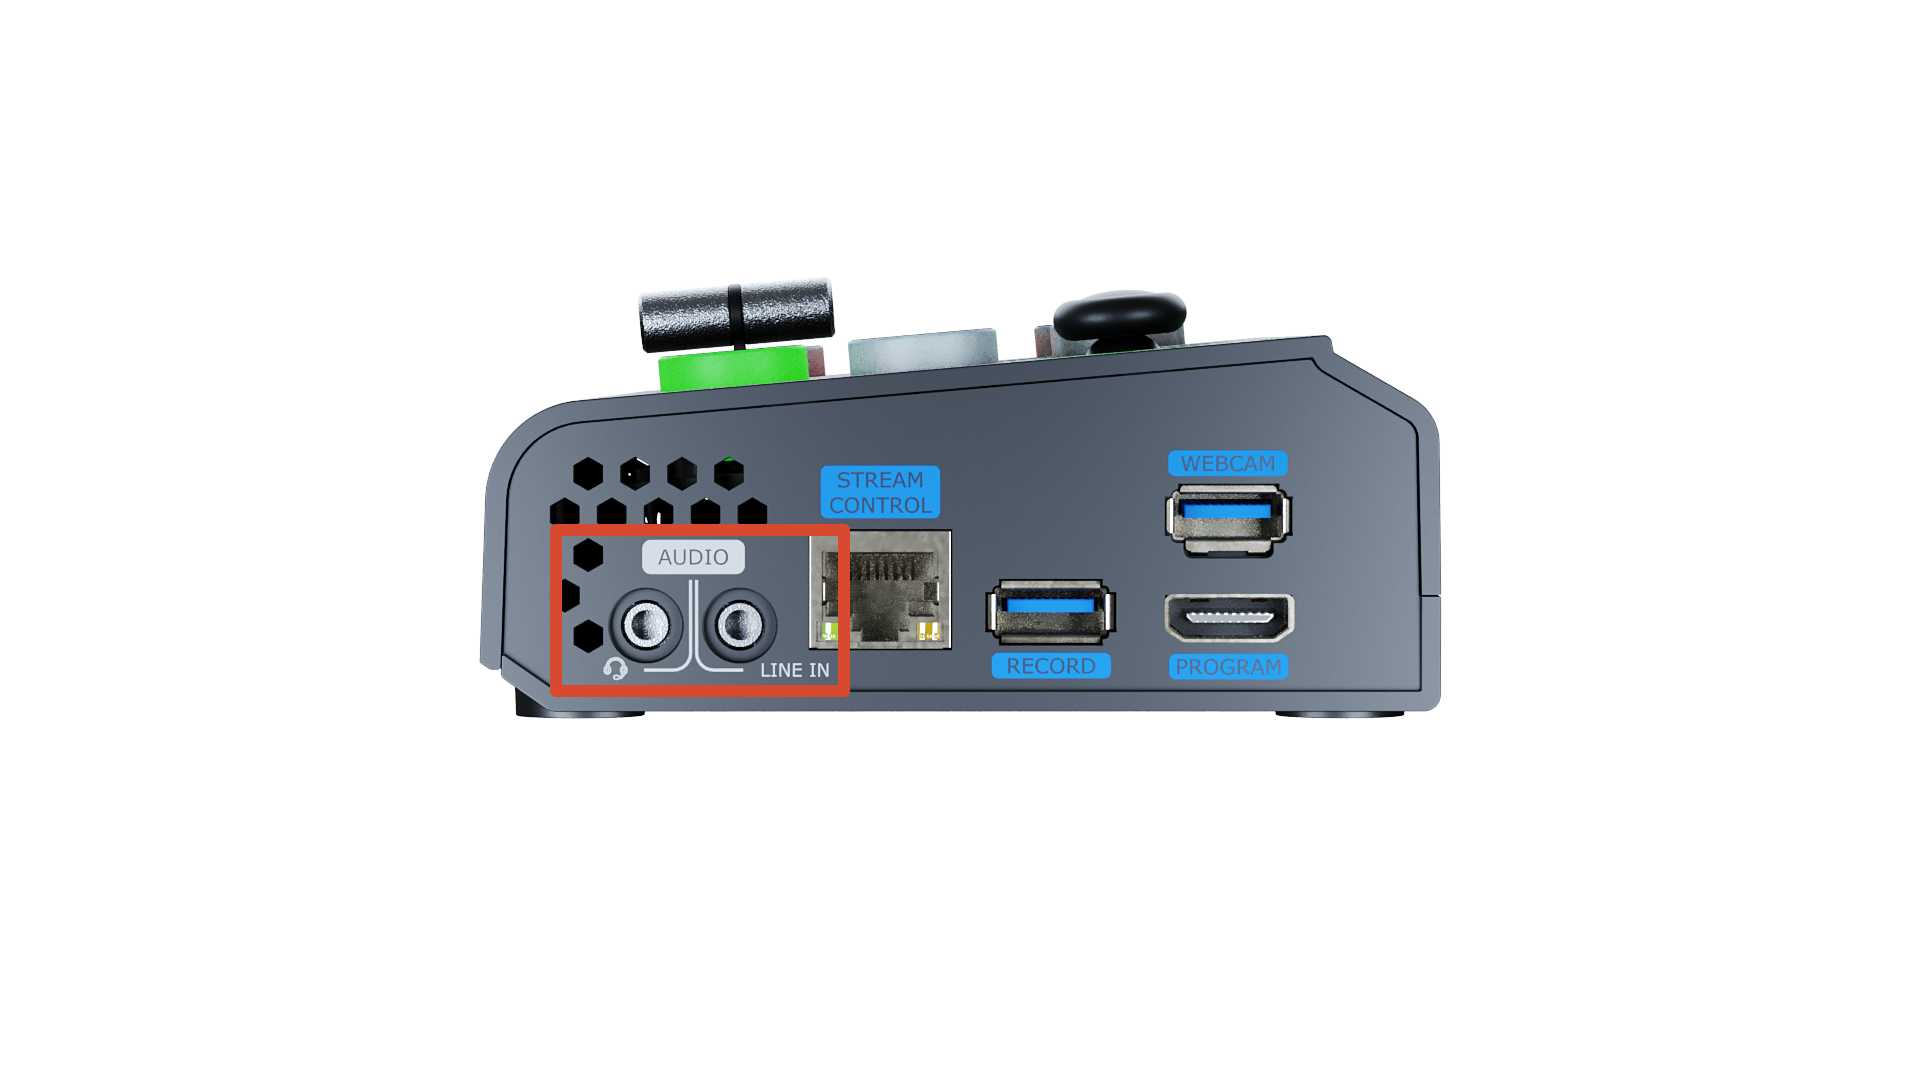
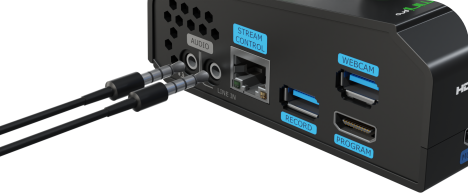
The right-side panel of mini-pro provides two 3.5mm audio ports:

  • Audio Output (Line Out)

Connect headphones or speakers for real-time monitoring of the main output audio.

  • Microphone Input (Mic In)

Connect a microphone, wireless mic receiver, or the Line Out output from an external audio mixer for audio mixing.

mini-pro supports:

  • 4-channel embedded HDMI audio
  • 3.5mm analog audio input
  • Multi-source audio mixing

This allows computer audio and microphone audio to be output simultaneously.

👉

Connect via USB for Recording

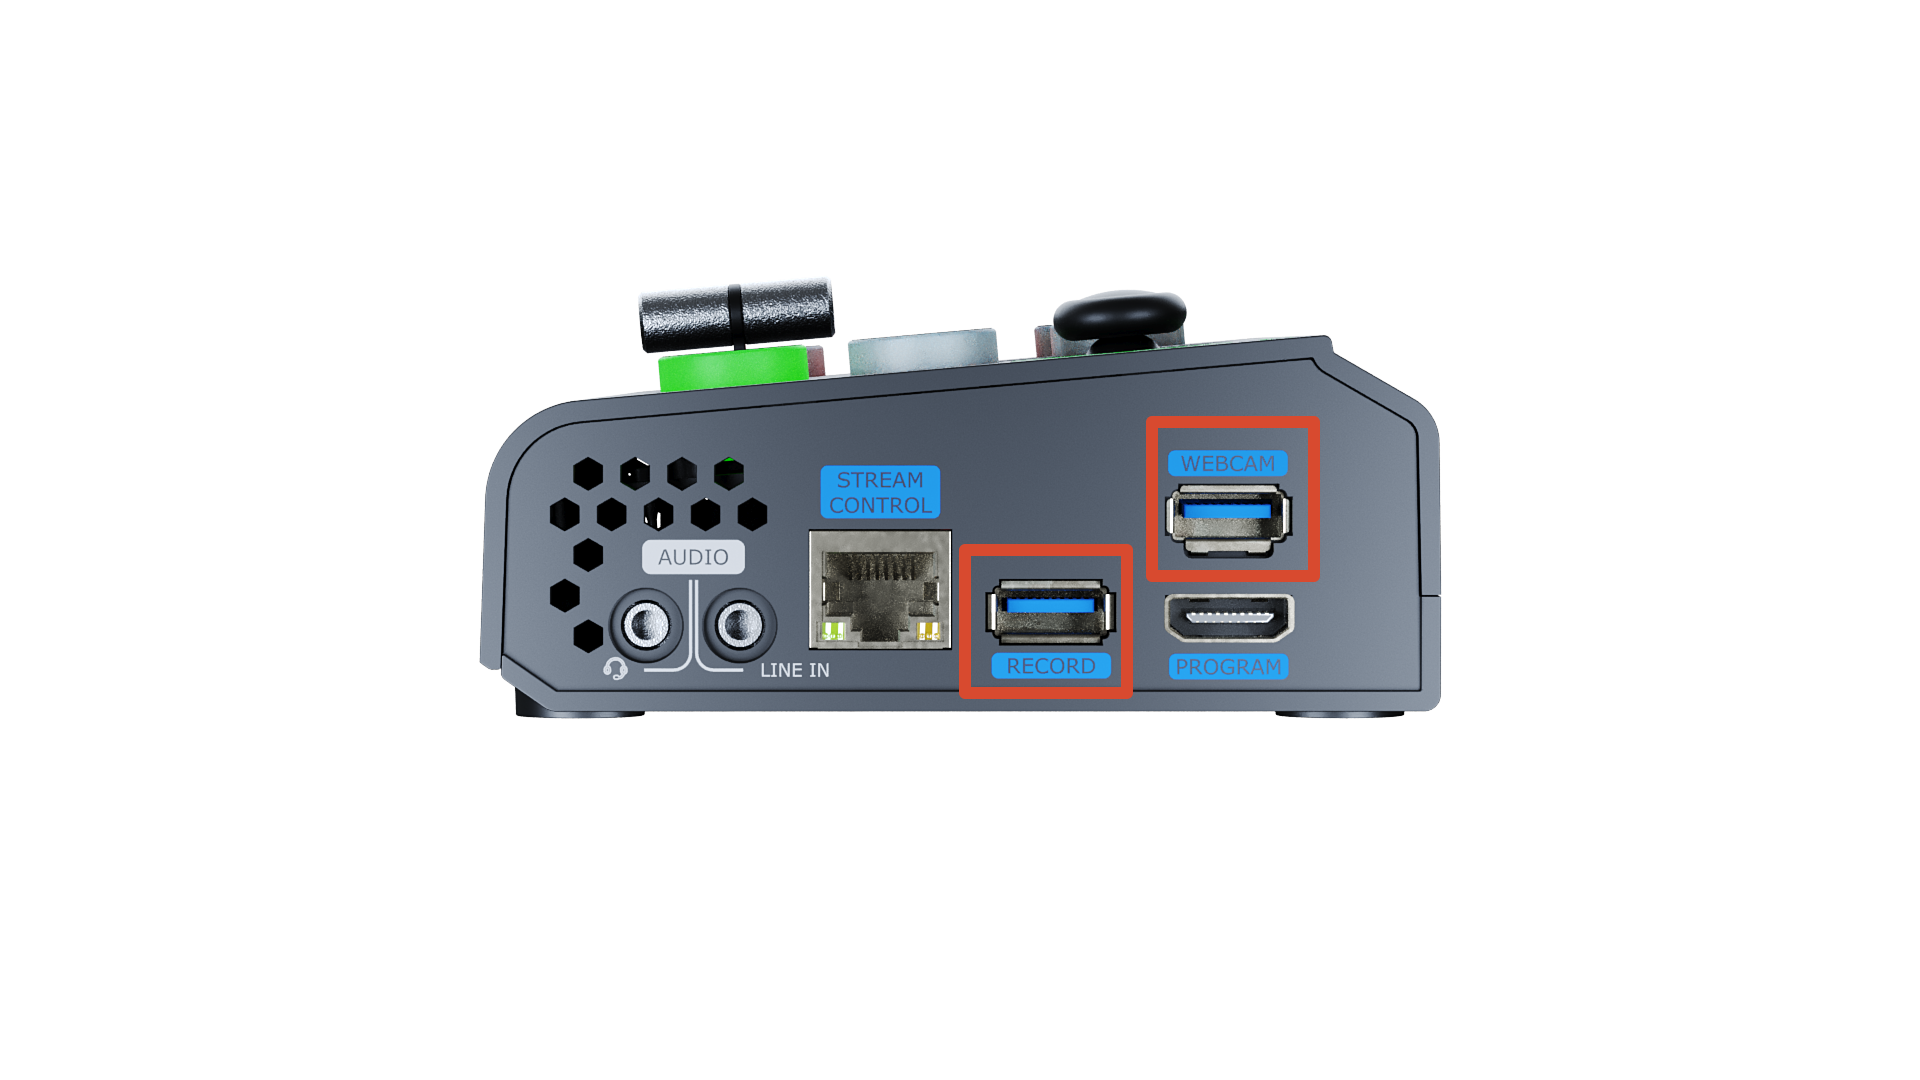
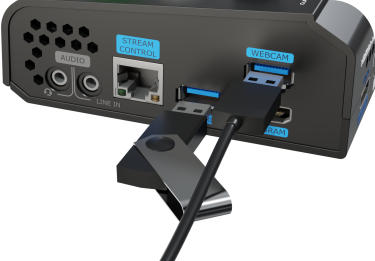
Connect the USB 3.0 port labeled as WEBCAM on mini-pro to your computer using a USB cable. The computer will recognize the device as a USB webcam source.

You can then select mini-pro as a video input source in streaming or recording software such as TikTok, Douyu, Bilibili, or OBS to achieve professional multi-camera production.

👉
📢  Notes

- If your computer only has USB-C ports, you can use a USB-A to USB-C cable. Make sure the cable supports data transfer.  
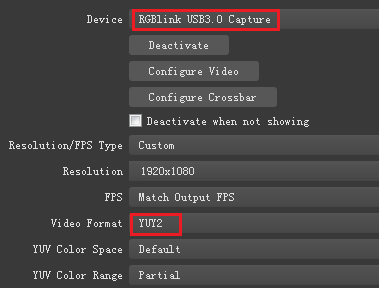
- The signal is recognized in Windows and MAC system as "RGBlink USB 3.0 Capture".
- For SSD, check the drive specifications to confirm whether external power is required.  
- Using multiple streaming outputs simultaneously, or using UVC output and recording at the same time, may cause frame drops or lag on mini-pro  .

Connect Router

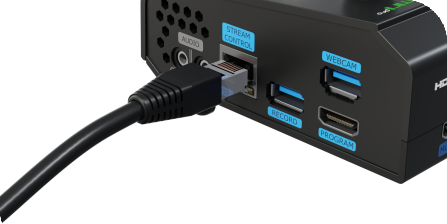
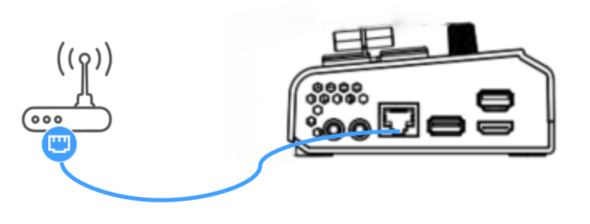
Use a CAT6 Ethernet cable to connect mini-pro to the router.

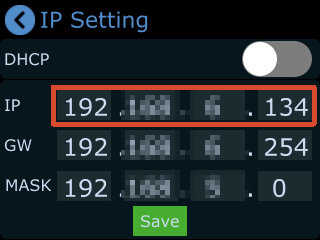
Press the M button to enter the menu, then go to: Menu > Settings > IP Settings > Disable DHCP, manually configure the IP address for mini-pro.

Make sure the router and mini-pro are on the same network segment.

👉

Connecting Power

RGBlink mini-pro package includes a PD 12V/2.5A power adapter and power cable.

Before connecting the power supply, make sure the power standard in your country or region is supported.

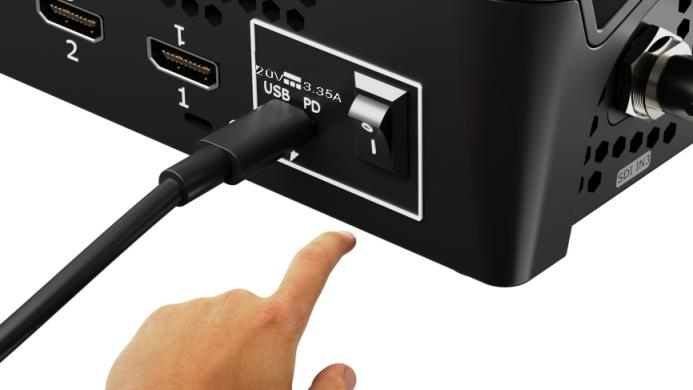
Firmly connect the power cable to ensure stable power delivery to mini-pro.

📢  Important

It is recommended to use the power adapter included with mini-pro. 

If another adapter must be used, make sure it meets the following requirements:  

- Supports the PD fast charging protocol 
- Uses a USB-C power port with reversible plug orientation 
- Provides up to 35W of PD output power
- If the power adapter has two ports, use **only** the USB-C port for powering mini-pro

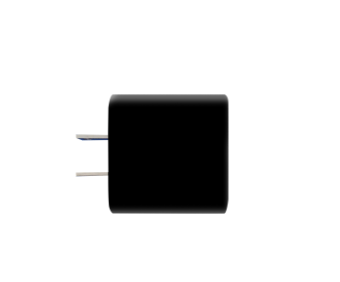
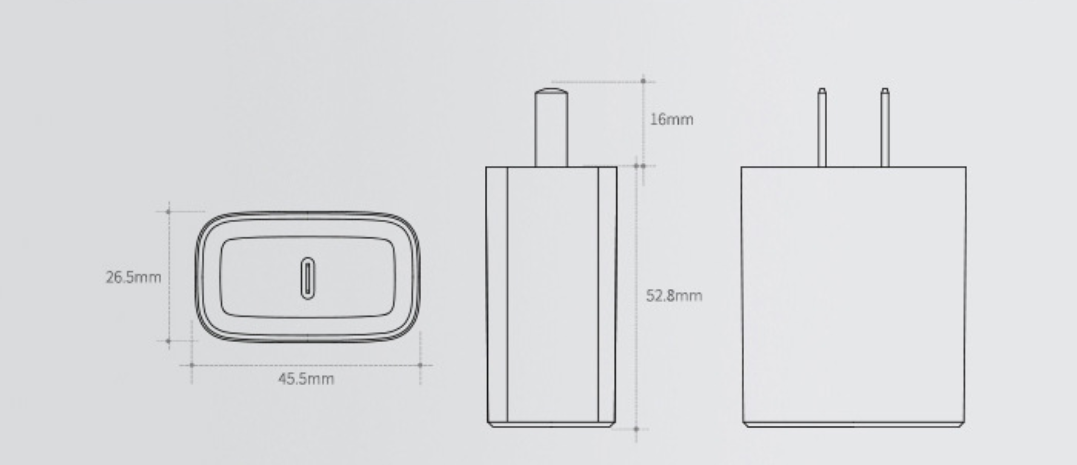
The following image shows the standard power adapter included with mini-pro series for reference:

Powering On mini-pro

Press the rocker power switch downward to power on the rear panel.

👉

After startup, the full-color display will show the mini-pro logo before entering the main operating interface.

3Use Your Product

Once installation and setup are complete, refer to this chapter for operating instructions.

The interfaces, images, and illustrations in this chapter are for reference only. Actual displays may vary by version. Please refer to the actual interface on your device.

3.1Operation

Touchscreen Operation

mini-pro features a 2-inch full-color touchscreen, and most device operations are performed through this display.

Before using the touchscreen, first familiarize yourself with the M button:

The M button is the MENU button. Press it once to quickly return to the main menu.

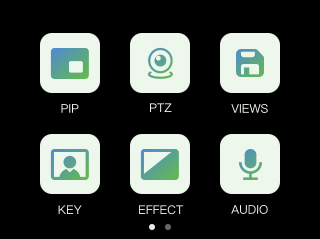
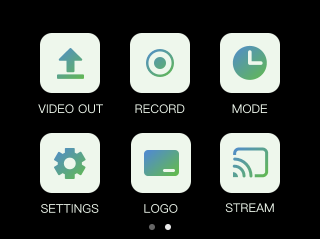
The touchscreen interface of mini-pro is similar to that of modern smartphones. Main menu items are displayed as icons, and you can tap an icon to quickly access the corresponding function page.

Swipe Gestures

mini-pro supports several touchscreen swipe gestures:

  • Swipe left or right to switch between menu pages
  • In adjustment interfaces such as time settings, you can drag the on-screen slider or use the knobs on both sides of the panel for adjustment

Preset Menu

Press the S button to enter the preset menu. Press S repeatedly to switch between functions.

In this menu, icons on the screen are dimmed by default to indicate inactive status.

The preset recall menu includes:

  • Effects
  • Modes
  • Presets 1–8
  • ...

Web App

You can also remotely control mini-pro through the Web App.

  • Connect mini-pro to the router using an Ethernet cable

  • Go to Settings > IP Setting, enable DHCP, and check the device IP address

  • Enter the device IP address in your browser's address bar to access the web control interface

3.2Switch Source

Switch Sources

The 1, 2, 3, and 4 buttons on the mini-pro control panel correspond to the four HDMI input ports.

After connecting input sources, the button indicators will display the following statuses:

  • Solid green: Signal detected and idle
  • Flashing green: The selected source is currently being edited
  • Solid red: The source is currently on the main output
  • Off: No signal detected, or the input resolution is not supported by mini-pro

Transition Effect Settings

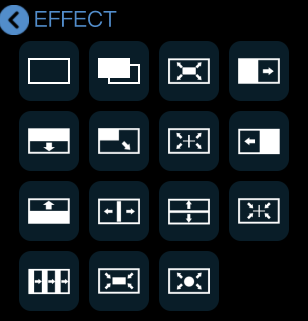
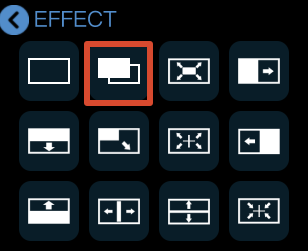
To create more dynamic scene transitions, mini-pro provides 15 transition effects for different production scenarios.

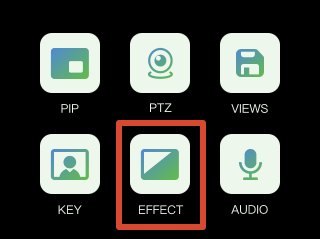
Tap the EFFECT icon on the touchscreen to open the transition effect selection menu.

What follows are the 15 transition effects.

Transition Effects
Cut

The Picture 1 switches to Picture 2 instantly with no transition effect.

👉
Mix

During the transition, Picture 1 gradually fades out while Picture 2 gradually fades in, blending together smoothly.

👉
Circle Expand

A circular mask expands outward from the center of the screen to transition from Picture 1 to Picture 2.

👉
Cross Expand

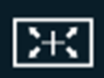
A cross-shaped mask expands outward from the center of the screen to transition from Picture 1 to Picture 2.

👉
Cross Collapse

A cross-shaped mask expands inward from the screen edges toward the center to transition from Picture 1 to Picture 2.

👉
Square Expand

A square mask expands outward from the center to transition between Picture 1 and Picture 2.

👉
Square Collapse

A square mask expands inward from the screen edges, to transition between Picture 1 and Picture 2.

👉
Bottom Up Wipe

Picture 2 wipes upward over Picture 1 until the transition is complete.

👉
Top Down Wipe

Picture 2 wipes downward over Picture 1 until the transition is complete.

👉
Left to Right Wipe

Picture 2 wipes from left to right over Picture 1 until the transition is complete.

👉
Right to Left Wipe

Picture 2 wipes from right to left over Picture 1 until the transition is complete.

👉
Diagonal Wipe

Picture 2 wipes in diagonally over Picture 1 until the transition is complete.

👉
Horizontal Center Expand

Picture 2 expands horizontally from the center toward both sides until it fully replaces Picture 1.

👉
Vertical Center Expand

Picture 2 expands vertically from the center toward both sides until it fully replaces Picture 1.

👉
Venetian Blinds Right

Picture 2 appears in vertical strips expanding horizontally from the center, creating a venetian blinds transition effect.

👉

3.3Switch Mode

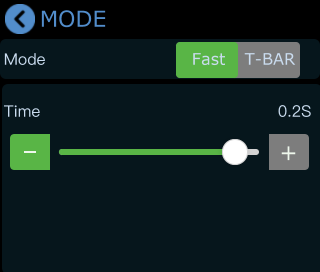
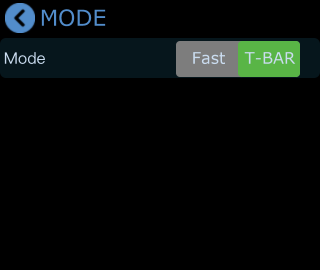
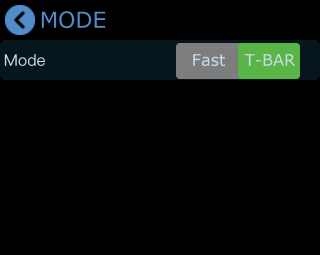
mini-pro provides two switch modes:

  • Fast mode
  • T-BAR mode

T-BAR mode is enabled by default. Tap the corresponding icon to switch modes.

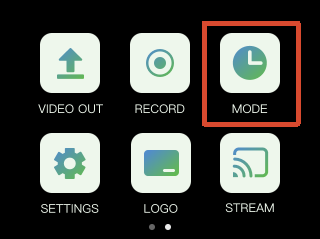
  1. Tap the MODE icon on the touchscreen to open the transition mode and transition duration settings menu.

  1. Fast Mode

After selecting Fast mode, you can adjust the transition duration using the on-screen slider. The selected value will be displayed in real time.

Once configured, transitions will follow the selected effect and duration time settings.

  1. T-BAR mode

For important production scenarios where accurate and stable switching is required, you can use T-BAR mode.

In this mode, the next scene can be previewed and edited in the PVW window before going live. After confirming the output, move the T-Bar to switch between PVW and PGM.

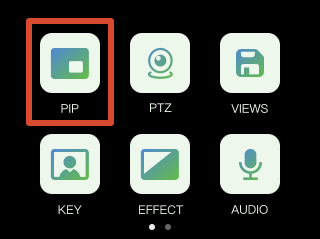
3.4PiP (Picture in Picture)

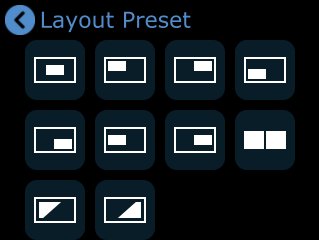
The PiP layout defines the preset scene structure.

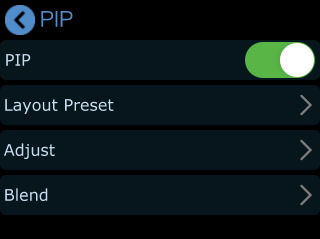
Tap the arrow on the right side of the Layout Preset option to open the PiP quick layout selection menu, where you can choose a layout based on your needs.

PiP Layer Settings

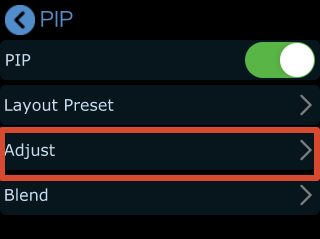
  1. Tap Adjust in the PiP menu to enter the layer adjustment interface.

  1. Select Main/Sub Layer
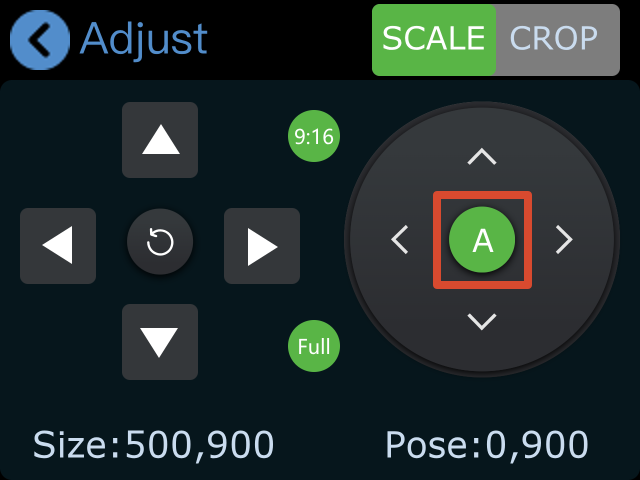
  • Tap A/B to select the main or sub layer.

  • Press 1/2/3/4 to select the input source for each layer.

  1. Layer Adjustment

After selecting layer A or B, you will enter the edit mode for that layer.

You can adjust the image using the following methods:

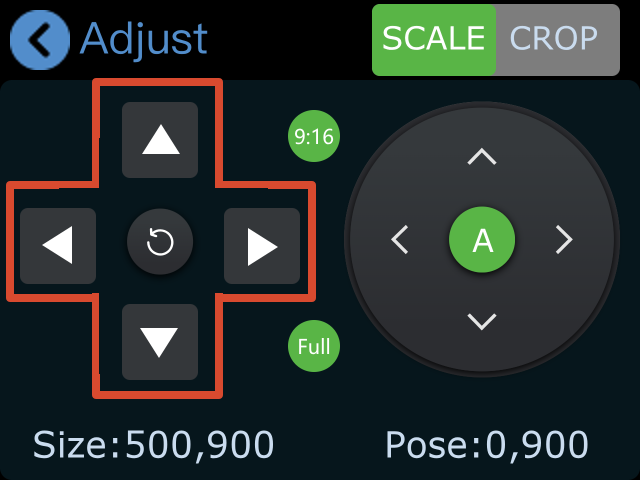
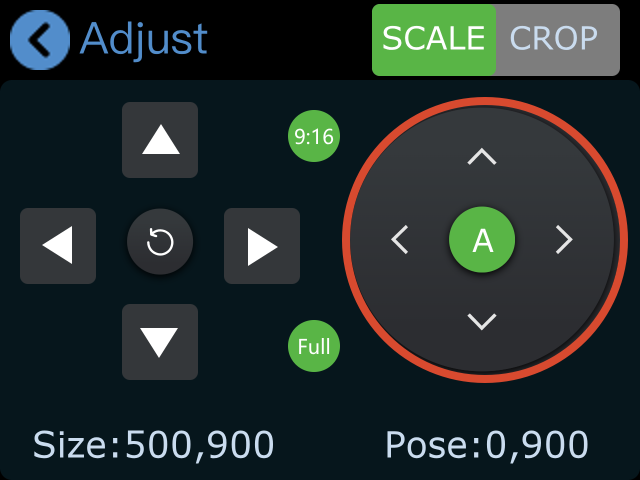
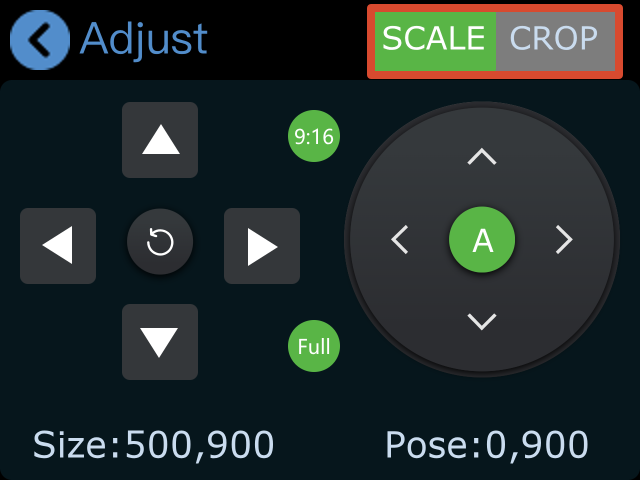
  • Use the directional icons on the left to adjust the image size. Click reset icon to restore the default settings.

  • Use the directional icons on the right to adjust the image position.

  • All changes are saved in real time to the current scene.
  • If aspect ratio lock is enabled, width and height will scale proportionally when adjusted.
  1. Aspect Ratio Adjustment

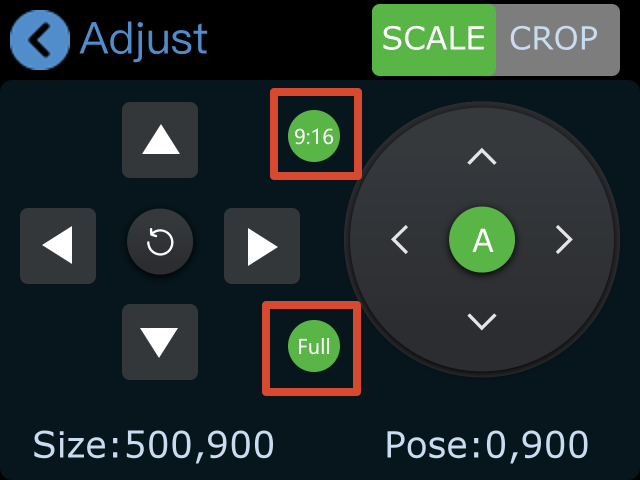
The default display mode is full screen.

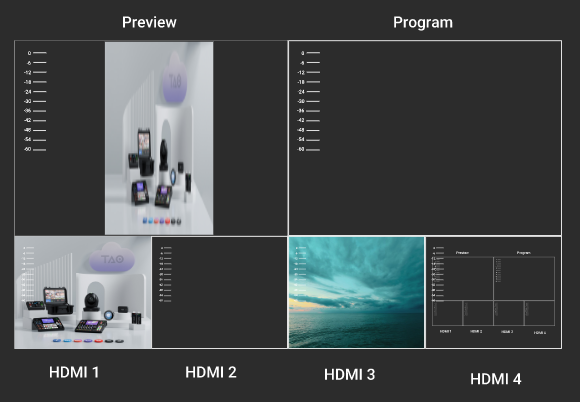
To support vertical video production, mini supports a 9:16 aspect ratio:

  • Tap 9:16 to switch to vertical mode
  • Tap Full to restore full screen

👉
  1. Scale and Crop

Scale and Crop share the same control logic as image adjustment. Refer to the section above.

Blend

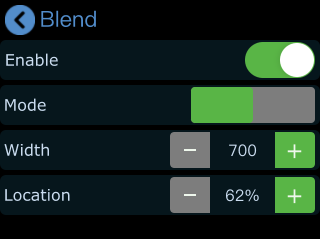
The Blend function creates a soft transition between two input sources by feathering the boundary area for a more natural composite effect.

  1. Go to the PiP menu and select Blend to enter the configuration page.

  1. Turn on the Enable switch to activate the blend effect.
  2. Parameters

Blend modes:

  • Left blend
  • Right blend

Adjustable parameters:

  • Width (default: 700)
    • Higher values increase the blur range and soften the edge
    • Lower values create a sharper boundary
  • Position
    • Controls the proportion of the blending area
    • Higher values expand the blend region

Blend settings can be saved to View 1–8 for quick recall.

Following is the illustration of Blend effect.

Display 4 Inputs on PGM

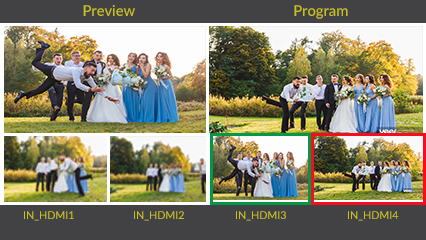
PiP supports up to two input sources in a left-right layout.

To display all four input sources simultaneously on the main output, combine PiP layout with T-Bar switching:

  • Set both preview and program outputs to PiP layout.
  • Set transition mode to T-Bar and select Fade effect.

  • When the T-Bar is positioned in the middle, both preview and program windows will display all four input sources.

📢  Notes

Since this display method uses a fade transition effect, the image may appear darker when the T-Bar is centered. You may adjust brightness as needed.

3.5Save and Load Views

mini-pro supports real-time view preset saving.

To quickly load your setup the next time the device is powered on, save the current configuration as a view preset.

View presets store all current parameters, including:

  • Picture-in-picture settings
  • Chroma key settings
  • Input source assignments
  • PTZ scene settings
  • Other current configuration parameters

Once saved, views can be recalled instantly using the [S] button.

  1. Save a View Preset

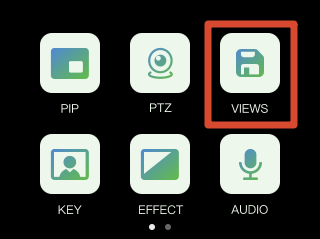
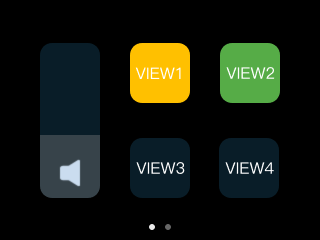
After completing your setup, press the [M] button and open the [VIEWS] menu.

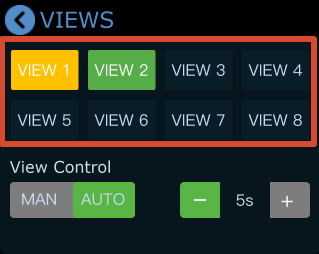
Tap a VIEW icon to save the current configuration to VIEW 1–8.

  1. Status Indicators
  • Yellow Icon: view that being used
  • Green Icon: saved views
  • Grey Icon: blank view
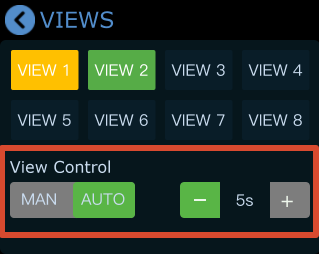
  1. View Control
  • [MAN]: Manual switching
  • [AUTO]: Automatic switching
  • Scene transition interval settings

  1. Load a View Preset

Press the [S] button to open the recall interface. From this menu, you can quickly access VIEW 1–8.

  1. Modify a Loaded View Preset

After recalling a scene, you can still adjust the layout if needed:

  • Tap [PiP] on the touchscreen.
  • Select the main or sub layer.
  • Use the [1][2][3][4] buttons to switch inputs.
  • Use the X/Y knobs to adjust image size and position.

All changes are saved to the current working state in real time.

  1. Re-save a View Preset

To make updated settings available for future load, the view must be saved again.

  • You can:
    Overwrite the current scene.
    Or save the configuration as a new scene.

Repeat the save steps above to complete the update.

3.6Video Output

mini-pro provides two independent video outputs:

  • PROGRAM (PGM) output
  • MULTI-VIEW (PVW) output

Depending on your workflow, they can be configured to output PVW 1/2, PGM, HDMI 1–4 or TP (Test Pattern)

📢 Important

PGM and Multi-view share the SAME output resolution. After you set the PGM output resolution, Multi-view uses the same resolution. 

The Multi-view resolution is not configurable separately.

mini-pro_Right Panelmini-pro_Rear Panel

This allows simultaneous program output and multi-view monitoring without manual switching, making operation more intuitive and efficient.

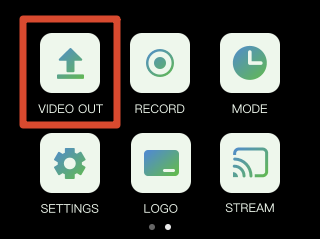
Press the M button to open the main menu, then tap VIDEO OUT to enter the output settings page.

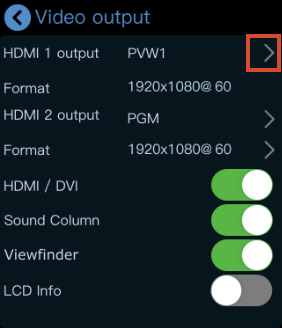
HDMI 1 Output

HDMI 1 outputs the multi-view preview (PVW) by default.

Tap the > icon on the right side to select another output source.

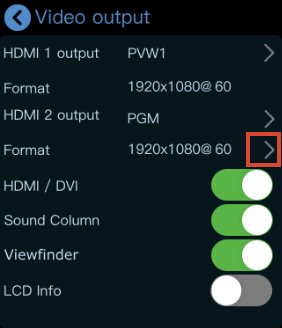
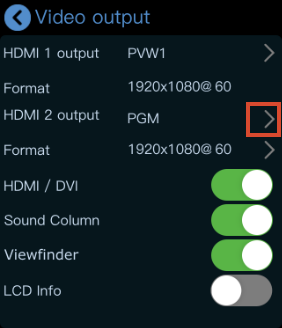
HDMI 2 Output

HDMI 2 outputs the PGM feed by default.

  1. Tap the > icon on the Format column to configure the resolution according to your requirements.

  1. Tap the > icon on the right side to select another output source.

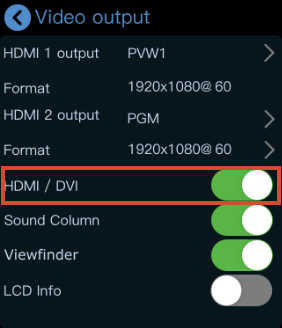
HDMI/DVI Mode

The HDMI/DVI option is enabled by default. This feature is designed for setups using different types of display devices simultaneously, such as:

  • DVI devices
    • LED controller/sender cards
    • Monitors with DVI input
  • HDMI devices
    • Monitors with HDMI input

When enabled, mini-pro automatically adapts to the connected display type.

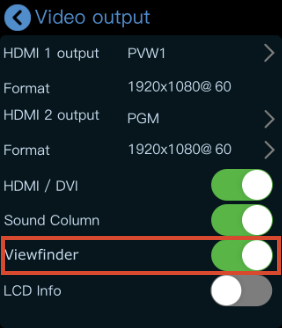
Viewfinder

When Viewfinder is enabled, a white frame will appear on the PVW preview screen to assist with composition and framing.

👉

LCD Information Display

When LCD Info is enabled, the interface switches from Simple Mode to Standard Mode.

In Standard Mode, the resolution of all four input sources is displayed.

Simple👉Standard

View the Output

After connecting a display, you can directly monitor the configured output. After configuration:

  • Press the M button to return to the main menu
  • Press M again to switch pages
  • Press M once more

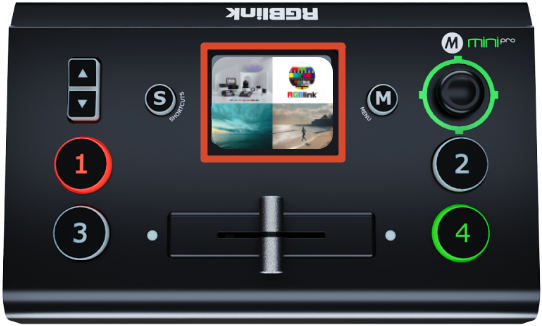
The touchscreen will then enter the 4-view monitoring interface.

👉

3.7Audio

mini features a built-in audio control system for convenient adjustment of all input audio sources.

Supported features include multi-channel audio mixing and AFV (Audio Follow Video) mode. This makes mini suitable for live streaming, recording, and multi-source audio production.

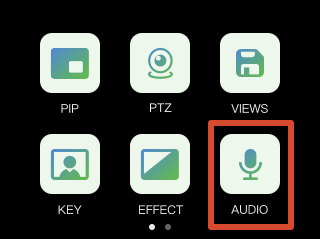
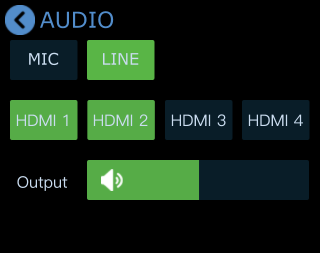
Press the M button to return to the main menu, then tap Audio to enter the audio settings page.

Adjust Volume

In the AUDIO settings interface, drag the on-screen slider to adjust the main output volume.

Tap MIC, LINE or HDMI 1–4 to open detailed settings for each input source.

MIC and LINE

mini provides:

  • MIC: 1 microphone input
  • LINE: 1 Line-in input

This means mini can be connected to microphones or line-level audio devices.

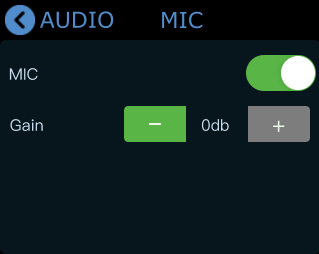
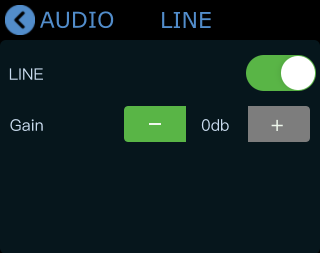
Tap MIC or LINE to open detailed settings.

  • Enable/disable input

    • Gray: Disabled
    • Green: Enabled
  • Adjust input volume

    • Tap - or + to adjust volume.
    • Adjustment range: 0–100
    • Gain/Step size: 10 db

MIX

mini supports multi-channel audio mixing. Up to 6 audio sources can be mixed simultaneously:

  • 4 HDMI embedded audio channels
  • 1 MIC input
  • 1 LINE input

MIC and LINE can also be enabled simultaneously.

In the Audio menu:

  • HDMI 1–4 represent the four HDMI audio inputs
  • Tap HDMI 1–4 for detailed settings

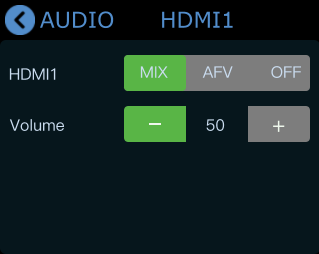
Tap Mix to enable MIX mode and mix HDMI audio into the main output.

You can independently adjust the volume level of HDMI 1–4 audio channels.

AFV (Audio Follow Video)

mini also supports AFV (Audio Follow Video) mode.

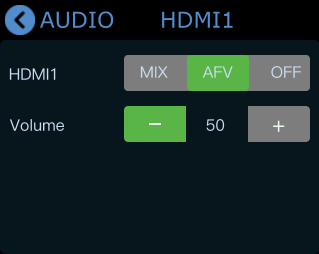
Tap AFV to enable the mode. Audio transitions automatically follow video switching for smoother synchronization.

How AFV works:

  • When an HDMI audio channel is set to AFV mode, its audio will only be output when that HDMI channel is switched to the PGM output.
  • All four HDMI channels on mini support independent AFV configuration. For example: If HDMI 1 is set to AFV mode, its embedded audio will automatically become active when HDMI 1 is switched to the PGM output.

3.8Chroma Key

mini-pro supports chroma keying, allowing solid-color backgrounds to be removed and composited with other video sources for virtual scenes and similar applications.

Chroma key parameters can be configured through the desktop control software for advanced adjustments or directly on the device for quick setup.

Enable Chroma Key

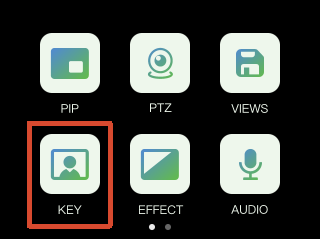
  1. Press the M button to return to the main menu.
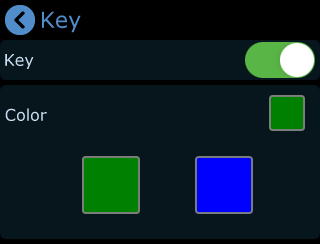
  2. Tap the KEY icon to enter the chroma key settings page.

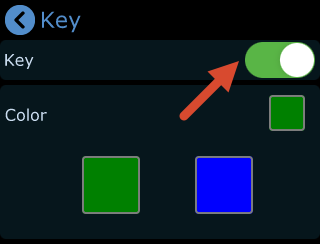
  1. Select On or Off.

Adjust Chroma Key Parameters

  1. The default chroma key color is green (green screen). Different color options can be selected on the touchscreen.
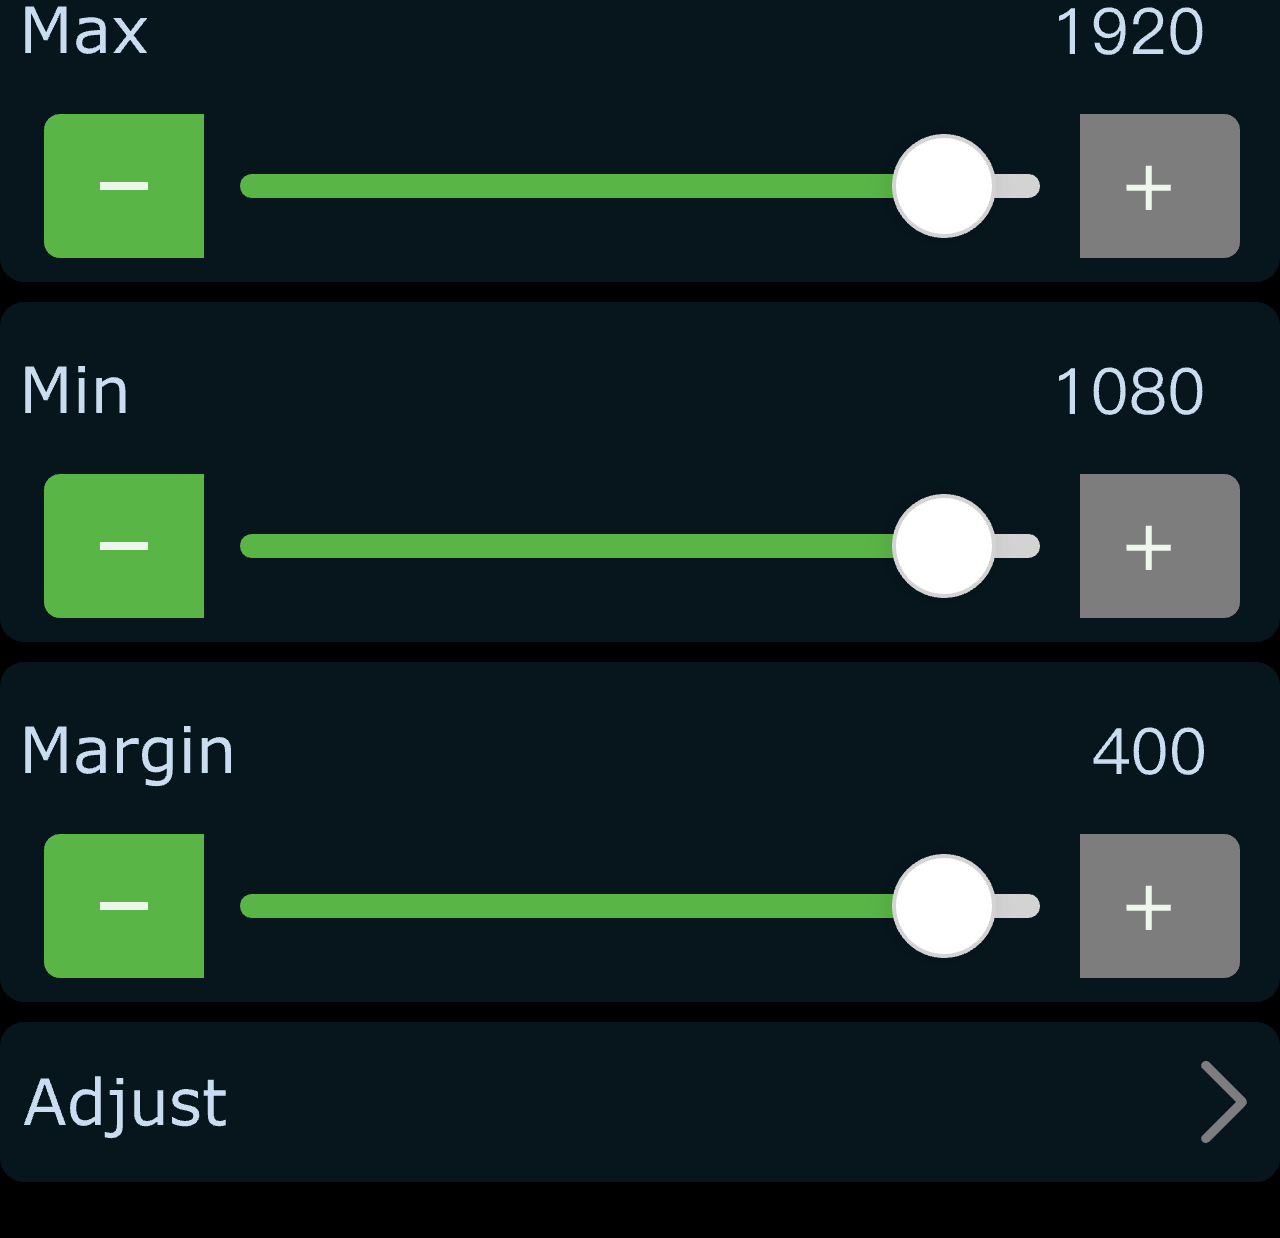
  2. Tap the - or + buttons to fine-tune the chroma key parameters.

Default parameter values:

  • Max Limit: 1232
  • Min Limit: 560
  • Margin: 602

Adjust the Layout

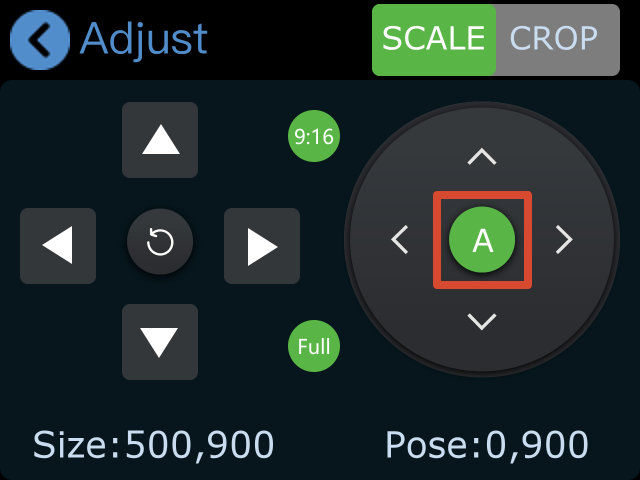
Tap Adjust to enter the layout settings page.

On this page:

  • Tap A/B to select the main screen or PiP screen

  • Press 1, 2, 3, or 4 on the main panel to switch input sources

Default configuration:

  • PiP screen: Input 4
  • Main screen: Input 1

Input sources can be changed based on actual requirements.

  • Use the toggle to adjust the screen size.

mini-pro 主面板上下键示意

  • Use 5-Direction Joystick to adjust the screen position.

mini-pro 主面板摇杆示意

All changes are saved automatically to the current scene in real time.

Save Chroma Key Settings

Chroma key settings can be saved directly on the device.

The next time chroma key is enabled through:

  • Desktop control software
  • The device itself

the previously saved parameter settings can be recalled automatically.

3.9PTZ

mini-pro supports PTZ camera control through the IP VISCA protocol, including:

  • Pan and tilt control (X/Y axis)
  • Lens zoom control
  • Manual and auto focus
  • PTZ preset recall

mini-pro also supports saving PTZ camera position and zoom status for quick recall later.

PTZ scenes on mini-pro save both PTZ parameters and the corresponding input source. When a PTZ scene is recalled, the system automatically switches to the associated camera input.

mini-pro v3 currently supports PTZ cameras using the VISCA protocol.

Open the PTZ Control Menu

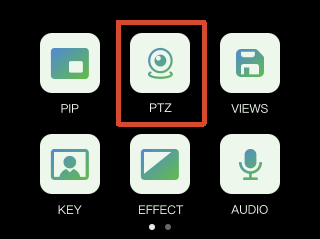
  1. Press the M button to return to the main menu.
  2. Tap PTZ to enter the PTZ control page.

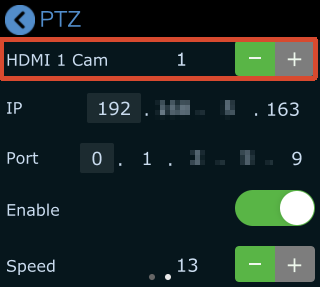
Select a PTZ Camera

  • Press 1, 2, 3, or 4 to select the corresponding input source.
  • Tap - or + next to the camera icon to switch between different video sources.

The selected camera becomes the active PTZ camera for control.

Camera Port Settings

Before controlling the camera with mini-pro, ensure the camera port number is set to 1259.

If the camera port is not 1259:

  • Refer to the camera user manual
  • Enter the correct port number on the PTZ settings page

This ensures proper PTZ communication.

We recommend using the RGBlink vue series PTZ cameras.

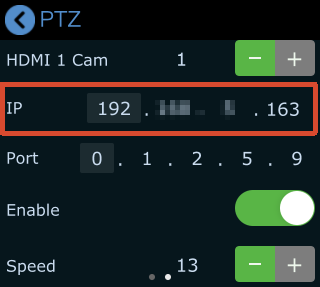
Network Requirements

mini-pro and the PTZ camera must be on the same subnet.

The first three segments of the following IP addresses must match:

  • mini-pro IP address
  • PTZ camera IP address

The mini-pro IP address can be modified in:

  • PTZ menu
  • SETTINGS > IP Setting

When modifying the IP address, use the X/Y knobs on the front panel to select and adjust each IP address segment.

PTZ Preset Control

Adjust Position / Zoom / Focus

After PTZ is enabled:

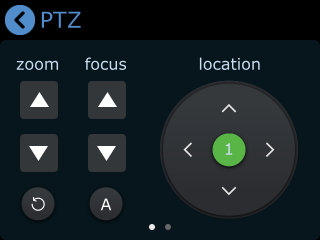
  • Tap the directional icons in the location section to adjust the PTZ position.
  • Tap the up and down icons in the focus section for manual focus.
  • Tap A icon to enable auto focus.
  • Tap the up and down icons in the zoom section to adjust the zoom level manually.
Adjust PTZ Speed
  1. In the Speed section, tap + or − to adjust the PTZ movement speed.
  2. Supported speed levels: 17, 14, 11, 8, 5, 2
Reset PTZ Settings

Tap the reset icon on the screen to restore PTZ parameters to default settings.

3.10TAO Cloud Streaming

Users can bind RGBlink devices such as mini-pro to TAO Cloud for efficient content production and live streaming management.

TAO Cloud provides a streamlined streaming platform designed for fast live setup and operation.

mini-pro supports simultaneous streaming to up to 4 platforms.

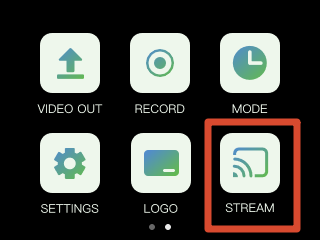
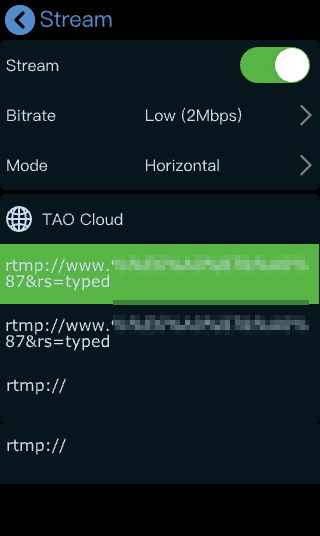
Press the M button to return to the main menu, then tap STREAM to open the streaming configuration page.

Network Connection

Before using the streaming function, make sure mini-pro is connected to the network.

Supported connection methods:

  • Wired Ethernet connection
  • Mobile network sharing
Wired Ethernet Connection

Connect mini-pro to a router or network switch using an Ethernet cable.

RGBlink CAT6 Ethernet cable (Product Code No. 940-0001-00-11-0) is recommended.

Mobile Network Sharing
📢  Notes

Due to ongoing updates to third-party operating systems, the interface layouts and navigation paths described below may differ slightly from the actual interface. 

Please refer to the actual version in use.  

iPhone Network Sharing

Follow these steps:

  1. Connect the iPhone to mini-pro using a standard USB cable through the USB streaming port (labeled WEBCAM)

  1. When the "Trust This Device" prompt appears, tap Trust
  2. Open Settings > Personal Hotspot
  3. Set the Wi-Fi password and enable Personal Hotspot
  4. Open Control Center and press the network panel in the upper-left corner
  5. When the hotspot status changes to "Connected", mini-pro has successfully connected to the network.
Android Network Sharing

Follow these steps:

  1. Open Settings > More Settings > Developer Options
  2. Enable USB Debugging
  3. Connect the phone to mini-pro using a standard USB cable through the USB streaming port (labeled WEBCAM)

  1. Open Settings > Mobile Network > Personal Hotspot > Other Sharing Mode
  2. Enable Share phone network via USB

Platform Streaming Setup

This section uses YouTube as an example for configuring a streaming destination.

Get the Streaming Address
  • Go to YouTube Studio.
  • Click Create > Go live.
  • Copy the Stream key and Stream URL from the stream settings tab.
🚨  Risk Warning

DO NOT share your stream key with anyone or display it during a live stream. 
Doing so may result in unauthorized account access, stream hijacking, or other potential risks and losses.

If your stream key is exposed:

-  Immediately reset the stream key on the corresponding platform.
-  Stop the current live stream.
-  Restart streaming using the new stream key.

View Streaming to Live Platforms to check how to get stream key from other platforms.

Bind the Device to TAO Cloud

Log in to TAO Cloud and complete Device Binding.

Make sure the network connection remains stable while receiving the verification code.

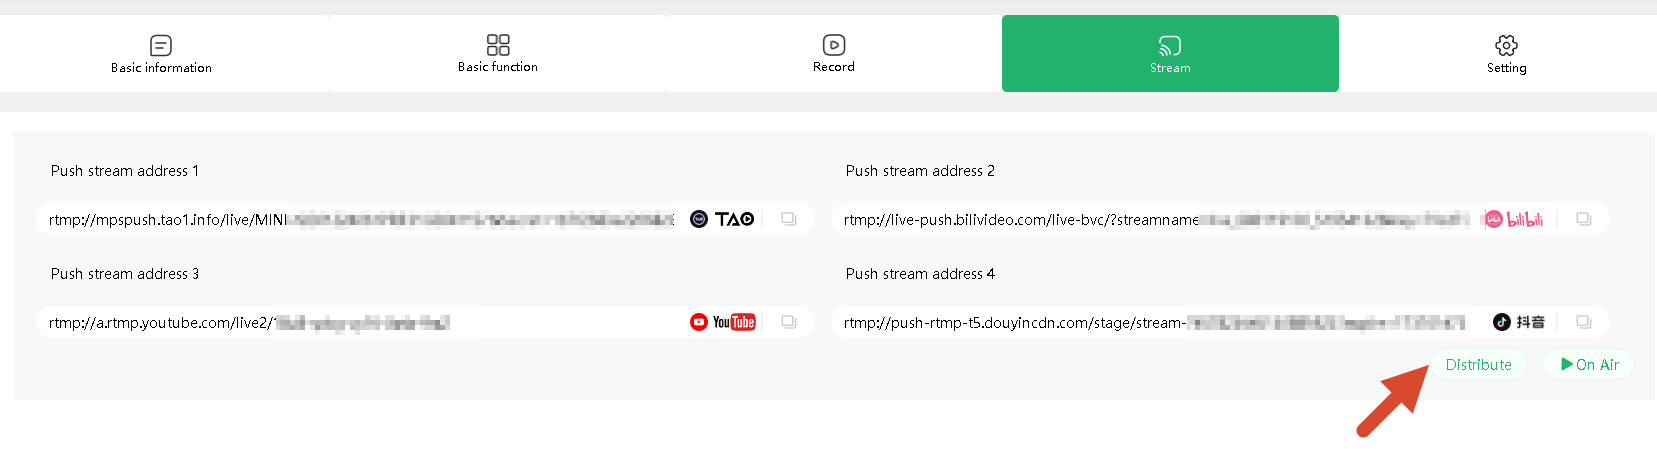
Import Streaming Information

Paste the streaming address and stream key into TAO Cloud, then click Distribute.

Start Streaming

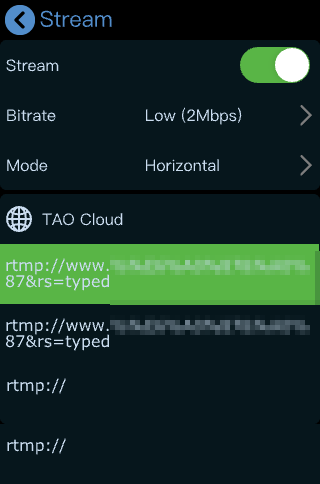
Enable the streaming switch from the streaming page or shortcut menu to start streaming.

During streaming, individual platform outputs can be enabled or disabled independently.

Status indicators:

  • Solid green: Streaming successfully
  • Blinking green: Streaming failed or connection abnormal

Streaming Quality Settings

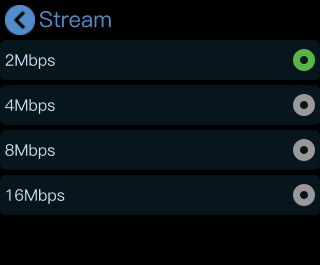
To achieve smoother and more stable streaming performance, mini-pro supports bitrate adjustment.

If the network connection is unstable or bandwidth is limited, reducing the bitrate is recommended.

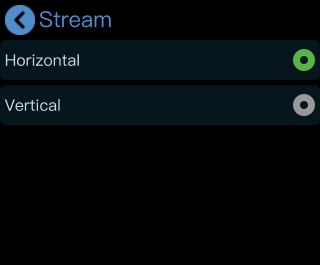
mini-pro also supports:

  • Horizontal: Landscape streaming
  • Vertical: Portrait streaming

for different platforms and streaming scenarios.

PTZ Control During Streaming

To use PTZ control and live streaming simultaneously, ensure that:

  • The PTZ camera
  • mini-pro device
  • The network

are all on the same subnet.

Enabling DHCP on mini-pro is recommended.

If static IP addresses are used, streaming will still function normally as long as there are no IP conflicts.

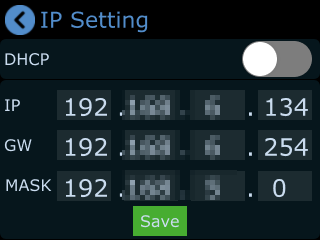
IP Settings

Tap Settings > IP Settings to open the network configuration page.

mini-pro supports two IP assignment methods:

Dynamic IP (DHCP)

Connect mini-pro to a DHCP-enabled router, then:

  • Enable DHCP on the router
  • Enable DHCP on mini-pro

mini-pro will automatically obtain an IP address.

Static IP

If DHCP is not used:

Disable the DHCP option and manually configure:

  • IP address
  • MASK: Subnet mask
  • GW: Gateway

3.11USB Port Capture and Output

📢  Notes

The screenshots in this document may differ from the current software version. 

Actual interface layout and wording may vary, but the operation flow remains the same.

Please refer to the version currently in use.

The USB port labeled WEBCAM supports USB video capture.

Users can capture video from mini-pro to a computer and stream through third-party software such as OBS to platforms including:

  • Facebook
  • YouTube
  • Zoom
  • Twitter/X
  • Other streaming platforms

OBS Streaming

mini-pro is compatible with various third-party streaming applications. We recommend using OBS.

Download OBS from: OBS Studio

Install the software and update it to the latest version before use.

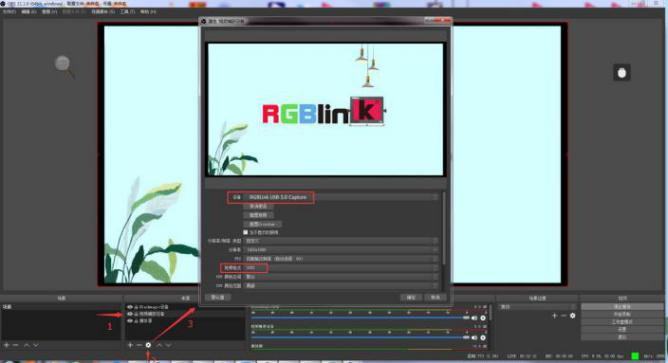
Add Video Capture Device
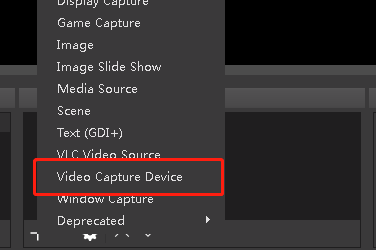
  1. Click the + icon in the Sources panel.

  1. Select Video Capture Device.

  1. Select RGBlink USB 3.0 Capture as the capture device.
  2. Set Video Format > YUY2.

📢  Notes

If the YUY2 format is unavailable, check the USB connection:

- Ensure the device is connected to a USB 3.0 port 
- Use a USB 3.0 cable 
- USB 3.0 ports are typically blue, while USB 2.0 ports are usually black 

Audio Settings

If no audio is detected during streaming:

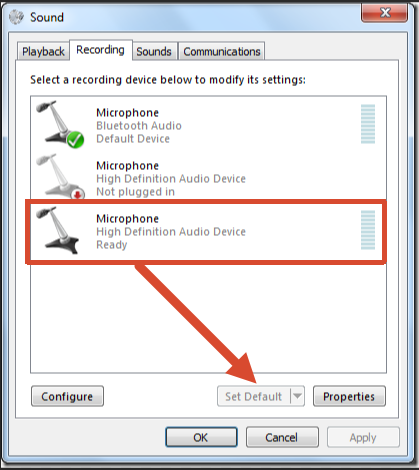
  1. Confirm the audio source on the device is configured correctly (Set Default).

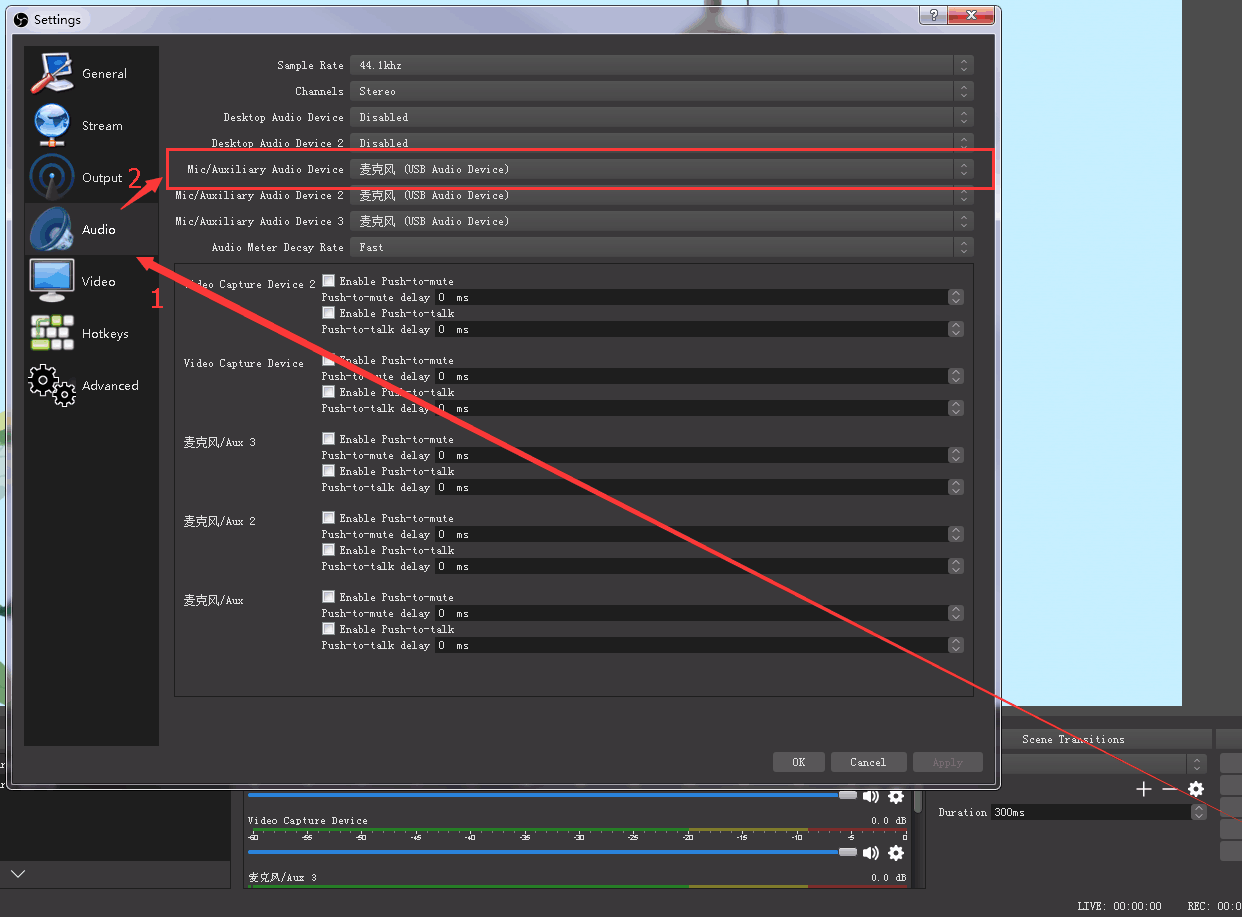
  1. In OBS, go to Settings > Audio. Select the correct device Mic/Auxiliary Audio Device.
Synchronize Video with External Audio

If the video source does not contain embedded audio and external audio is used separately, synchronize the audio and video using the following steps.

  1. Go to Settings > Audio > Mic/Auxiliary Audio Device and select the audio source.

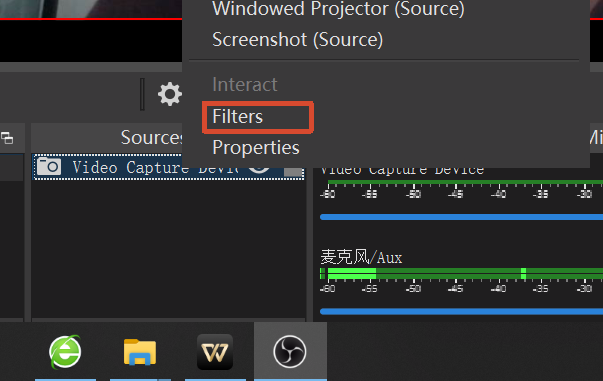
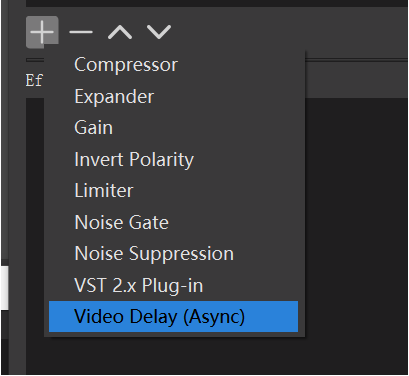
  1. In the Sources panel, right-click Video Capture Device, then select Filters.

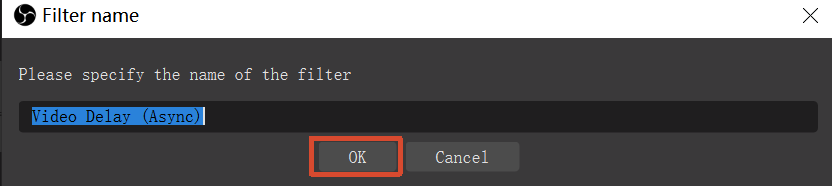
  1. Under Audio/Video Filters, click + and select Video Delay (Async).

  1. Enter a filter name if needed, then click OK.

  1. Enter the delay value in milliseconds (ms).
    Adjust the value until the audio and video are synchronized.

Streaming Settings
  1. Obtain the RTMP URL and Stream Key from the streaming platform.
  2. Copy the RTMP URL and Stream Key.
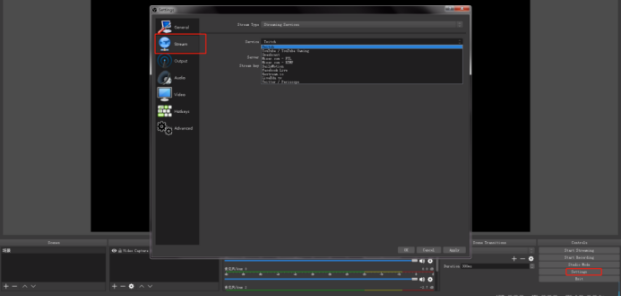
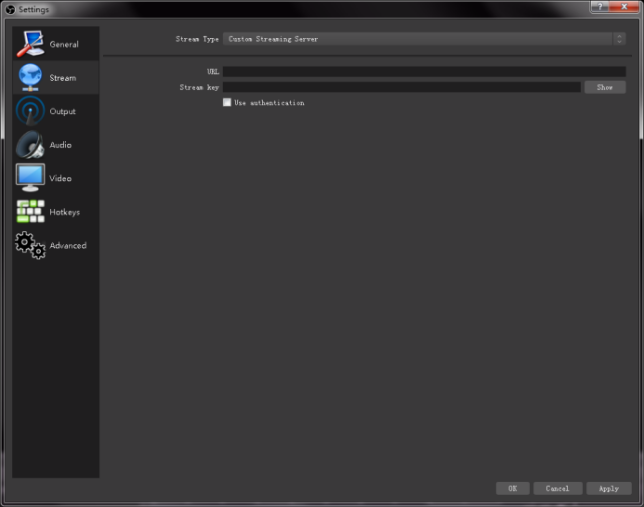
  3. In OBS, go to Settings > Stream.
  4. Select the streaming type:
  • Streaming Service
  • Custom Streaming Server

If the platform is listed under Service, select it directly.

If using a custom server:

  • Enter the RTMP URL in Server/URL

  • Enter the Stream Key in Stream Key
  1. Click Start Streaming.
  2. Return to the streaming platform and confirm the live stream is active.

vMix Streaming

 📢  Notes

vMix cannot automatically detect the output resolution of mini-pro.  
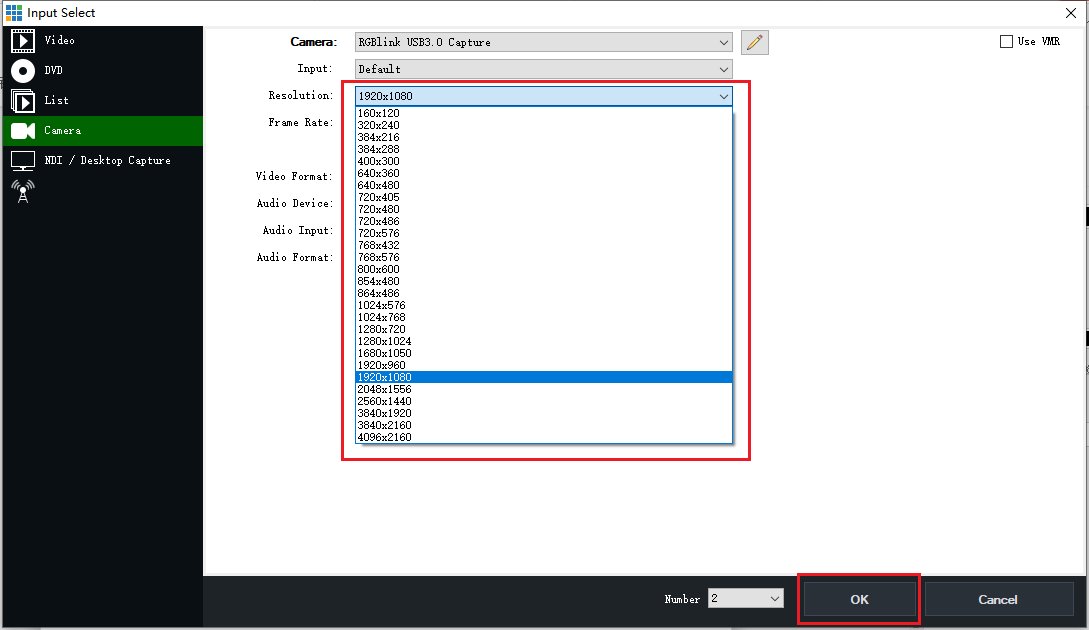
Each time the output resolution of mini-pro is changed, the video preview in vMix may freeze. Re-select **RGBlink USB3.0 Capture** and manually set the current output resolution of mini-pro to restore normal video display.  

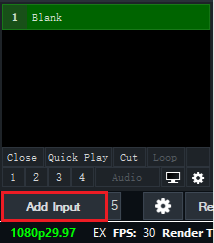
  1. Click an empty input area, then click Add Input.

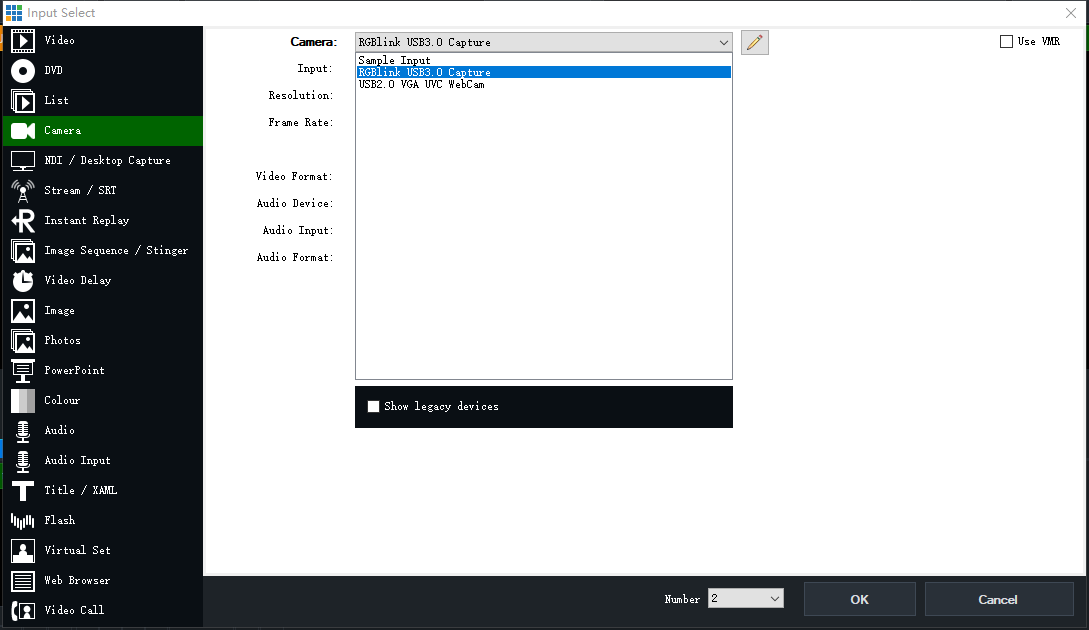
  1. Select Camera > Camera > RGBlink USB3.0 Capture.

  1. Select the same resolution as the mini-pro output resolution, then click OK.

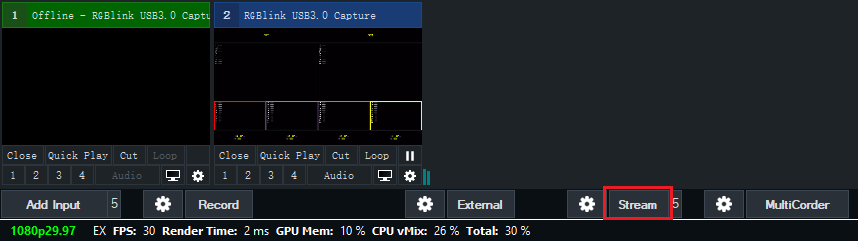
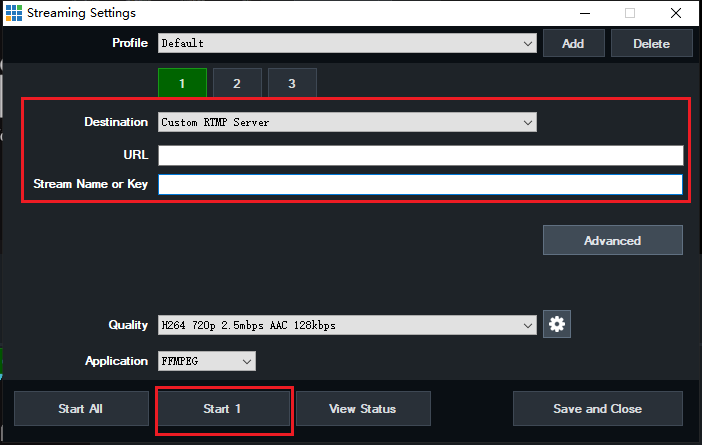
  1. Click the stream settings button.

  1. Enter the streaming URL and Stream Key.
  2. Click Start 1 to begin streaming.

Facebook Streaming

Refer to the actual Facebook Live interface for streaming setup.

Official Guide link: https://www.facebook.com/business/help/165076674943644?id=1123223941353904

Zoom Streaming

Refer to the actual Zoom interface for streaming setup.

Official Guide link: https://support.zoom.com/hc/en/article?id=zm_kb&sysparm_article=KB0064210

3.12Record

mini supports recording video to an external SSD or USB drive through the USB port, providing local recording for live streaming and content creation.

Supported Specifications

  • External SSDs up to 2 TB are supported
  • USB drives up to 64 GB are supported
  • Supported file systems: FAT32 and exFAT

When a recording file reaches 2 GB, the system automatically saves the recording as a new segment. Each recording segment is approximately 60 minutes long.

Connect a Storage Device

Insert the USB drive or external SSD into the USB recording port labeled RECORD on the mini panel.

Format the Storage Device

Before using the recording function, format the USB drive or external SSD first.

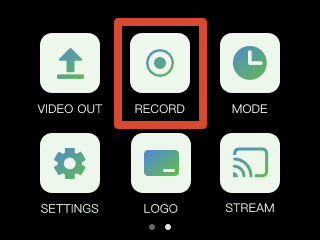
  1. Press the M button to return to the main menu.
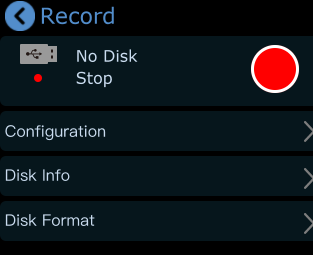
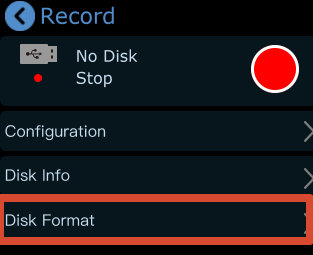
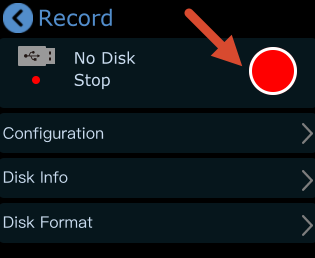
  2. Tap RECORD to enter the recording settings page. The system will display the current disk status and related settings.

  1. mini automatically detects whether a storage device is connected. Recording is unavailable if no disk is detected.

  1. Format the disk on the computer. On Windows:
  • Insert the USB drive or external SSD
  • Right-click the target disk partition and select Format
  • Select exFAT as the file system
  • Set Allocation Unit Size to 128 KB

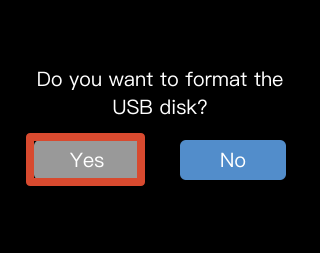
e. On the RECORD page, tap Disk Format > Yes to complete disk formatting.

📢  Tips

If the computer cannot recognize the external SSD after connection, use a dual-USB power cable to provide additional power.  

Recording Configuration

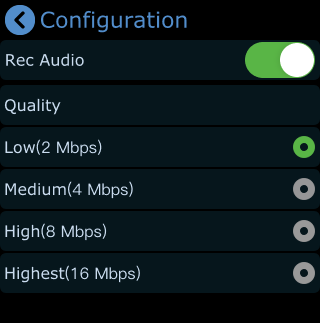
After formatting the disk, tap RECORD > Configure to set:

  • Audio recording on/off
  • Recording quality level

View Disk Information

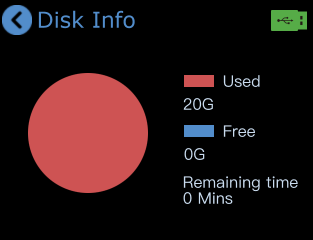
Tap Record > Disk Info to view:

  • Used disk space
  • Remaining available space
  • Remaining time for recording

Start Recording

Recording can be started from either of the following locations:

  • The recording switch on the RECORD page

  • The recording icon on the Preset Recall Menu page

After recording starts, the Record page displays:

  • Total recording duration
  • Recording progress

3.13LOGO

Bind the device to TAO Cloud before proceeding. See section 3.14 Settings, TAO Cloud for details.

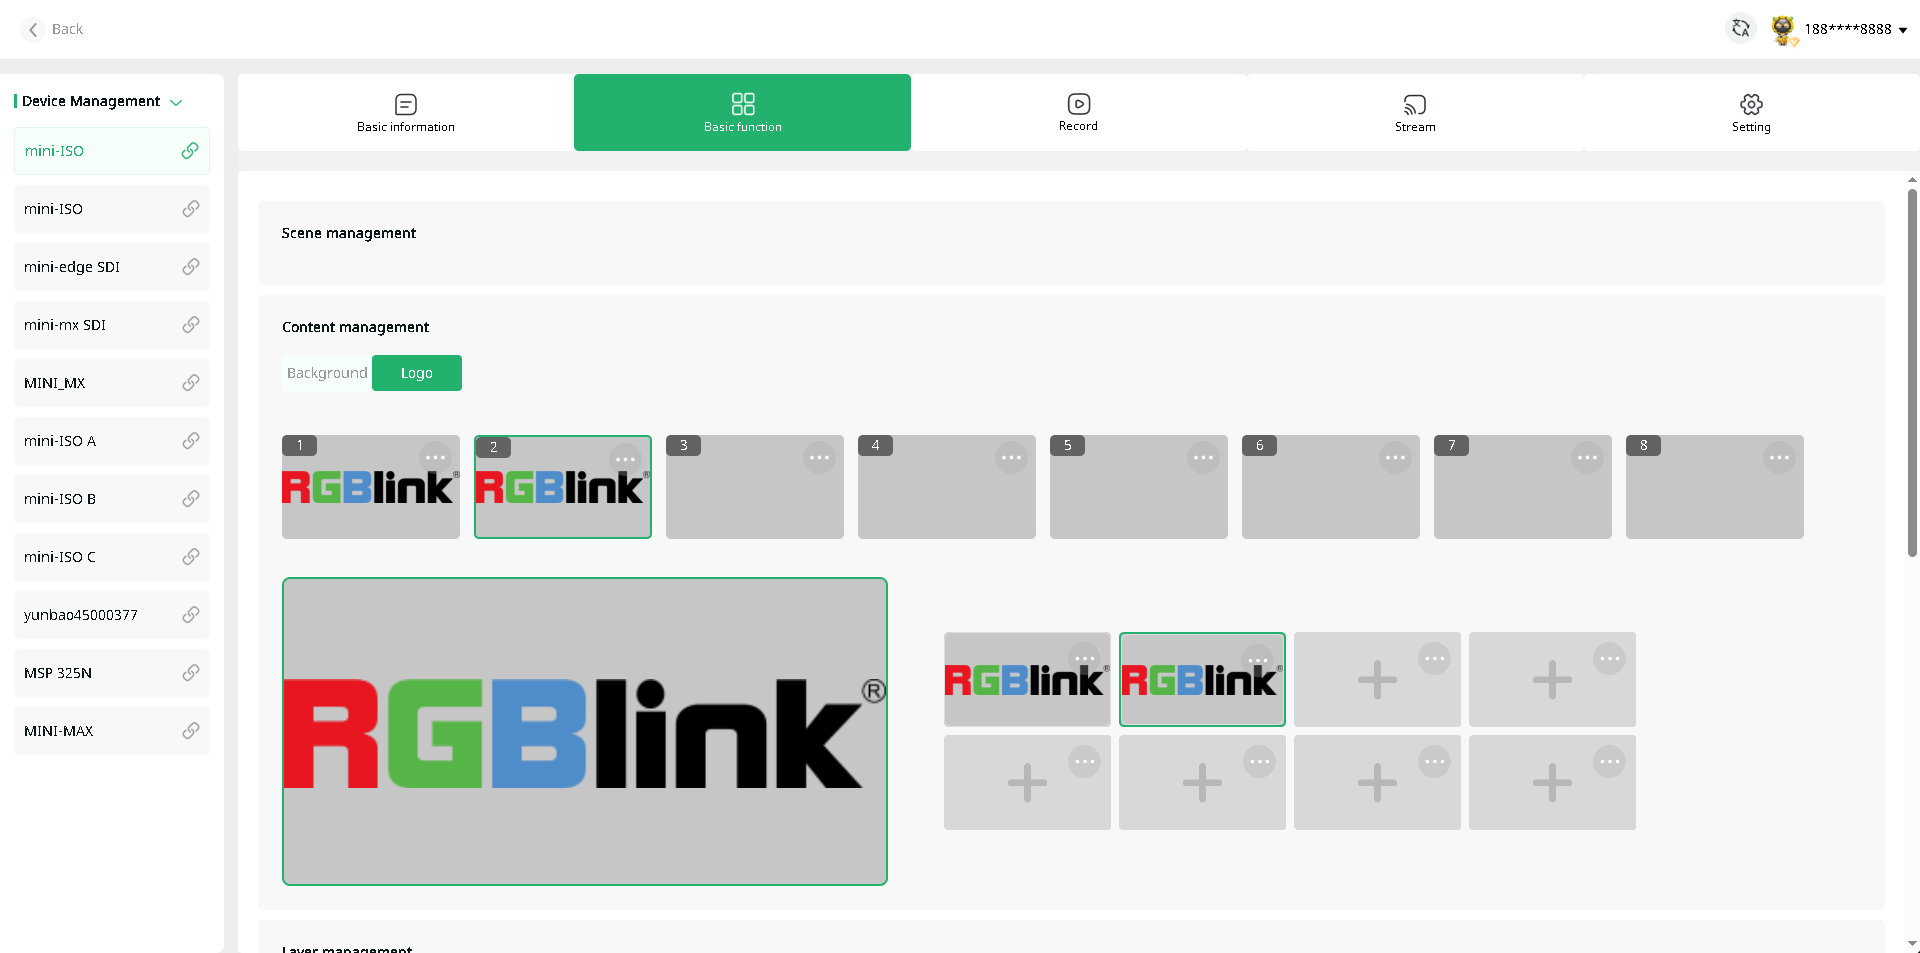
Import Logo Material in TAO Cloud

Open TAO and go to My Collection> My Devices. Then open the management page for the target mini device.

Under Basic Function > Content Management > Logo, select the target scene and upload or add logo material in the content management section.

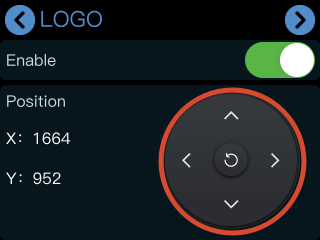
Adjust the Logo Position

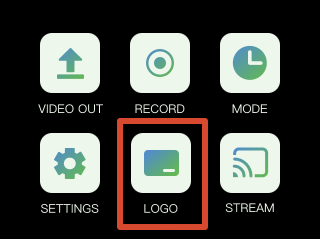
Open the Logo menu from the main menu on mini.

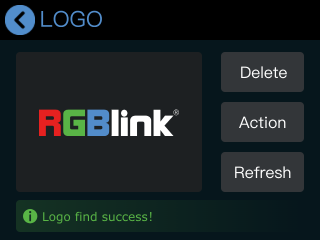
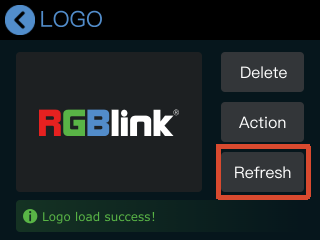
The logo settings page will display the material uploaded in TAO Cloud.

Tap Action After enabling the logo function, the logo will appear in the current preview screen.

  • Use the directional icons to adjust the position.
  • Tap the reset icon to restore.

Logo refreshment must be performed in TAO Cloud.

Go to the mini device management page and select a new logo asset under Basic Settings

Then return to the logo settings page on mini and tap Refresh to update the current logo.

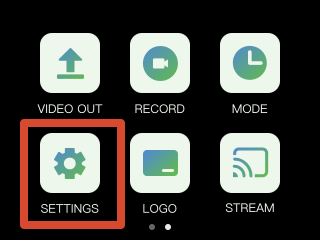
3.14Settings

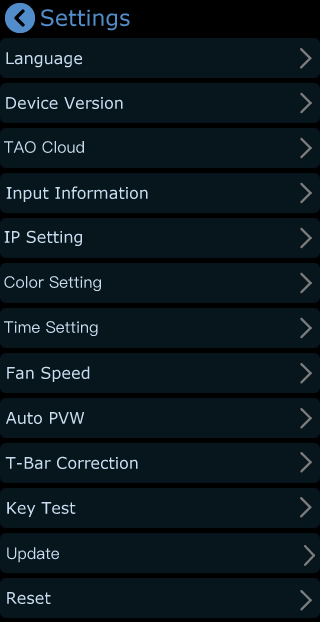
Tap Settings to open the system settings menu.

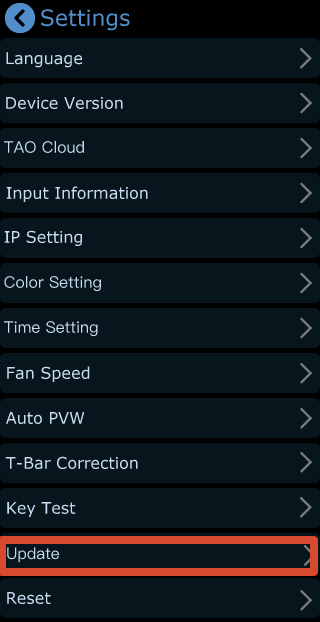
The settings menu includes:

Language, Device Version, Input Information, IP Setting, Color Setting, Time Setting, Fan Speed, Auto PVW, Reset, T-Bar Correction, Key Test, Update and Reset.
Language

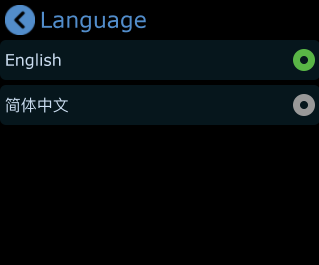
Go to Settings > Language to open the language settings page.

mini-pro supports:

  • 简体中文
  • English

Select the preferred interface language as needed.
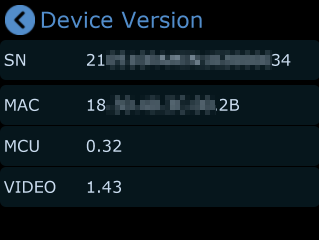
Device Version

Go to Settings > Device Version to view device information.

Available information includes:

  • SN: Device Serial Number
  • MAC address
  • MCU version
  • Video version

TAO Cloud

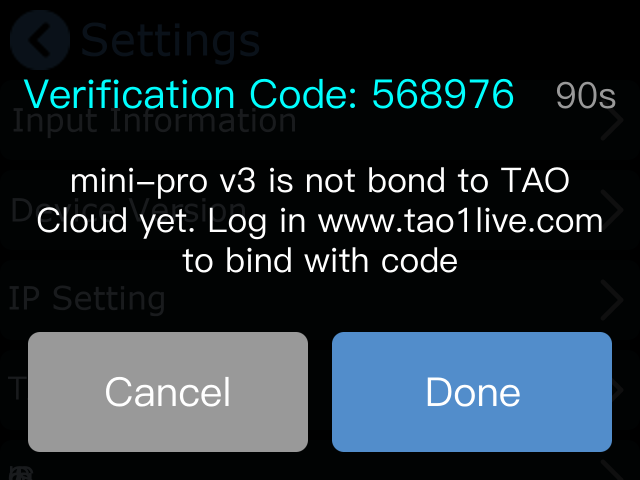
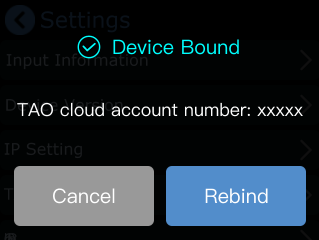
After the network connection is established:

Tap Settings > TAO Cloud

The device binding verification code will be displayed on the screen.
Log In to TAO Cloud

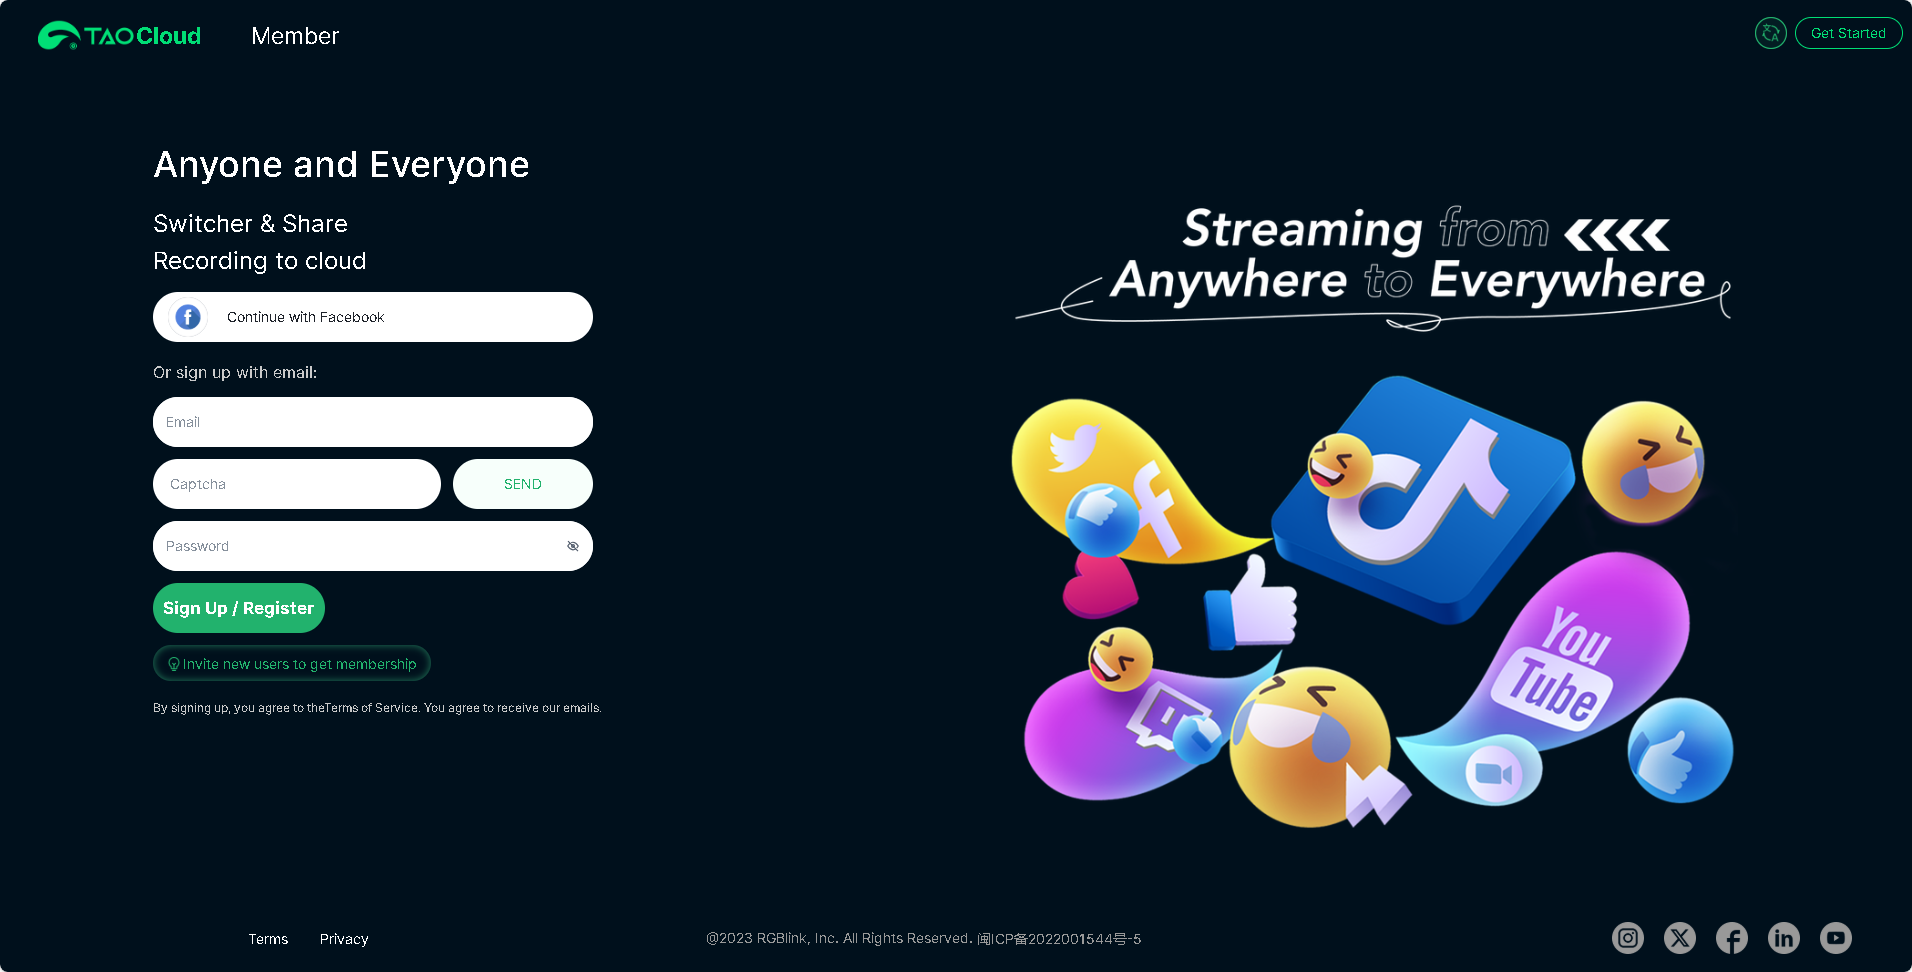
Open the official TAO Cloud website: TAO Cloud

Continue with Facebook account or sign up with e-mail.

Then tap Send for verification code.

After receiving the verification code, enter it and log in.
Bind the Device

After logging in to TAO Cloud, go to:

My Collection > Device > All Application >Binding Devices
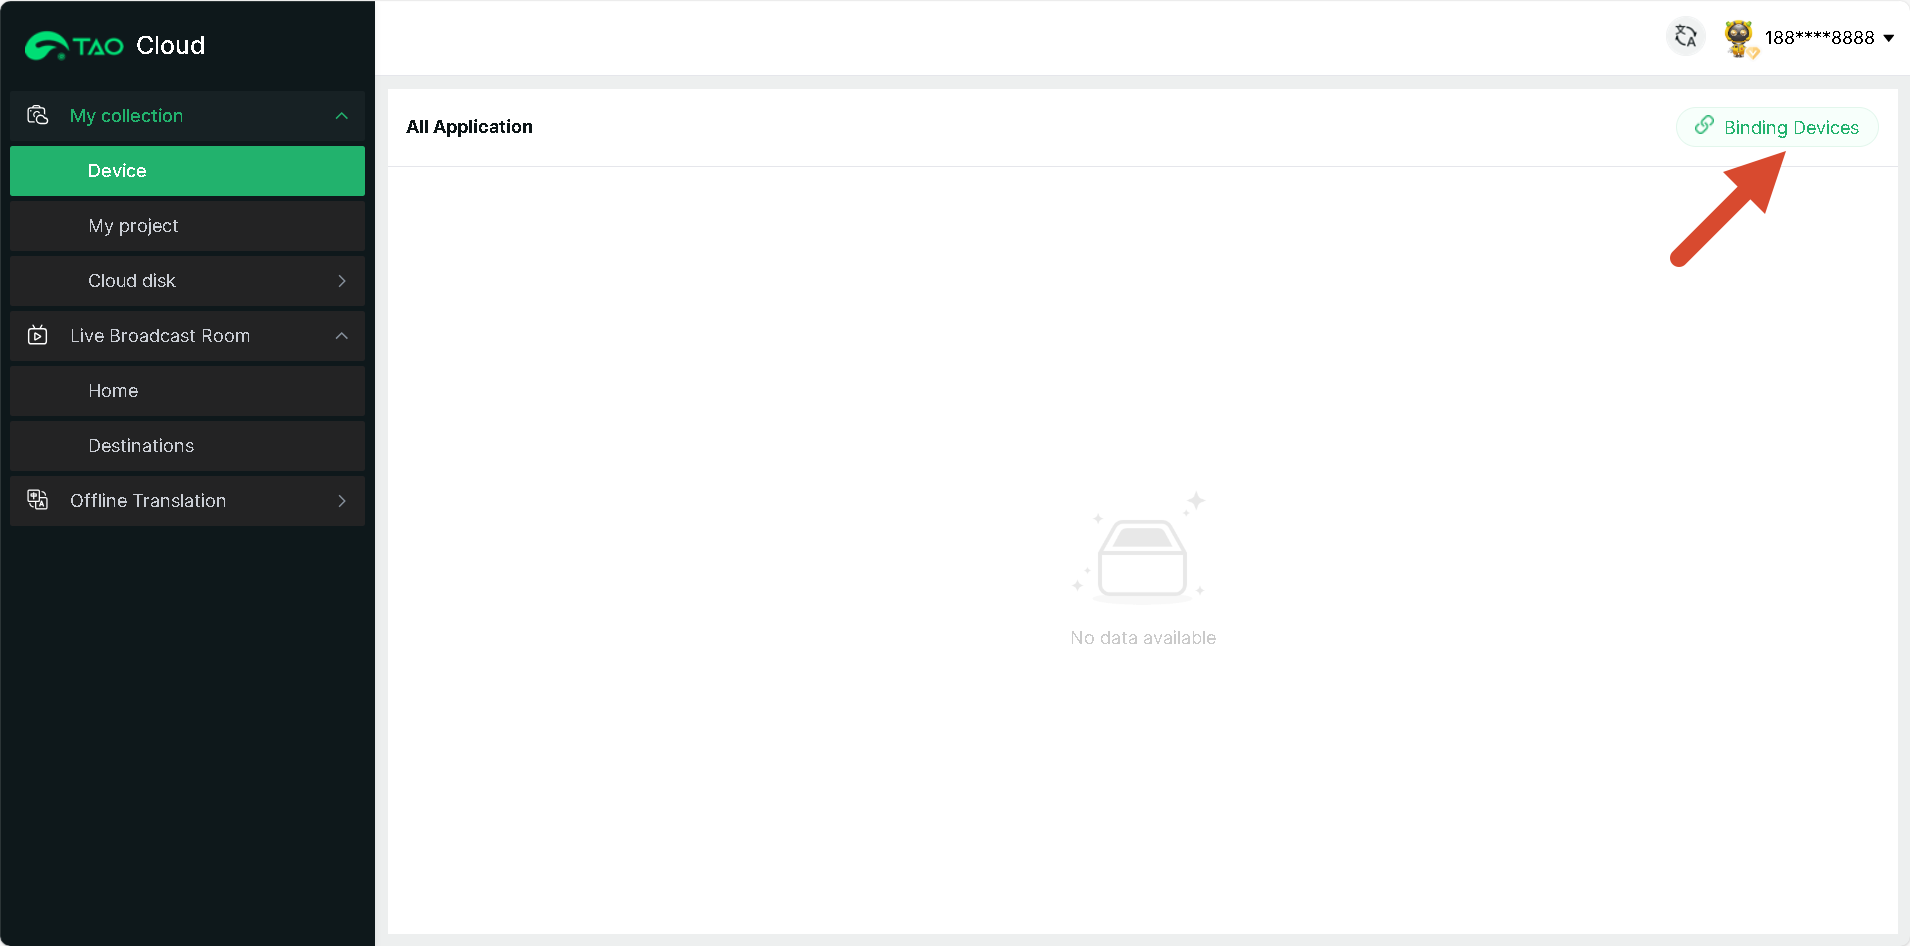
Enter:

  • Device Name
  • Verification Code

Then tap Bind to complete device binding.
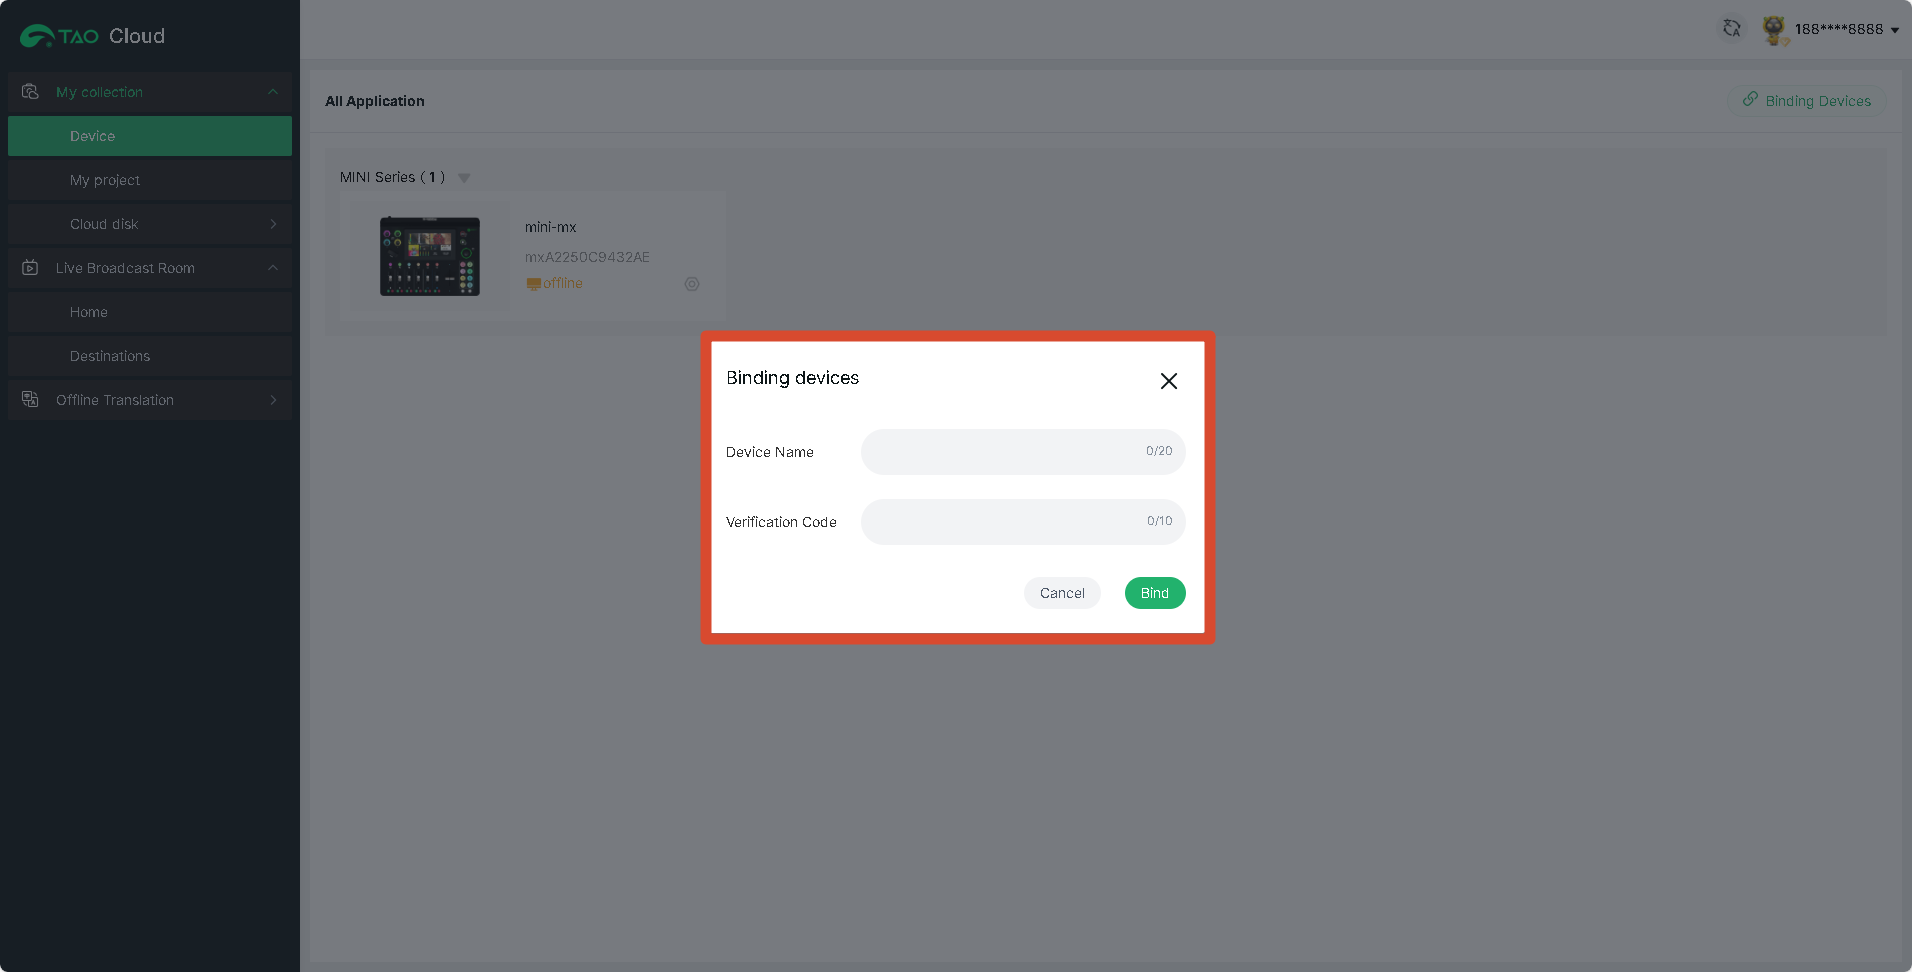
After binding, the device status can be viewed in All Application page.
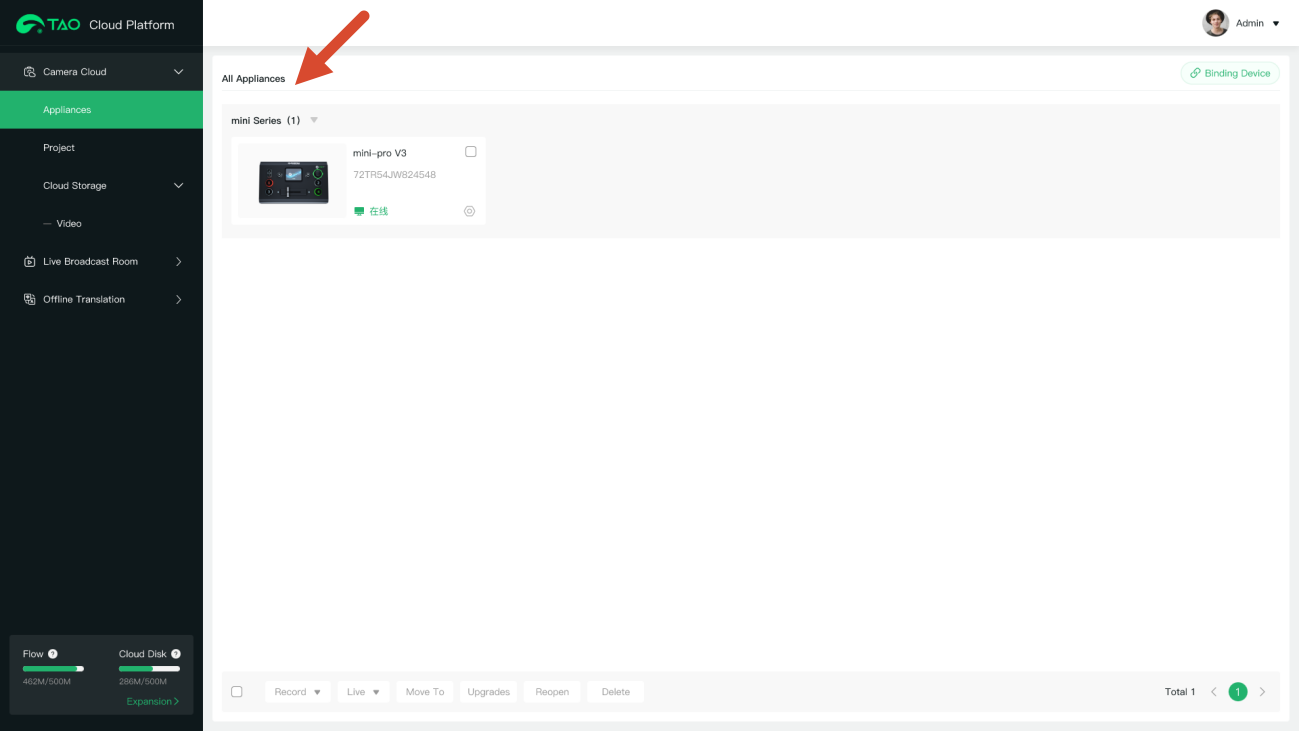
Unbind the Device

To unbind the device:

Open the TAO Cloud page on mini-pro again and select Rebind to remove the current binding.
Feature Licensing

Input Information

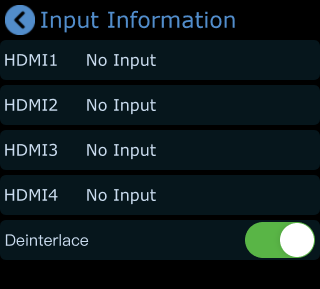
Go to Settings > Input Information to view HDMI input status.

In this page:

  • If no HDMI input is detected, the screen displays No Input
  • If an HDMI source is connected, the input resolution will be displayed
  • If the input signal is interlaced, Deinterlace can also be enabled.
Color Setting

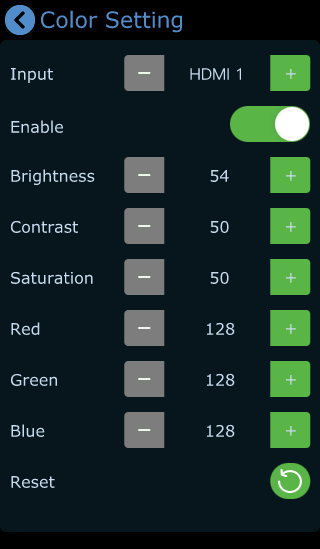
Go to Settings > Color Management to open the image adjustment page, you can independently adjust HDMI 1–4 input sources.

After enabling Color Management, you can use the following controls:

  • Tap - or + to switch HDMI input sources, or use the front-panel X knob to select inputs
  • Tap - or + to adjust image parameters, or use the front-panel Y knob for adjustment
    • Brightness
    • Contrast
    • Saturation
    • Other image parameters

This helps achieve more consistent and balanced output across different sources.

If incorrect settings are applied, tap Reset icon to restore default parameters.
Fan Speed

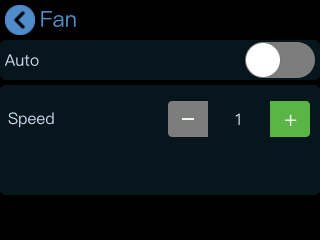
Go to Settings > Fan to configure fan settings.

● When Auto mode is enabled, mini-pro adjusts fan speed automatically
● When Auto mode is disabled, fan speed can be adjusted manually

Four fan speed levels are available.
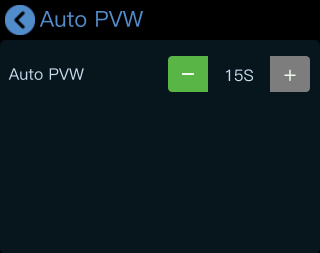
Auto PVW

Go to Settings > Auto PVW to configure automatic preview return timing.

The system can automatically return to the default PVW after a period of inactivity.

  • Default value: 15 seconds
  • Adjustment step: 15 seconds

T-Bar Correction

Go to Settings > T-Bar Correction to open the calibration page.
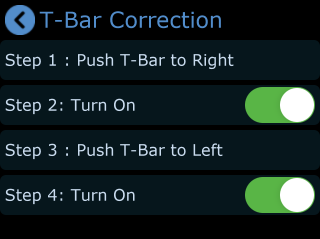
Follow these steps to complete:

  1. Move the T-Bar fully to the right

  1. Enable the switch
  2. Move the T-Bar fully to the left

  1. Enable the switch again
  2. When calibration is complete, the screen will display "Correct!"
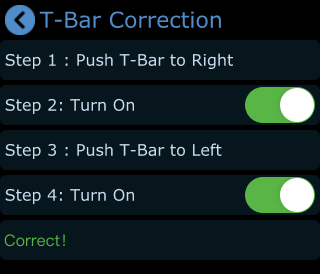
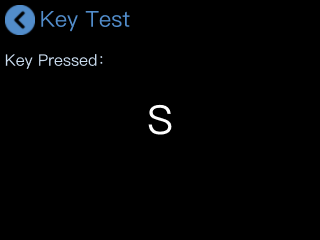
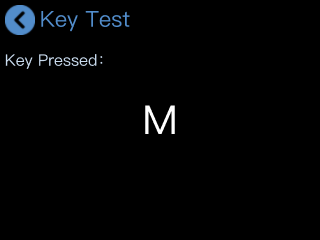
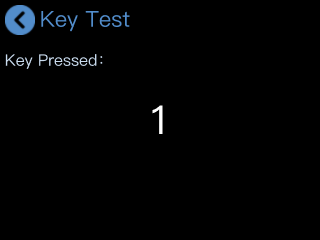
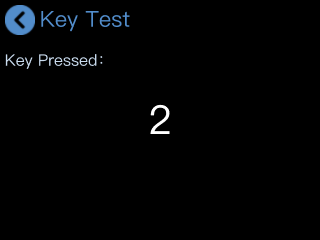
Key Test

Tap Key Test to enter the test interface.

Press the M button or other buttons and verify that the displayed information matches the button being pressed to confirm proper operation.

Update

Tap Upgrade to enter the system upgrade interface.

Tap Upgrade to start upgrading mini-pro.
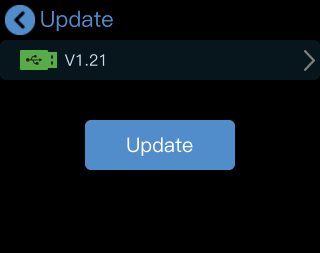
📢  Important

Make sure the network connection is stable before and during the upgrade process.
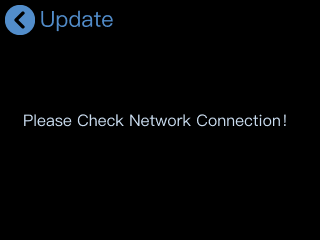
Reset

Tap Reset to enter the factory reset interface.
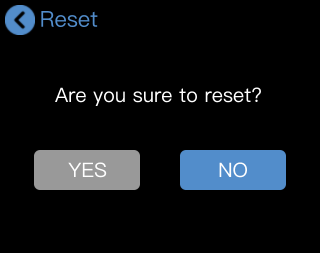
Tap YES to restore the device to its default settings.

After the reset is complete, reboot the device.
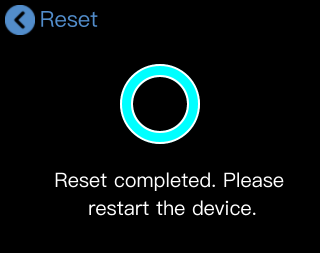
4Upgrade

mini-pro supports online upgrades.

Before You Start

  1. Connect the mini-pro to the computer using an Ethernet cable.
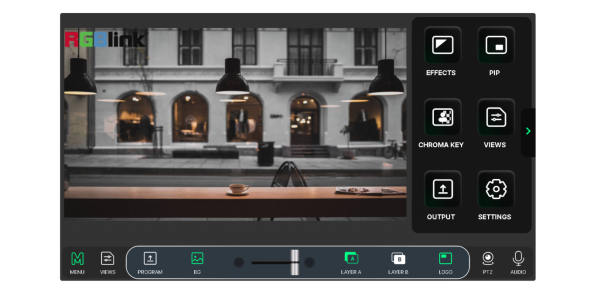
  2. Open the network settings on the computer and ensure the computer and mini-pro are connected to the same LAN. DHCP is recommended for automatic IP address assignment to ensure proper communication.
Upgrade Procedure

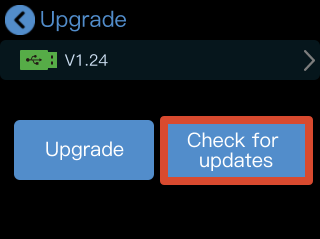
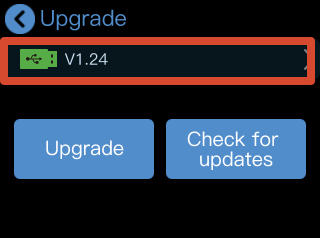
  1. Go to SETTINGS > Upgrade to open the upgrade page.
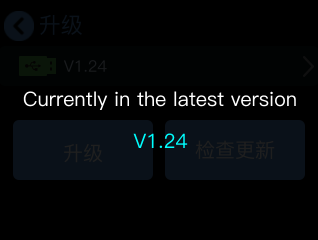
  1. If the device is already running the latest version, tap Check for Updates, the page will display Currently in the latest version along with the current version number.
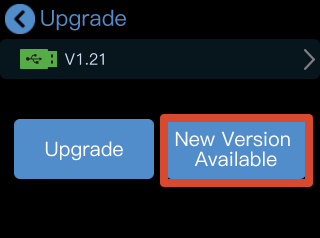
  1. If a new version is available, the page will display New Version Available.

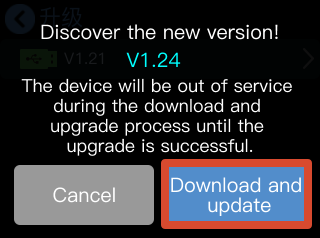
  1. Tap New Version Available to view the latest version information. Then tap Download and Update to download the upgrade package.

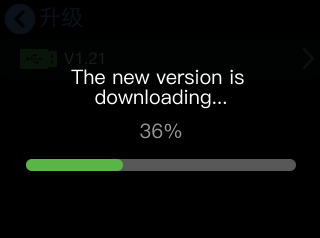
  1. The download progress will be displayed during the process.
    The download may take approximately 10 minutes, depending on the network speed.

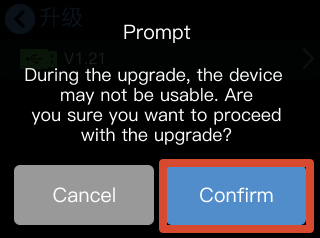
  1. After the download is complete, tap Confirm to start the upgrade.

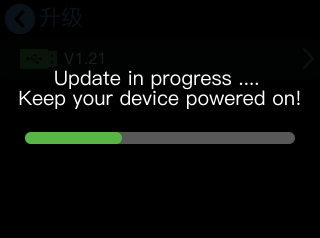
  1. The upgrade progress bar will be displayed during the upgrade process. Once the upgrade is complete, the device will restart automatically.

📢  Important

DO NOT power off the device during the upgrade process. 

Otherwise, the upgrade may fail.

  1. After the device restarts, the updated version number will be displayed on the Upgrade page.

5FAQ

Need help?

Choose one of the following support options:

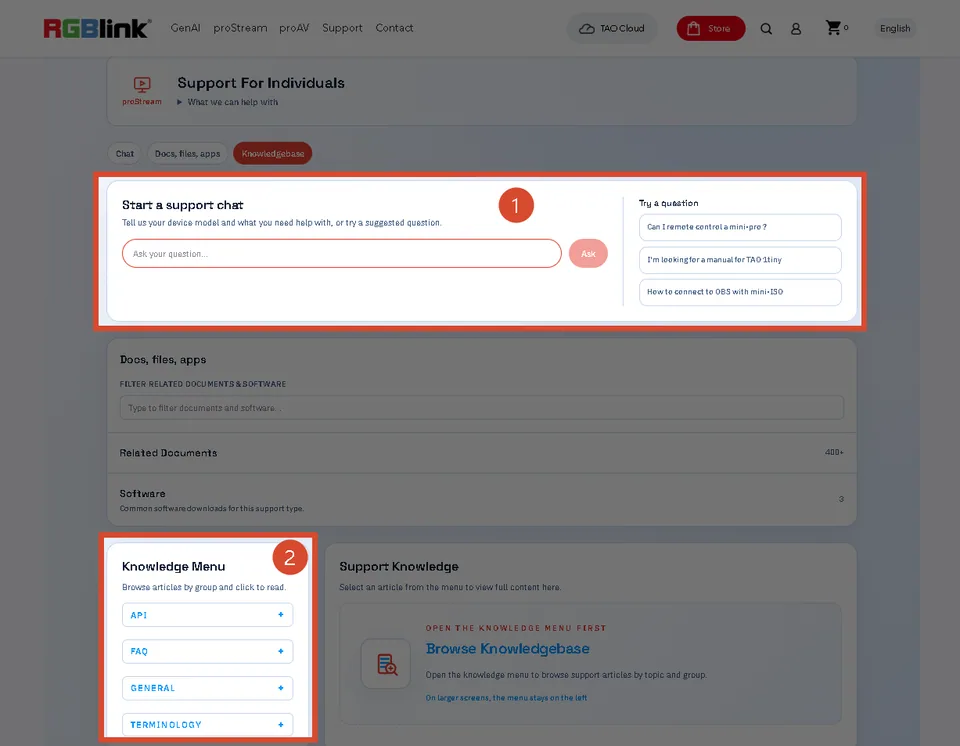
  • AI Support Search (Recommended): Visit Support > Support For Individual on the RGBlink official website and ask the RGBlink AI Bot for quick answers to your questions.
  • FAQs: Visit Support > Support For Individual on the RGBlink official website and browse Knowledge Menu > FAQ for relevant information.
  • Contact Technical Support: Visit this manual, Technical Support page for our contact details.

Document image

6Technical Support

7Revision History

VersionDateDescriptionAuthor
V1.02024-03-21Release mini-proAster
V1.12024-05-06Add Transition Effect illustrationAster
V1.22024-07-06Update Upgrade stepsAster
V1.32025-01-10Delete streaming via USB and add Steps of Streaming via Tao CloudAlyssa
V1.42025-01-21Delete Upgrade Via XTOOL or U DiskAlyssa
V1.52025-03-131. Update all known incorrect UI diagrams 2. Modify all known format errorsAlyssa
V1.62025-07-14Update the included accessoriesAlyssa
V1.72026-07-09Publish documentation online, add FAQ items, and update related details.Alyn

About Us / Find Support

Xiamen RGBlink Science & Technology Co., Ltd. designs and manufactures professional video processing, switching, streaming and LED display control products for live events, broadcast, education and fixed installations.

Need help?

Choose one of the following support options:

  • AI Support Search (Recommended): Visit Support > Support proStream/proAV/proEvents on the RGBlink official website and ask the RGBlink AI Bot for quick answers.
  • FAQs: Visit Support > Support proStream/proAV/proEvents on the RGBlink official website and browse Knowledge Menu > FAQ.
  • Contact Technical Support: Visit the Technical Support page of this manual or the RGBlink official website for our contact details.

Document image

RGBlink

www.rgblink.com

© Copyright Xiamen RGBlink Science & Technology Co Ltd