Export PDF

RGBlink
stream gO

User Manual

stream gO

970-5513-01-0

RGBlink

www.rgblink.com

November 2026

1stream gO Specifications

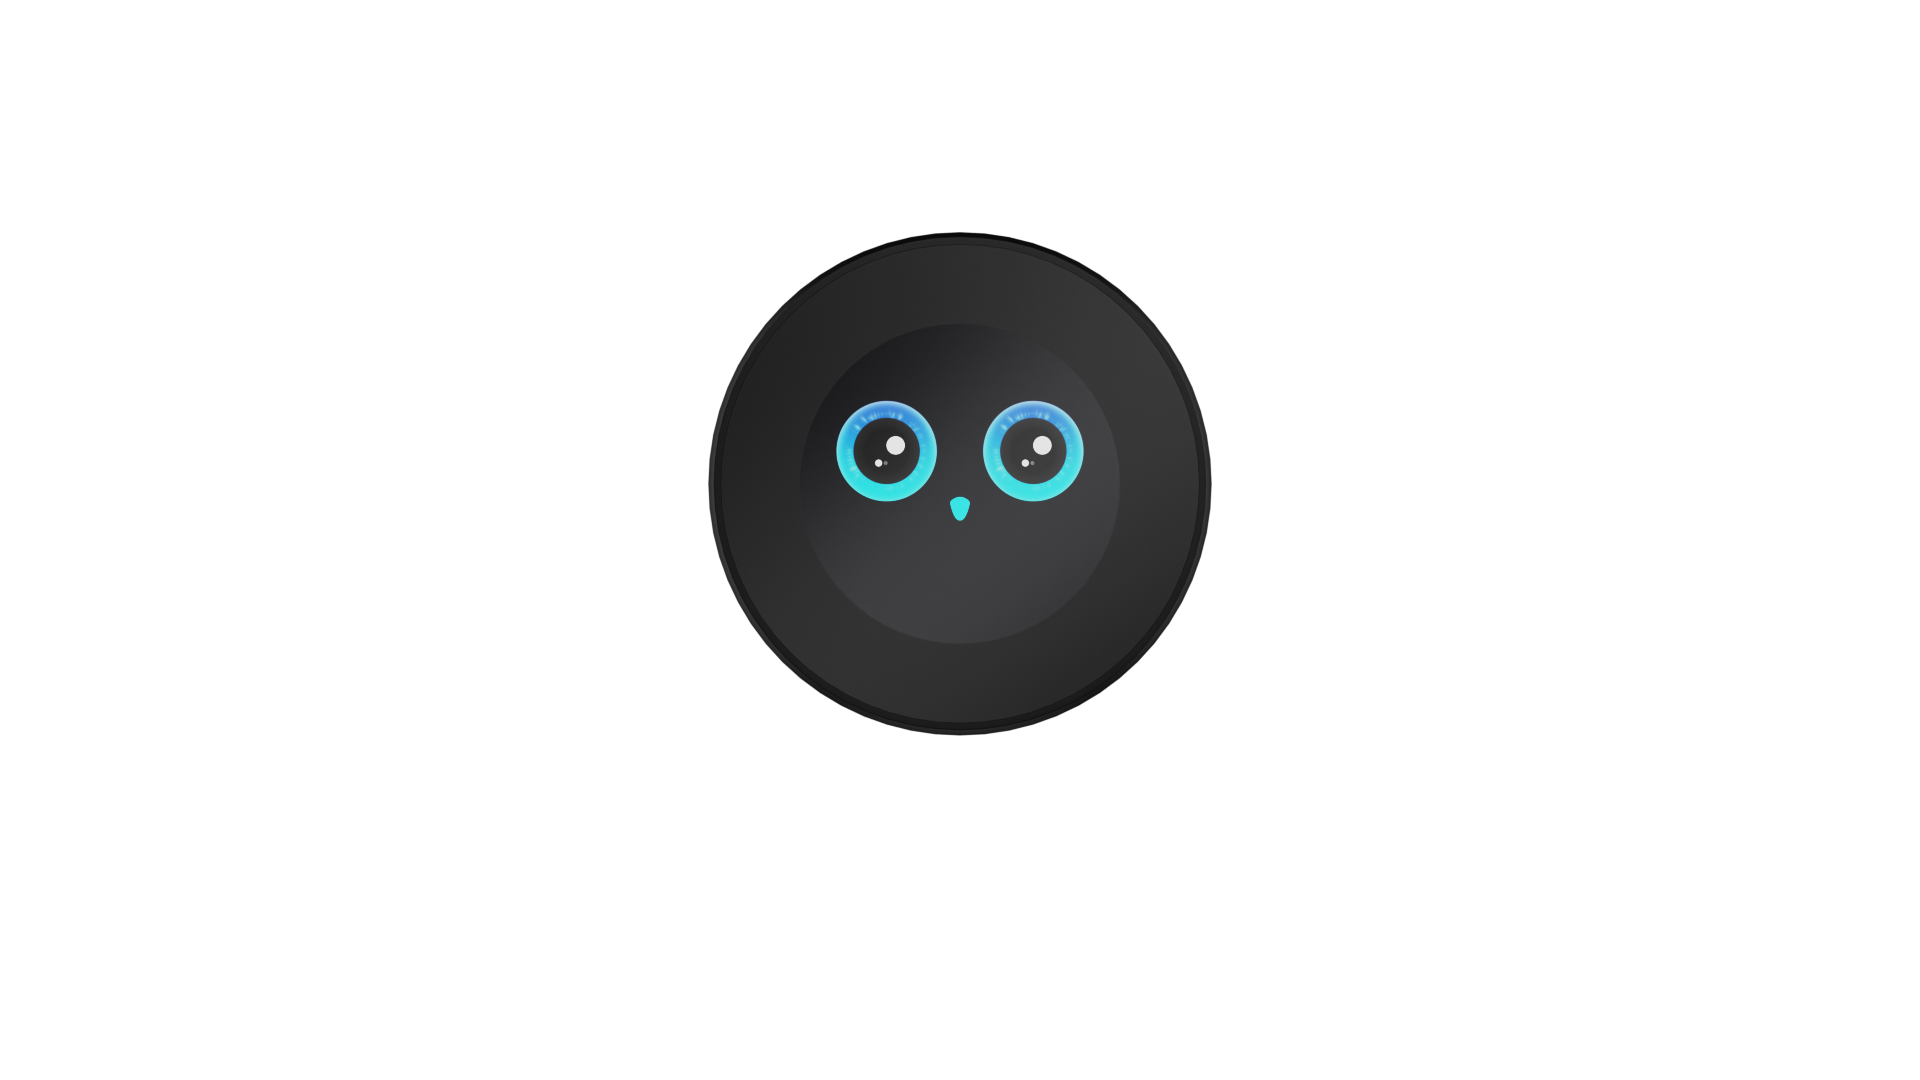
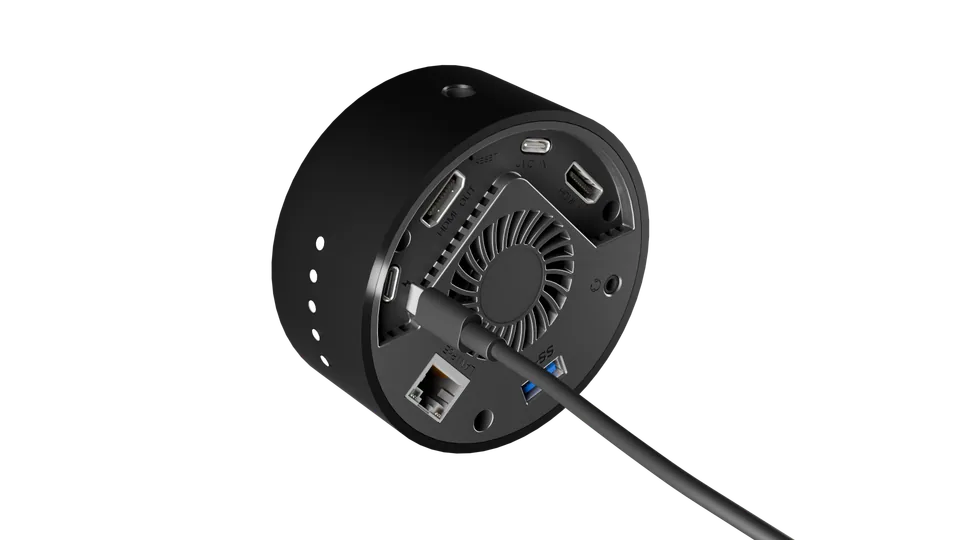
云宝gO俯视图
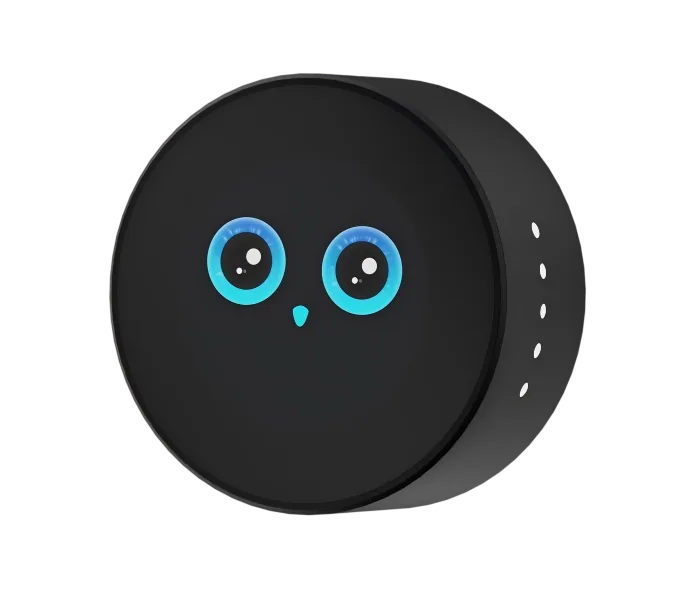
stream gO: AI Production Companion + Brand Asset Hub
Key Features + Compact and portable with full-color touchscreen, built-in LED TALLY indicators, and USB-C/PoE power support + All-in-one live production with up to 4K@60 capture and built-in streaming templates + Multi-platform streaming to up to four platforms, supporting HTTP / RTMP/NDI, up to 4K@60 encoding + AI content creation including AI editing, agents, AI copywriting and so on + Flexible mounting with dual screw holes for easy installation
Application
Dimension

Connectors

Item
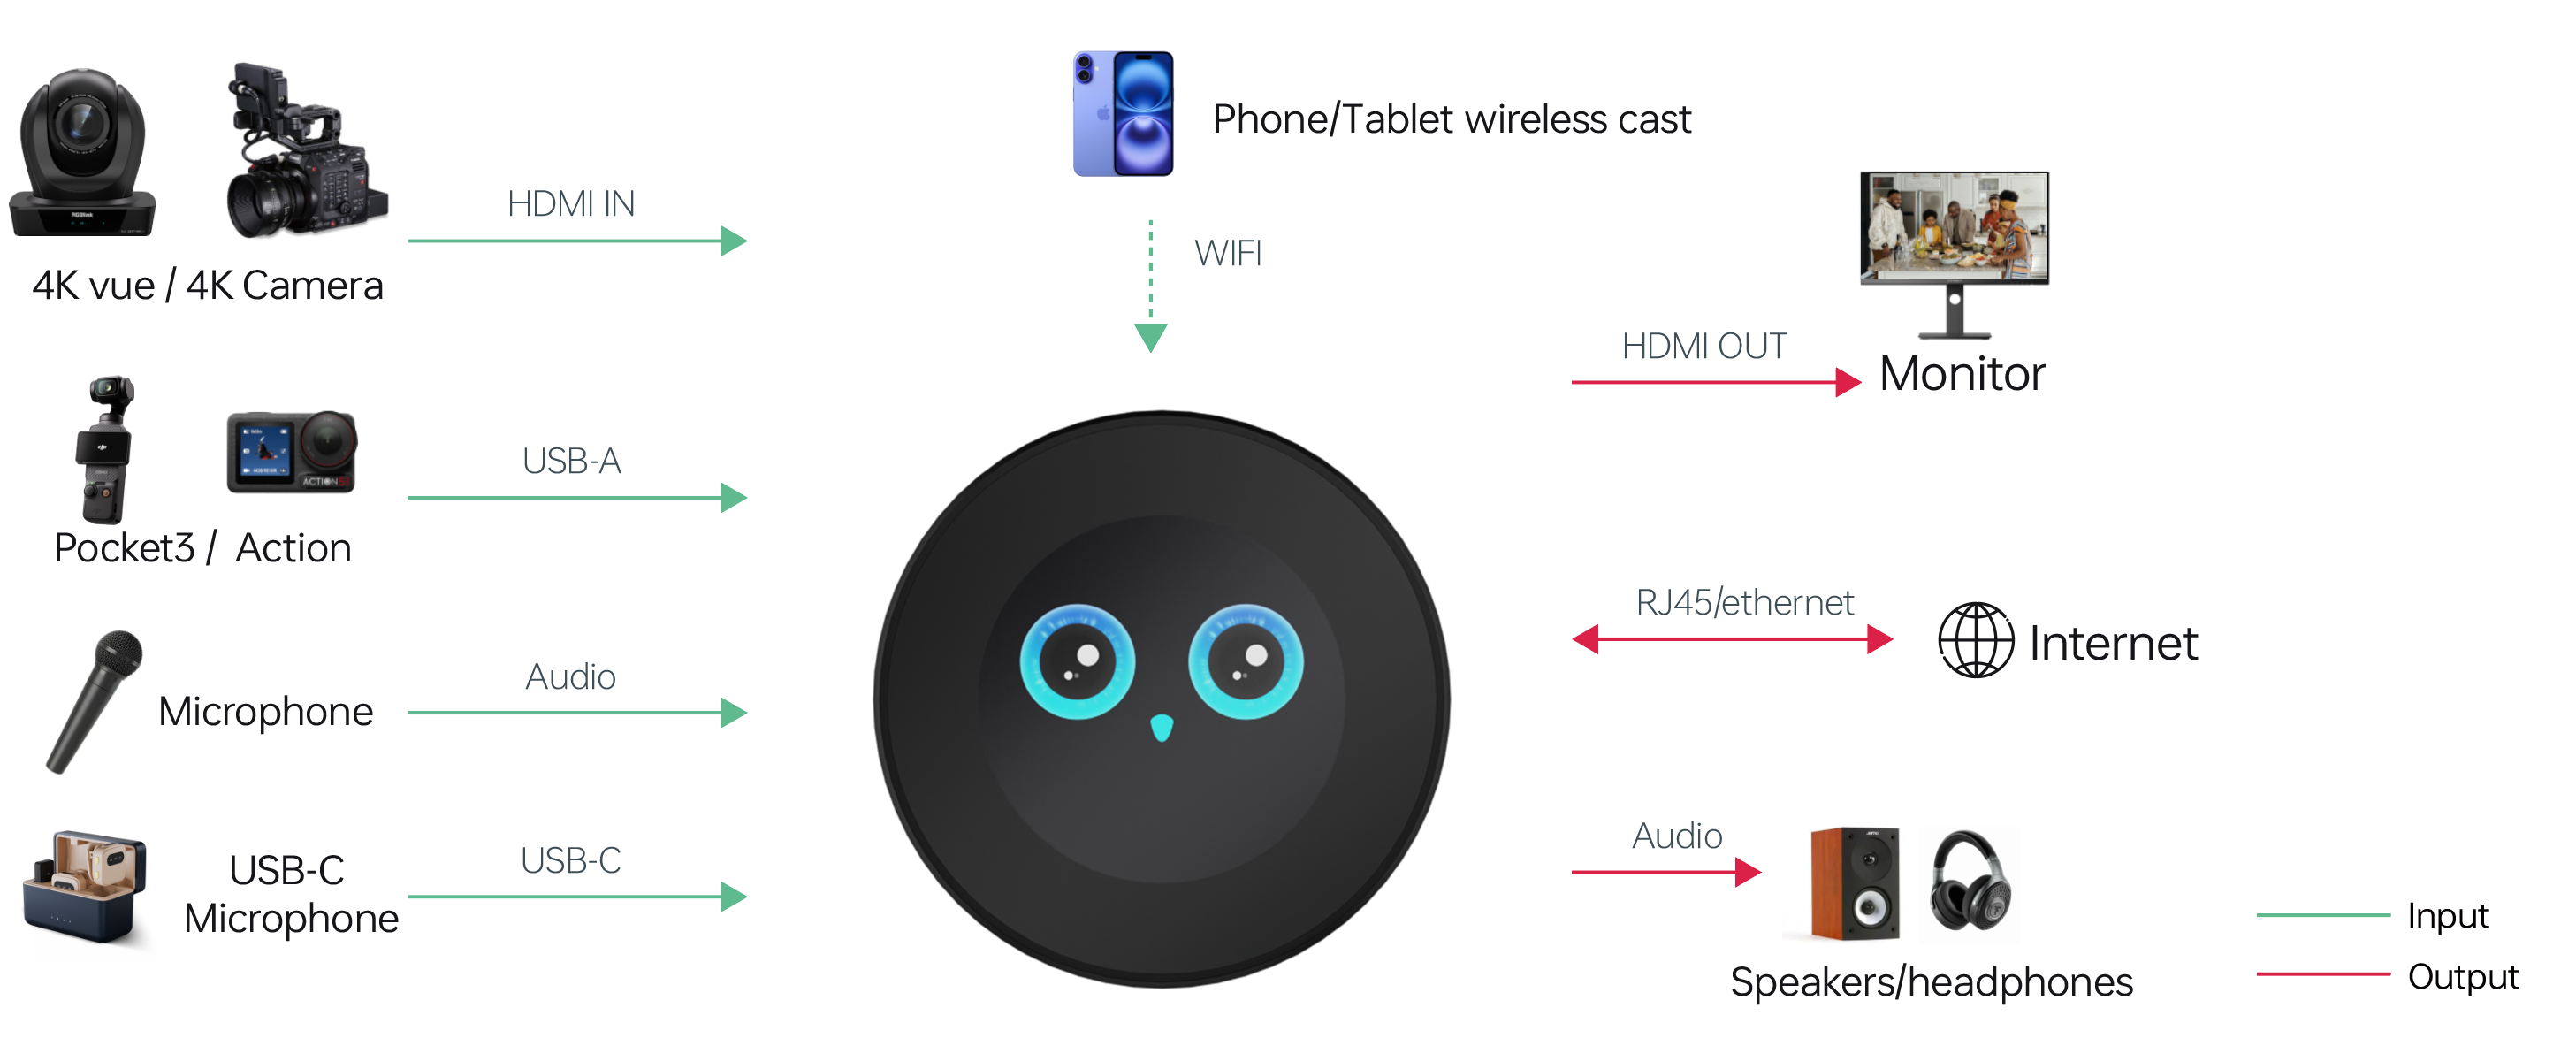
InputHDMI 2.01×HDMI-A
UVC1×USB-C
OutputHDMI 2.01×HDMI-A
AudioInput1×3.5mm Audio Jack
CommunicationLAN(PoE)1×RJ45
USB 3.01×USB-A
PowerType-C1×PD Type-C
LAN(PoE)1×RJ45

Performance

Item
HDMI 2.0 InputInput Resolution720@50/60, 1080@50/60
Format720@50/60, 1080@50/60, 1080@30/50/60, 1280×720@50/60, 1280×768@60, 1280×1024@60, 1360×768@60, 1366×768@60, 1600×900@60, 1920×1080@50/60, 3840×2160@60
Bit Depth8 bit/10 bit
Pixel FormatBT.601, BT.709
Image Delay3 Frames
UVC/Type C InputInput Resolition1024×768@60, 1280×720@50/60, 1280×768@60, 1280×1024@60, 1360×768@60, 1920×1080@24/25/30/50/60
Audio InputAudio Delay0~160ms
Analog Audio InputLINE
Maximum Input Level+2dBu
LANGigabit Ethernet
EncodingPerformanceH.264,H.265
ProtocolsHTTP/RTMP/NDI
ResolutionUp to 3840 × 2160p@60
HEMI 2.0 OutputOutput Resolution720×480@30, 1280×720@30, 1920×1080@30/60, 3840×2160@60
AudioEmbedded audio output

Power

Item
ModePoE, PD
Input Voltage5~12V
Maximum Power10W

Working Environment

Item
Temperature0℃~55℃
Humidity5%~85%

Physical

Item
WeightProduct180g
Package780g
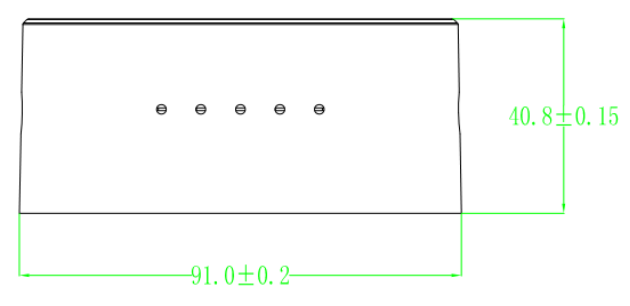
DimensionProduct91mm (diameter)×40.8mm (height)
Package215mm x145mm x 80mm

Order Codes

Product CodeItem
970-5513-01-0stream gO

2stream gO Quick Start

Welcome to the Quick Start Guide.
Follow the steps in this guide to quickly set up your device and get started.

2.1In the Box

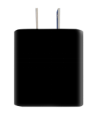
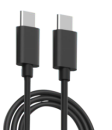
stream gO DevicePD Power AdapterUSB-C Cable
Document image

2.2Product Overview

stream gO is an AI Production Companion + Brand Asset Hub that combines live production, streaming, AI content creation, and brand asset management in a compact and portable device. It is pre-installed with OpenClaw for AI-powered content creation and workflow automation.

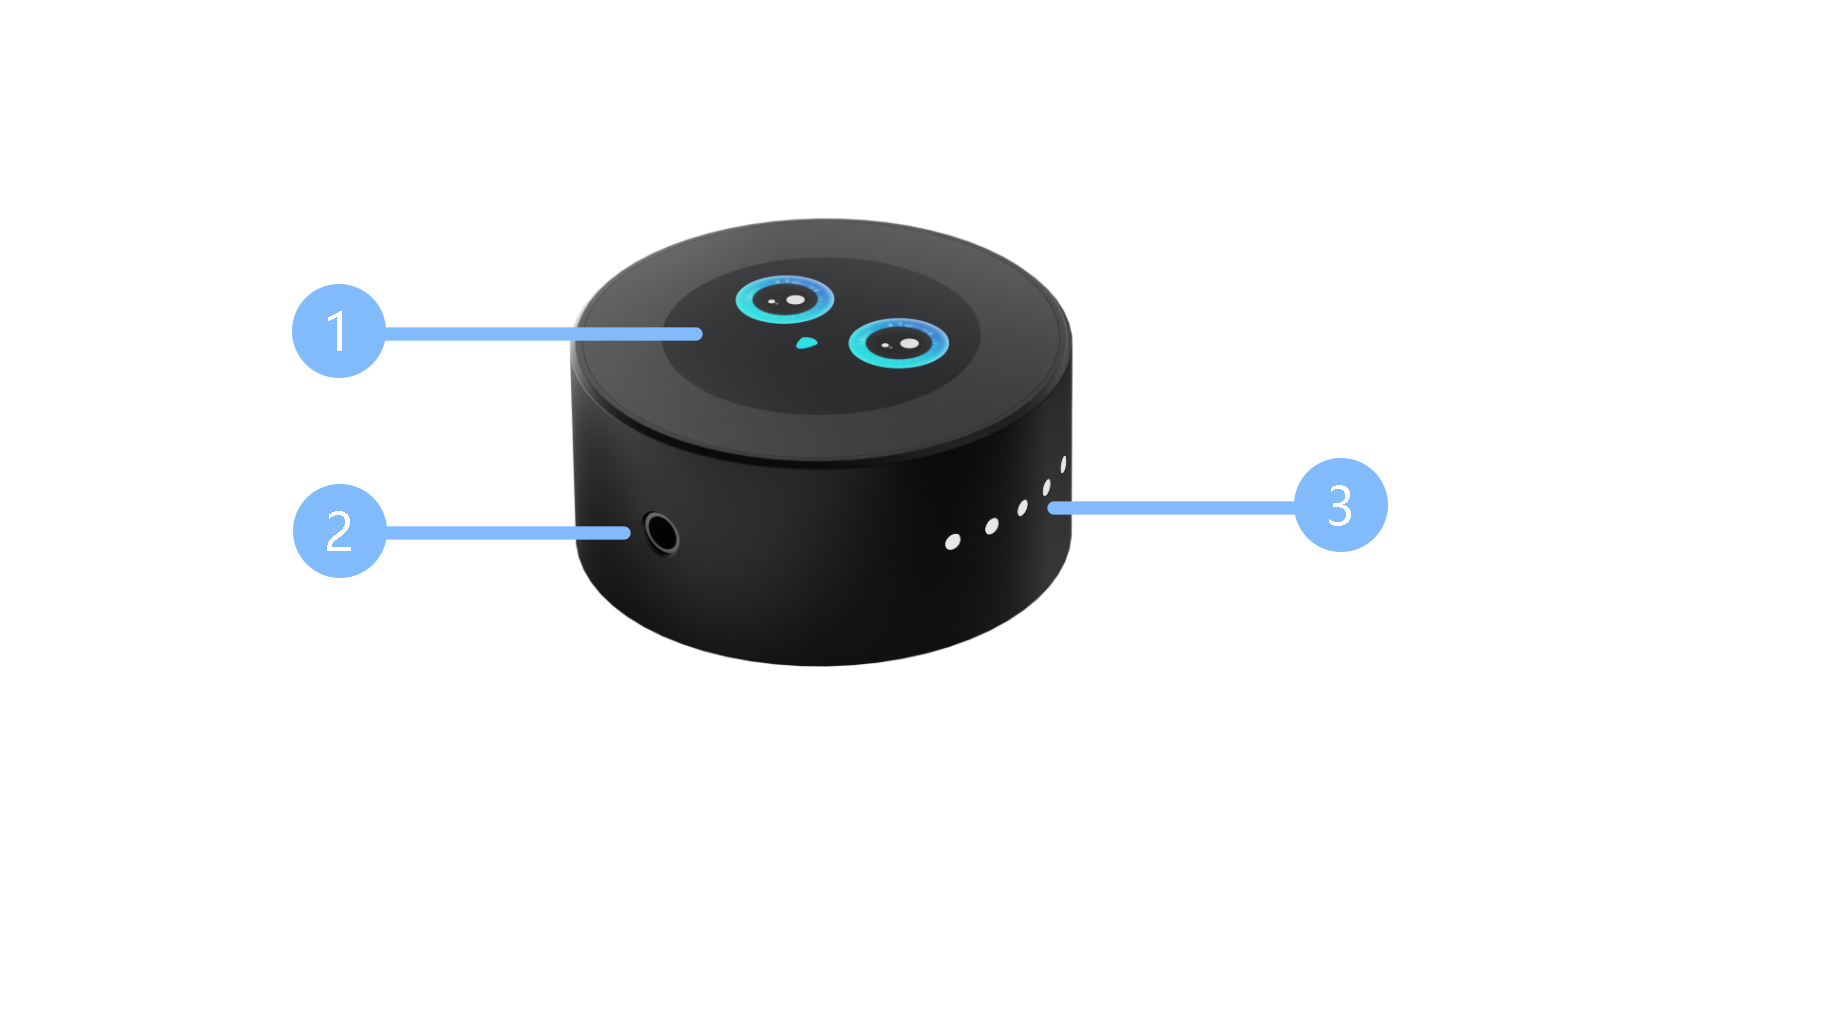
2.3Front Panel

ItemDescription
① Touchscreen2.1-inch touch screen for real-time monitoring of signals and menu operations.
② ¼in MountsFor mounting.
③ TALLY IndicatorsIndicators show device status.

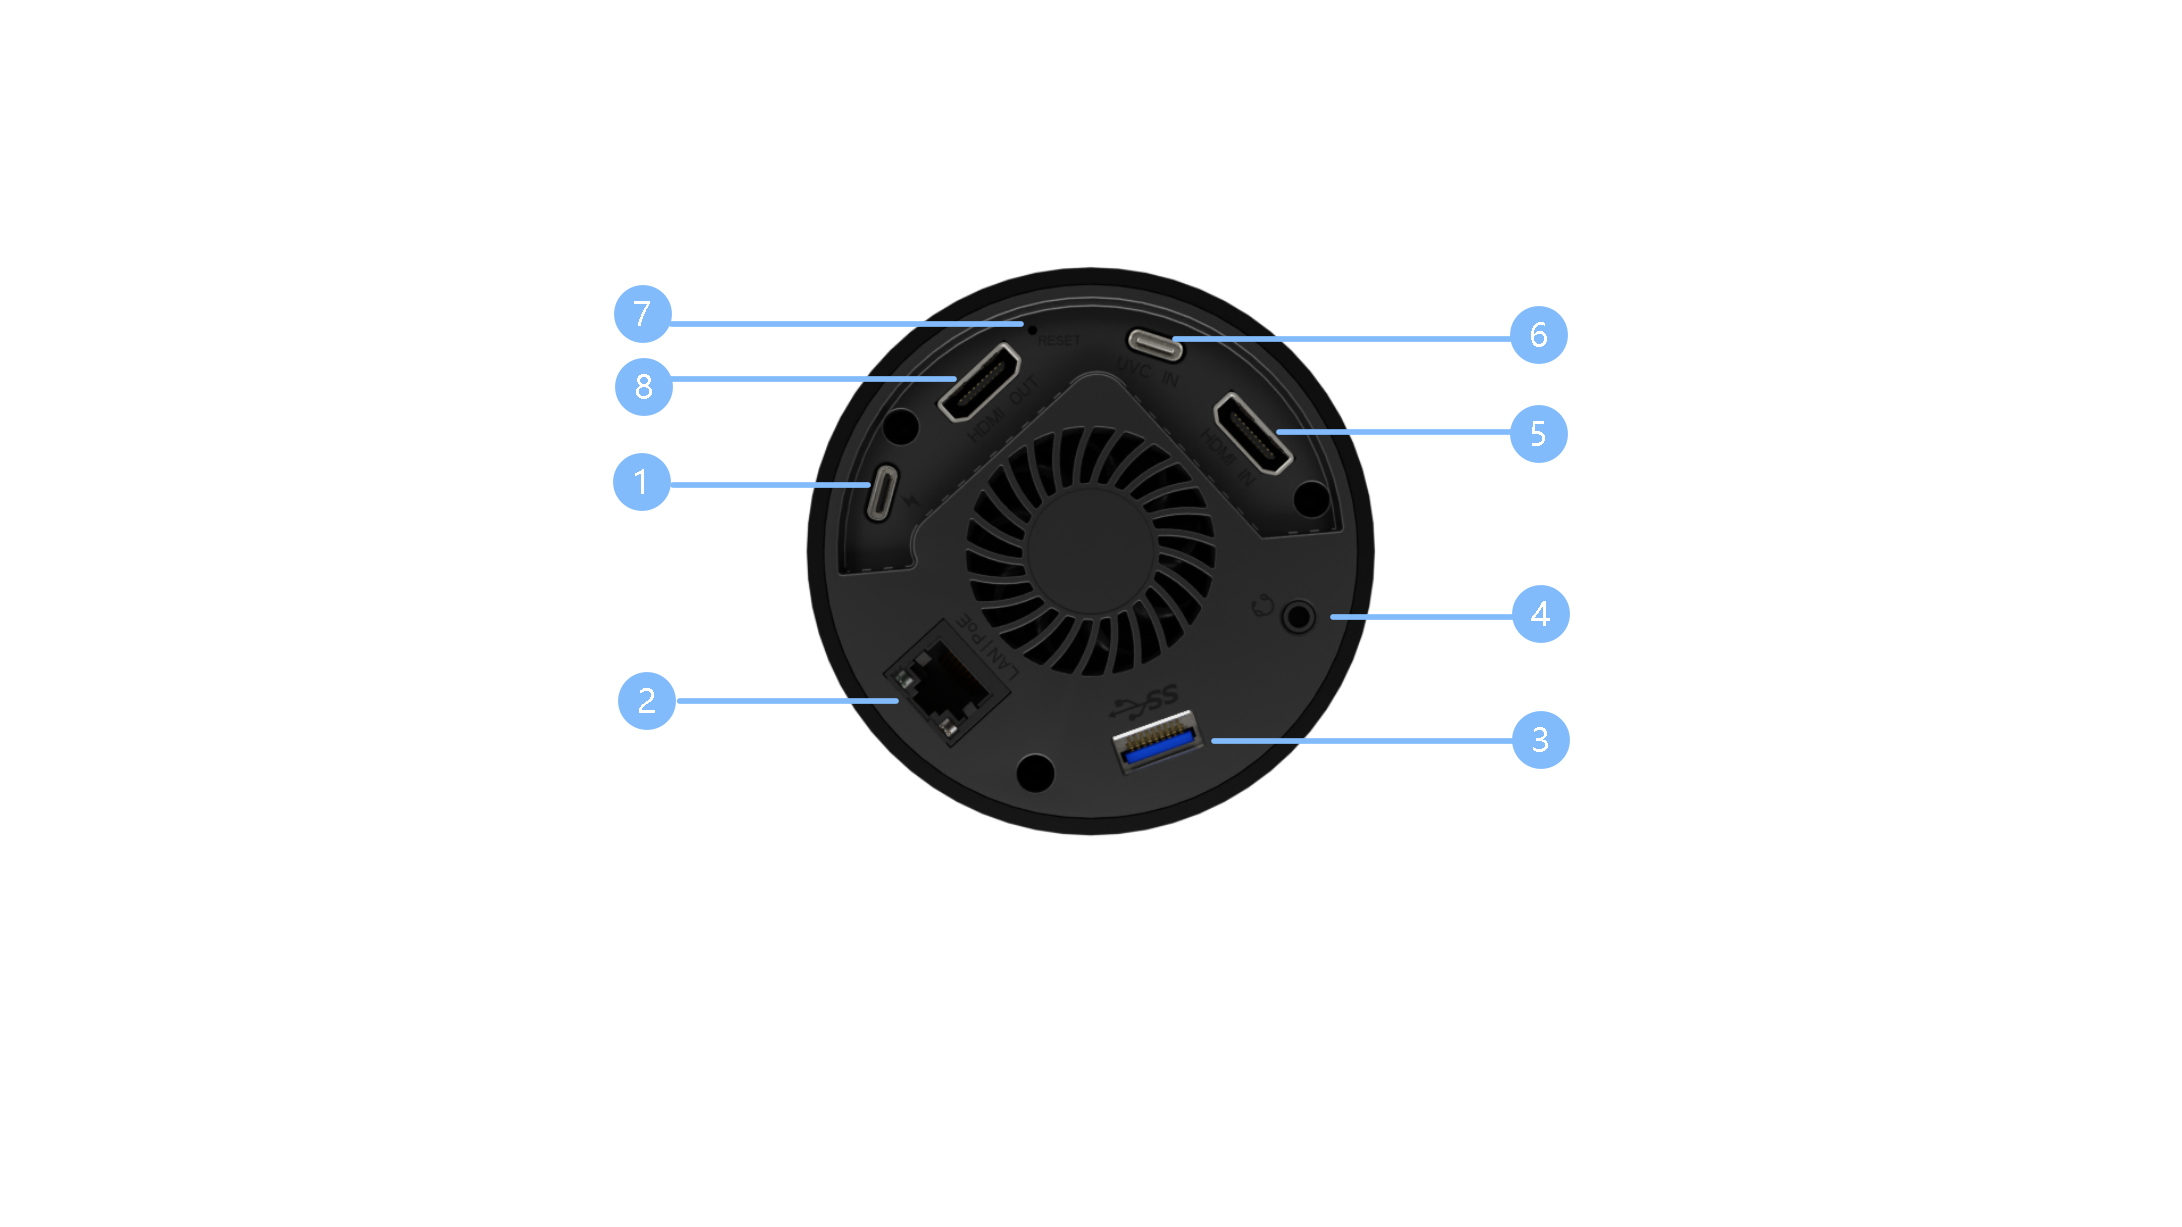
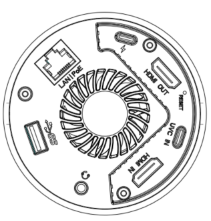
2.4Bottom Panel

!ItemDescription
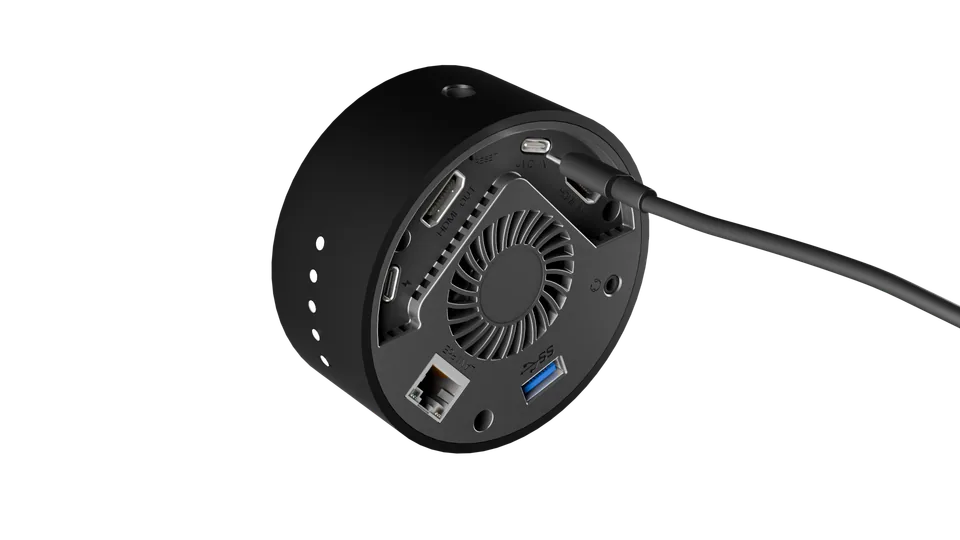
① USB-CConnect to the power supply, support PD protocol.
② LANPoE, Gigabit network port with PoE.
③ USB-A (3.0)Connect to hard disk for recording, and storage up to 2T.
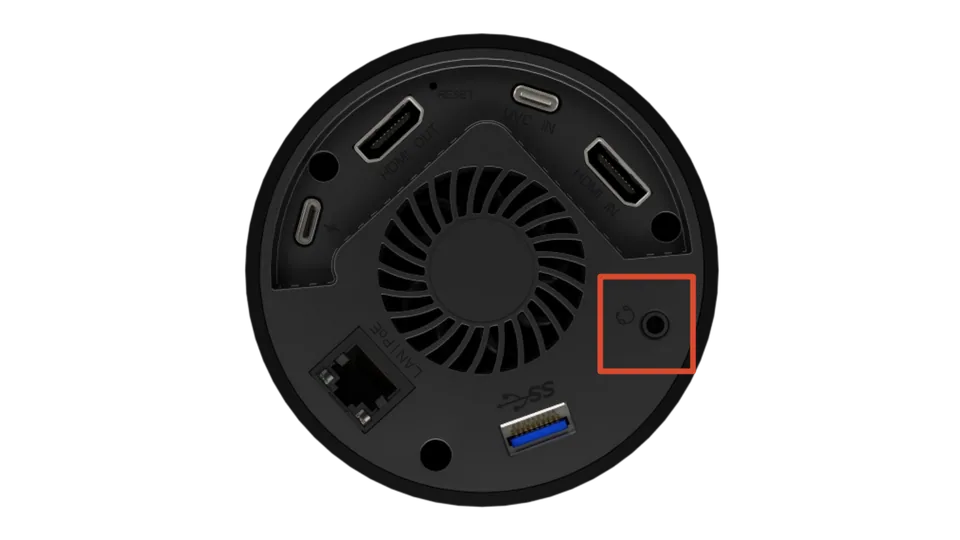
④ 3.5mm Audio SocketFor analog audio input and audio output monitoring.
⑤ HDMI INFor receiving video signal.
⑥ USB-C/UVC INFor receiving video signal from your phone or others. Connect to USB camera for UVC capture. Support 5V/1A reverse power supply.
⑦ RESET/
⑧ HDMI OUTConnect to external monitor for real-time monitoring of inputs and outputs.

2.5Main Interface

Power On

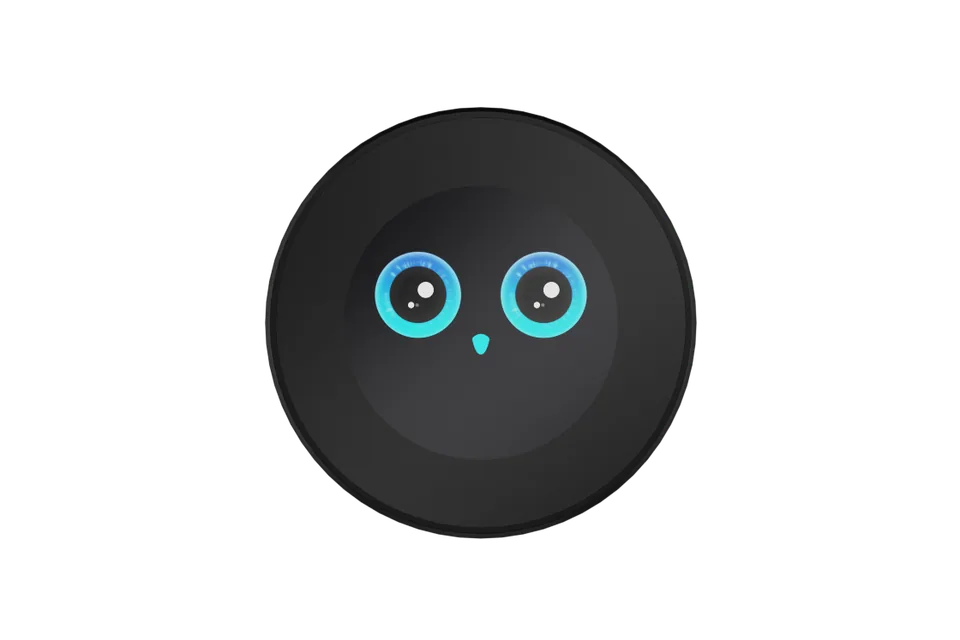
Show stream gO expression by default. (●'◡'●)

Home Page

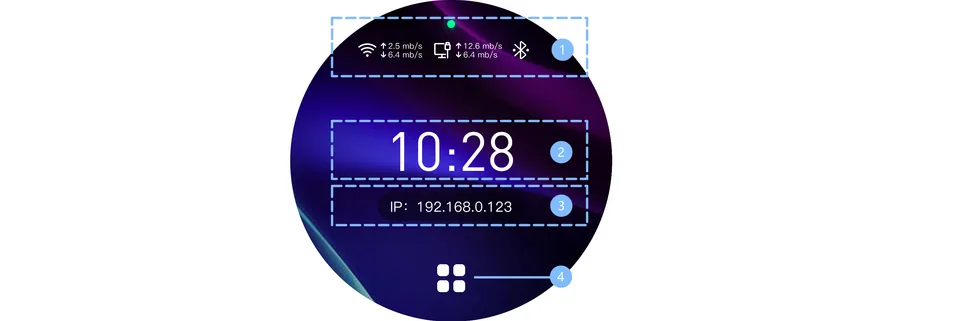
Swipe left/right on the touchscreen to switch interface and view Home page.

Document image

ItemDescription
① Device Info BarDisplays network upload/download speed, Bluetooth connection status and other information.
② TimeDisplays the current system time.
③ IP AddressDisplays the current device IP address.
④ MenuTap to open the operation menu.

Operation Page

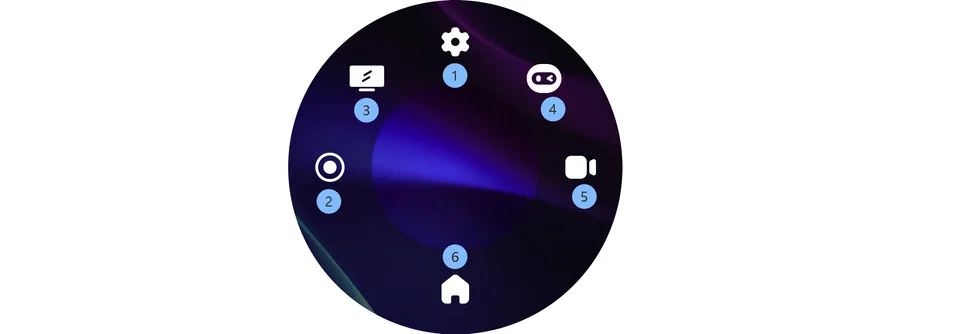
Tap the Menu icon to open the operation menu. Tap a function icon then tap > again to enter the corresponding operation page.

The main functions are described below: Document image

IconDescription
①Settings: Includes detailed configuration options such as device info, network port, Wi-Fi, Bluetooth, and time.
②Start Recording: Start or stop recording. Recording duration and remaining recording time are displayed in real time.
③Preview: Swipe left or right to switch between and preview connected input sources.
④Companion Mode
⑤Go Live: Start or stop live streaming. The elapsed streaming time is displayed in real time.
⑥Back to Home: Return to Home screen.

2.6Dimension

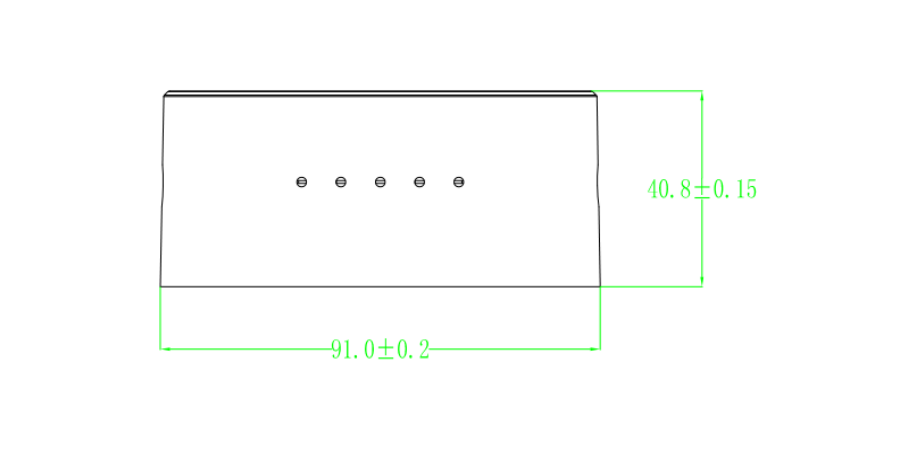
Following is the dimension of stream gO for your reference:

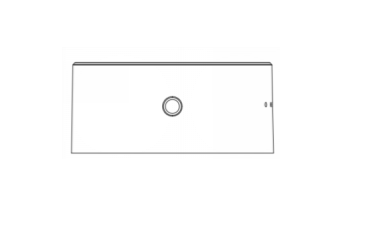
91 mm (diameter) x 40.8 mm (height).

Front ViewLeft View
Top ViewBottom View

2.7Getting Started

Step 1: Plug in power and connect to network

Refer to Power Connection and Network Connection for setup instructions.

Step 2: Bind stream gO

  • After powering on, swipe left or right on the screen to access the Menu.
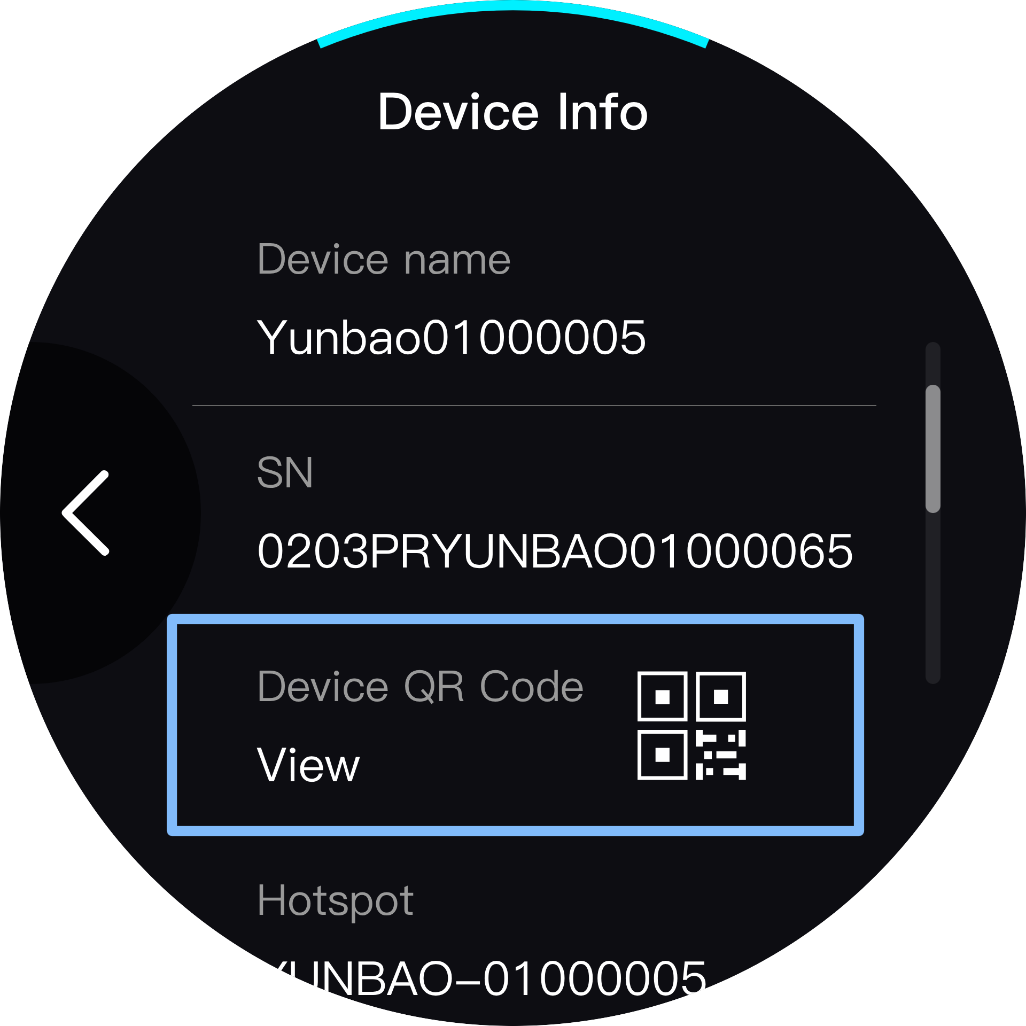
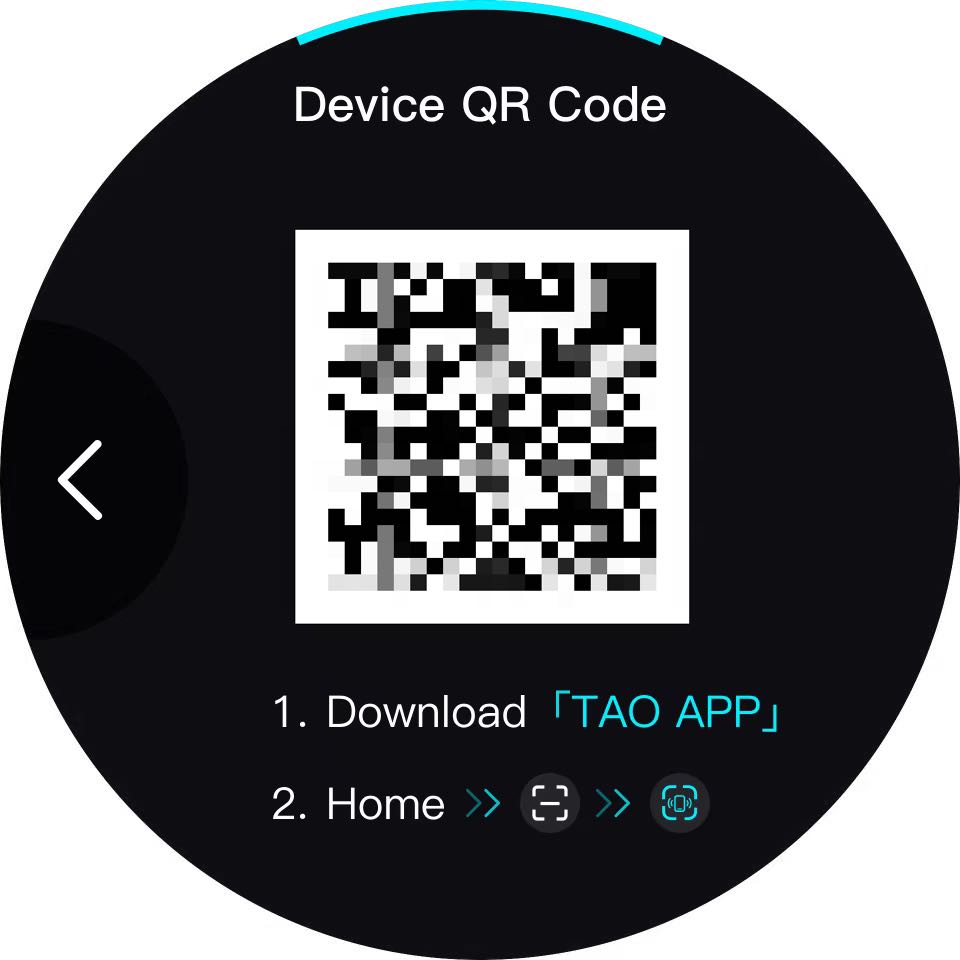
    Tap Settings, then go to Device Info to view the Device QR code.
→
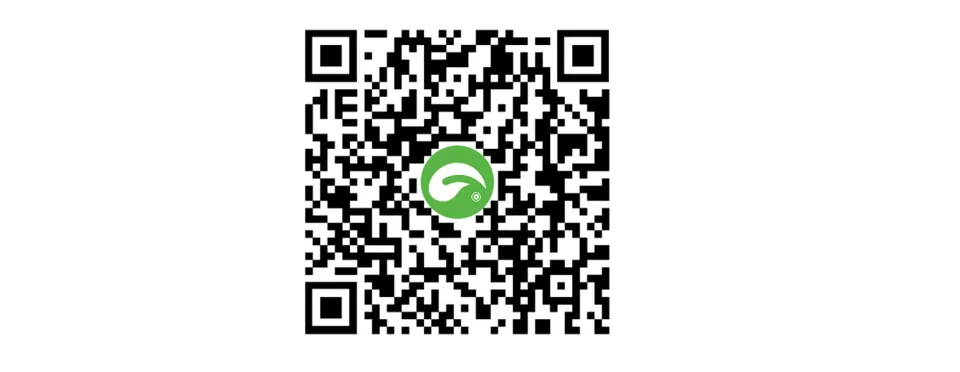
  • Download the TAO APP.
    • Scan the QR code to download.

Document image

  • Or search and download from the app store:
    • Android: Search TAO
    • iOS: Search TAO RGBlink
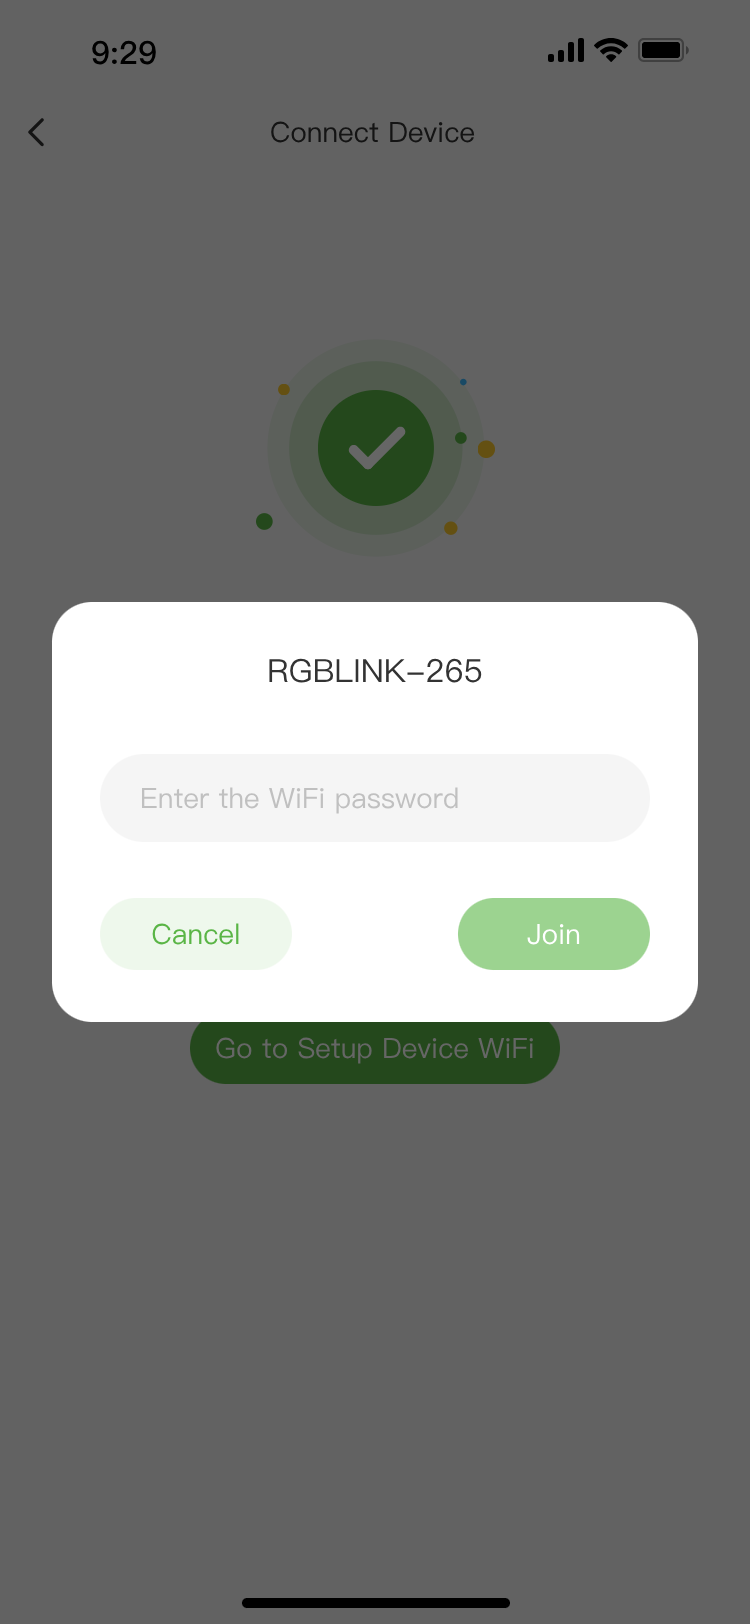
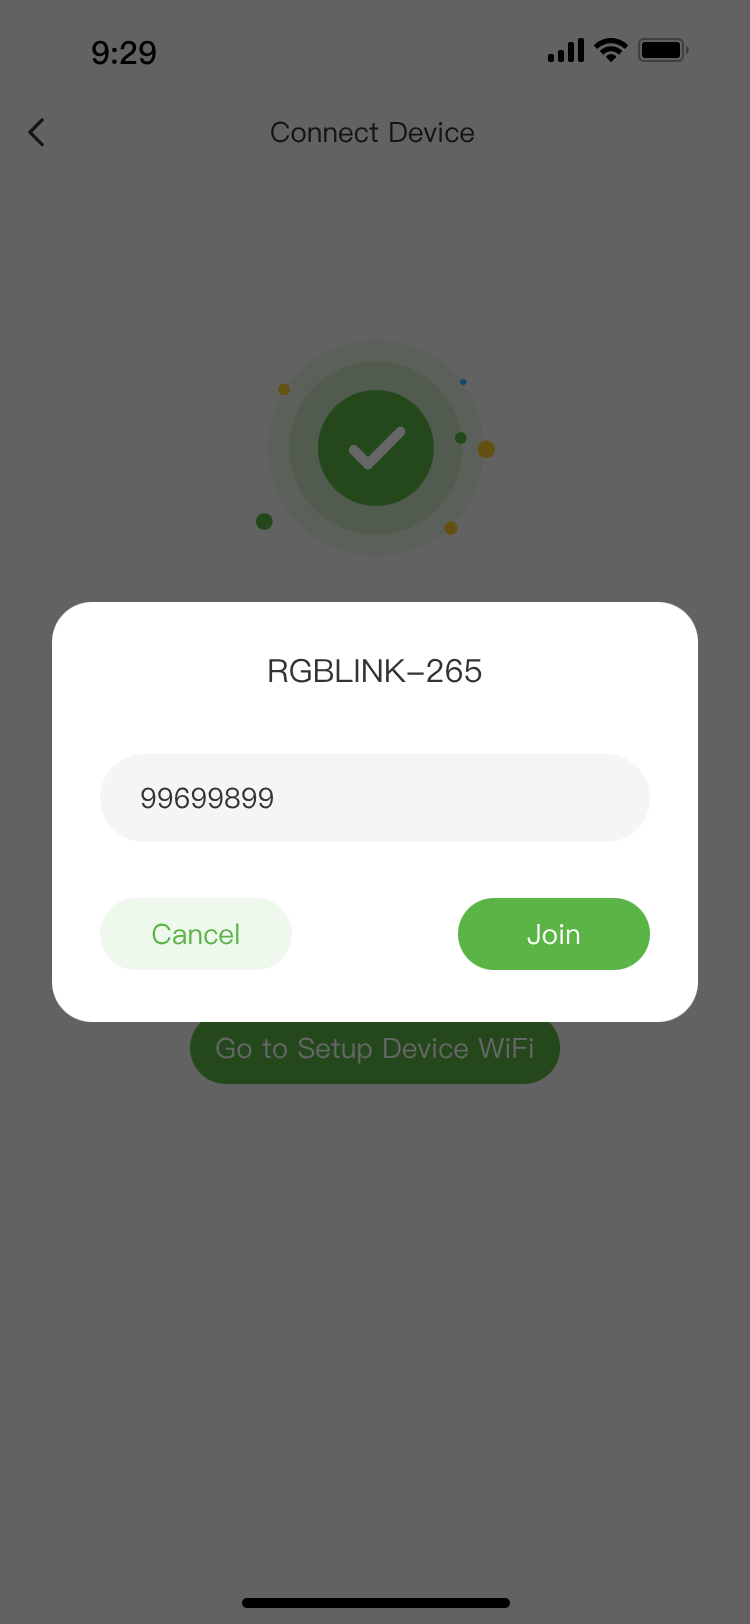
  • Open the TAO APP→ Log in with your mobile number → Scan the stream gO Device QR code 。Follow the on-screen instructions in the app:
    • Select Wi-Fi.
    • Enter the Wi-Fi password.
    • Ensure stream gO connects to the same Wi-Fi network as your phone.
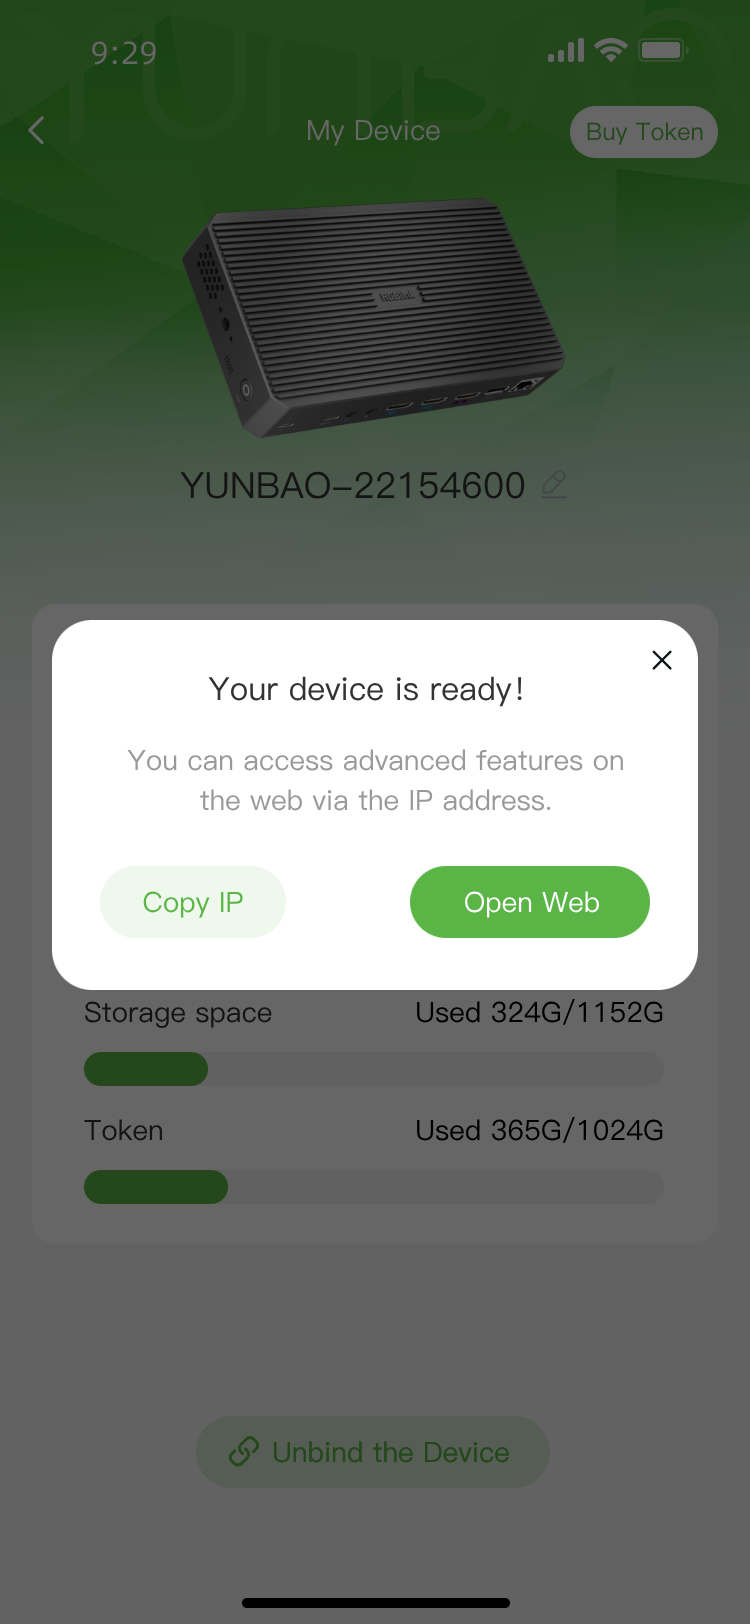
    • Once connected to the internet, the stream gO binding is complete.
  • Enter the device IP address in a phone or computer browser, then click Login to access the stream gO Web interface.

Step 3: Connect input signal

Streaming via Smartphone
  • Navigate in the TAO APP to Phone Casting > Cast Settings > Mode > Orientation > Preview.
  • Press the preview page button to start.

View your mobile feed on the web interface under Home > Preview > Phone .

Streaming via Other Devices
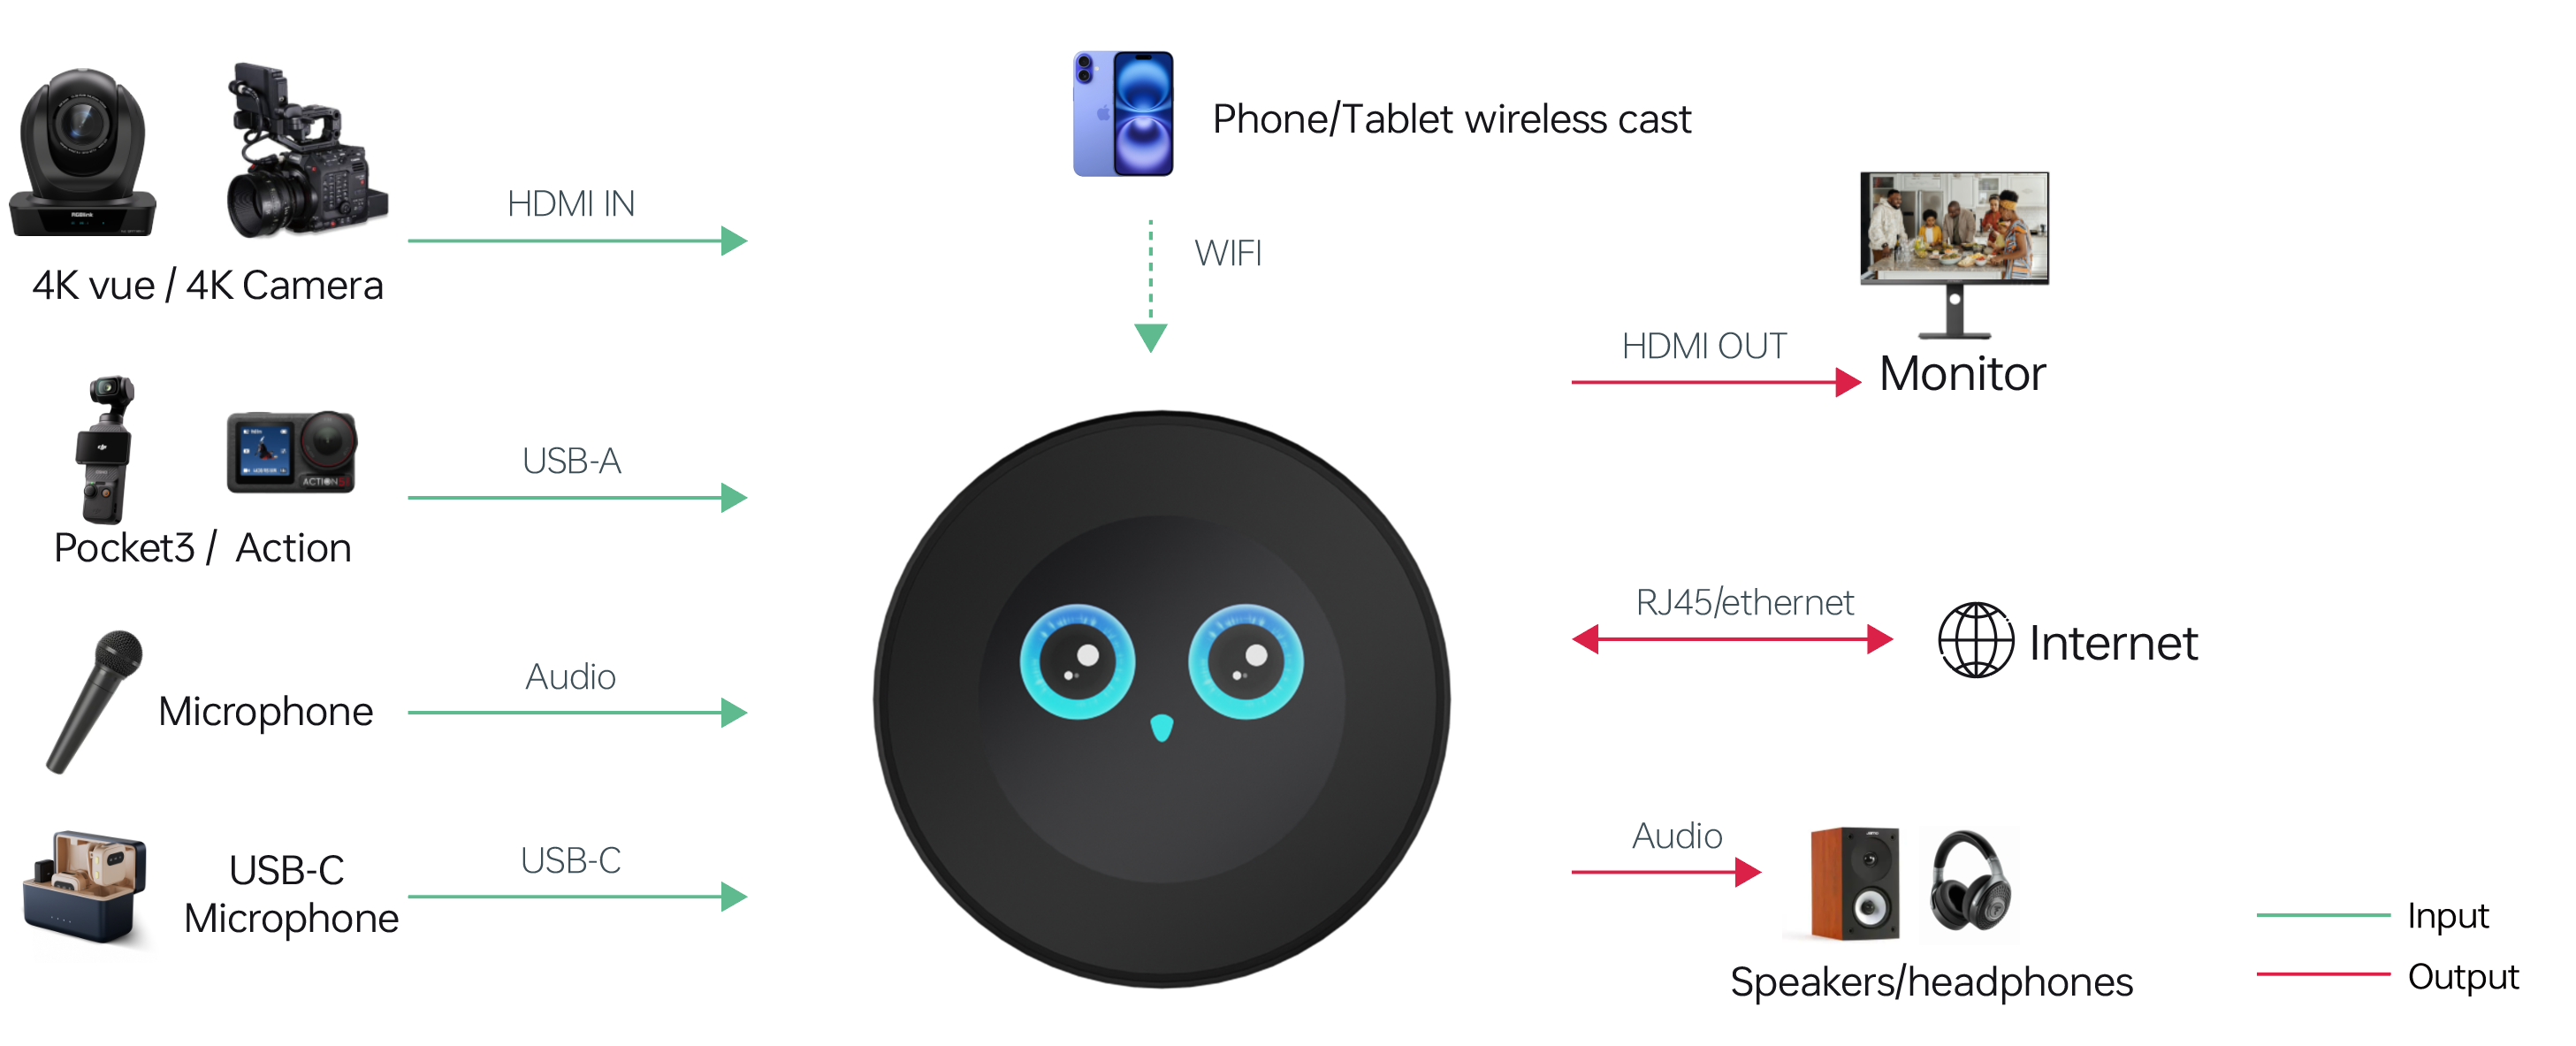
  • Connect one end of an HDMI cable to the HDMI output of a camera, game console, or other devices.
  • Connect the other end to the HDMI IN port on stream gO.
  • Optionally connect the HDMI OUT port of stream gO to a monitor using an HDMI cable to preview the signal.

Step 4: Scene creation and streaming to live platforms

  • On the Web interface, click Create Preset to enter the setup page.
  • Under Add Materials, select your connected signal sources and add additional materials, then click Apply.
  • For quick setup, use Add Materials > Media Assets > Template Library.
    • Supports layer ordering and source property editing.
  • Configure Push Streaming Settings at the bottom of the page.
  • Enter Description and Push Streaming Address (obtain from your streaming platform beforehand).
  • Click Save and Enable after configuration.

Step 5: Go Live

  • Click Go Chat Live Now on the Web Interface.
  • You can also start or stop streaming directly from the stream gO touchscreen under Home > Go Live.

2.8Install Your Product

Power Connection

Power the device using the included power adapter and USB-C cable, or supply power via PoE.

After the power is properly connected, the device automatically turns on.

The 2.1-inch full-color touchscreen displays the stream gO expression standby screen by default.

Swipe left or right on the screen to switch interfaces and enter the Home page.

📢  Important

The device must remain connected to power during operation.

Network Connection

Connect the device to a network using one of the following methods:

  • Connect to a known Wi-Fi network with an available SSID and password.
  • Connect an Ethernet cable from a network device (such as a router) to the device's LAN port.

Input Signal Connection

  • Connect HDMI or UVC input sources to the device's** HDMI/UVC input port** using appropriate cables.
  • Connect the HDMI output port to a display device using an HDMI cable.

USB Drive Connection (for agentZ Edition)

The agentZ edition of stream gO requires a USB drive for recording, live streaming and storage features.

if no USB drive is connected, the system prompts you to insert a USB drive and restart the device to continue. And the following features are unavailable:

  • Recording
  • Go Live
  • Check Device Info > Device QR Code
  • Check Device Info > Device Storage
📢  Tips

USB 3.0 flash drives are recommended for optimal performance. 

2.9Openclaw Configuration

Configuration Requirements

Power and Display

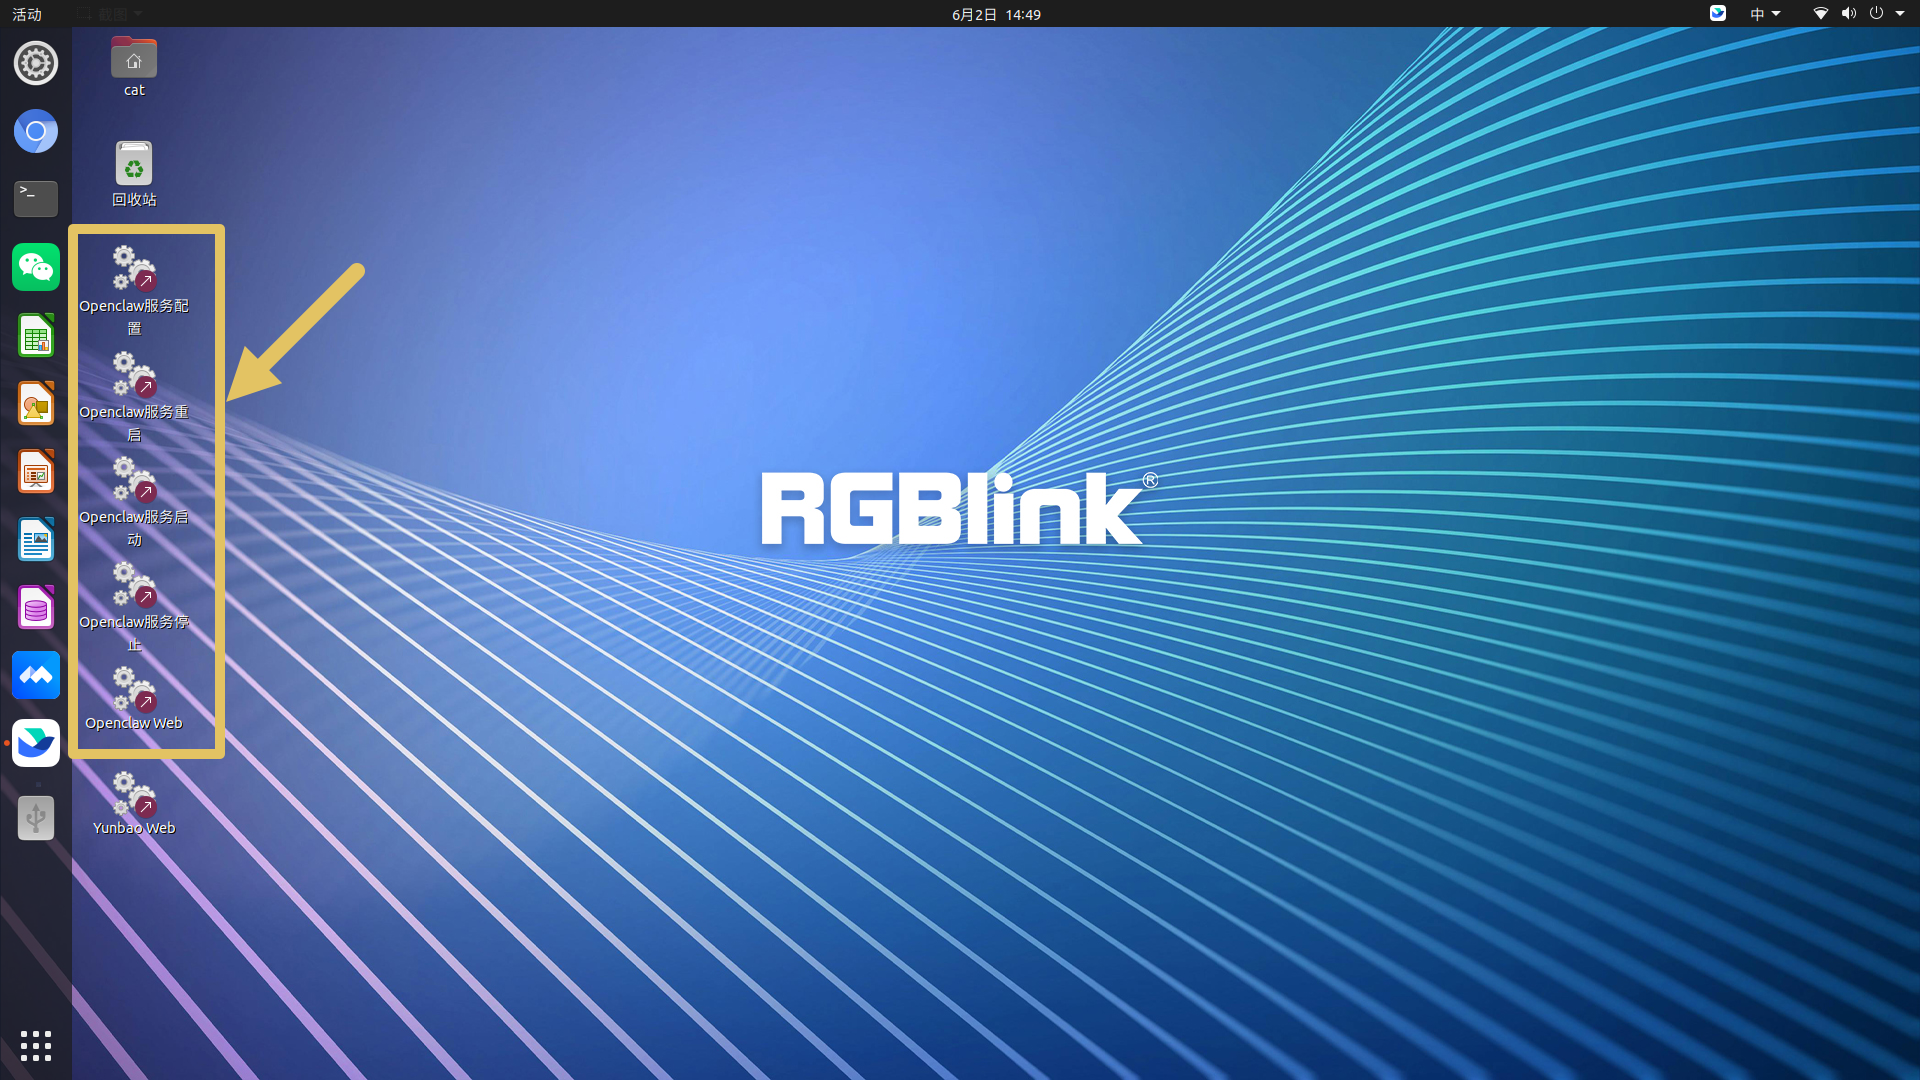
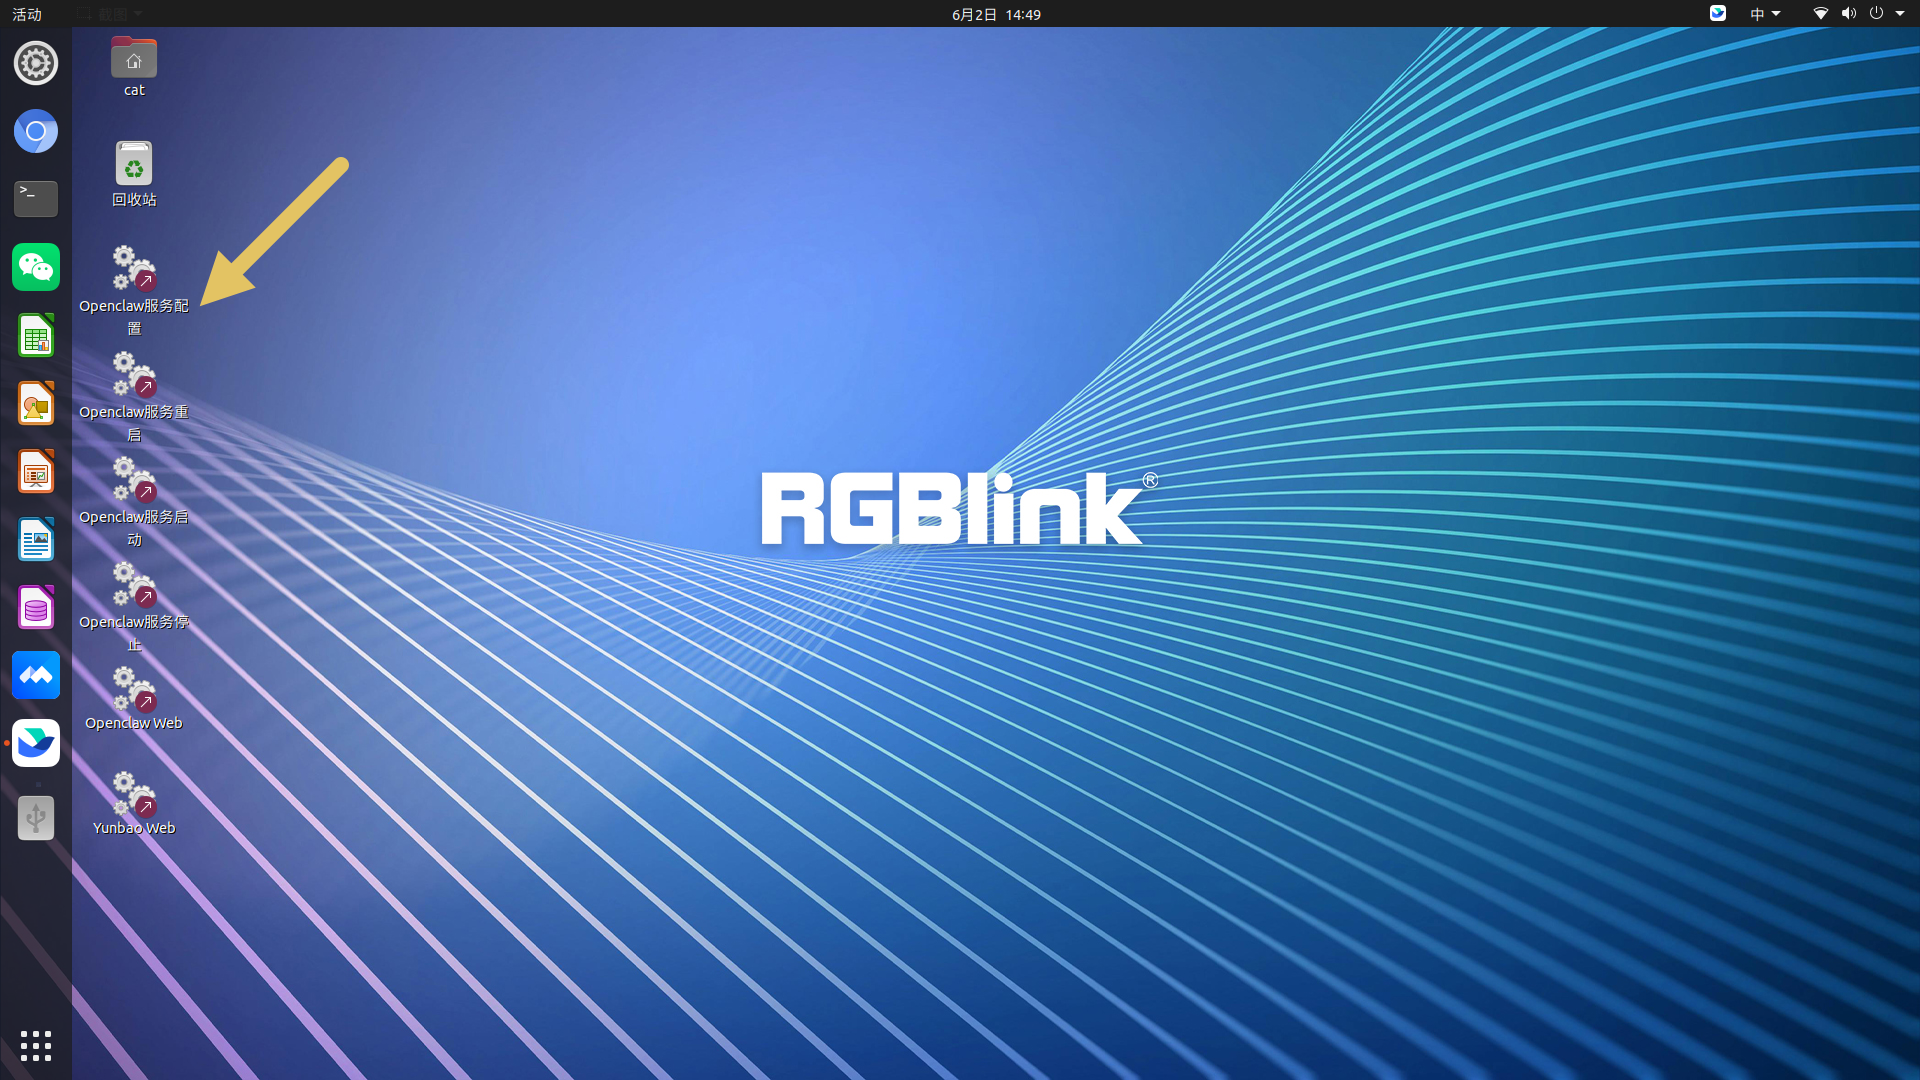
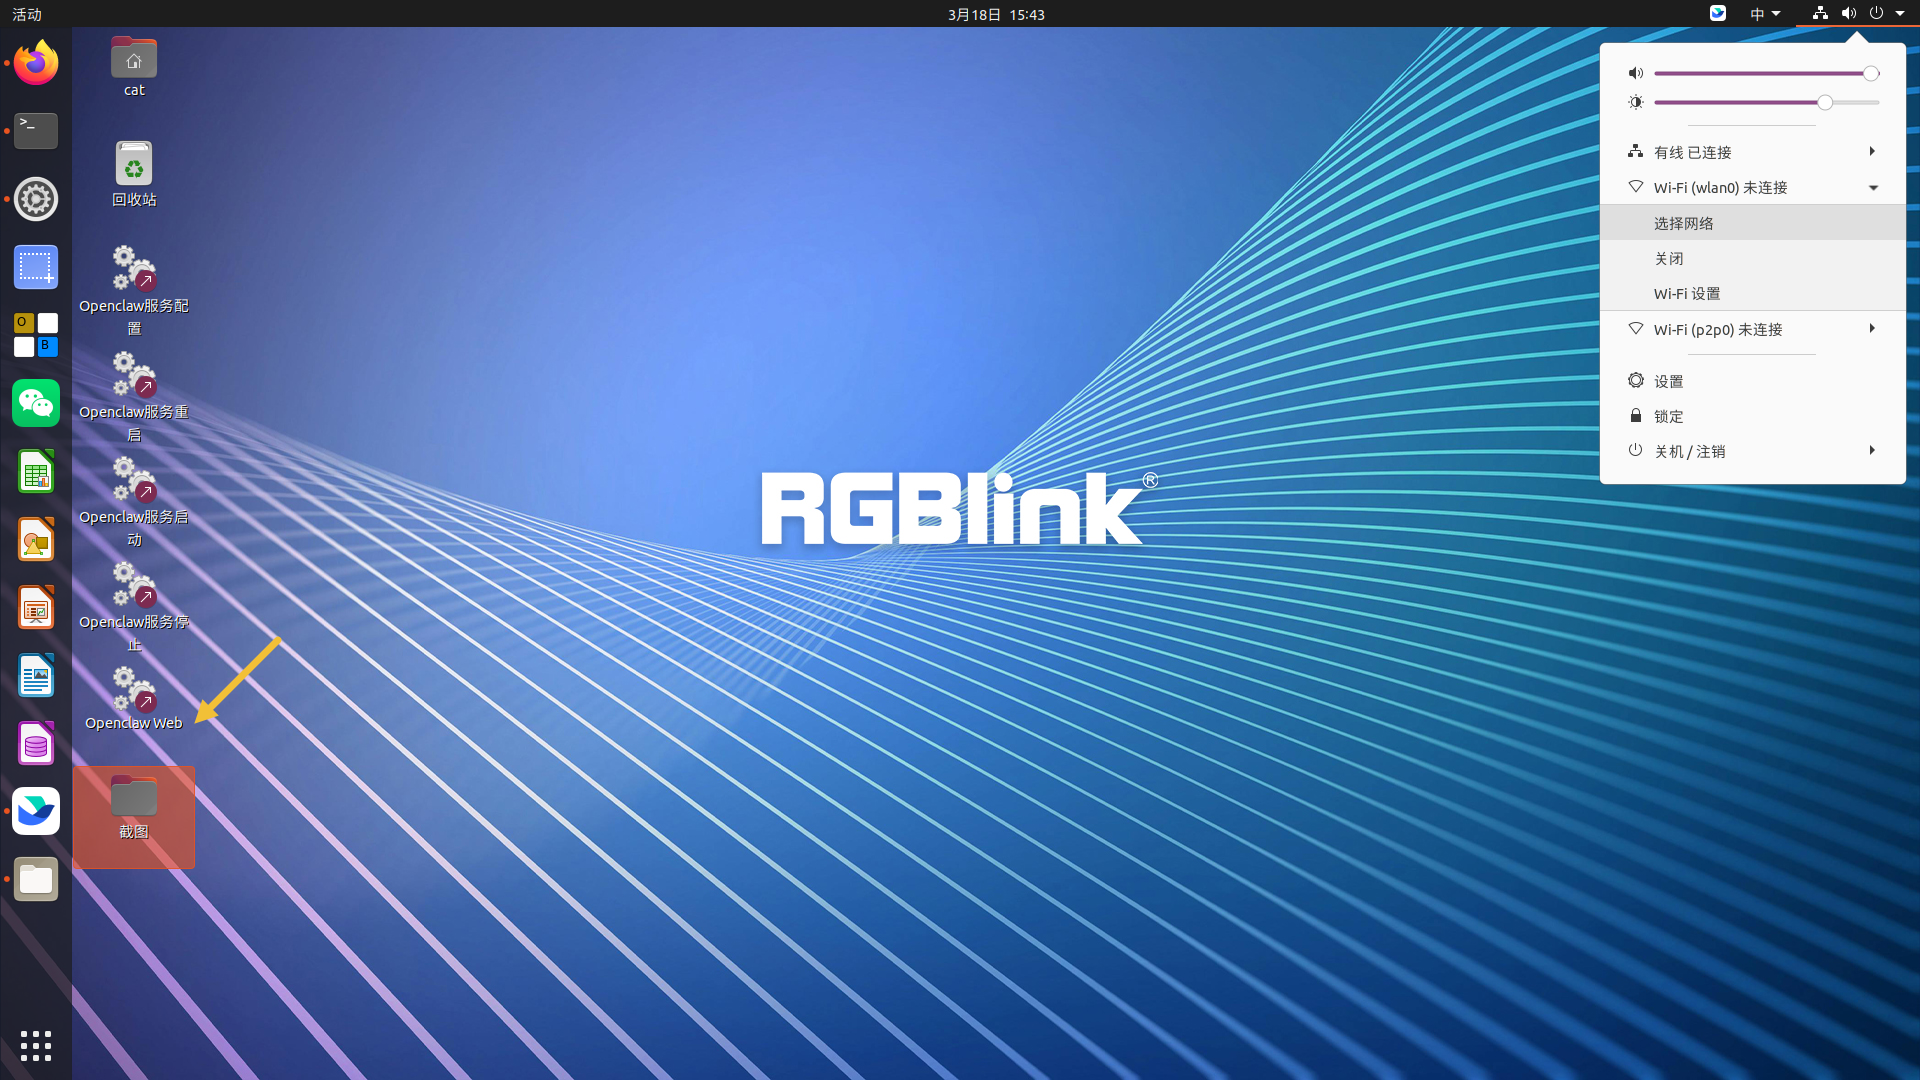
Once the stream gO is properly connected to power and a monitor, five installed OpenClaw applications will appear on the desktop.

openclaw_config
openclaw_restart
openclaw_start
openclaw_stop
openclaw_web
Network Connection

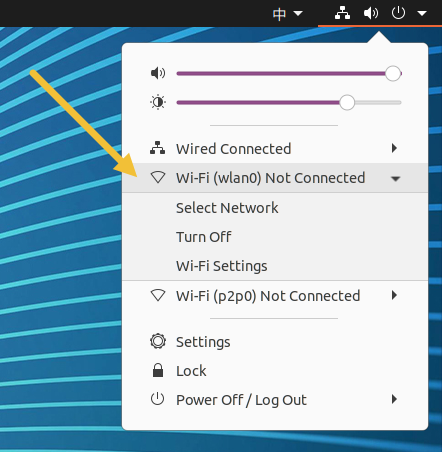
You may connect the device to the LAN port using an Ethernet cable , or click the network settings icon in the top-right corner of the system interface, select Wi-Fi (wlan0), and connect to a wireless network.

Start Configuration

Click the openclaw_config to begin your setup.

openclaw_config

Configuration Guide

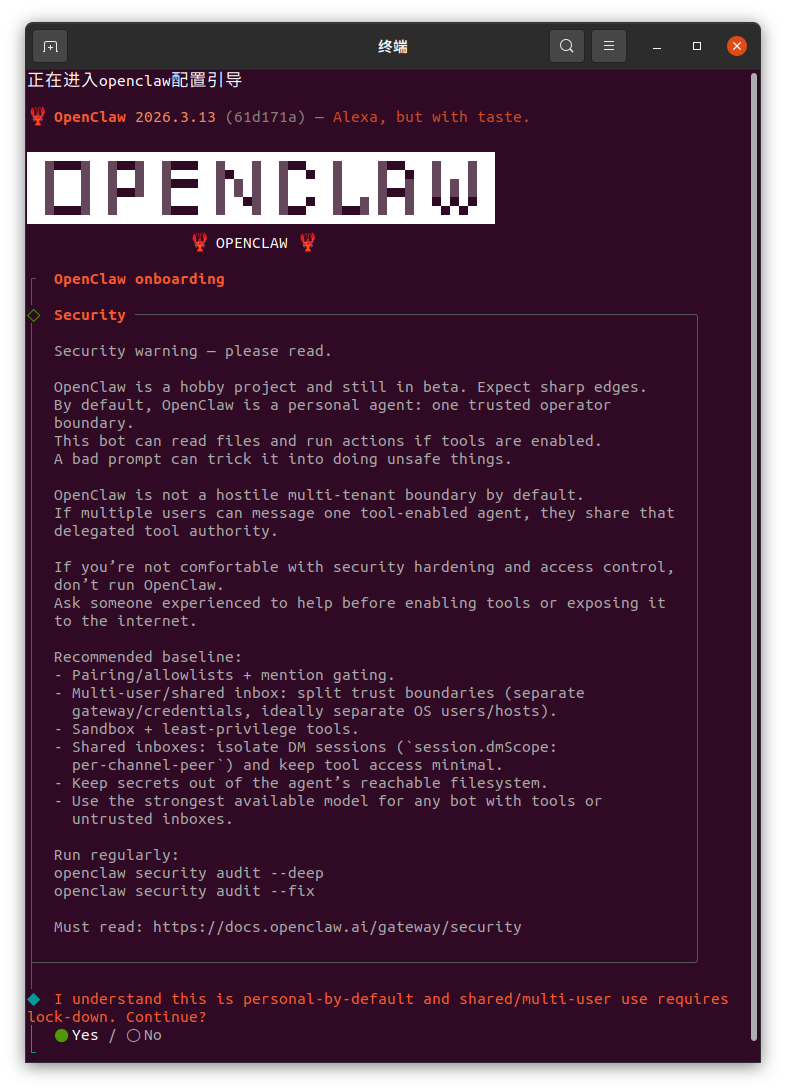
After opening the openclaw_config, follow the on-screen instructions to complete your setup.

The screenshot and descriptions below are for reference only. The actual interface may vary depending on the current version.

 📢  Important

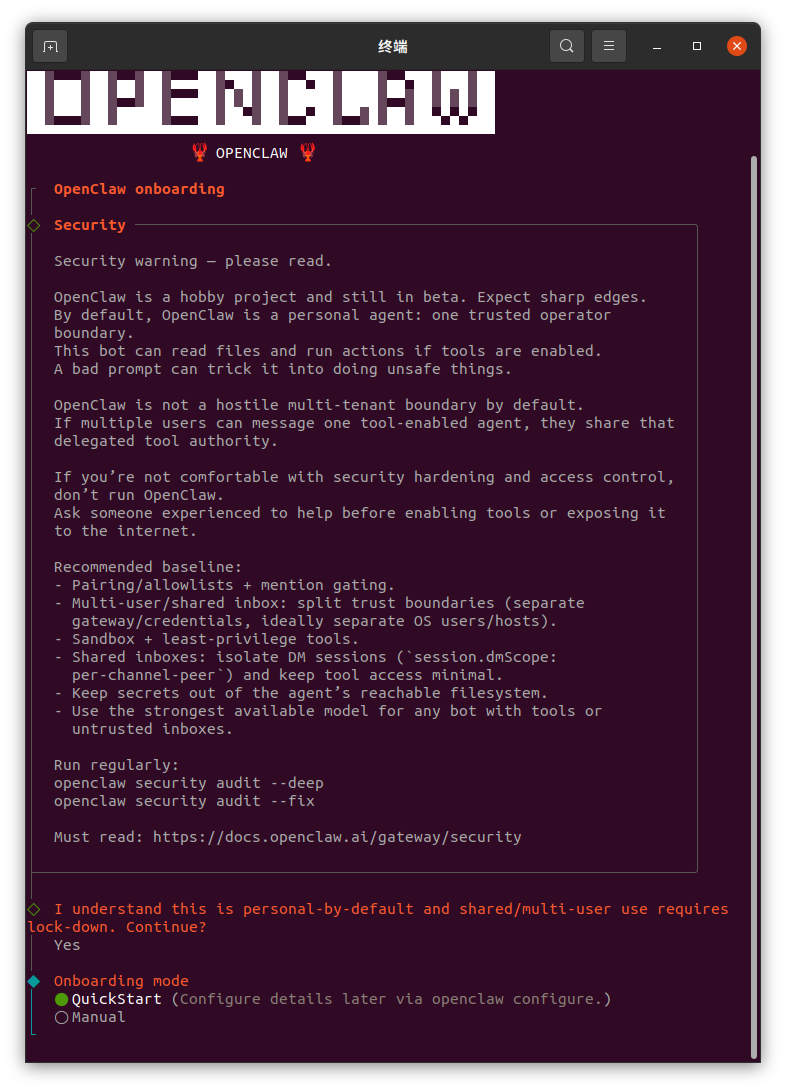
During the process, mouse input is not supported. Please use the keyboard for interaction (use the arrow keys to navigate and press Enter to select and proceed).

Quick Configuration
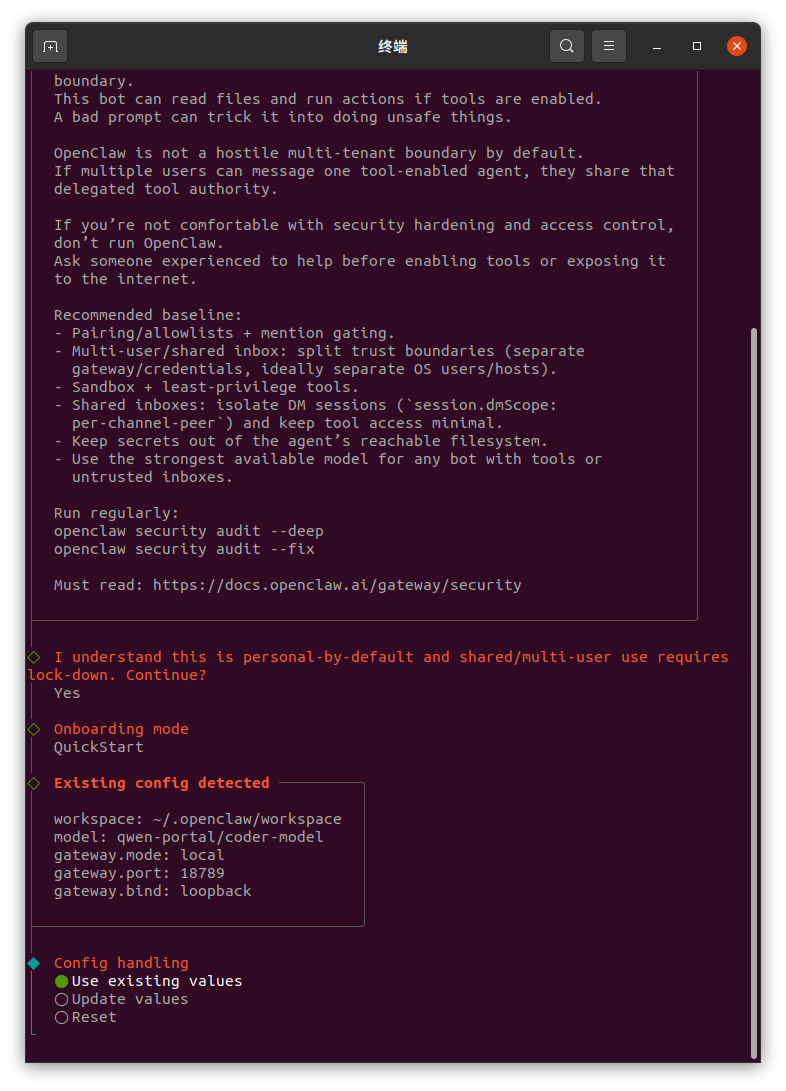
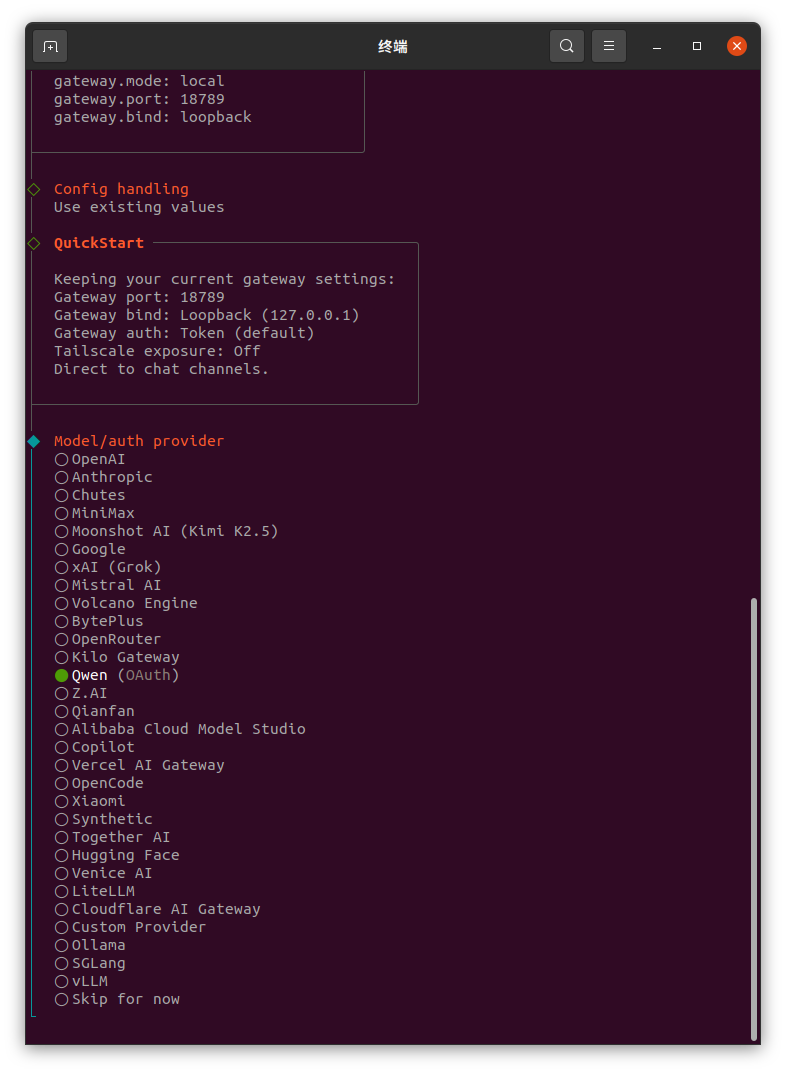
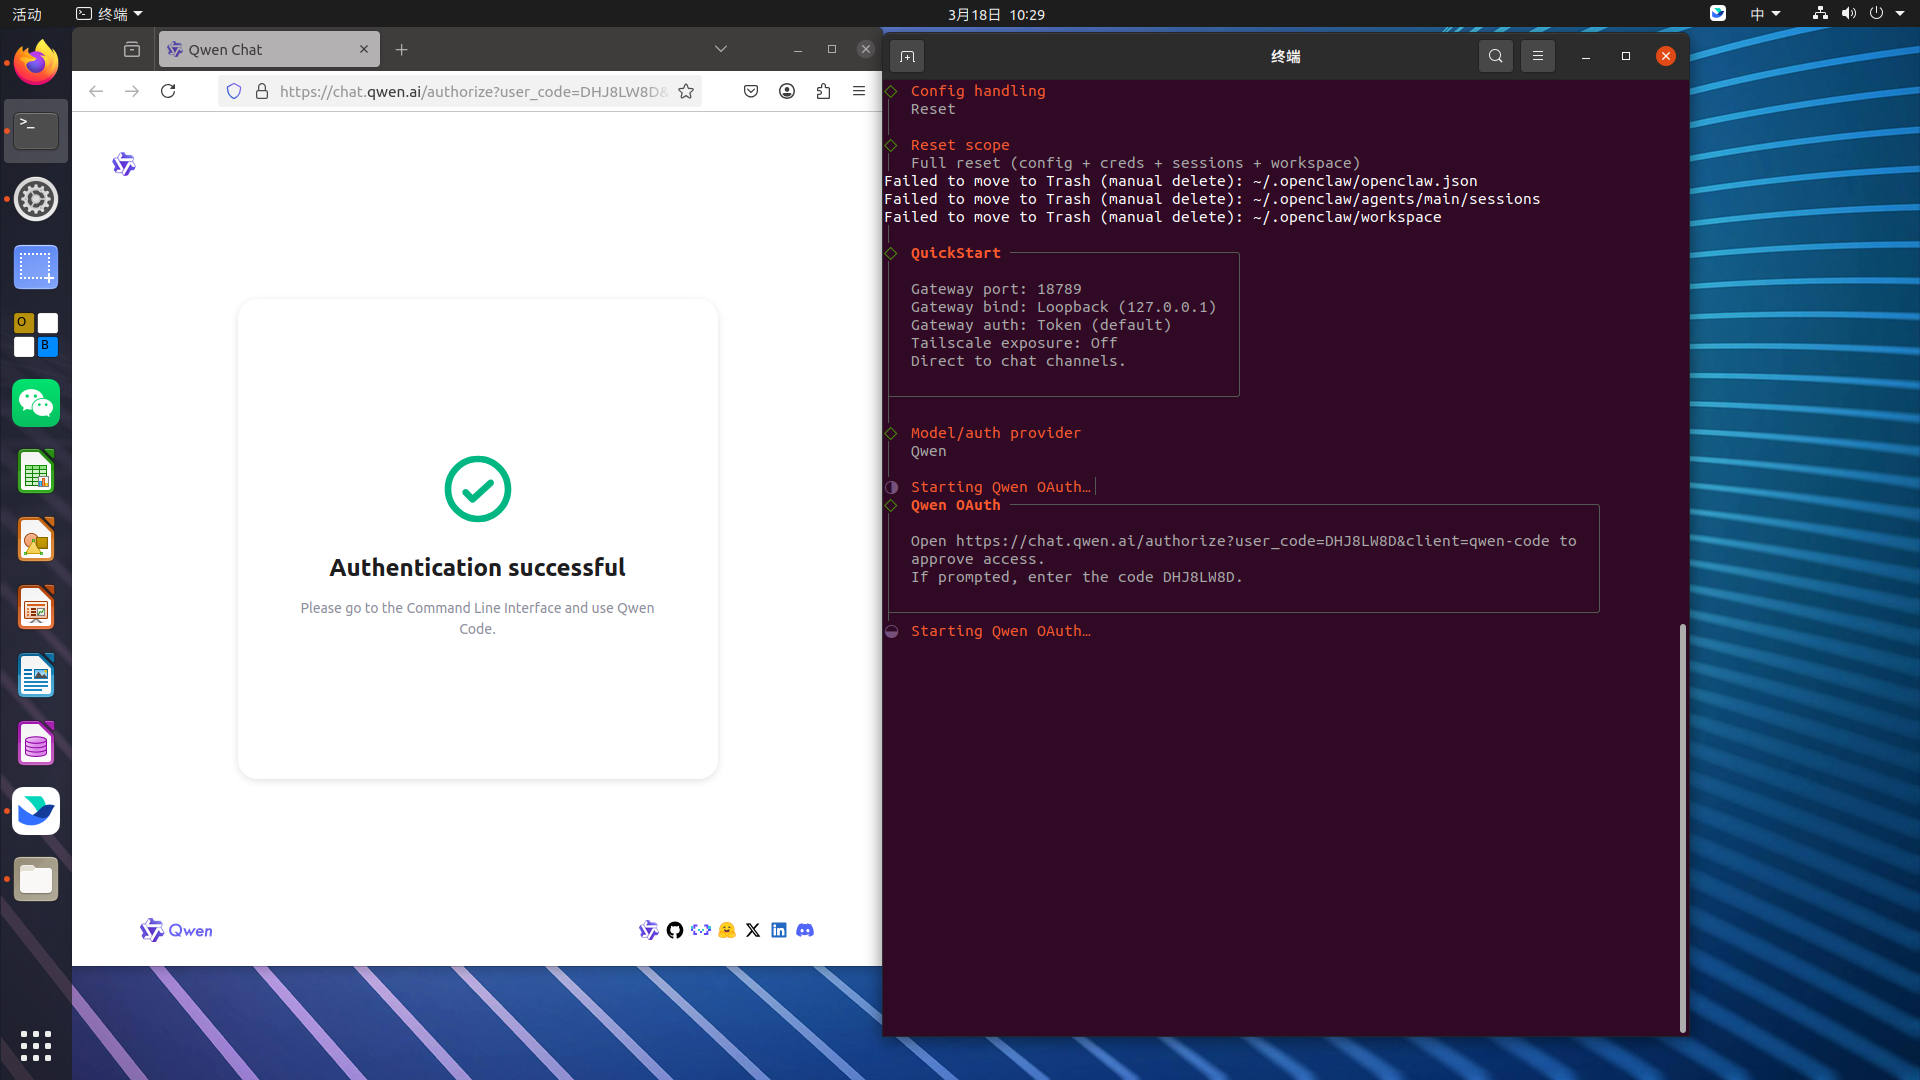
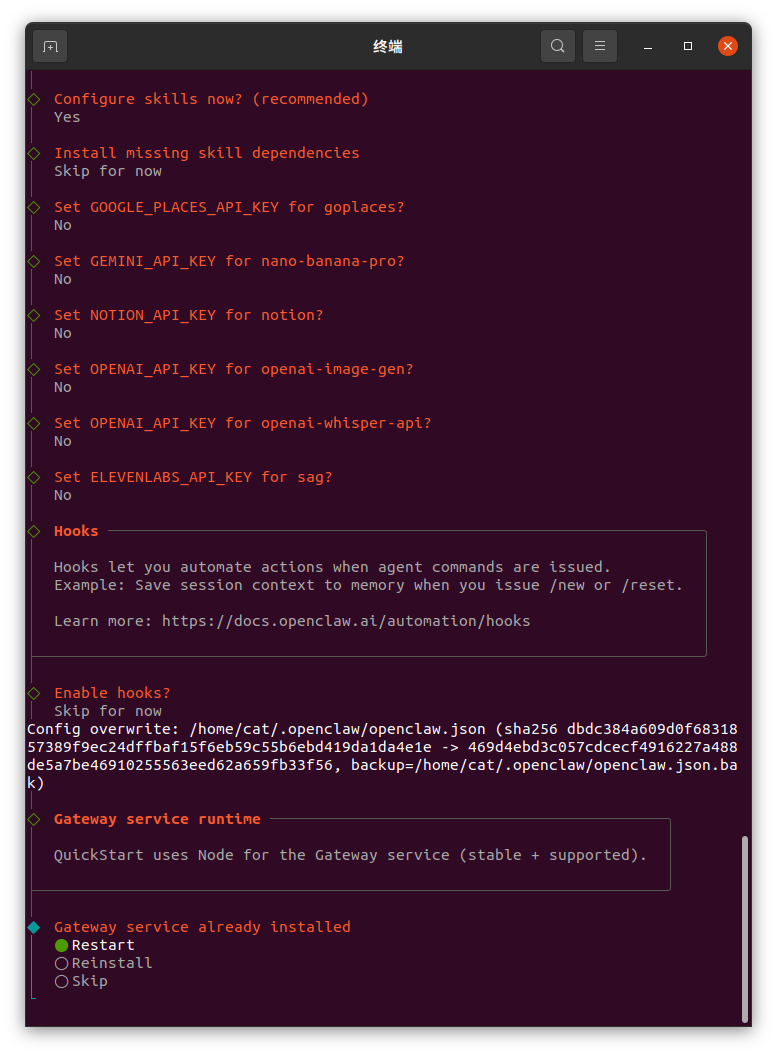
Interface ScreenshotsOption Tips
Select YES to grant file access and command execution permissions (ensure a secure environment).
Choose Quick Start to apply recommended default settings.
Select Use existing values for config handling.
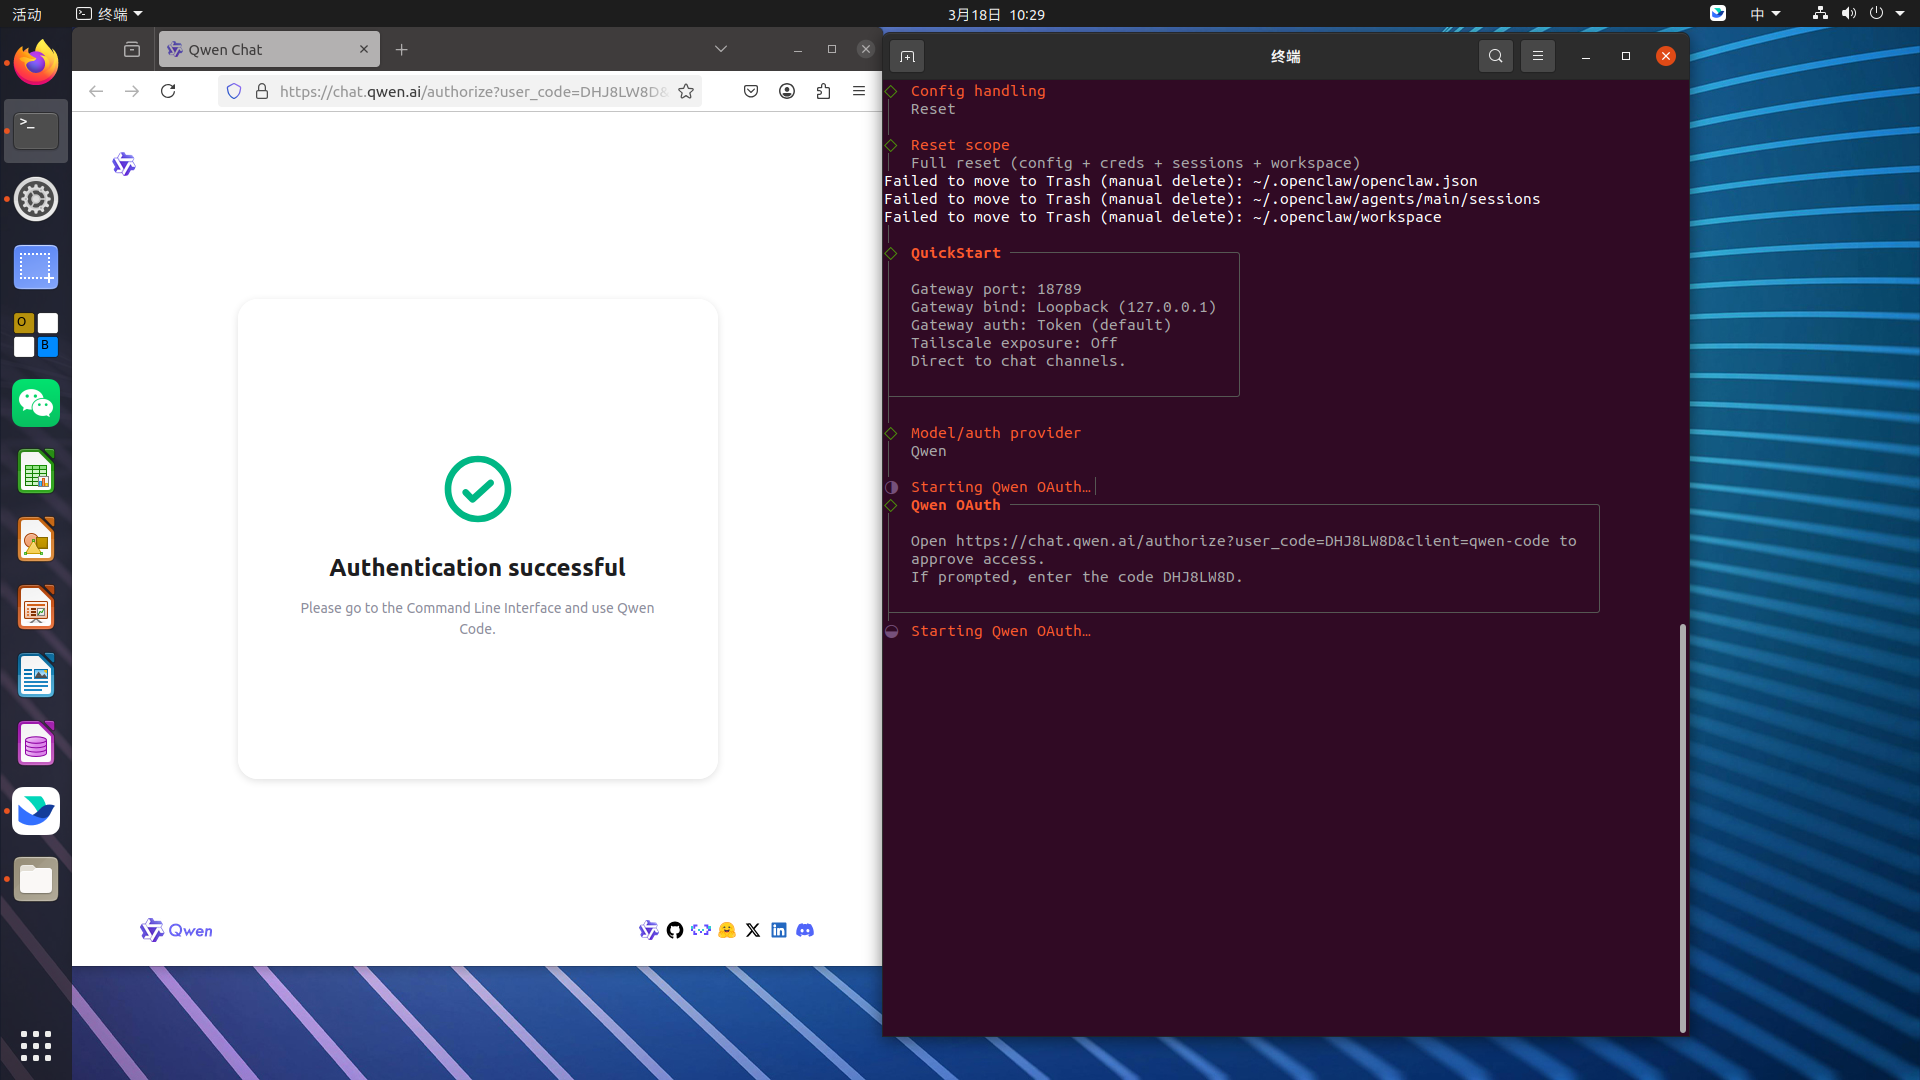
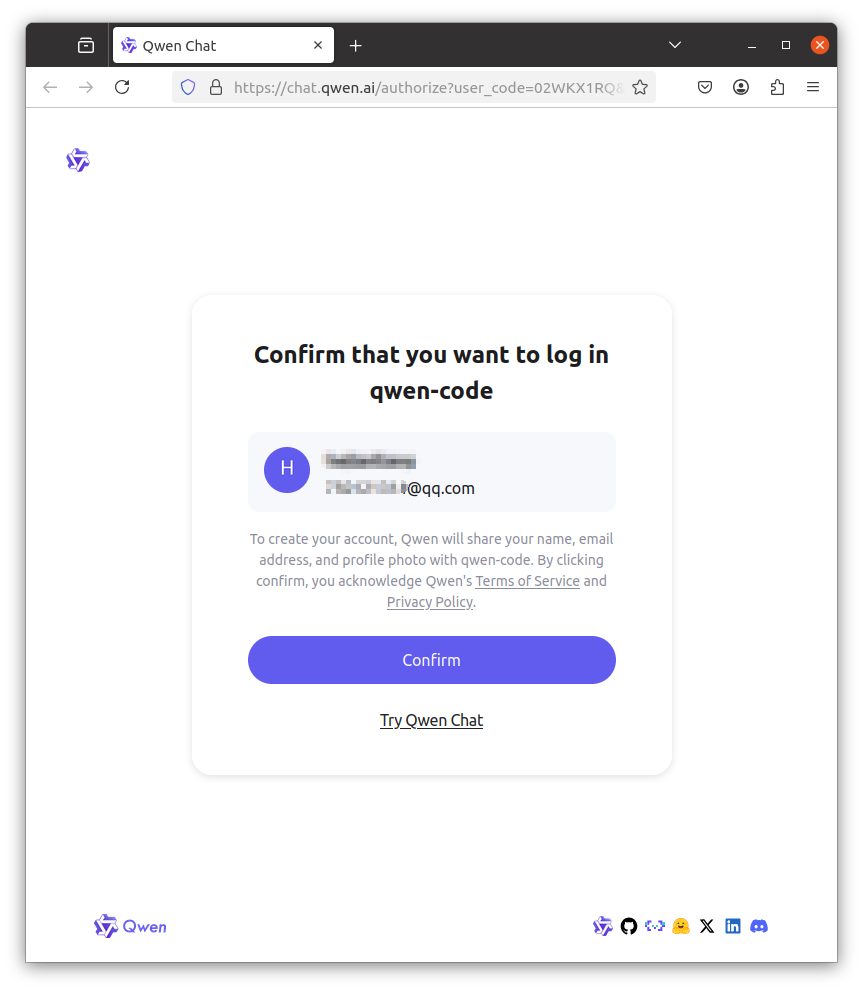
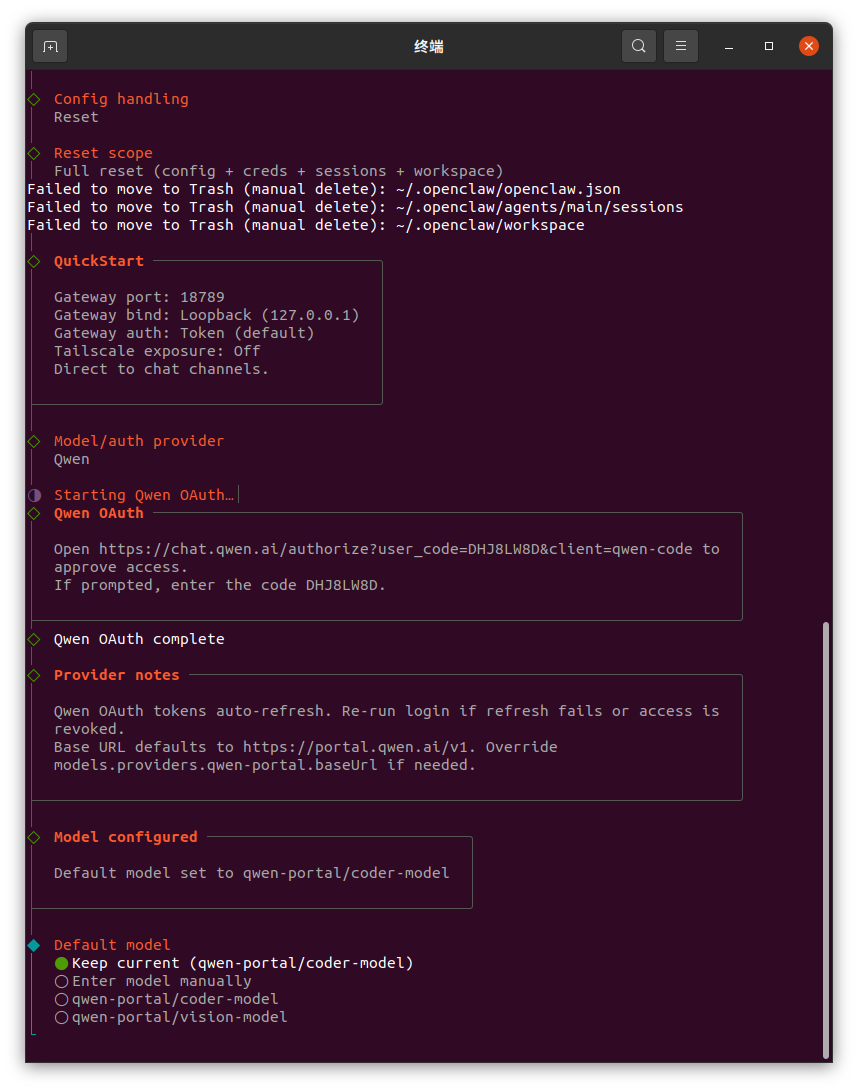
Select a model provider based on network and cost. Results may vary by model. Example: Qwen.
Select Qwen and press Enter.
Complete login, confirm authentication, then close the window to proceed.
Select Keep current for default model.
Advanced Function Configuration

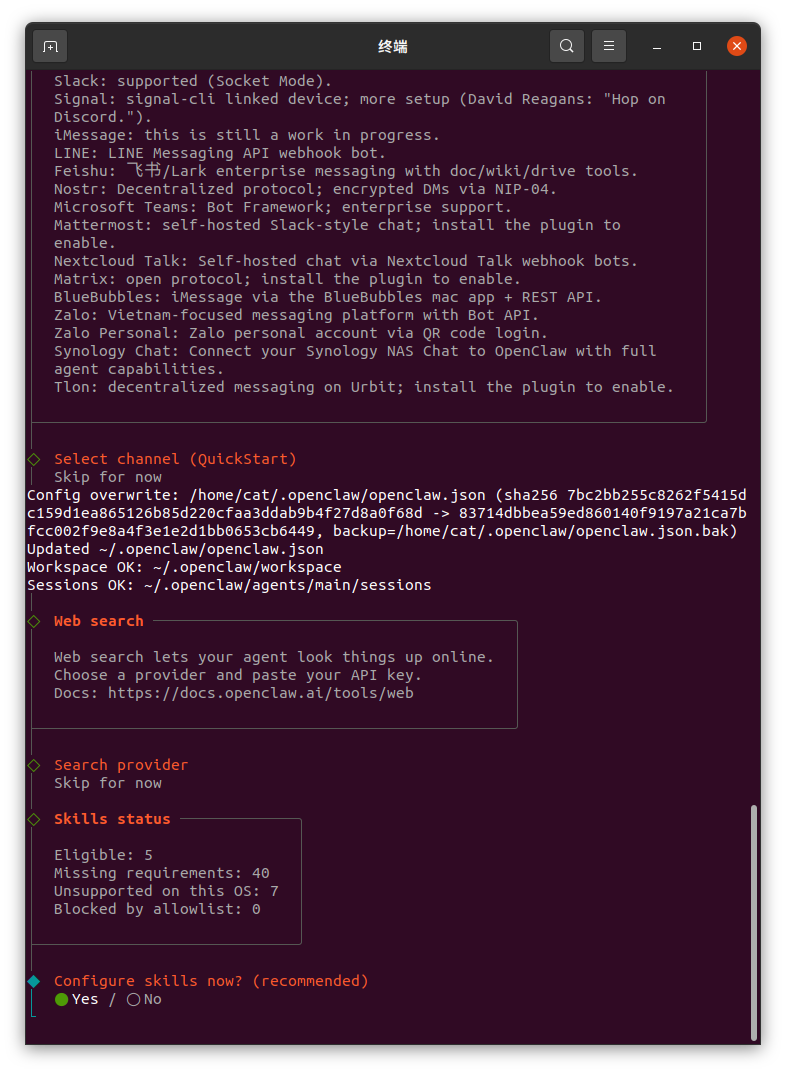
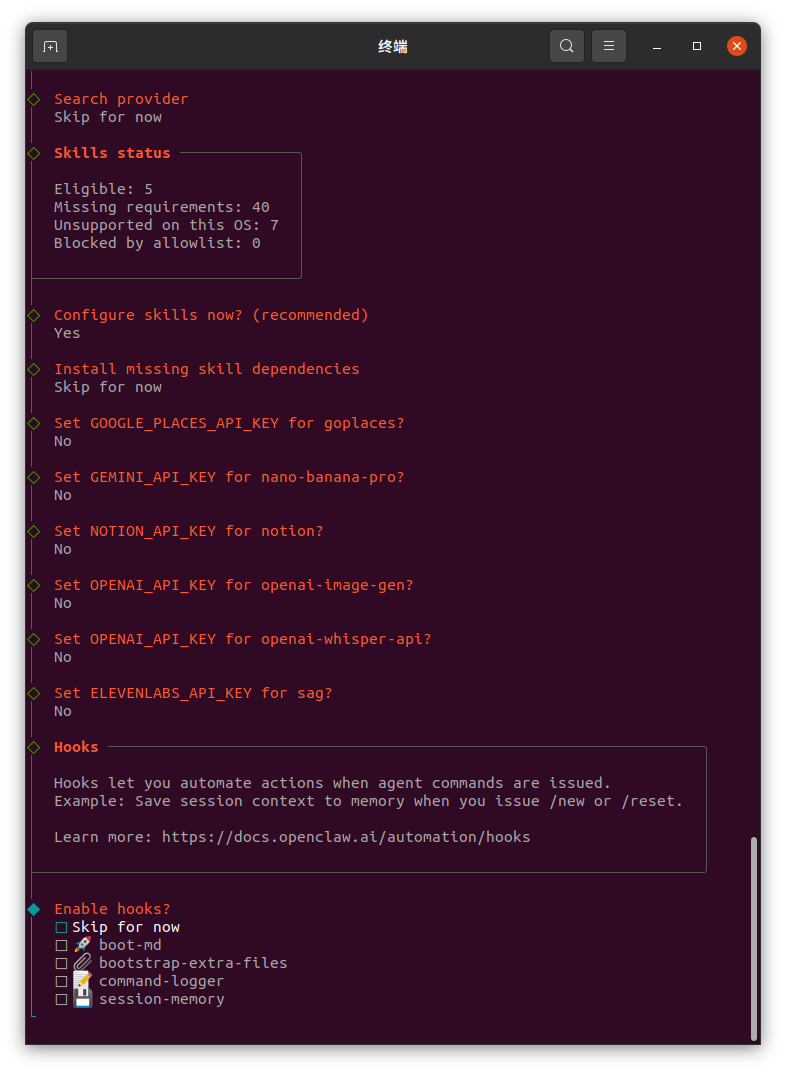
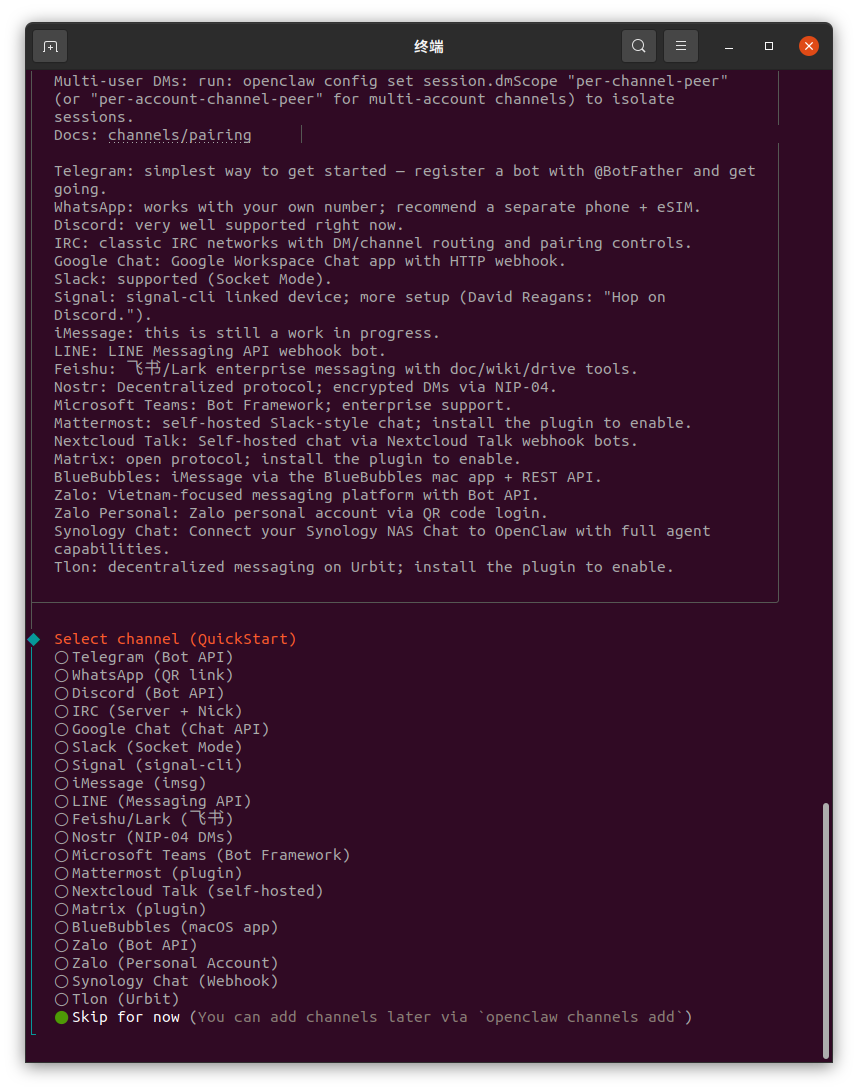
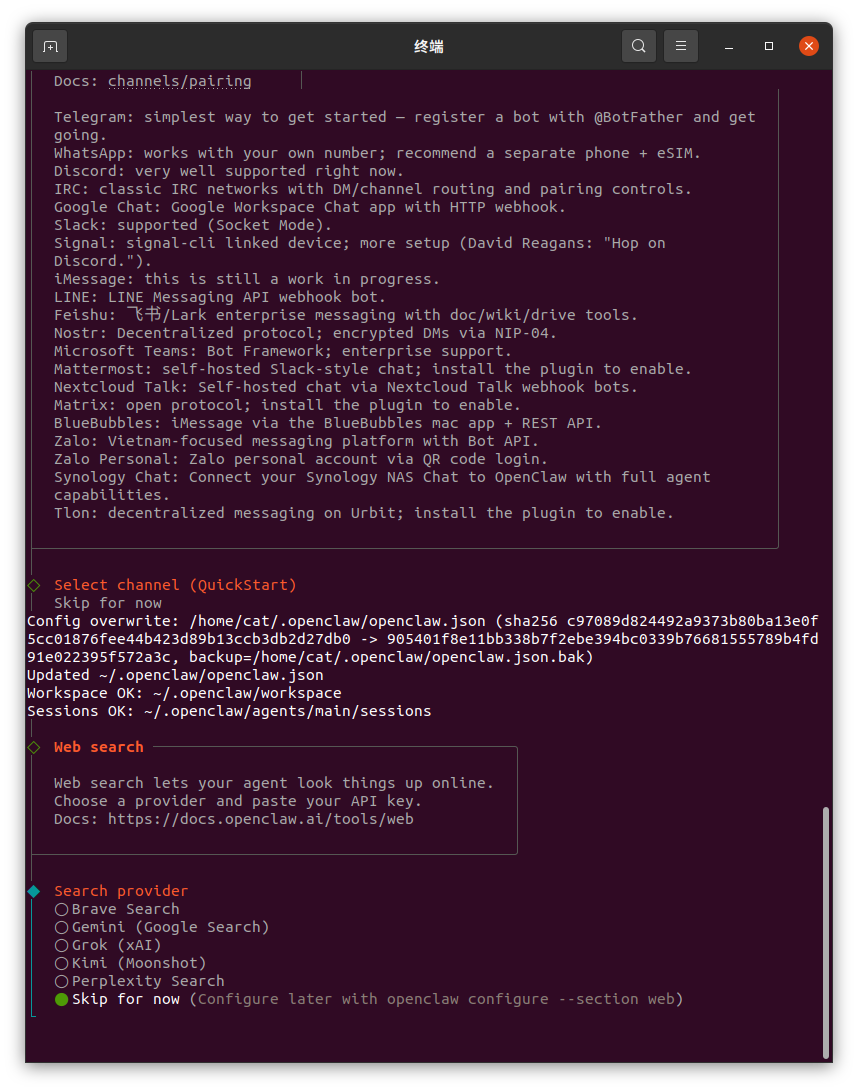
The following options are optional. You may select Skip for now without affecting basic functionality.

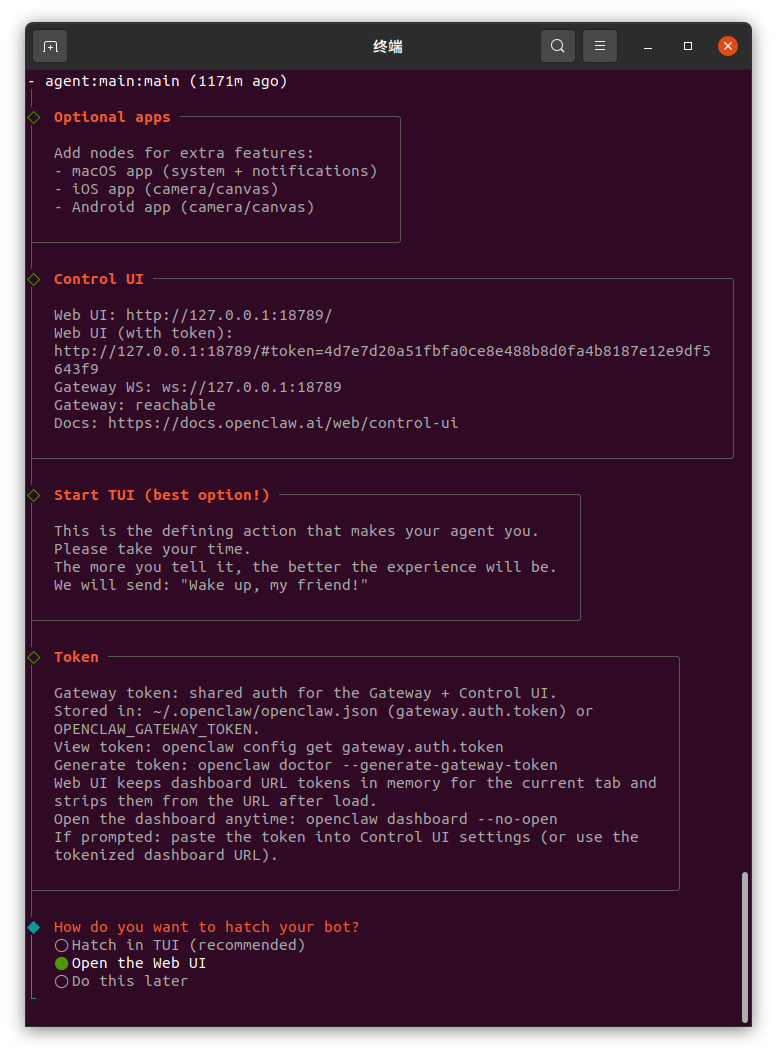
Interface ScreenshotsOption Tips
Select channel, or skip and use the web interface for chat.
Select a Search provider to enable online search.
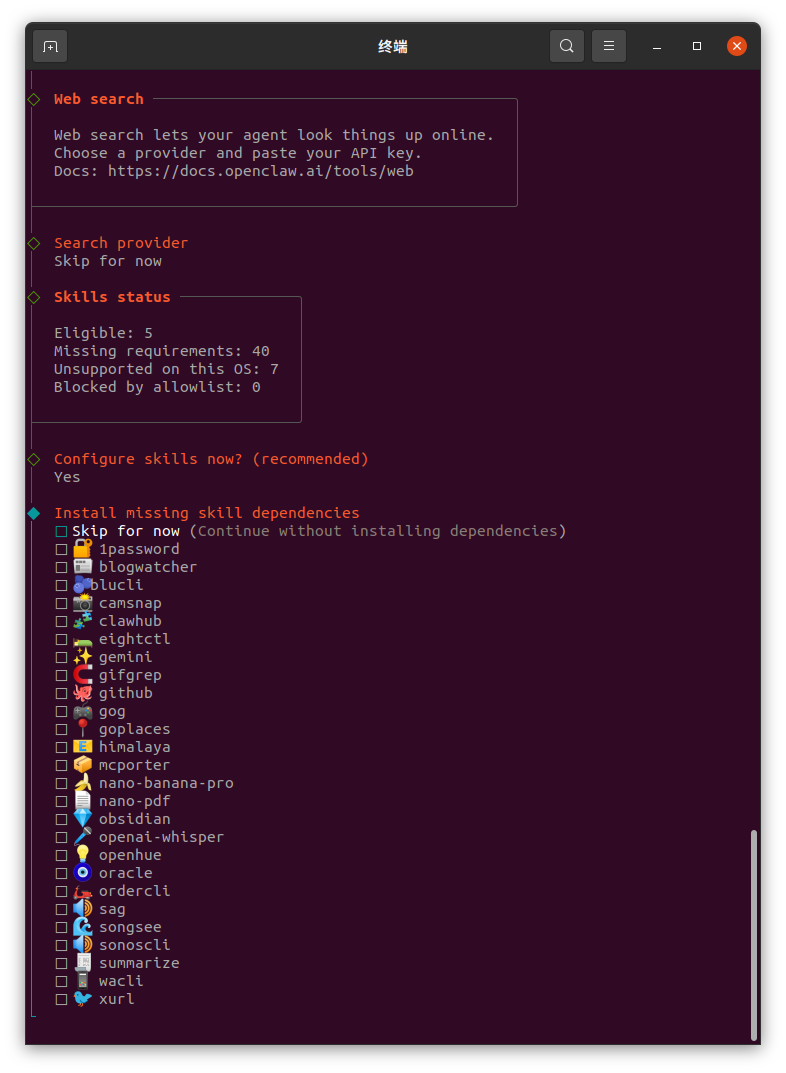
Configure skills, select YES or NO.
If YES, select skills from the list (use Space to select, Enter to confirm; multiple selections supported).
Enable hooks for startup tasks.
Gateway service already installed.
Configuration complete. Select Open the web UI to finish.
Web Interface
🚨  Attention

When the web interface displays a notification such as "Update Available", DO NOT click Update Now.

Performing the update may cause abnormal page behavior or prevent the web interface from being accessed properly. It is recommended to keep the current version and ignore the update notification.

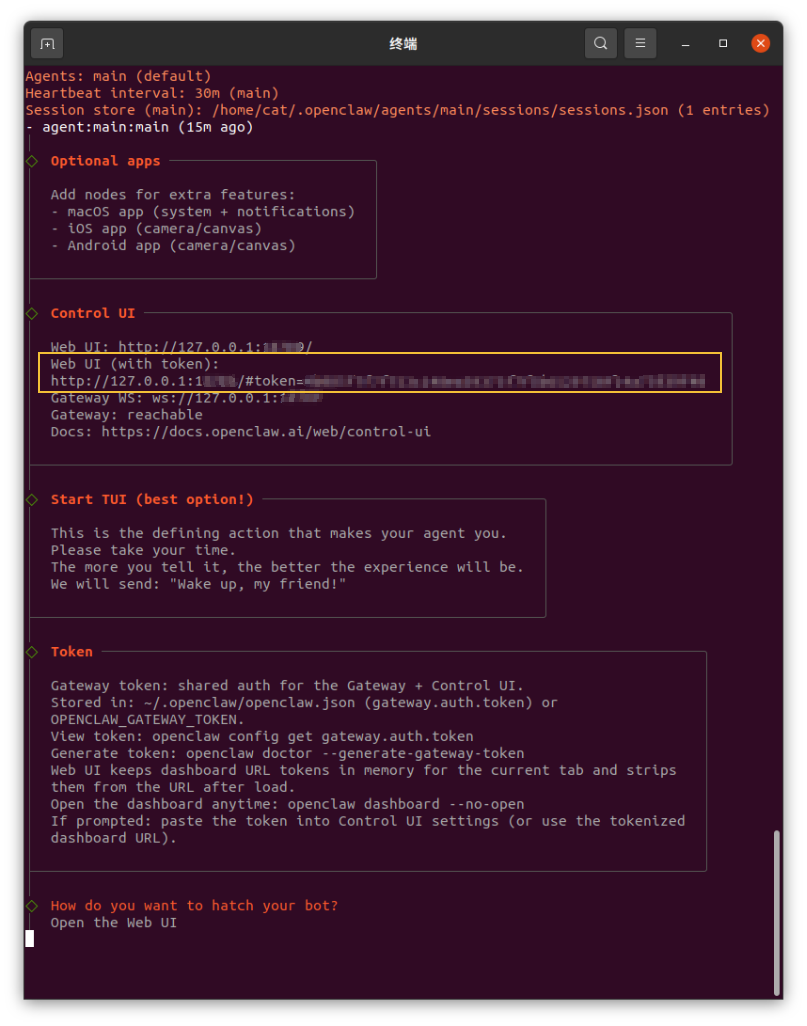
Interface ScreenshotsOption Tips
Locate Control UI and copy the Web UI URL (with token) into a browser to access it.
Alternatively, open the OpenClaw Web on the desktop.
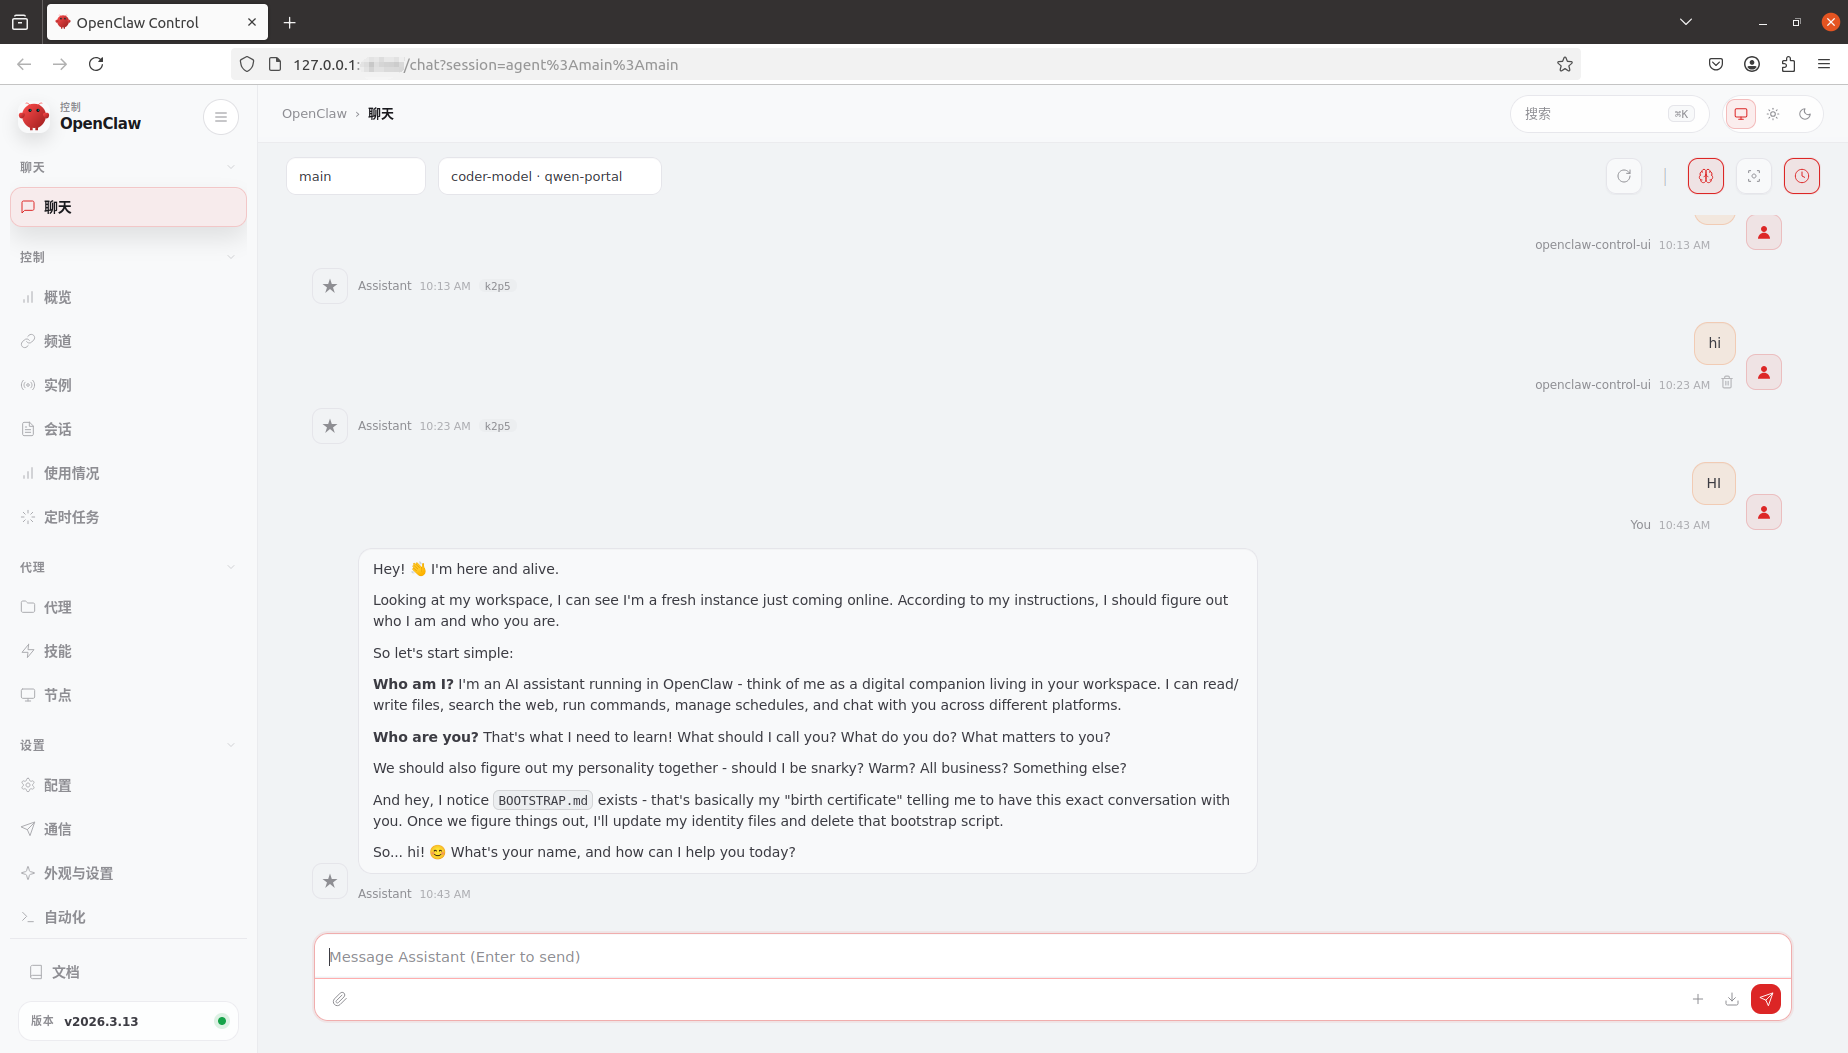
Web interface overview.
Chat example.

2.10Platform Upgrade

TAO APP

In the TAO APP, tap Me > Online Upgrade to view the current system version and check for updates.

Web Interface

A yellow dot next to System Settings in the Sidebar indicates that a system update is available.

Upgrade Steps:

  • Click System Settings in the sidebar.
  • Locate System Upgrade at the bottom right. Click Start Upgrade to download the installation package.
  • After the download is complete, click Confirm in the pop-up window
  • The device will automatically restart and enter Upgrade Mode.
📢  Important

Do NOT disconnect the power.

  • Refresh the web browser to synchronize the updated system.

2.11Revision History

VersionDateDescriptionAuthor
V1.02026-04-21First release.ZYL

3stream gO-User Manual

Thank you for choosing RGBlink stream gO.This manual provides information on the device features, installation and operation.

Before using the device for the first time, please read this manual carefully to ensure safe and proper use of the product.

3.1Declarations

FCC/Warranty

Federal Communications Commission (FCC) Statement

This equipment has been tested and found to comply with the limits for a class A digital device, pursuant to Part 15 of the FCC rules. These limits are designed to provide reasonable protection against harmful interference when the equipment is operated in a commercial environment. This equipment generates, uses, and can radiate radio frequency energy and, if not installed and used in accordance with the instruction manual, may cause harmful interference to radio communications. Operation of this equipment in a residential area may cause harmful interference, in which case the user will be responsible for correcting any interference.

Guarantee and Compensation

RGBlink provides a guarantee relating to perfect manufacturing as part of the legally stipulated terms of guarantee. On receipt, the purchaser must immediately inspect all delivered goods for damage incurred during transport, as well as for material and manufacturing faults. RGBlink must be informed immediately in writing of any complains.

The period of guarantee begins on the date of transfer of risks, in the case of special systems and software on the date of commissioning, at latest 30 days after the transfer of risks. In the event of justified notice of compliant, RGBlink can repair the fault or provide a replacement at its own discretion within an appropriate period. If this measure proves to be impossible or unsuccessful, the purchaser can demand a reduction in the purchase price or cancellation of the contract. All other claims, in particular those relating to compensation for direct or indirect damage, and also damage attributed to the operation of software as well as to other service provided by RGBlink, being a component of the system or independent service, will be deemed invalid provided the damage is not proven to be attributed to the absence of properties guaranteed in writing or due to the intent or gross negligence or part of RGBlink.

If the purchaser or a third party carries out modifications or repairs on goods delivered by RGBlink, or if the goods are handled incorrectly, in particular if the systems are commissioned operated incorrectly or if, after the transfer of risks, the goods are subject to influences not agreed upon in the contract, all guarantee claims of the purchaser will be rendered invalid. Not included in the guarantee coverage are system failures which are attributed to programs or special electronic circuitry provided by the purchaser, e.g. interfaces. Normal wear as well as normal maintenance are not subject to the guarantee provided by RGBlink either.

The environmental conditions as well as the servicing and maintenance regulations specified in this manual must be complied with by the customer.

Operators Safety Summary

The general safety information in this summary is for operating personnel.

Do Not Remove Covers or Panels

There are no user-serviceable parts within the unit. Removal of the top cover will expose dangerous voltages. To avoid personal injury, do not remove the top cover. Do not operate the unit without the cover installed.

Power Source

This product is intended to operate from a power source that will not apply more than 230 volts rms between the supply conductors or between both supply conductor and ground. A protective ground connection by way of grounding conductor in the power cord is essential for safe operation.

Grounding the Product

This product is grounded through the grounding conductor of the power cord. To avoid electrical shock, plug the power cord into a properly wired receptacle before connecting to the product input or output terminals. A protective-ground connection by way of the grounding conductor in the power cord is essential for safe operation.

Use the Proper Power Cord

Use only the power cord and connector specified for your product. Use only a power cord that is in good condition. Refer cord and connector changes to qualified service personnel.

Use the Proper Fuse

To avoid fire hazard, use only the fuse having identical type, voltage rating, and current rating characteristics. Refer fuse replacement to qualified service personnel.

Do Not Operate in Explosive Atmospheres

To avoid explosion, do not operate this product in an explosive atmosphere.

Installation Safety Summary

Safety Precautions

For all product installation procedures, please observe the following important safety and handling rules to avoid damage to yourself and the equipment.

To protect users from electric shock, ensure that the chassis connects to earth via the ground wire provided in the AC power Cord.

The AC Socket-outlet should be installed near the equipment and be easily accessible.

Unpacking and Inspection

Before opening product shipping box, inspect it for damage. If you find any damage, notify the shipping carrier immediately for all claims adjustments. As you open the box, compare its contents against the packing slip. If you find any shortages, contact your sales representative.

Once you have removed all the components from their packaging and checked that all the listed components are present, visually inspect the system to ensure there was no damage during shipping. If there is damage, notify the shipping carrier immediately for all claims adjustments.

Site Preparation

The environment in which you install your product should be clean, properly lit, free from static, and have adequate power, ventilation, and space for all components.

1.About Your Product

😀 Meet stream gO

stream gO is a next-generation AI production companion and brand asset hub from RGBlink. Powered by the preinstalled OpenClaw AI agent, it combines network storage, professional live production, and AI content creation to automate the entire creative workflow and deliver ready-to-use intelligent workflows.

stream gO supports video capture and encoding up to 4K@60, with protocols including HTTP, RTMP, and NDI. It also integrates NAS storage, AI video editing, AI avatars and talking-head videos, and AI copywriting to support live production, media asset management, and AI-powered content creation.

The device features a full-color touchscreen and TALLY indicator, with USB-C and PoE power options for flexible deployment across different scenarios. When idle, the screen displays playful facial expressions for a more interactive user experience.


📢  Important Notes

- stream gO is an RGBlink hardware product shipped with the OpenClaw application preinstalled. A USB drive is required to use recording, live streaming, device QR code display, and other features. Ensure sufficient storage space is available on the drive.
- The OpenClaw application is supported only on product models officially designated by RGBlink. Future upgrades and feature support are subject to RGBlink's product roadmap.

✨ Key Features

  • Compact and Portable: Full-color touchscreen control, built-in TALLY indicator for real-time status display, and USB-C/PoE power options for convenient operation.
  • All-in-One Live Production: Supports video capture up to 4K@60 and includes multiple live studio templates for quick scene setup and streaming.
  • Multi-Platform Streaming: Supports simultaneous streaming to up to four platforms, with HTTP, RTMP, and NDI protocols and encoding resolutions up to 4K@60.
  • AI-Powered Content Creation: Integrates AI video editing, AI avatars and talking-head videos, and AI copywriting to support end-to-end content production.
  • Flexible Mounting: Features two mounting screw holes for easy installation and secure mounting across various deployment scenarios.

1.1In the Box

stream gO DevicePD Power AdapterUSB-C Cable
Document image

1.2Front Panel

ItemDescription
① Touchscreen2.1-inch touch screen for real-time monitoring of signals and menu operations.
② ¼in MountsFor mounting.
③ TALLY IndicatorsIndicators show device status.

1.3Bottom Panel

!ItemDescription
① USB-CConnect to the power supply, support PD protocol.
② LANPoE, Gigabit network port with PoE.
③ USB-A (3.0)Connect to hard disk for recording, and storage up to 2T.
④ 3.5mm Audio SocketFor analog audio input and audio output monitoring.
⑤ HDMI INFor receiving video signal.
⑥ USB-C/UVC INFor receiving video signal from your phone or others. Connect to USB camera for UVC capture. Support 5V/1A reverse power supply.
⑦ RESET/
⑧ HDMI OUTConnect to external monitor for real-time monitoring of inputs and outputs.

1.4Main Interface

Power On

Show stream gO expression by default. (●'◡'●)

Home Page

Swipe left/right on the touchscreen to switch interface and view Home page.

Document image

ItemDescription
① Device Info BarDisplays network upload/download speed, Bluetooth connection status and other information.
② TimeDisplays the current system time.
③ IP AddressDisplays the current device IP address.
④ MenuTap to open the operation menu.

Operation Page

Tap the Menu icon to open the operation menu. Tap a function icon then tap > again to enter the corresponding operation page.

The main functions are described below: Document image

IconDescription
①Settings: Includes detailed configuration options such as device info, network port, Wi-Fi, Bluetooth, and time.
②Start Recording: Start or stop recording. Recording duration and remaining recording time are displayed in real time.
③Preview: Swipe left or right to switch between and preview connected input sources.
④Companion Mode
⑤Go Live: Start or stop live streaming. The elapsed streaming time is displayed in real time.
⑥Back to Home: Return to Home screen.

2.Key Steps

Step 1: Download the TAO app

Option 1: Scan the QR code

Document image

Option 2: Download from an app store

Search for TAO or TAO RGBlink in your app store.

  • iOS: Search for TAO RGBlink in the App Store.
  • Android: On Android devices, download TAO from an official app store.
Mobile PhoneOfficial app store
HuaweiAppGallery
XiaomiGetApps
OPPOOPPO App Market
VIVOV-Appstore
HONORHONOR App Market
Google PixelGoogle Play
......
📢 Note

If the TAO app cannot be found or installed, update your phone's operating system and try again.

Step 2: Sign Up and Log In

Step 3: Power Up

stream gO powers on automatically when connected to power. Keep it powered during useAfter startup, the touchscreen displays a startup animation.
Document image👉Document image

Step 4: Scan and Bind

Open the TAO App and scan the QR code on the Settings > Device Info > Device QR Code.

Follow the on-screen instructions to bind the device.

Step 5: Network Configuration and Web Login

Follow the instructions in the app to configure the network.

After setup, obtain the device IP address and log in to the web console.

The IP address remains displayed on the screen for 1 minute after startup.

Setup Process
Connect to Wi-FiEnter PasswordDevice Bound and Open Web

Using a Wired Connection Connect an Ethernet cable between the stream gO Ethernet port and the router LAN port.View IP details: Connect a monitor to the HDMI OUT port to see your status.You can access the web console using either IP address. Using a Mobile HotspotWith TAO APPV2.7.2( Android) or later, stream gO can also connect through a mobile hotspot.

Step 6: Update Your Credentials

Change the default username and password in the web settings.

Setup Completed Successfully.

📢 Important

-Network Requirement: Ensure your phone, stream gO, and the web console device are all connected to the same Wi-Fi network.
-Data Sync: Initial discrepancies between the app and the web console are normal. The system will auto-sync the moment you upload or place your first file.
-Wi-Fi Updates:If you change your router's name or password after setup, stream gO will go offline. Scan the QR code to re-bind.

2.1First-Time Login Notes

Three Control Interfaces

stream gO provides three control interfaces: TAO App, Web, and TAO Cloud.

-TAO App: Initial device setup, phone casting, basic device management and so on.
-Web: Live streaming operations, systems settings, AI tools and so on.
-TAO Cloud: Membership management, multi-platform streaming and cloud features.

TAO Cloud (https://www.tao1live.com) is a Live streaming platform developed by RGBlink.

All stream gO functions are managed through a single TAO Cloud account.

TAO APP Binding

After registering and logging into the TAO app, your account is automatically linked to the stream gO device.

Web Synchronization

A one-time manual link is required to connect the device to the web interface:

  • In the web console, navigate to System Settings > Device Information > Verification Code to locate the real-time verification code (valid for 120 seconds).
  • Log in to TAO Cloud, then enter the device name and the verification code under My Collection > Device.

Join the TAO Cloud membershipUpgrade to a TAO Cloud Membership to enable broadcasting to multiple platforms simultaneously. To upgrade, open TAO Cloud > User's Avatar > Recharge .

3.Use Your Product

This chapter covers stream gO’s core features and operations, including device management, live production, recording, and AI tools.

Learn how to configure stream gO and use its features for live streaming and content creation.

3.1Web App Operation

NO.Feature
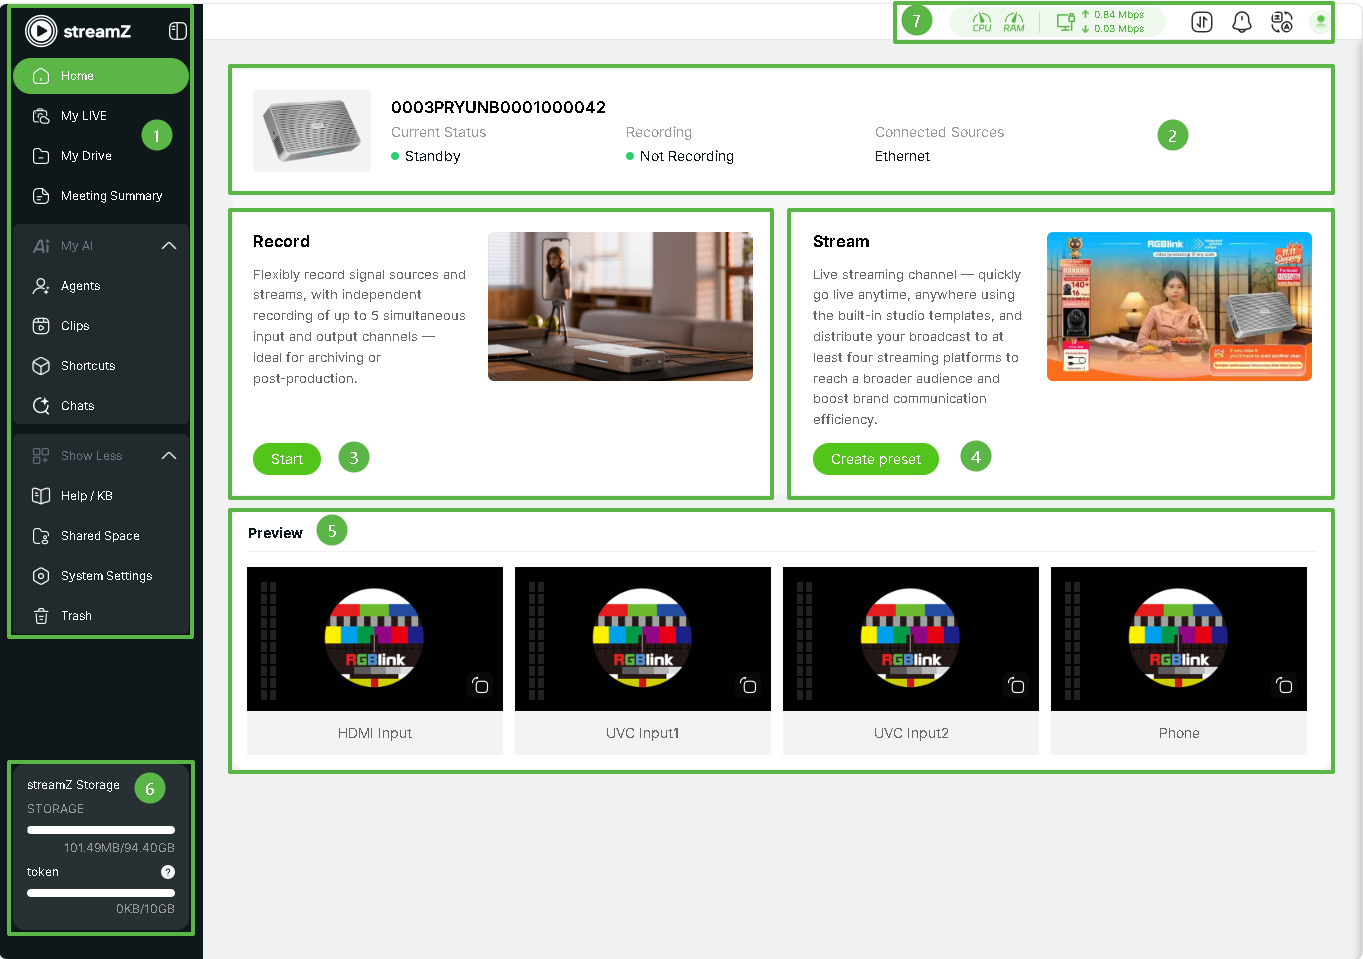
① SidebarQuickly switch between Home, My LIVE, My Drive, and Meeting Summary. AI Tools, Help, Settings and other entrances are located at the bottom.
② Device StatusMonitor current device status, stream key, recording, and Wi-Fi connection.
③ RecordStart recording. Supports independent recording for up to 4 inputs and 1 output.
④ StreamCreate live scene presets and broadcast to multiple platforms simultaneously.
⑤ PreviewReal-time monitoring for all connected input sources.
⑥ Resource StatsDisplays storage and tokens status. SD card capacity and usage are shown in real time.
⑦ Top Status BarDisplays real-time CPU/RAM usage and network bandwidth (Upload/Download). Provides access to Task Center, Messages, Language, and Profile here.

📢  Update Notification

A yellow dot next to System Settings in the Sidebar indicates that a system update is available.
Upgrade Steps:
- Click System Settings in the sidebar.Locate System Upgrade at the bottom right. 
- Click Start Upgrade to download the installation package.
- After the download is complete, click Confirm in the pop-up window.
- The device restarts automatically and enters upgrade mode. The screen turns off.
- When the device restarts and displays the robot animation, manually refresh the browser to sync the version and access the system.

Important: Do NOT disconnect the power.

3.1.1System Settings

📢 Note

The actual interface may vary slightly depending on the software version. Screenshots are for reference only.  
Click the outline on the right to quickly navigate to the corresponding settings description.

Device Information

View detailed information such as device details.

You can also bind/rebind the device to TAO Cloud here.

Network

Enable DHCP: The device automatically obtains an IP address.
Disable DHCP: Manually configure the IP address.
After making changes, click Save in the upper-right corner.

Wi-Fi

View details about the wireless network currently connected to stream gO.

Time Setting

Enable Automatic Time Setting: The device automatically synchronizes with the local network time.
Disable Automatic Time Setting: Manually configure the time and time zone.
We recommend enabling automatic time setting to ensure accurate timestamps for recordings and logs.

Storage Settings

Click Browse next to the storage path to view or modify the location for recorded files and generated digital human videos.
Before modifying the storage path, ensure sufficient storage space is available.

Live Encoding Settings

View the encoding format (H.264) and adjust resolution and bitrate to match different scenarios and network conditions.
Generally, a higher bitrate provides better image quality but requires more storage and bandwidth.
If the selected bitrate is too high for the device performance, it may cause issues such as lag, frame drops, or increased latency.

Adjust the bitrate based on network conditions and device performance.

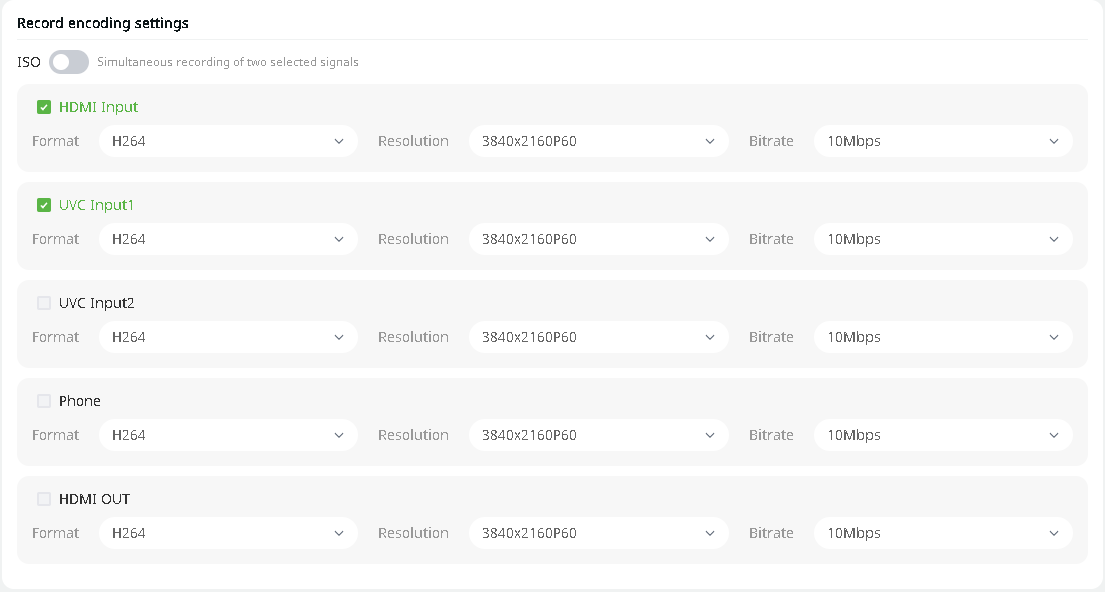
Record Encoding Settings

Choose whether to enable ISO mode.
View the encoding format (H.264) for input/output signals and adjust resolution and bitrate.

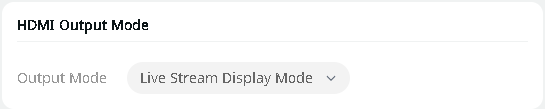
HDMI Output Mode

Two output modes are available: Live Stream Display Mode and Browser Mode.
Select the appropriate mode based on your usage scenario.

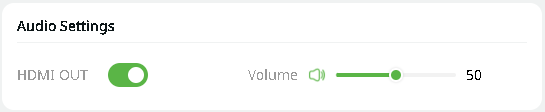
Audio Settings

Adjust the volume of the HDMI output signal to control audio output for connected display or capture devices.

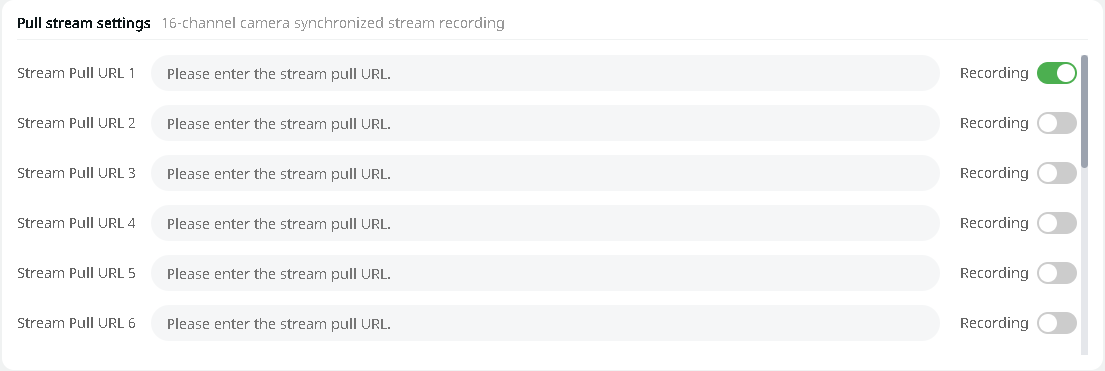
Pull Stream Settings

Supports synchronous stream pulling and recording for up to 16 cameras:
● Manually enter the camera stream URL
● Enable the corresponding stream channel using the toggle switch
Once enabled, the device will pull and record streams simultaneously.

Fan

Supports fan speed adjustment (Levels 1–5 and Auto).
Increasing the fan speed improves cooling performance, which is recommended for long-duration streaming, high-bitrate recording, or high-temperature environments.
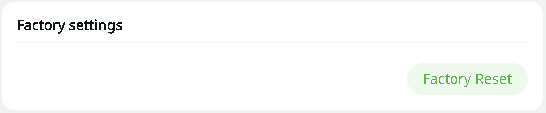
Factory Settings

Restoring factory settings will unbind the device and reset all user configurations. This action is irreversible.
Please back up important data before proceeding.

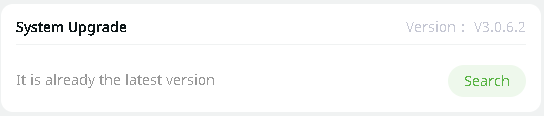
System Upgrade

Click Check for Updates to determine whether the device is running the latest version.

If not, the system will prompt you to download the update package.

The device will be unavailable during the upgrade process. Ensure a stable network connection during installation.

3.2File Management

Yunbao

Yunbao is the system's root directory. It stores recordings, AI avatar videos, and phone backups. This folder cannot be renamed or deleted.

  • Click + to upload local assets.
  • Files are automatically organized by Year/Month/Day. Double-click a file to preview, or use the top-right toolbar to move, download, or delete.
  • Deleted files can be restored from Trash.
  • Right-click a file and select Share files. Copy the generated code and send it to another stream gO user.
  • Click Shared File Code, paste the received code, and access the shared file.

Share

  • Add Files: Move files from Yunbao to Share,or upload files directly to this folder.
  • Manage Members: Select Shared Members to view authorized users or revoke access.
  • Permissions: Authorized users can access content only within this specific folder.

Cloud Files Synchronization

  • Connect with TAO Cloud, Dropbox or Baidu Cloud for cross-platform asset management.
    • TAO Cloud: Log in to the official website to bind the device.
    • Baidu Cloud/Dropbox: Click Authorize and follow the prompts to link the account.
  • Select a cloud file and click Share to save it directly to local stream gO storage.

Other Devices

When multiple stream gO devices operate on the same LAN, this feature enables local file sharing between devices.

  • Check Message Center for incoming access requests or to track your own application status.
  • Manage permissions and view members in the Share folder interface.
  • Approved members can access only the Share folder and cannot access Yunbao.
 📢 Note

To change the default storage location for recordings or AI videos, go to System Settings > Storage settings. 

The device must be restarted for the changes to take effect.  

3.3Live Streaming

After initial setup, follow this chapter to connect video sources, set up a live studio, and configure streaming to start your first live stream.

3.3.1Video Source Connection

Select the connection method for your video source based on the device type.

This section covers connecting devices such as smartphones and cameras to stream gO.

3.4.3.1.1Streaming via Smartphone

Use your smartphone as a camera source for stream gO.

Choose Your Mode

  • Camera: Switch between front and rear camera for live streaming.
  • Screen Mirroring: monitor your mobile screen in real time for presentations or gaming.

Start Casting

① Network Check

Ensure that your smartphone, stream gO device, and computer are connected to the same Wi-Fi network.

② APP Operation

Navigate in the TAO App to Phone Casting > Cast Settings > Mode > Orientation > Preview .

③ Begin Casting

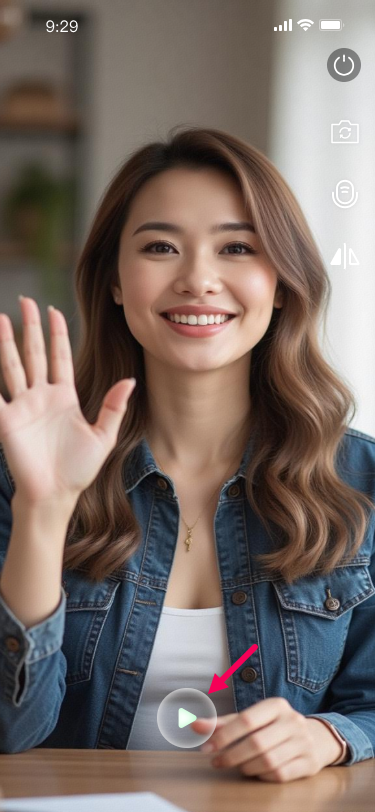
Press the preview page button to start.

Orientation is locked once casting begins; select Landscape or Portrait layout before starting.

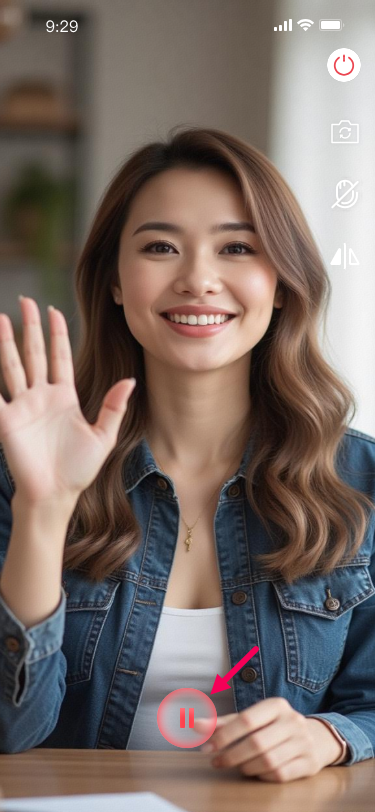
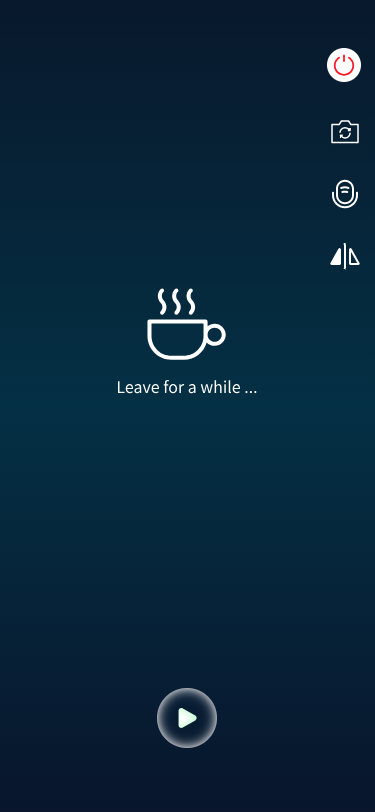
StartPausePause Interface

④ Interface Guide

IconFunction
⏹️Stop the current stream.
📷Switch between front and rear cameras.
🎤Turn microphone on/off.
🔺Flip image horizontally.

Web Interface View and Application

① Live Preview

View your mobile feed under Home > Preview > Phone .

② Add as Source

Go to Home > Create preset > Add Materials > Real-time Video > Phone to add and adjust the mobile feed in the scene.

For more details, see Section 3.3.2 Scene Creation and Usage.

📢 Note

- Privacy: Some apps may activate built-in privacy protection during screen mirroring, which can mosaic the feed. This is a standard security feature.
- APP Activity: The camera signal is interrupted if the TAO app is not active during casting. Other mobile activities are not recorded. If casting stops manually, the stream will display a color bar test pattern.
- Storage Path: Screen casting recordings are saved by default in `Yunbao/Record`.

3.4.3.1.2Streaming via Other Devices

Visual

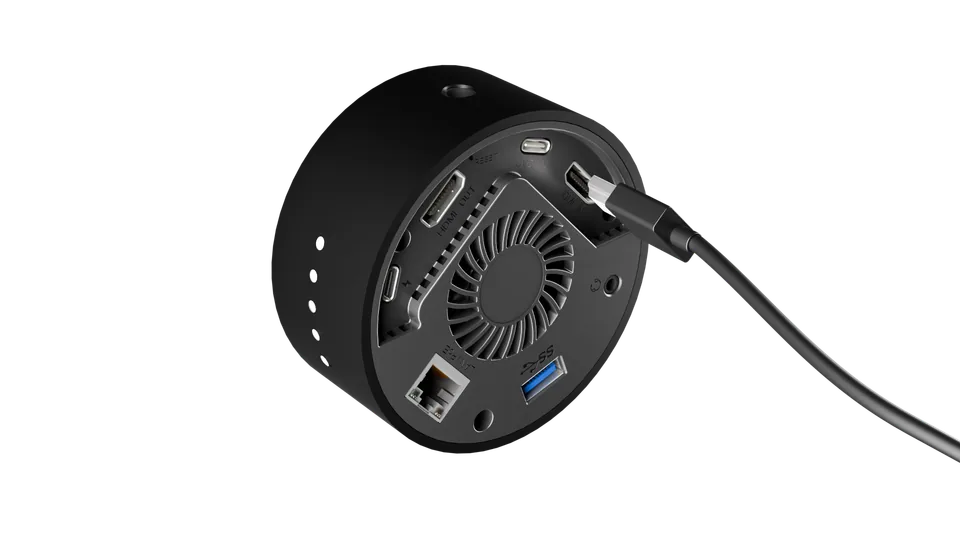
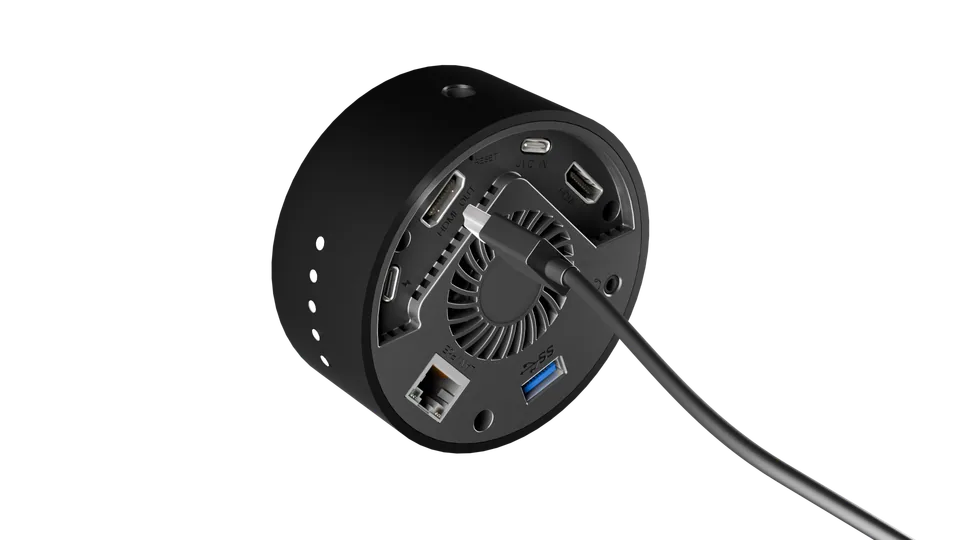
Connecting Your Device
Document imageConnect your camera, game console, or other video source to the HDMI IN port on stream gO using an HDMI cable.
When a Monitor is Connected
Document imageHDMI OUT Port: Previews the final live broadcast feed.

Audio

  1. Connect a lavalier microphone or external microphone via the 3.5 mm Line-in port. In the live scene setup, select Audio > Line In. Document image
  2. Connect a professional condenser microphone via the USB-C port. In the live scene setup, select Audio > UAC. Document image

3.3.2Live Scene Setup

What is a Scene?

A Scene is a pre-set live stream template. It provides a canvas to arrange and save video sources, images, music, and text overlays.

Why use Scenes Presets?

  • Reduce repetitive setup for live streaming.
  • Maintain consistent visual layout across broadcasts.
  • Switch between scenes instantly.

Create Scenes

① Set Orientation

Select landscape or portrait before building a scene. Orientation cannot be changed mid-way.

There are 12 independent template slots--6 for each orientation.

② Add Overlays

Use Create Preset to add overlays, manage layer order and edit content.

Observe the limits in the table to maintain stable performance.

Material TypeMax per SceneNotes
Real-time Video4HDMI IN, UVC IN 1/2 and Phone
Audio3Line in, Mic and UAC
Local Video2 in totalChroma Key supported.
PlaylistItems can be added repeatedly.
Music1
Music Playlist1
Photo20Chroma Key supported.
TextUnlimited
Template1

3.4.3.2.1Advanced Scene Setup

After completing the initial scene setup , this section introduces advanced layout and editing features for scene customization.

Scenes maintain visual consistency and allow quick transitions between segments (for example: Intro → Product Demo → Guest Talk → Break).

The following sections describe asset preparation and scene editing.

Asset Management

📢 Important

Multimedia assets must be uploaded to your My Drive folder before creating scenes.
The editor does not automatic saving. Keep the page open while editing; unsaved changes may be lost.

For additional creative assets and AI-generated content, see section 3.5.3 Shortcuts .

CategoryNotes
① VideoHDMI INSee section Streaming via Other Devices for more.
UVC IN 1/2FOV mode supported.
PhoneSee section Streaming via Smartphone for more.
② AudioLine inSet video-embedded volume to 0 if using external audio to prevent echoes.
Mic
UAC
③ Media
VisualTemplateUse Templates for one-click layout loading.
Imagejpeg/png/gif
Text/
DynamicVideo/
PlaylistSet Looping and order via drag-and-drop.
BGMMusic/
playlistSet Looping and order via drag-and-drop.

Editing

After adding assets to the scene, use Properties and adjust Layers for precision.

① Basic Layout
PropertyFuncion
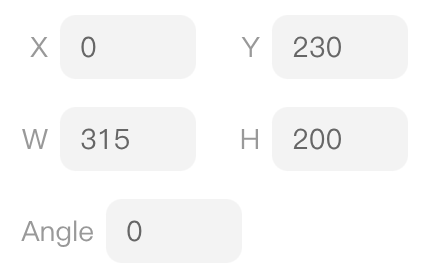
PositionSet coordinates for object placement.
SizeAdjust width and height.
RotationAdjust rotation angle.
ImageSet aspect ratio and fitting mode.
MirrorFlip horizontally or vertically.
LayerArrange object stacking order
② Advanced Tips
PropertyFunction
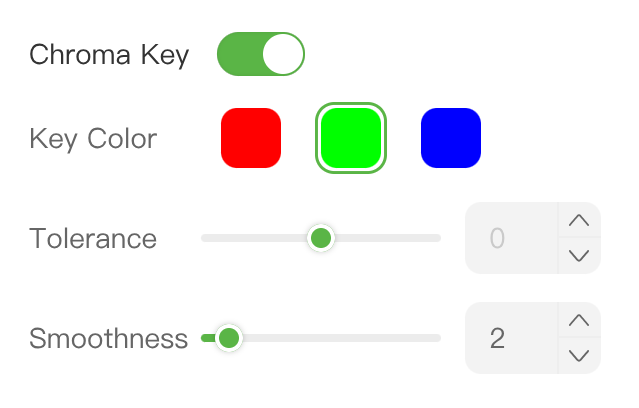
Chroma KeyRemove background color from images or videos. Enable Chroma Key, select the background color, then adjust Similarity and Smoothness.
OpacityAdjust transparency. For watermark text, an opacity of about 30% is recommended.
.........

3.4.3.33.3.3 Streaming to Live Platforms

What is Streaming?

Live streaming delivers video content to viewers in real time.

Streaming refers to the process of sending the live video feed to a streaming platform.

The Stream URL and Stream Key are provided by the platform and act as the destination for your live stream. stream gO uses this information to send the processed video feed to the selected platform.

Streaming Modes

  • RTMP Mode( Universal): Compatible with most platforms. Enter the Server URL/ Stream Key in the My LIVE > Push Streaming Setting to start streaming.

How to Get Your Stream Key (Guide for major platforms)

🚨  Risk Warning

DO NOT share your stream key with anyone or display it during a live stream. Doing so may result in unauthorized account access, stream hijacking, or other potential risks and losses.

If your stream key is exposed:

1.  Immediately reset the stream key on the corresponding platform.
2.  Stop the current live stream.
3.  Restart streaming using the new stream key.

PlatformIntroductionOfficial Guides
YouTubeGo to YouTube Studio. Click Create > Go live. Copy the Stream key and Stream URL from the stream settings tab.https://support.google.com/youtube/answer/9854503?hl=en#zippy=%2Cadd-a-trailer-to-your-live-stream%2Cstream-key%2Cstream-url
FacebookFrom Feed/Page/Profile, click Live video (Enter Live Producer). Click Go live > Select > Streaming software, then find and copy Stream Key/ Server URL.https://www.facebook.com/business/help/165076674943644?id=1123223941353904
TwitchOpen profile icon > Creator Dashboard > Settings > Stream and copy the Primary Stream Key.https://help.twitch.tv/s/article/twitch-stream-key-faq?language=en_US
Bigo LiveGo to profile avatar > Personal Center > Settings menu > Enable "OBS Streaming" option. Copy provided Server URL and Stream Key.https://www.bigo.tv/blog

Platforms-Specific Notes

Some platforms, including TikTok and Kwai, restrict direct RTMP access and require proprietary software.

Third-party tools (e.g., GravitasQ) may be used to obtain temporary Stream Keys. These tools may become unreliable due to platform updates.

🚨 Risk Warning

Using unofficial streaming tools may be detected as abnormal activity by the platform and could result in account suspension.

Before using third-party streaming software, carefully evaluate potential account risks.

RGBlink provides technical support only and assumes no liability for account suspension, abnormal behavior, or other issues caused by third-party software.

Setup Steps

  • In Push Streaming Settings , click the + icon.
  • Enter the Server URL and Stream Key provided by the platform in Push Streaming Address, then save.
  • Enable the stream. Up to four platforms can be streamed simultaneously by default.
📢  Note

The first row is your TAO Cloud replay address. 
This field is reserved for TAO Cloud Members—upgrade to activate and store your past streams.

💰 TAO Cloud Membership: Multi-Platform Sync

  • stream gO supports streaming to up to 4 platforms by default. Upgrading to a TAO Cloud Membership enables streaming to up to 10 platforms simultaneously.
  • After configuration on TAO Cloud platform under Live Broadcast Room > Home > Choose Destinations, use Go Live on All Platforms to start broadcasting to all selected destinations.
  • Join Membership: My LIVE > Push Streaming Settings( first row) > Enable > Buy Now

3.4Recording

📢  Important

The current OpenClaw version of stream gO requires a USB drive for recording.
Ensure sufficient storage space is available.  

📢  Important

To ensure smooth recording, go to System Settings > Record Encoding Settings and confirm that the selected source corresponds to the actual input signals.  

Recording Basics

  • Start and Stop Recording

Recording can be controlled from either the Web interface or the device.

Web Interface

  • Click Start recording in My LIVE on the homepage.
  • Recording duration and remaining recording time are displayed in real time.

Device Home Screen

  • Tap the Record icon to start recording.
  • Tap the Record icon again to stop recording.
📢  Notes
Connect a video source before recording.
Otherwise, the system displays “No valid signal source.”

Recording Modes

  • Standard Mode
    Records up to two 4K@30 signals simultaneously.
  • ISO Recording Mode
    Create separate video files for each connected input (cameras, smartphones, PCs) for post-production workflows.

Time Calibration

  • Network Sync: Connect stream gO to the internet before the first session. The device auto-sync with standard time to ensure accurate file timestamps.
  • Offline Recording: Recording without a network uses a default factory date, which may affect file organization.

3.4.1Find Your Recordings

Default Formats

  • Video Format: .mp4.
  • Audio Format: .mp3.
  • Segmented Saving: Recordings are automatically split every 3.8GB to prevent file corruption.

Storage Path

  • Default Path: Recordings are stored at My Drive>Yunbao>Record. Files can be viewed, downloaded, or shared directly from this folder.
  • Custom Path: The storage location can be changed in System Settings. A device reboot is required for the new path to take effect.
  • For more on file management, see section 3.2 File Management.

3.5AI Tool Box

This chapter introduces the built-in AI features of stream gO, including AI-assisted creation and content processing tools.

With AI-powered tools, users can streamline content production workflows and improve efficiency in live streaming and content creation.

3.5.1Meeting Summary

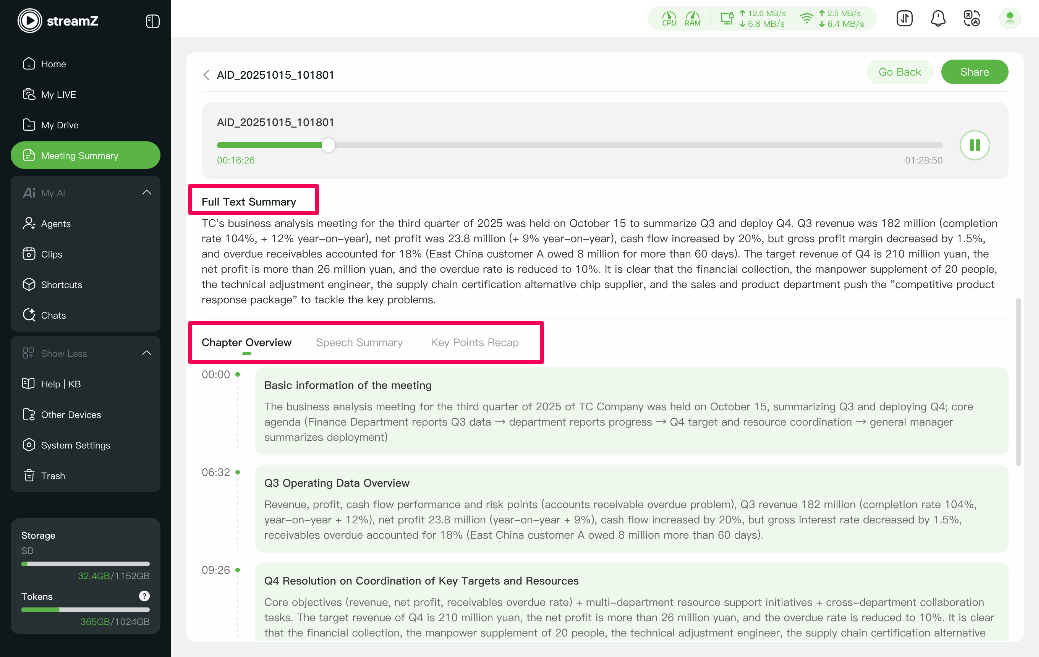
The Meeting Summary feature converts live audio into structured, actionable documents, eliminating the need to re-listen to full recordings or manually take notes.

Intended Users

- Content Creators → Brainstorming logs, interview transcriptions, and podcast debriefs.
- Business Teams → Project planning, client requirement archives, and post-stream reviews.
- Educators/Knowledge Influencers → Course outlining and initial research screening.  
-  ...

Recording and Preparation

To maximize AI accuracy:

  • Audio Quality: Use an external microphone in noisy environments (cafes, halls). Clear audio allows stream gO precisely distinguish between speakers.
  • File Specs: Audio files must be MP3 format and under 500MB.
📢 Tip

For very long meetings, record in segments to prevent upload interruptions or failures.

Upload and Process

There are two ways to generate a summary:

  • Select audio file under the STORAGEand submit. The system processes it automatically.
  • Use a Shared File Code to access audio from another stream gO device, avoiding physical file transfer.

Meeting Summary Modules

Each summary is divided into five modules for quick information digestion:

ModuleDesc.Typical Use
Full Text SummaryComplete transcript of the meeting with key conclusions.Update team members who could not ttend.
Meeting DetailsMaps each statement to the original speaker and verbatim text.Fact-Checking and verification.
Chapter OverviewAuto-generate timestamped segments.Jump directly to key points efficiently.
Speech SummaryGroup viewpoints by person to clarify stances and commitments.Avoid confusion and clarify responsibilities.
Key Points RecapAuto-generate a structured follow-up checklist.Streamlining post-meeting execution; no manual organizing required.

3.5.2Clips

The stream gO Clips feature is designed for short-form content. It uses raw footage stored on the device to quickly generate edited videos with templates.

📢 Note

streamgO does not currently support saving drafts. Ensure your assets are uploaded to the folder before starting. 

Do not exit or close the interface during editing, as actions cannot be undone.

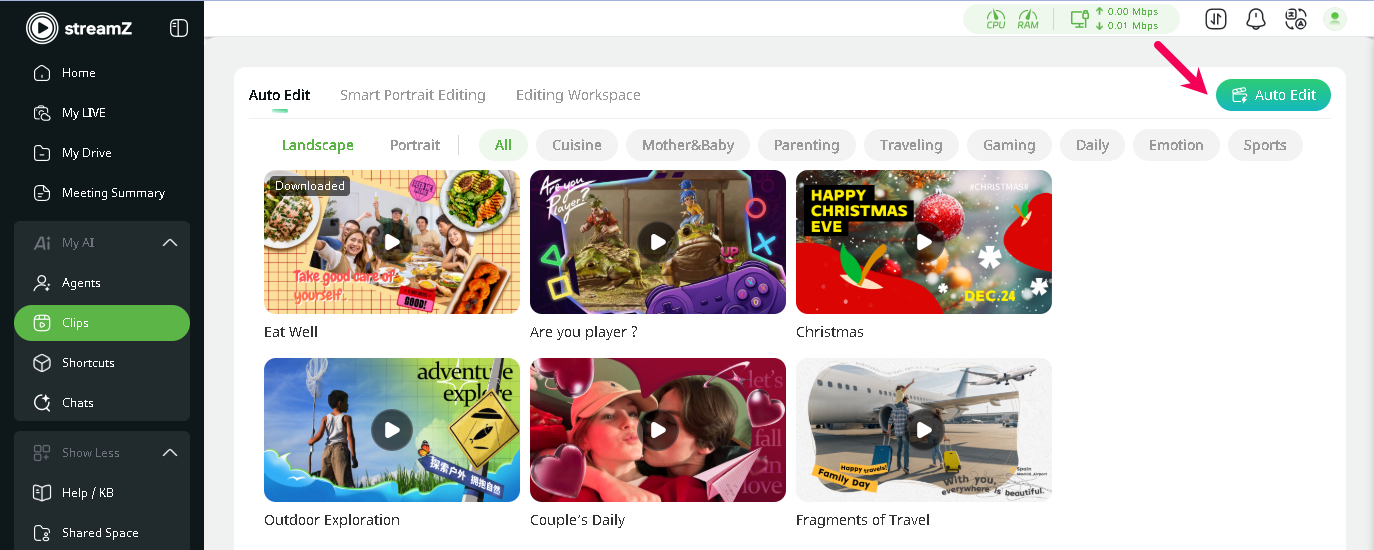
Auto Edit

The AI merges selected clips into a cohesive, ready-to-post video using script-based logic.

  • Click Auto Edit.
  • Enter a content description of the scene. The AI will generate several suggested scripts.
  • Select a template suitable for the content (e.g., gaming, daily or traveling).
  • Choose at least three clips from the storage path for a single edit.
  • Enable or disable Backgroud Music (Template Music or Customize).
  • Click Export and wait for stream gO to generate the video.
  • The system generates multiple short videos based on the script. Preview the results and download the preferred version to local storage.
  • Find all your completed videos in Editing Workspace.

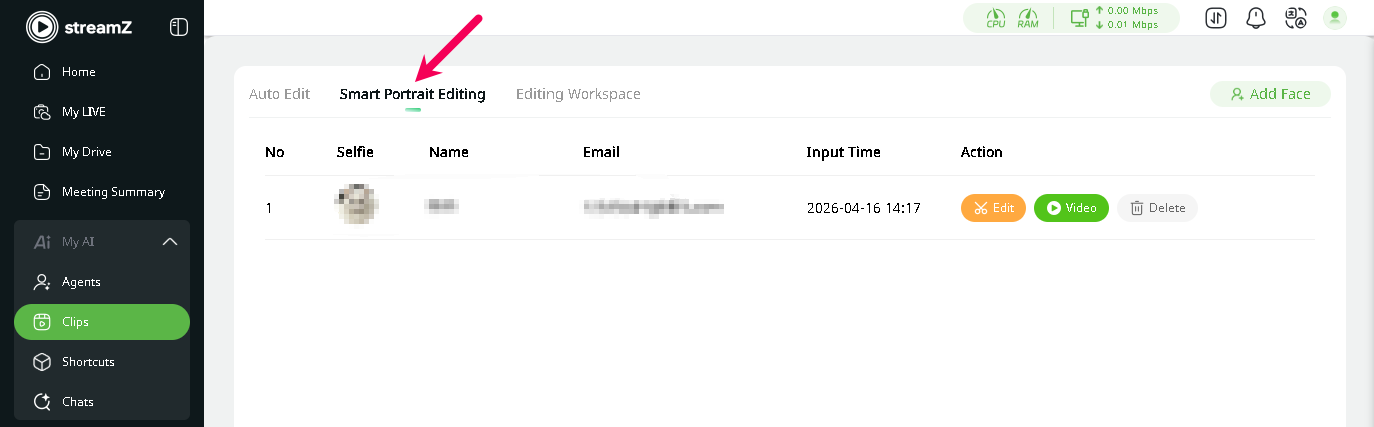
Smart Portrait Editing

Designed for single-subject content, this AI function automatically detects and crops the frame to keep the subject centered.

Web Interface

Add Face
  • Select Smart Portrait Editing, click Add Face .
  • Follow the instruction, upload a clear portrait photo.
  • Enter name and email, click Sure to add the portrait.

The added portrait will appear in the Selfie list, where you can perform Edit, view Video and **Delete **actions.

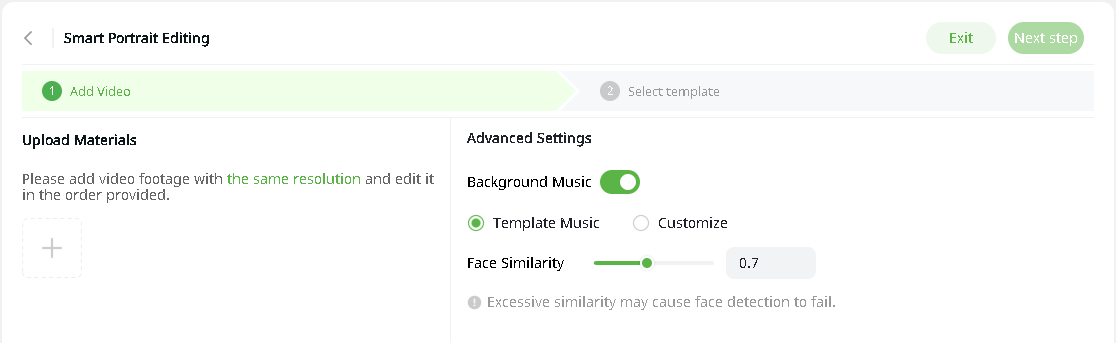
Edit
  • Click Edit for the corresponding face in the Selfie list.

  • In ① Add Video, click + to upload materials from STORAGE, then click Confirm. Please add video footage with the same resolution. You can filter resolution when selecting the files.
  • Configure advanced settings as needed.
    • Enable or disable Backgroud Music (Template Music or Customize).
    • Adjust Face Similarity.
  • Click Next step to Select template.
  • Select a landscape or portrait template based on your video (download template first).
  • Click Export and wait for stream gO to generate the video.
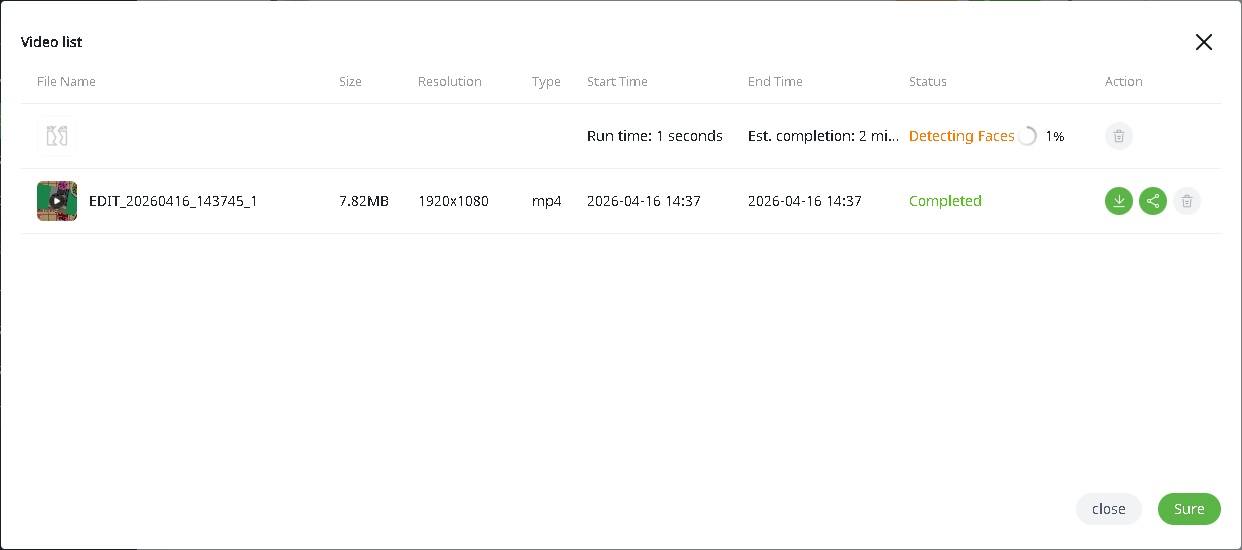
View Generated Videos
  • Click Video for the corresponding face in the Selfie list.
    • Check status
    • Download
    • Share (to TAO cloud/Baidu cloud/Dropbox)
    • Delete
APP Interface
  • Android Users: Tap Selfie Check-in on the App home page to register the portrait and begin editing.
  • iOS Users: This feature is currently unavailable. Future updates may support this function.

3.5.3Shortcuts

The Shortcuts feature provides centralized access to leading AI tools. It eliminates the need to search or bookmark individual platforms. Access it via Web Dashboard > My AI > Shortcuts

📢 Notes

When accessing third-party tools through stream gO, all token consumption, membership permissions, and billing follow the respective platform's terms of service.

Typical Use Cases and Recommended Workflow

  • Content Creators → Record with stream gO + Generate scripts via AI writing+Create covers via AI image tools.
  • Business Teams → Combine Meeting Summary with AI office tools to expand your to-do lists.
  • E-commerce → Combine AI Avatar with AI Video tools to optimize marketing.

Categories of AI Tools

CategoryRecommended Examples
Top Picks
AI Chat
AI Writing
AI Image
AI Video
AI Office

3.5.4Agents

Digitize your likeness and voice to generate professional presentations from text. This feature eliminate traditional filming requirements and enable 24/7 content broadcasting.

📢 Important

  • Compliance: Ensure all uploaded footage has explicit consent.
  • Prohibited: Generating illegal content, content that infringes copyright, or content that would violate privacy.
  • Tokens: Training and generation consume Tokens (billed by video minutes). Check your balance before starting to avoid interruptions.

Notification Example

Check Balance and PurchaseHover over the Tokens icon (bottom-left web dashboard). Follow the prompts to open App > My Devices > Buy Token to purchase additional Tokens.

Create Your Agent

Create your agent before generating content.

Click the Xiao Bao icon (bottom-right) to start the tutorial.
  • Navigate to My AI > Agents and click Create My Agent.
  • Provide a high-res video (30s-5min). Ensure the subject is clear.
  • Check the compliance requirements and proceed.
  • Enter your Agent's name and click Confirm.
  • After the upload check, click View and wait for processing.
  • Once complete, your Agent will appear in My Agent.

Generate Content

  • Select an Agent from My Agent and click Make A Content.
  • Canvas and Background
    • Set orientation: Landscape or Portrait.
    • Upload a custom background or use a template/color.
    • Drag and Resize the Agent layer to position it.
    • Green screen removal is not yet supported; please use pre-processed or green-screen-ready source footage.
  • AI Dubbling: Input your text and adjust voice speed (0.5x-2x).
  • Click Generate Video, name your file, and confirm.
  • Track progress, rename, or delete files in My Video.
  • Saved to YunBao/Digital by default. Change this in System Settings > Storage settings.

Use Cases

  • E-commerce → Pair Agents with multi-lingual AI voices for low-cost, global product intros.
  • Corporate Training → Record a trainer then update scripts and backgrounds to batch-produce course series.
  • ...

3.5.5Chats

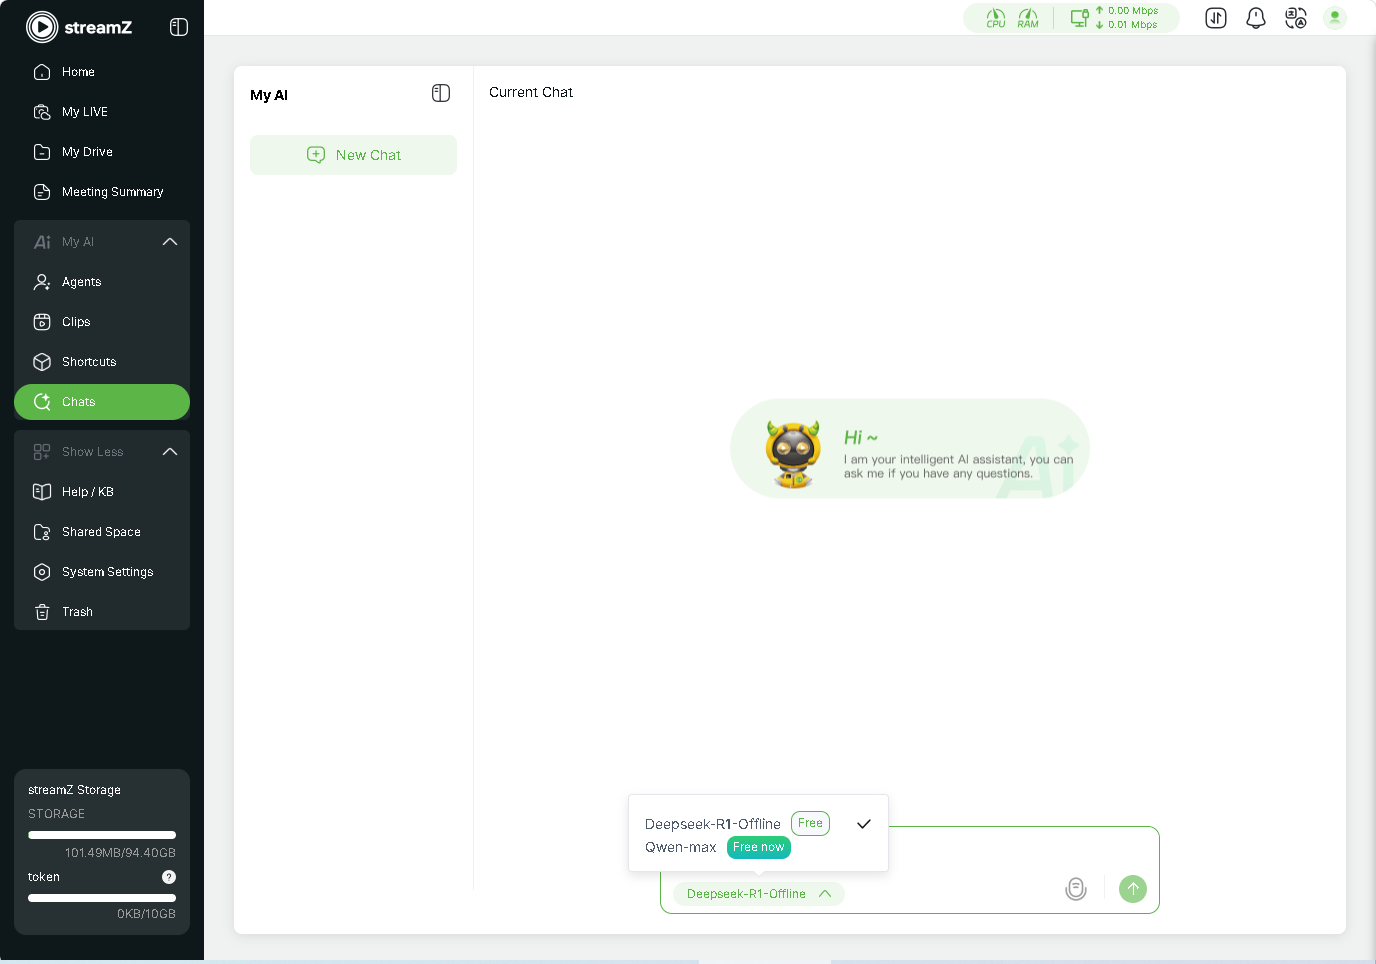
Switch Models

4Revision History

VersionDateDescriptionAuthor
V1.02026-04-20First release.ZYL

About Us / Find Support

Xiamen RGBlink Science & Technology Co., Ltd. designs and manufactures professional video processing, switching, streaming and LED display control products for live events, broadcast, education and fixed installations.

Need help?

Choose one of the following support options:

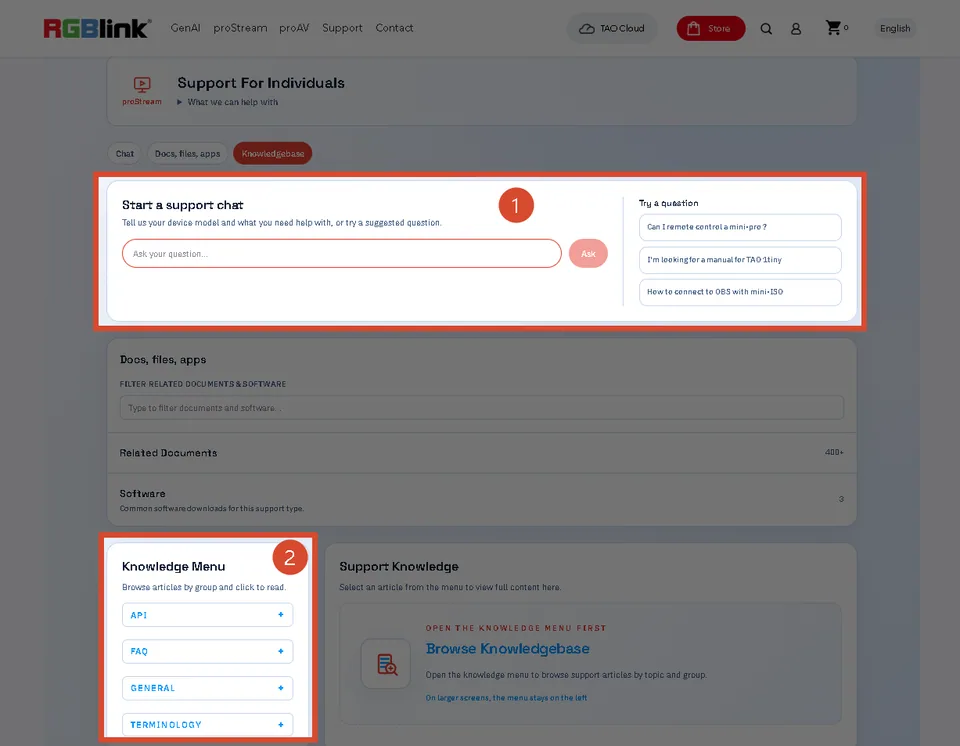
  • AI Support Search (Recommended): Visit Support > Support proStream/proAV/proEvents on the RGBlink official website and ask the RGBlink AI Bot for quick answers.
  • FAQs: Visit Support > Support proStream/proAV/proEvents on the RGBlink official website and browse Knowledge Menu > FAQ.
  • Contact Technical Support: Visit the Technical Support page of this manual or the RGBlink official website for our contact details.

Document image

RGBlink

www.rgblink.com

© Copyright Xiamen RGBlink Science & Technology Co Ltd