Online Manual
mini-max User Manual

3.5 About Layers
mini-max combines multiple layers to create the final Program output. The output image consists of the following layers:
| Layer | Type | Description |
|---|---|---|
| Layer A | Dynamic | Main video layer. |
| Layer B | Dynamic | Secondary video layer for PiP or dual-screen display. |
| Background | Static | Display background images. |
| Foreground | Static | Display logos, corner graphics, or other overlays. |
mini-max sipports Picture in Picture and Chroma Key functions.
3.5.1 Adding Layer A/B
Layer A and Layer B are the main video layers used to create the Program output.
By default:
- Layer A is used as the main video.
- Layer B is used as the secondary video.
Combining Layer A and B enables single-screen, picture-in-picture, and dual-screen layouts.
Adding Layer A
- Press the A button in the PICTURE IN PICTURE row on the front panel.
- Confirm that the A button lights blue.
- Select a source from the PROGRAM/B row.
- Confirm that the corresponding source button lights red.
The selected source will be output as Layer A in the Program output.
Alternatively:
- Select a source from the PREVIEW/A row.
- Confirm that the corresponding source button lights blue.
Perform switching according to the current switch mode:
- CUT mode: Press the corresponding source button in the PROGRAM/B row to switch the source to Program output.
- AUTO mode: Press the AUTO button or move the T-Bar to complete the transition.
Adding Layer B
- Press the B button in the PICTURE IN PICTURE row on the front panel.
- Confirm that the B button lights blue.
- Select a Layer B source using the same method as adding Layer A.
After Layer B is added, mini-max enters picture-in-picture mode.
📢  Notes

mini-max uses single-screen mode by default. After Layer B is enabled, the system automatically switches to dual-layer mode.
3.5.2 Picture in Picture
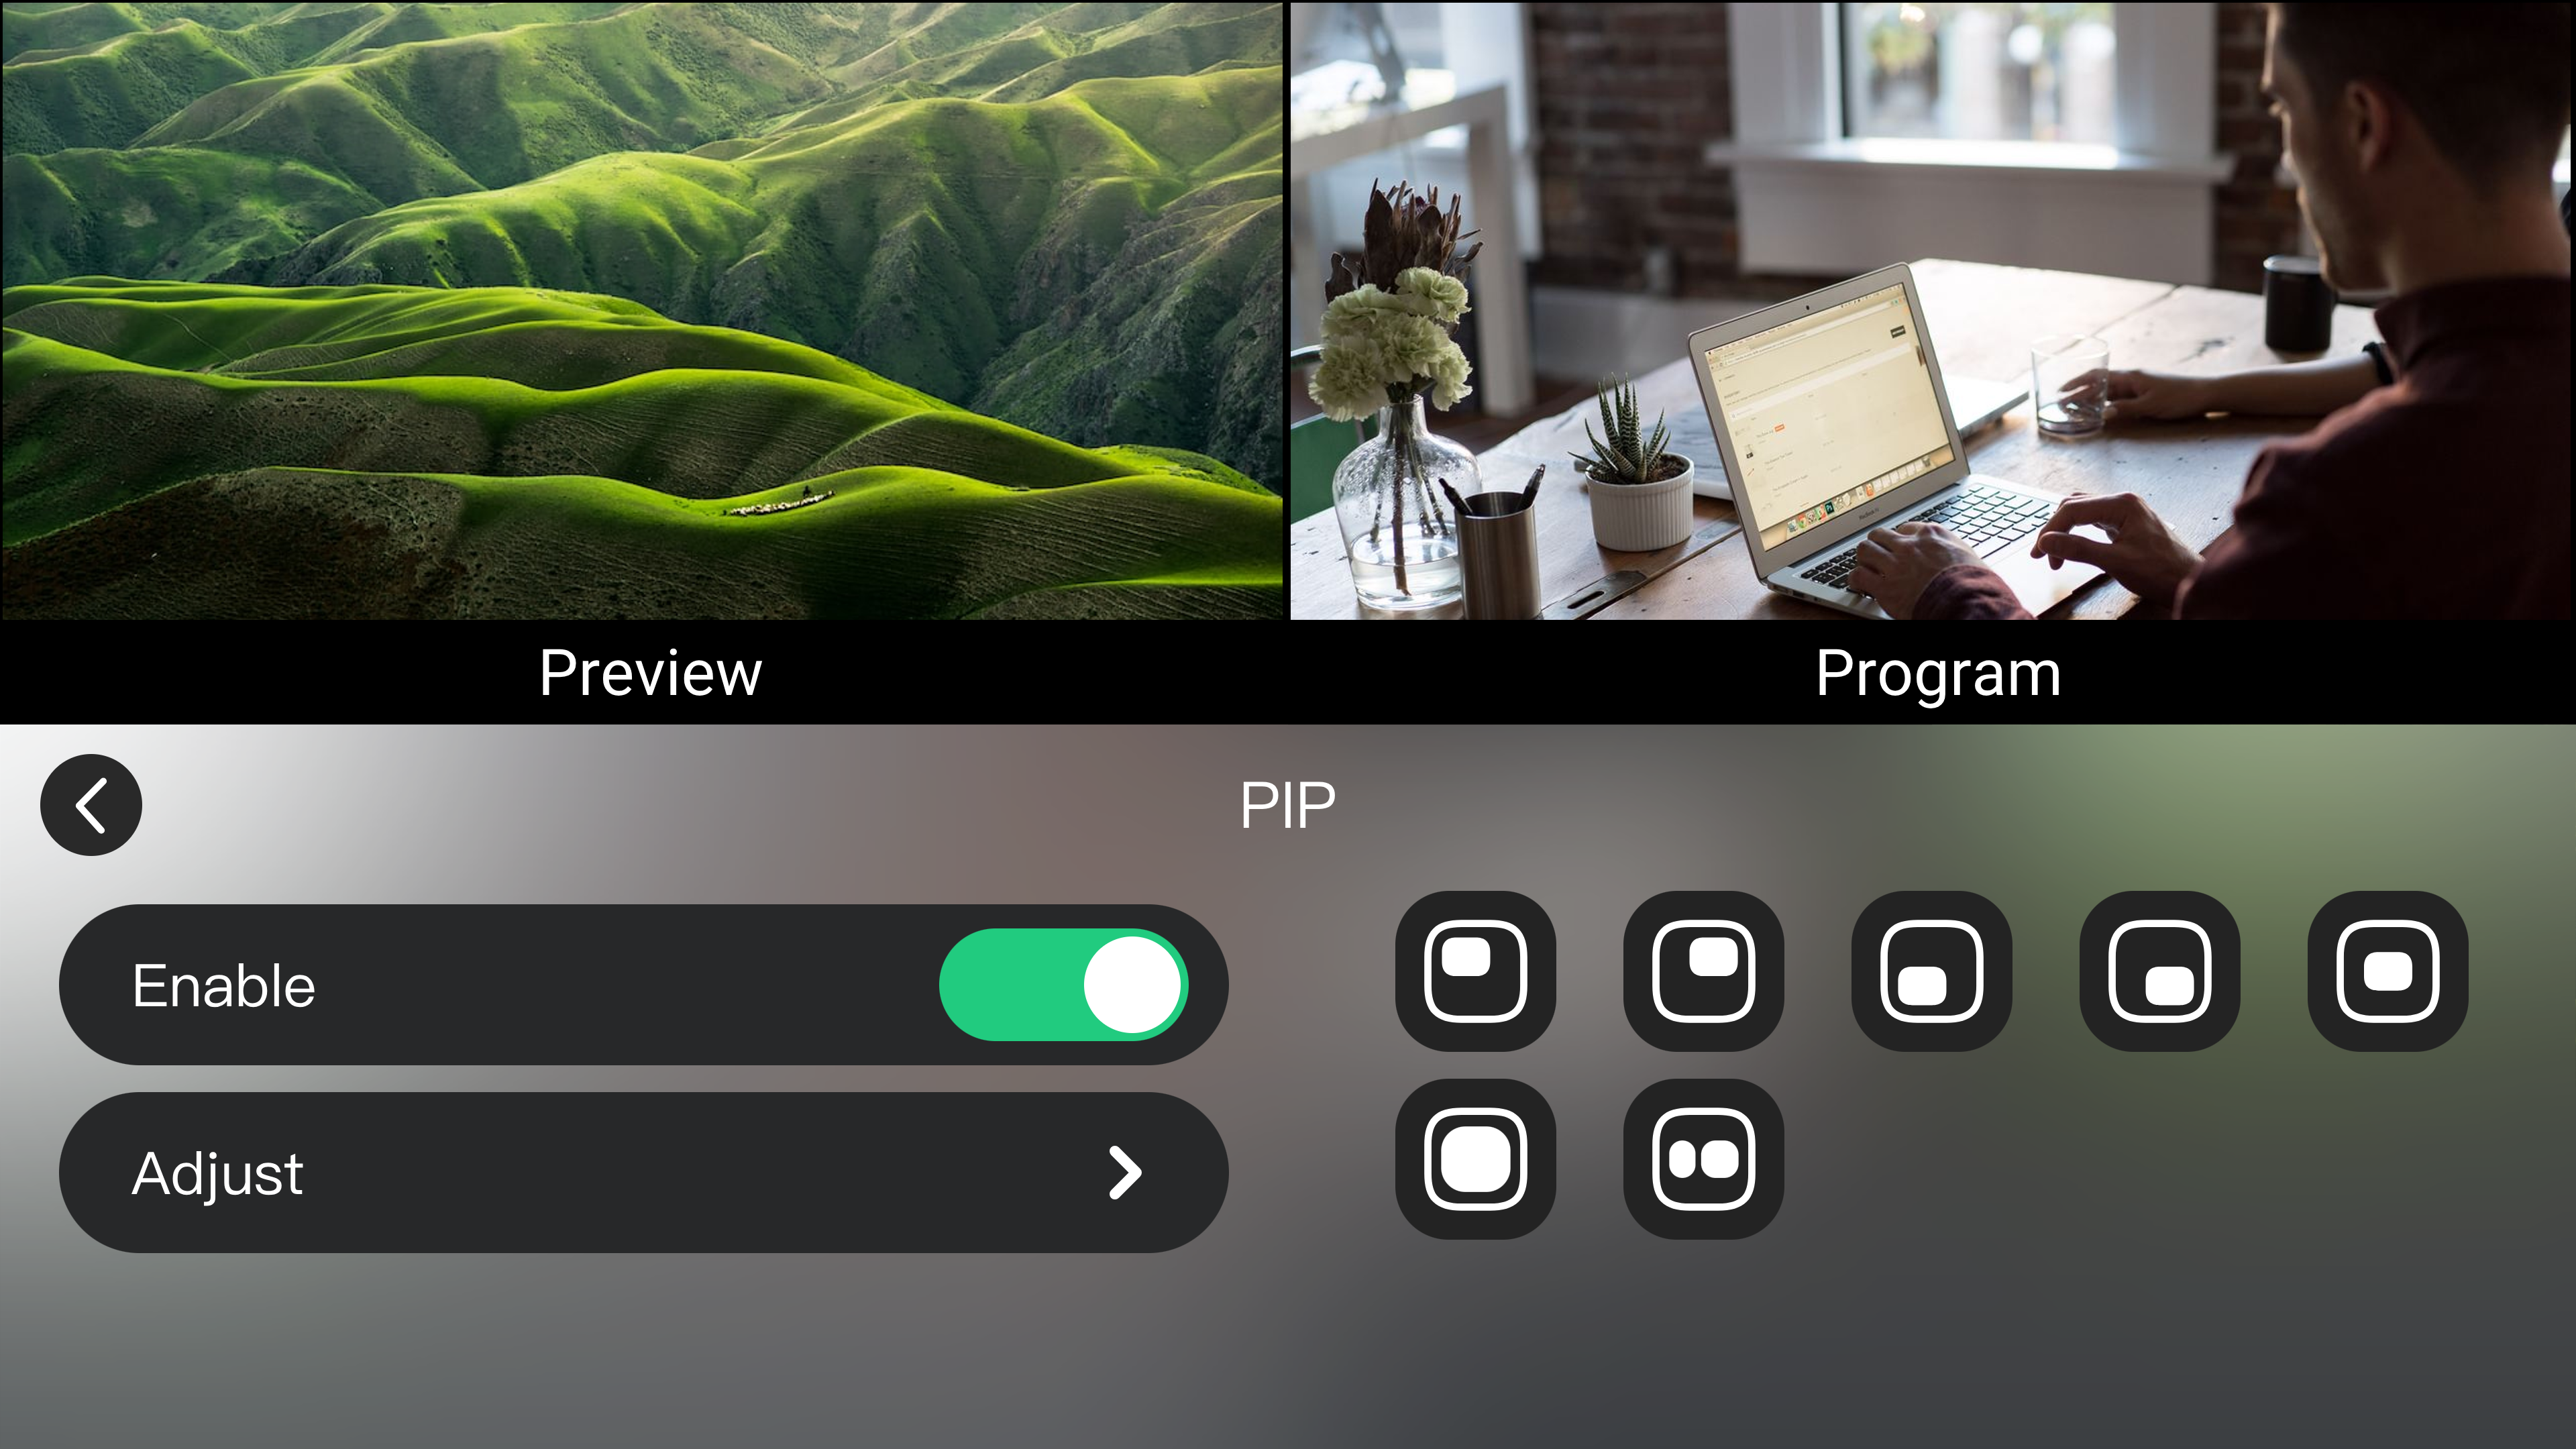
Picture-in-picture displays Layer A and Layer B simultaneously. Users can adjust the layout, position, and size of each layer.
mini-max provides six built-in picture-in-picture layouts and one single-layer layout.
Switching Layout
- Using the front panel
- Enable Layer A and B
- Using the layout buttons in the PICTURE IN PICTURE row to select a layout.
- Using the menu
- Go to MENU > PIP
- Press Enable. Then select a layout.
Adjust Layers
Layer A and B can be adjusted independently for position, size, and aspect ratio.
- Select a layer to edit. The corresponding button will light blue.
- Use ZOOM toggle to adjust the size.
- Use 5-Direction joystick to adjust the horizontal/vertical position.
- Or go to MENU > PIP > Adjust and enter PIP adjust page.
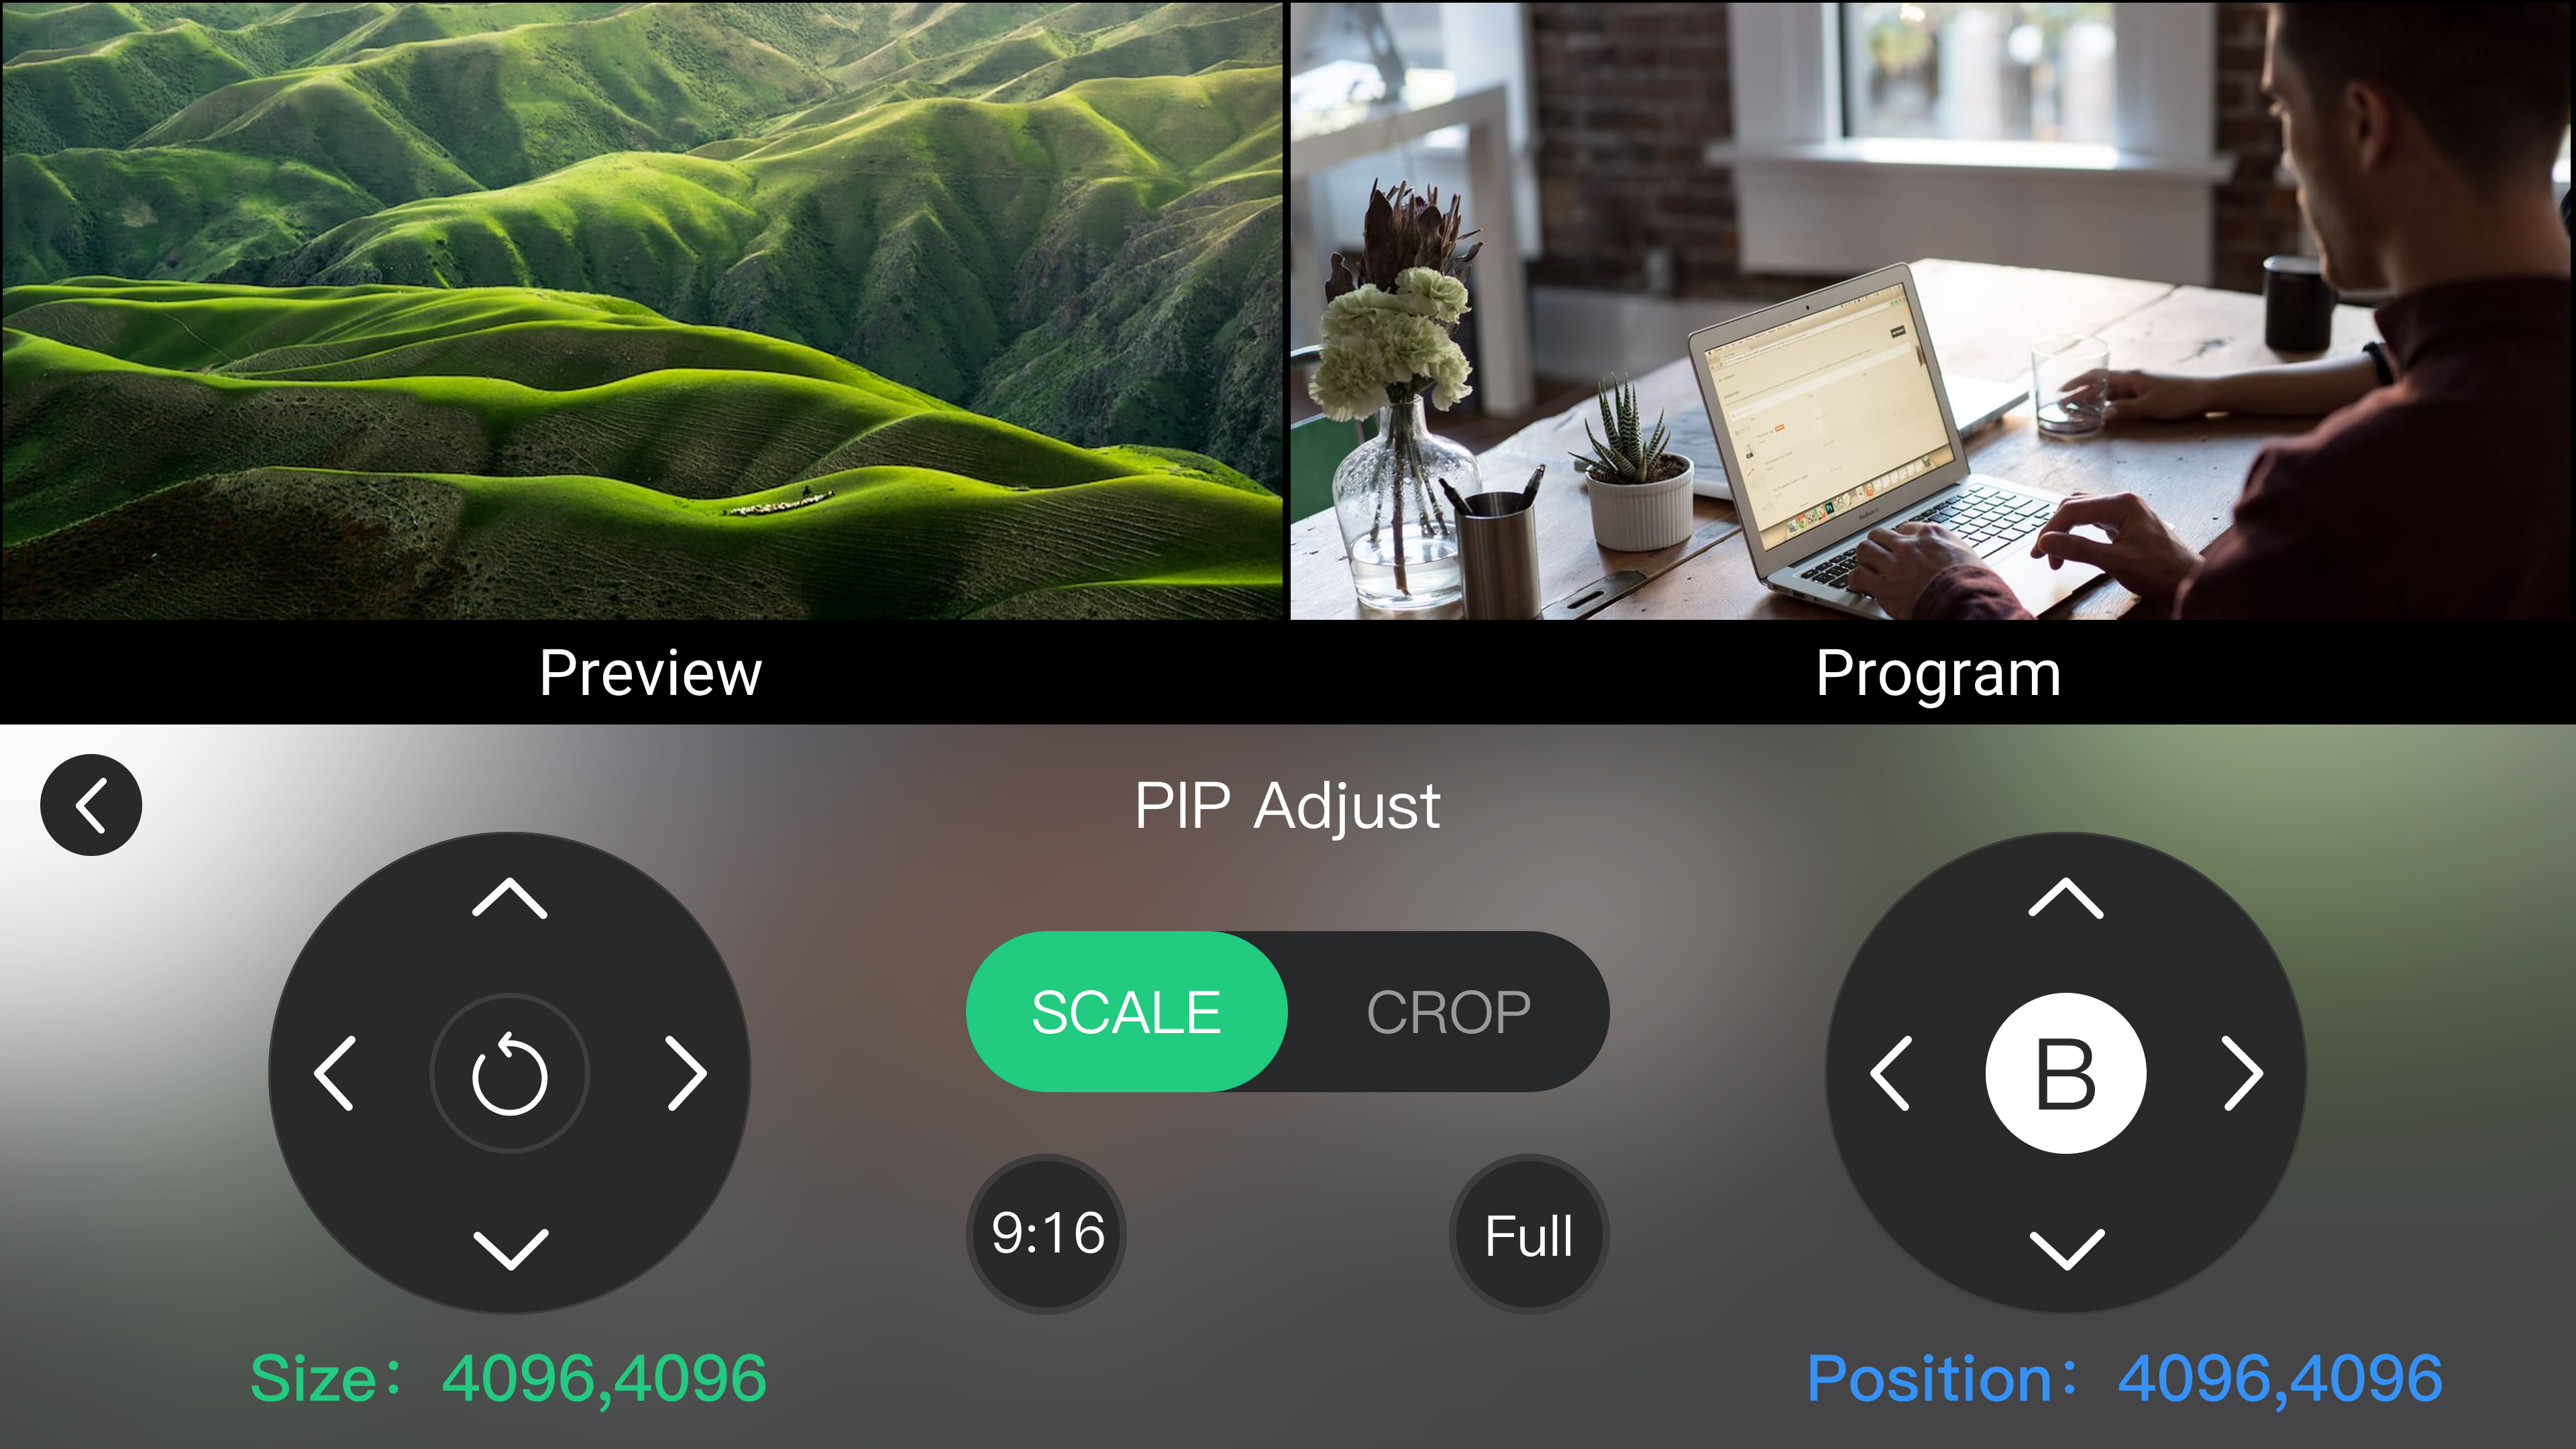
Available settings:
| Setting | Description | |
|---|---|---|
 | Layer | Select Layer A or B. |
 | 9:16 | Switch to vertical aspect ratio. |
 | Full Screen | Restore full screen display. |
 | Reset | Restore the original state. |
 | Scale | Adjust image size and position. |
 | Crop | Crop image edges. |
3.5.3 Adding Background and Foreground
Background and Foreground layers are used to enhance the Program output.
- Background replaces the black screen or displays a fixed background image.
- Foreground displays logos, corner graphics, masks, and other overlay elements.
Supported format:
| Parameters | Requirement |
|---|---|
| Format | PNG |
| Color Depth | 24 bit |
| Maximum Resolution | 3840 × 2160 |
Importing Materials
- Connect a USB flash drive to USB-C 1.
- When the USB drive is detected, the RECORD button lights up.
- Select Input > Background or Input > Foreground to open the asset menu.
- The following folders will be created in the root directory of the USB drive (or can be created manually):
mini-max/backgroundmini-max/foreground
- Prepare PNG images that meet the format requirements.
- Name background images back1, back2, back3, etc.
- Name foreground images fore1, fore2, fore3, etc.
- Copy background images to mini-max/background.
- Copy foreground images to mini-max/foreground.
📢  Notes

- Asset folders are created only after entering the corresponding asset page.
- If the folders are not created automatically, create folders with the same names manually.
- Preview and Program share the same Background and Foreground assets. Different assets cannot be assigned separately.
Adjusting Materials
- Select the Background Layer or Foreground Layer.
- Use the ZOOM toggle to adjust the size.
- Use the 5-Direction joystick to adjust the position.
Applying Materials
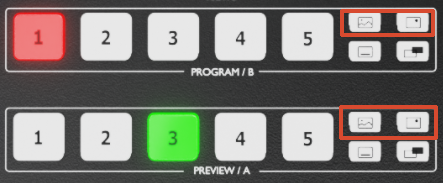
The PREVIEW and PROGRAM rows on the front panel provide shortcut buttons for Background and Foreground. Press the corresponding button to add or remove an asset.
3.5.4 Chroma Key
📢  Notes

mini-max supports chroma key.
Upgrade firmware to V2.39 or later before using this function.
Chroma key removes the background and overlays the subject onto other layers. The chroma key function applies to Layer B by default.
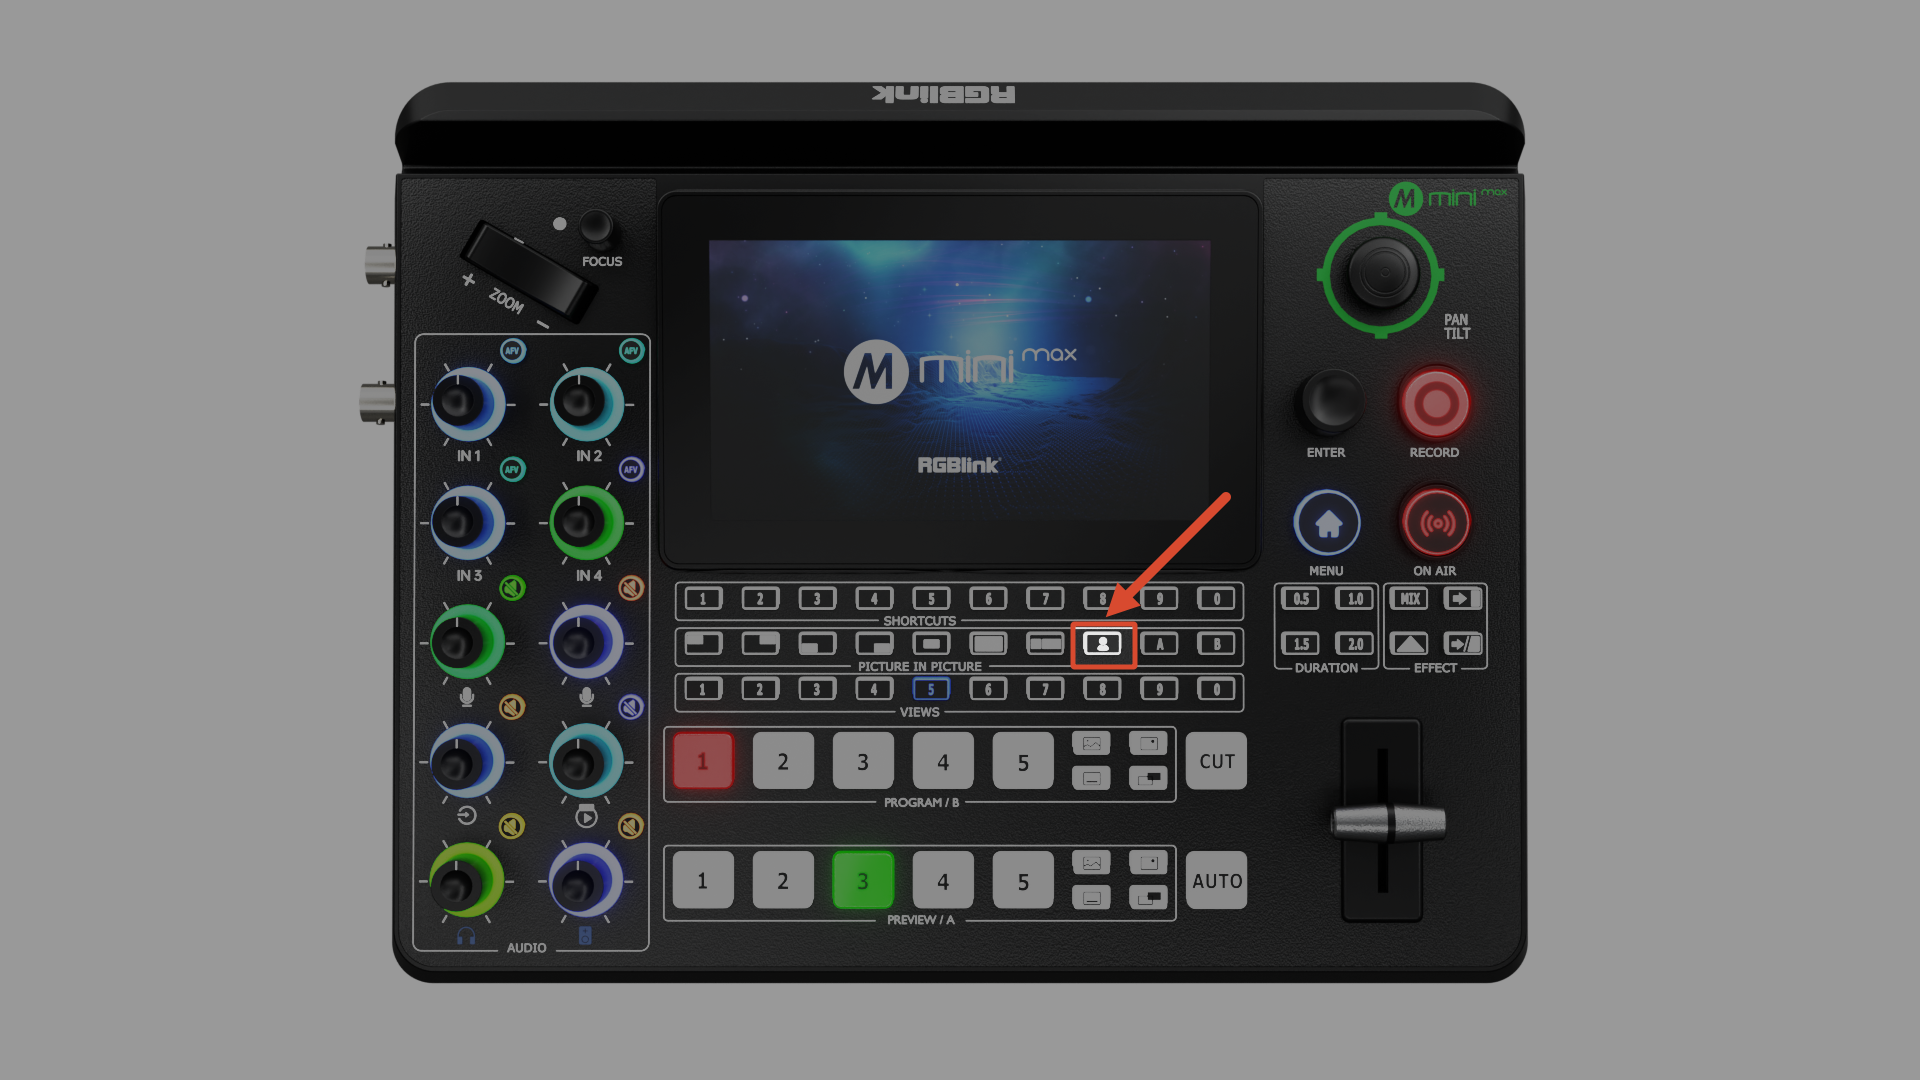
Using the Front Panel
- Congigure the Layer B
- Press the chroma key button (as highlighted by the box and arrow). The system displays the chroma key preview.
Using the MENU
- Go to MENU > KEY
- Enable the picker (see ①). Select the color area in Preview on the touchscreen, or use the five-way joystick to adjust the selection position.
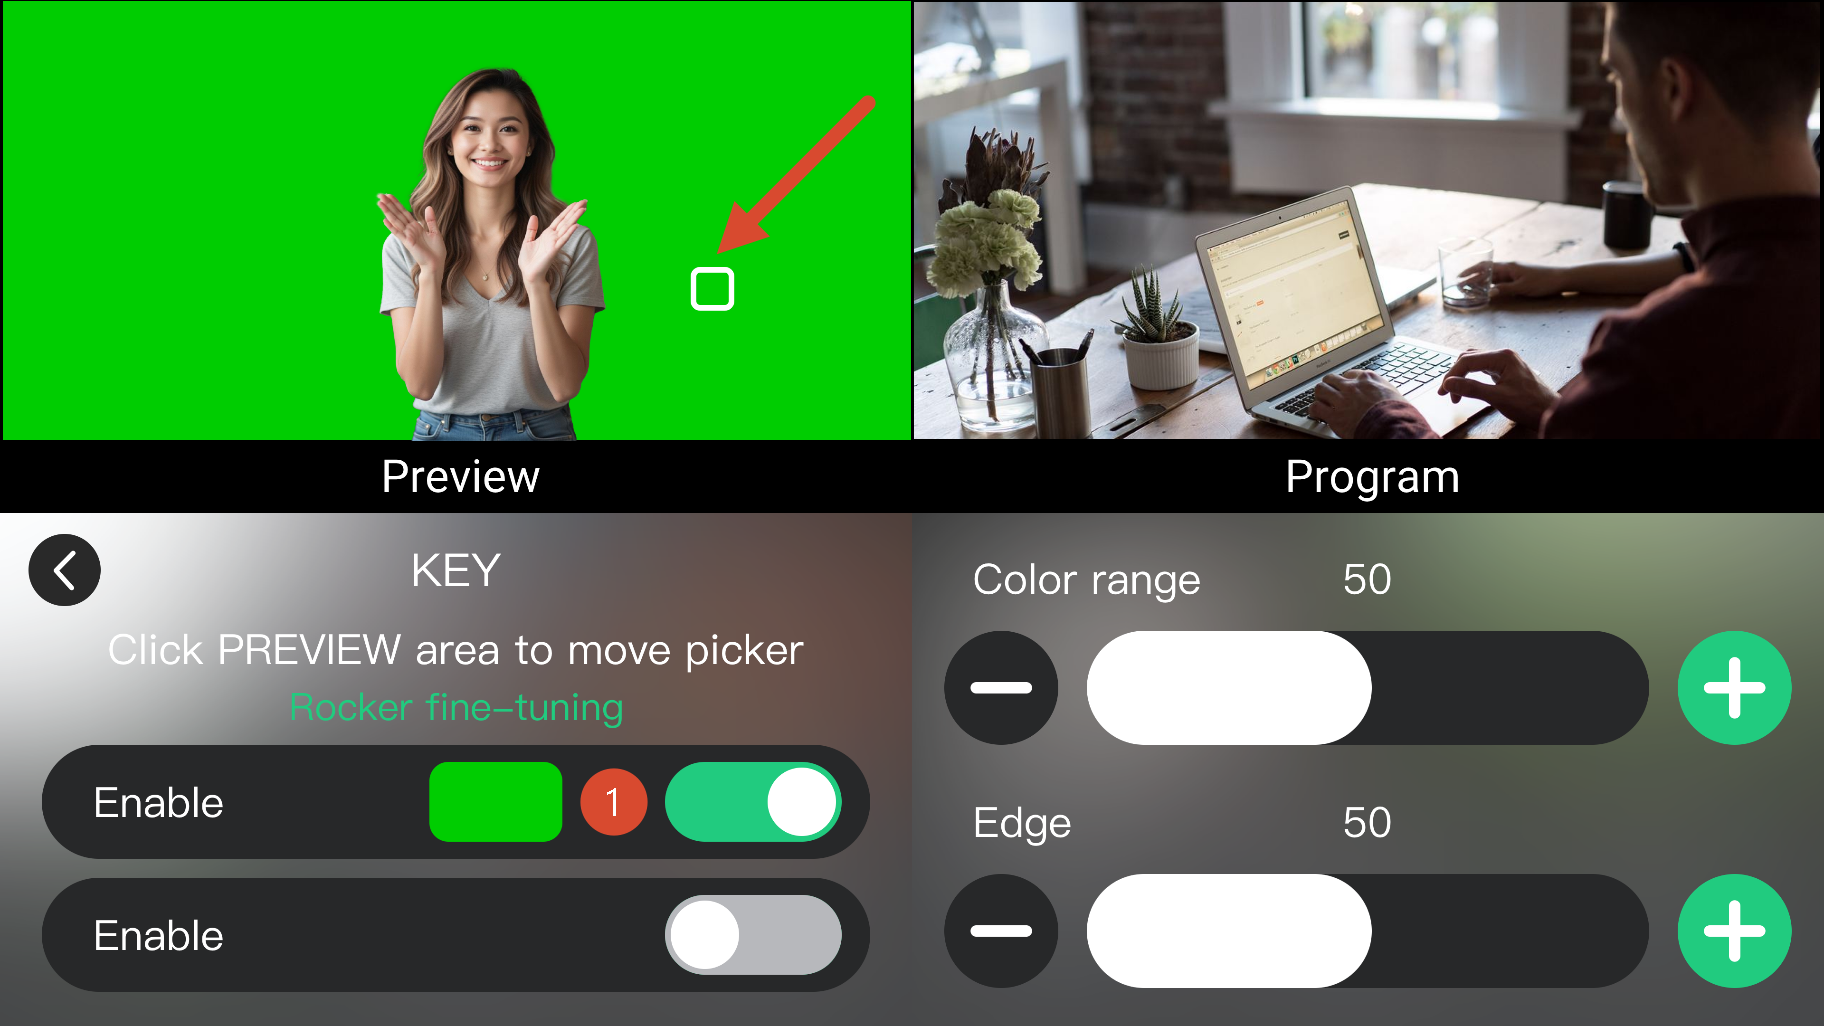
- Enable the chroma key function (see ②) to apply the effect.
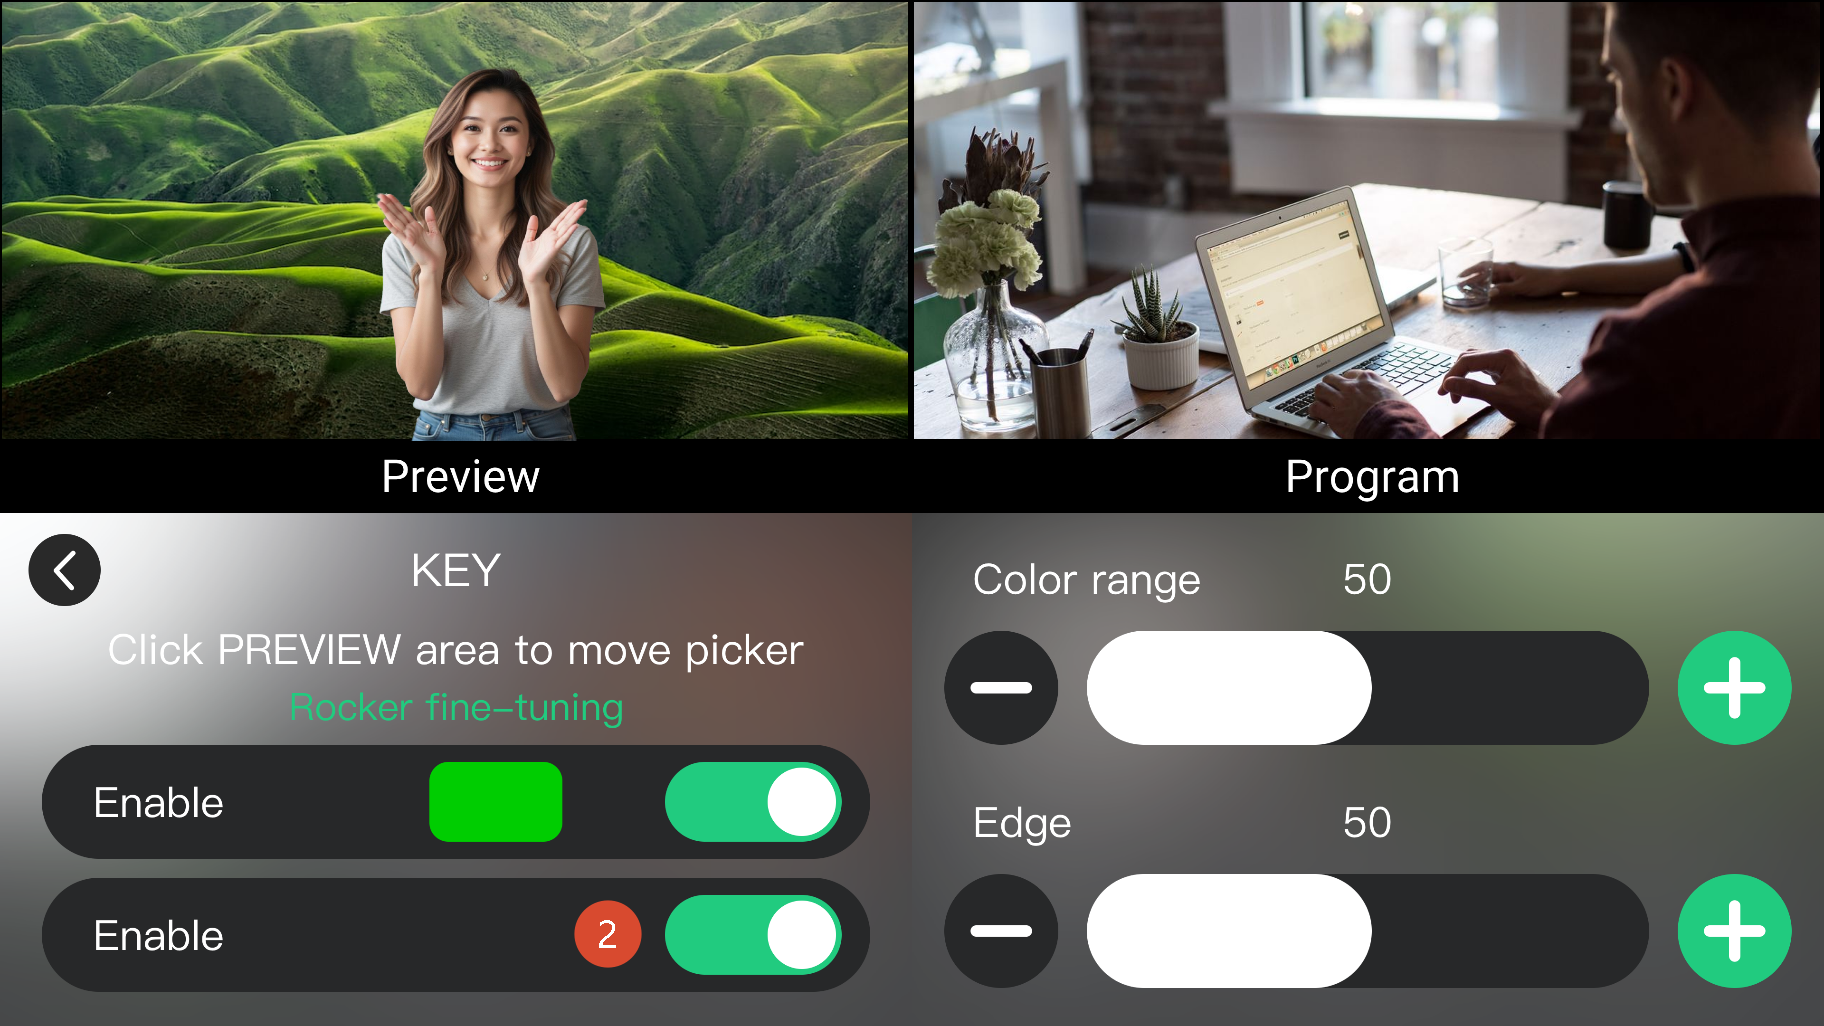
- Use the + and - buttons to adjust the chroma key effect.
- Color Range: Adjusts the selected background color range. Higher values select a wider color range; lower values provide more precise selection.
- Edge: Adjusts edge smoothness.