Online Manual
mini-iso-manual

1.2 Front Panel
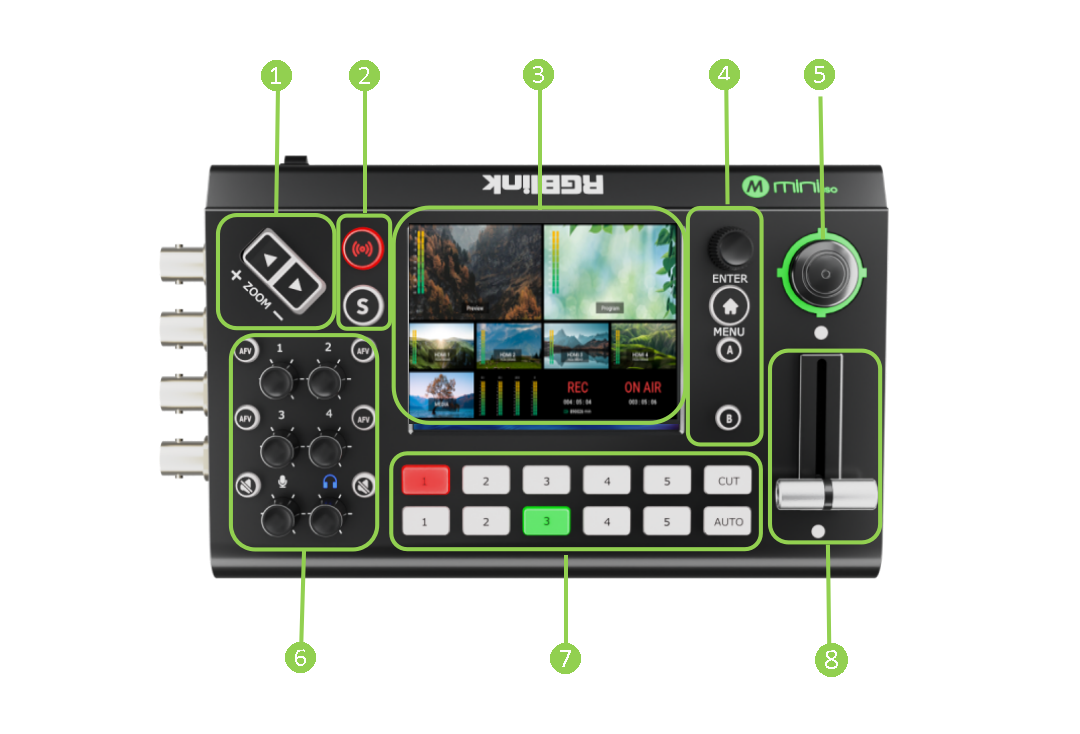
| No. | Item | Description |
|---|---|---|
| ❶ | ZOOM IN/OUT | + Function as focus adjustment and zoom in/out when a PTZ device is being controlled. + Adjust the layer size when a layer is selected. |
| ❷ | Stream | Tap to turn on/off the streaming. |
| Shortcut | Tap to enter Record interface. Tap again to enter transition effects interface. | |
| ❸ | 3.5-inch touch screen | Tap the screen for menu operation and signal monitoring (Ten preview windows by default.). Signal monitoring windows: + Yellow: Zoom button for adjusting the PTZ focus. Joystick for adjusting the PTZ position. Press the joystick to access the PTZ setting interface. + Green: Zoom button for scaling the layer. Joystick for adjusting the layer position. Press the joystick to resize the layer to full screen. |
| ❹ | ENTER | Tap the button to select and confirm the selection. |
| MENU | Tap the button + Tap the 10 preview screen to open the main menu. + Tap the menu screen to return to the previous interface and the main menu with a long press. + Tap the main menu to exit the menu interface and enter the 10 preview screen. | |
| Layer A | Tap to enable the main screen. | |
| Layer B | Tap to enable the sub-screen. | |
| ❺ | Five-direction joystick | Move the joystick up, down, left and right + Adjust the direction of a PTZ camera when it is being controlled. + Adjust the layer position when a layer is being controlled. Tap to enable the layer scaling and tap again to reset the layer size to full screen and another tap can reset the layer to the previous size. |
| ❻ | Volume Knob | Audio Adjustment Knob: + The knobs with digital logos are used to adjust the volume of the input signals 1~4 (embedded audio). + The microphone labeled knob is for adjusting the MIC2. The earphone labeled knob is for adjusting the output volume. |
| AFV | Tap AFV to enable the audio-follow-video function of the current channel. | |
| Mute | + The left bottom knob controls the analog audio input. Tap the button to mute and tap again to cancel the mute. + The right bottom knob is for the program output volume control. Tap the button to mute and tap again to cancel the mute. | |
| ❼ | ①②③④⑤ | + Press button 1~5 above to switch the dedicated input directly to the program output. + Press button 1-5 below to switch the Preview signals according to the layer selected. + Press CUT to switch between PRE and PGM. + Press AUTO to switch the layer effects between the PRE and PGM. + Button unlit: no input signal + Button lit white: an input source loaded but unselected + Button lit green: preview output status + Button lit red: program output status |
| ❽ | T-Bar | Switch manually between the preview and program outputs according to the selected switching effect. |